Results for wall openings
The "Wall openings" option, located within the "Beams/Walls" menu on the "Results" tab, allows you to view and modify the reinforcement applied by the program to wall openings.
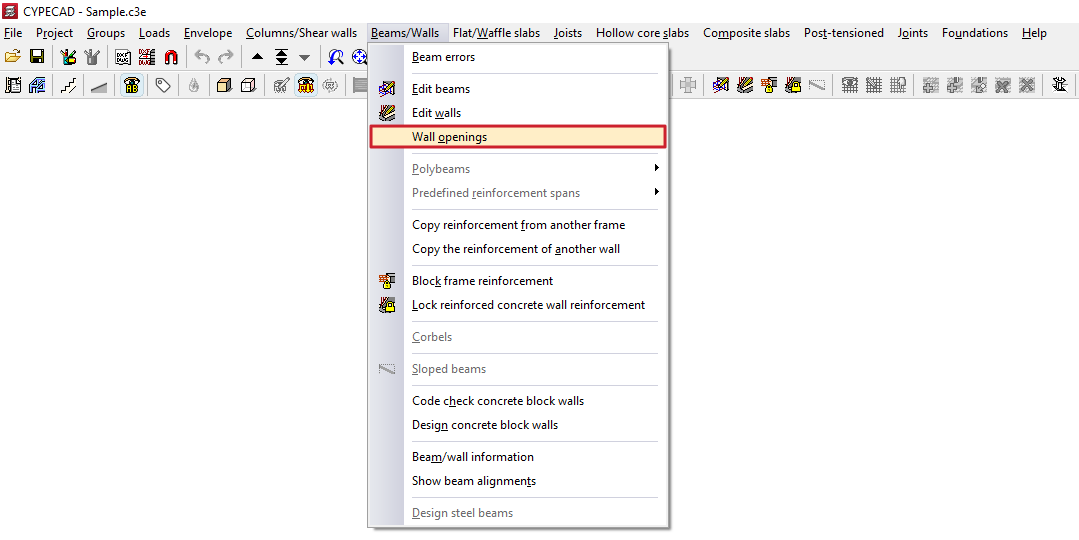
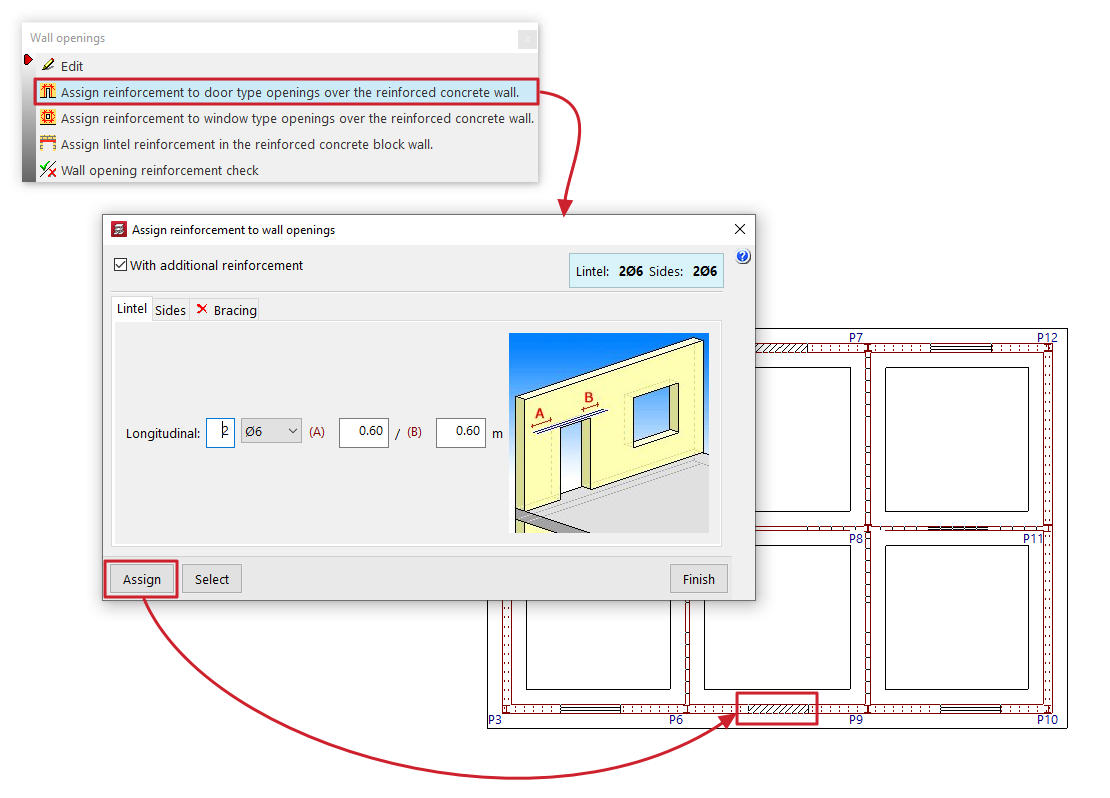
Clicking on this option opens the "Wall openings" window, which contains a menu with the following tools:
- Edit
- Assign reinforcement to door-type openings over the reinforced concrete wall
- Assign reinforcement to window-type openings over the reinforced concrete wall
- Assign lintel reinforcement in the reinforced concrete block wall
- Wall opening reinforcement check
Each of these features is described below:

Edit
Allows you to edit the reinforcement mesh placed around the perimeter of the opening in the wall.
When you click on the option, the "Window" or "Door" panel opens, depending on the type of wall that is open.
First of all, you will need to specify whether there is a "Reinforcement the same for all floors of the group" or "Different reinforcement on each floor" by selecting the floor to be edited from the drop-down menu.
Next, the "With additional reinforcement" checkbox is selected if reinforcement bars are present around the perimeter of the opening. This enables the editing of the reinforcement in the lower section, which varies depending on the type of wall in which the opening has been created.
The assembly process is summarised in a coloured box to the right of this panel.
The program also displays a help diagram on the right-hand side to identify the assembly being edited, as well as its definition parameters.
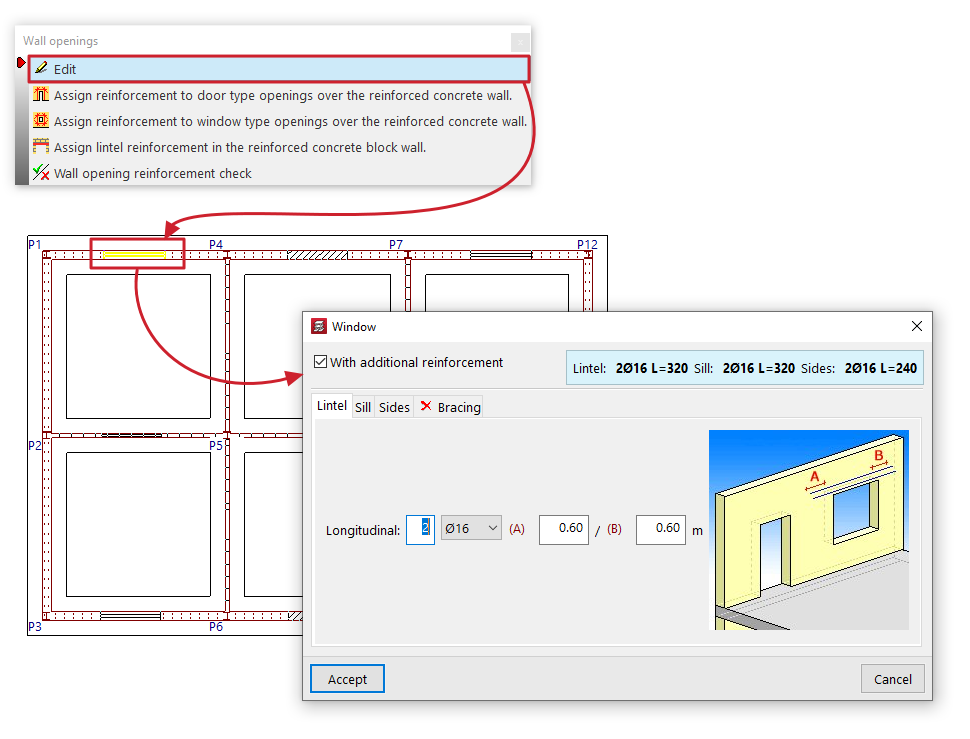
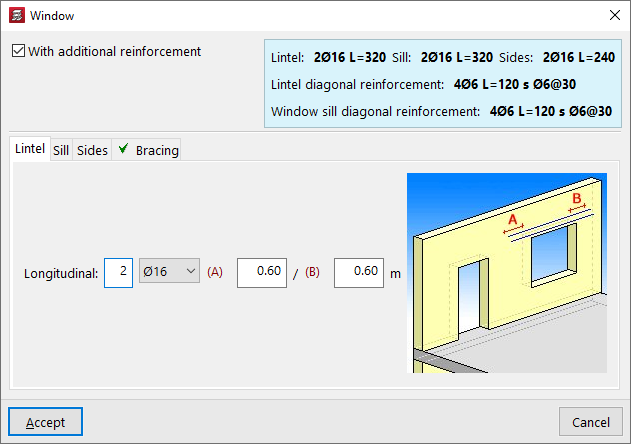
Reinforcement detailing for reinforced concrete walls, flat-tension walls and masonry walls
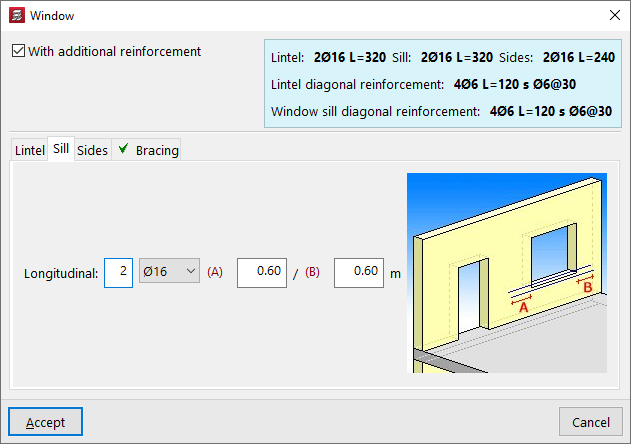
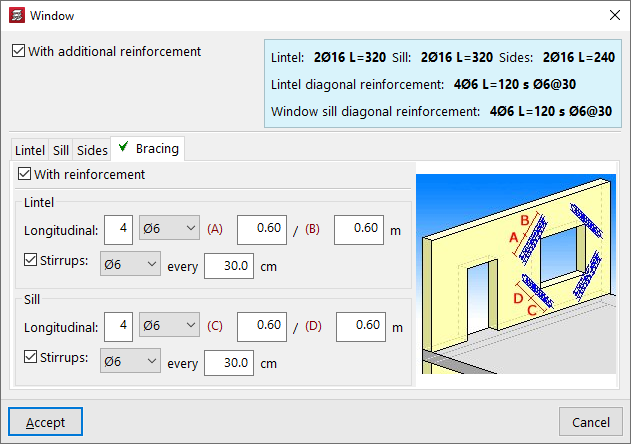
The components on these walls are edited using the tabs at the bottom: "Lintel", "Sill" (for windows), "Sides" and "Bracing":
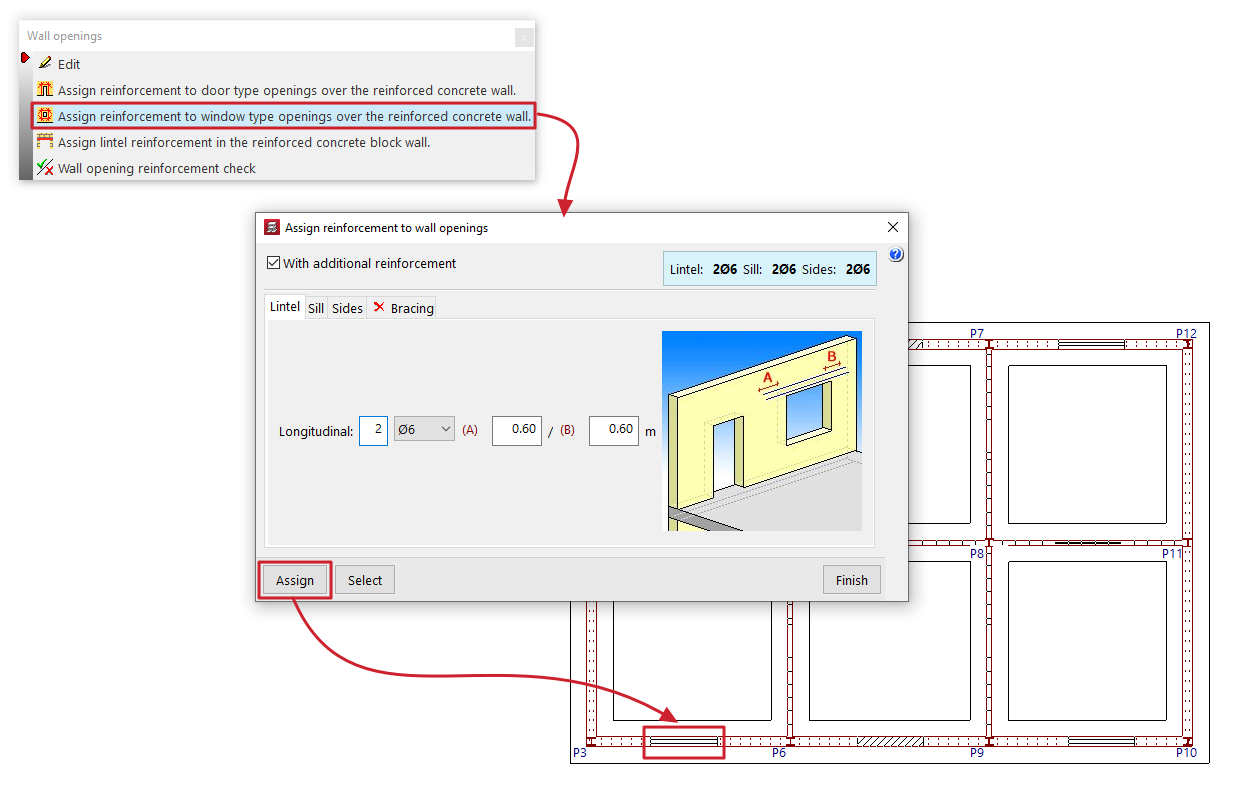
- For the reinforcement of the "Lintel" (and for that of the "Sill" in windows), the number and diameter of the bars in the "Longitudinal" reinforcement are specified, as well as the distances "A" and "B" by which the reinforcement extends to the left and right beyond the edge of the opening.
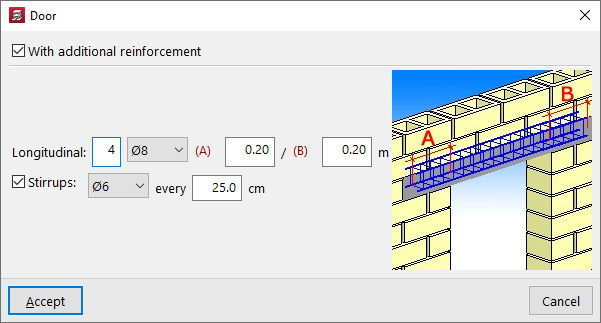
- For the reinforcement of the jambs or "Sides", the number and diameter of the bars in the "Longitudinal" reinforcement are specified, as well as the distances "A" and "B" by which the reinforcement extends at the bottom and top beyond the edge of the opening.
- To add reinforcement to the "Diagonals", tick the "With reinforcement" box; then, for both the "Lintel" and, where applicable, the "Sill", specify the number and diameter of the "Longitudinal" reinforcement bars, as well as the distances "A" and "B" by which the reinforcement extends beyond the corner of the opening; finally, tick the bottom box to indicate the presence of "Stirrups", their diameter and spacing.

Reinforcement detailing for concrete block walls
You can add reinforcement to the lintel of openings in concrete block walls.
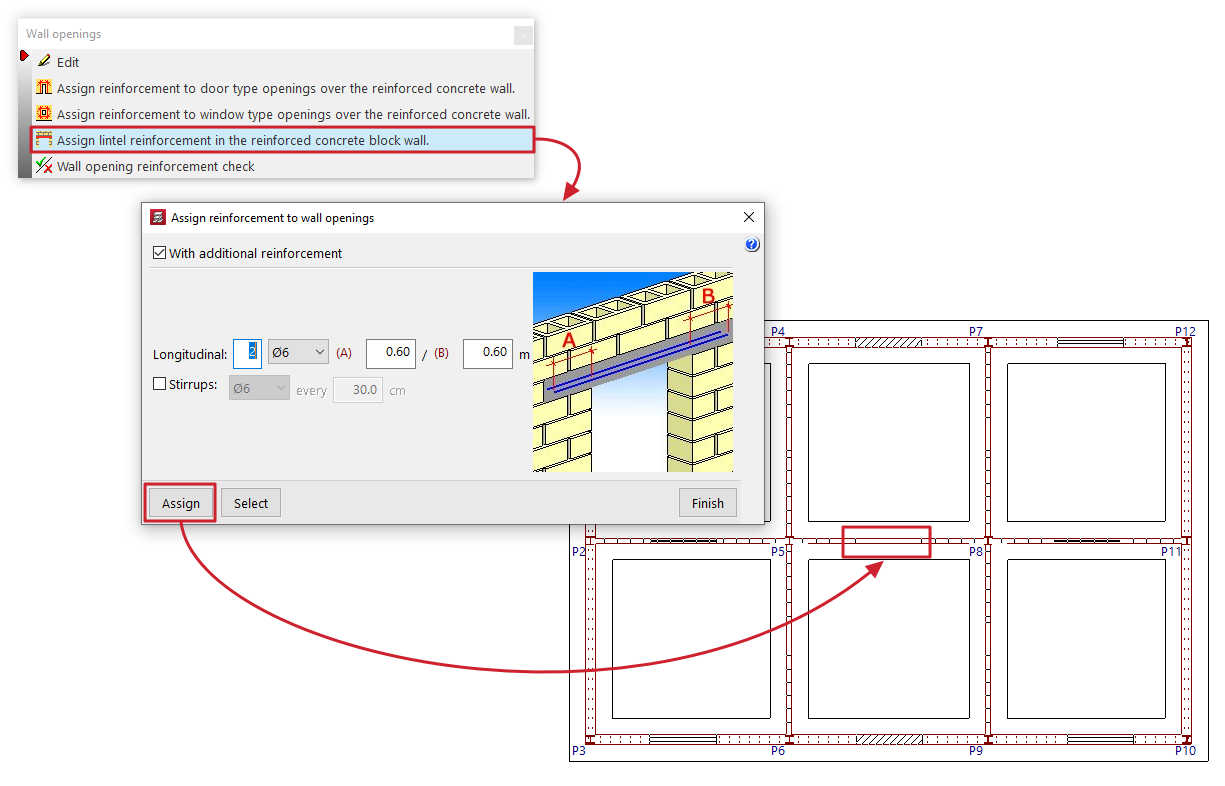
To do this, specify the number and diameter of the "Longitudinal" reinforcement bars, as well as the distances "A" and "B" by which the reinforcement extends to the left and right beyond the edge of the opening; finally, tick the box at the bottom to indicate the presence of "Stirrups", their diameter and spacing.
Assign reinforcement to door-type openings over the reinforced concrete wall
This option is available if openings have been created in walls of the "Reinforced concrete wall", "Masonry wall" or "Plane stress walls" type.
Clicking on this option opens a reinforcement editing panel for the opening, identical to the one that appears when using the "Edit" option. In this case, you can define a reinforcement for "Door" openings in the panel and then click "Assign" to apply it to the doors opening onto this type of wall selected in the current floor plan group. It is also possible to use the "Select" option in the panel to extract information from a selected opening on the floor plan.
Assign reinforcement to window-type openings over the reinforced concrete wall
This option is available if openings have been created in walls of the "Reinforced concrete wall", "Masonry wall" or "Plane stress walls" type.
Clicking on this option opens a reinforcement editing panel for the opening, identical to the one that appears when using the "Edit" option. In this case, you can define a reinforcement for "Window" openings in the panel and then click "Assign" to apply it to the windows in this type of wall selected in the current floor group. It is also possible to use the "Select" option in the panel to extract information from a selected opening on the floor plan.
Assign lintel reinforcement in the reinforced concrete block wall
This option is available if openings have been created in walls of the "Concrete block wall" type.
Clicking on this option opens a reinforcement editing panel for the opening, identical to the one that appears when using the "Edit" option. In this case, you can define a reinforcement for openings in the panel and then click on "Assign" to apply it to the openings in this type of wall selected in the current floor plan group. You can also use the "Select" option in the panel to extract the information from a selected opening in the floor plan.
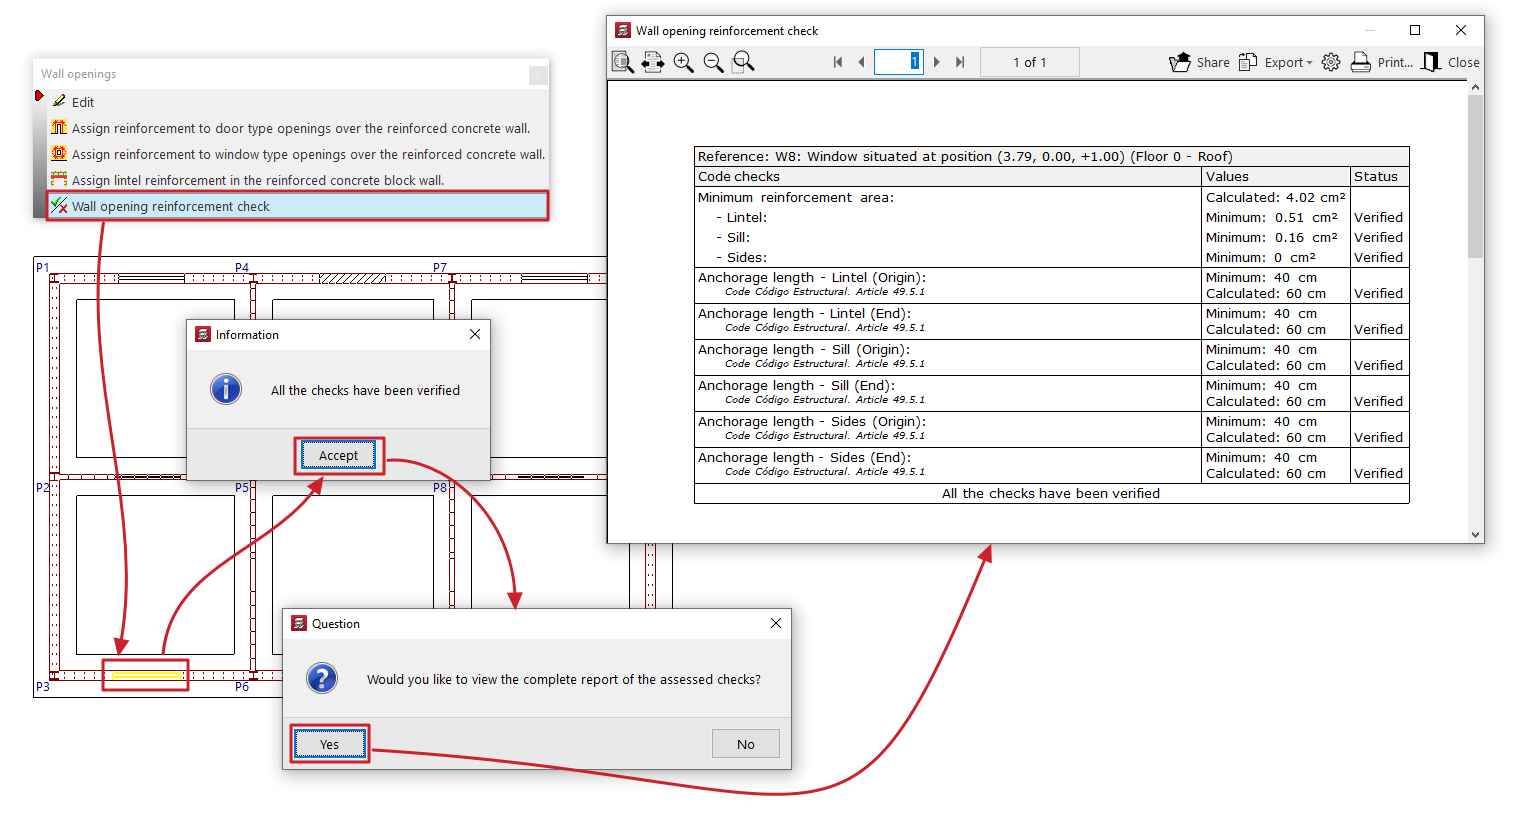
Wall opening reinforcement check
This option allows you to select a wall opening on a floor plan and display on screen the list of checks carried out on its reinforcements, as well as their compliance status.
These include checks on the minimum reinforcement area or the minimum anchorage length of the bars, depending on the selected standards.
This report can be printed or exported in various formats.
| Note: |
|---|
| If the position or dimensions of a wall opening are changed after the last analysis has been carried out, it will not be possible to check the reinforcement for the opening. However, even if the opening has been added or modified since the last calculation was performed, the program allows you to edit and draw its reinforcement on the drawings. If you wish to dimension and check the wall taking into account the opening’s reinforcement, the structure must be recalculated. |