Introduction
CYPE Menu. Full installation is an app that, once installed, lets you access CYPE’s main programs. You can use it as a single platform to launch each app individually.
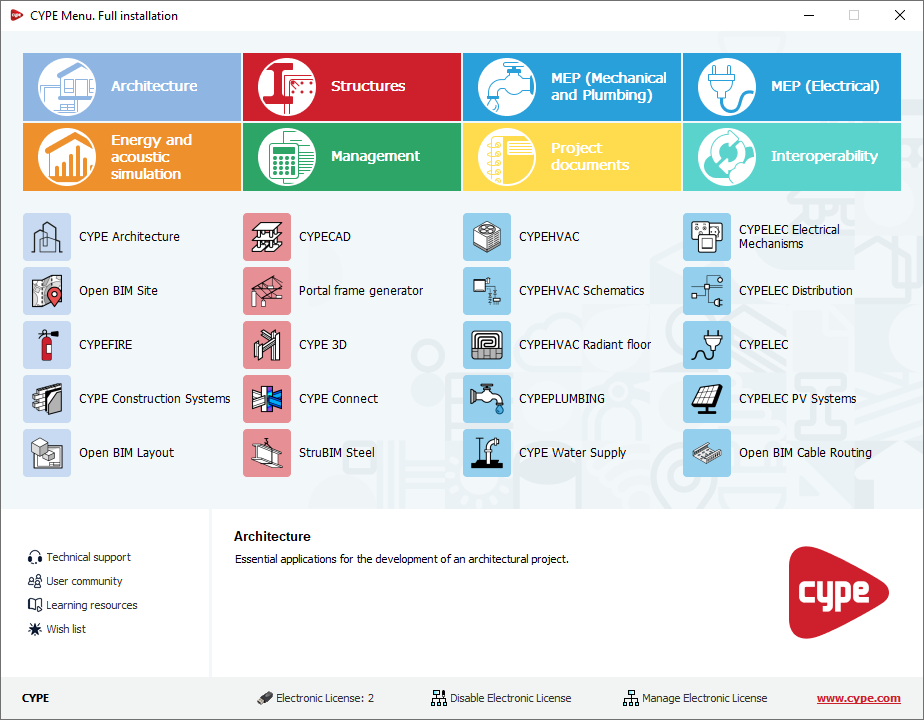
When opening CYPE Menu. Full installation, a panel appears that lets you access the different CYPE programs, organised into several categories: Architecture, Structures, MEP (Mechanical and Plumbing), MEP (Electrical), Energy and acoustic simulation, Management, Project documents and Interoperability. This structure makes it easy to locate and quickly access each program.
As well as acting as an app launcher, CYPE Menu. Full installation lets you sign in to the BIMserver.center platform and works as an electronic licence manager, including the ability to view purchased modules and tools for using or managing licences.
From the interface, you can also access additional services such as technical support or the learning resources for each program.
Differences between CYPE Menu and CYPE Menu. Full installation
The CYPE Menu and CYPE Menu. Full installation programs act as entry points or launchers for the main CYPE apps. There are, however, the following differences:
- CYPE Menu is an app you can use to install individual apps. When you install CYPE Menu, it is installed on an empty system, with no previously installed apps. From this point onwards, you must install each app before you can run it. This is the recommended option if you do not wish to install all the apps or want to keep track of which apps have been installed.
- Furthermore, installing CYPE Menu. Full installation automatically installs all included apps. Therefore, you only need a single installation process. From this point onwards, you can run each app directly. Keep in mind, however, that CYPE Menu. Full installation is not available in the latest version of CYPE's apps. This is the recommended option if you wish to install all the apps included in CYPE Menu. Full installation in one go, and you don't need to use the latest version.
| Note: |
|---|
| The CYPE Menu installation is located in "C:\CYPE Ingenieros\Version 20XX\CYPE Menu", where '20XX' is the year of the CYPE Menu version (for example, for CYPE Menu 2026.a, the path is C:\CYPE Ingenieros\Version 2026\CYPE Menu. Full Installation). Within this path, apps installed from CYPE Menu are stored in app folders named "app_XX" (where XX is the identification number for each app). The CYPE Menu. Full installation is located in "C:\CYPE Ingenieros\Version 20XX\CYPE Menu FI", where '20XX' is the year of the CYPE Menu. Full installation version (for example, for CYPE Menu. Full installation 2026.a, the path is C:\CYPE Ingenieros\Version 2026\CYPE Menu FI). This is where all the files for all the apps included in CYPE Menu. Full installation are stored. Storing the apps in a single path reduces the amount of disk space required and makes it easier to share files. The CYPE Menu and CYPE Menu. Full installation programs are independent of one another. Programs installed via one of them are not shared with, nor recognised by, the other. |
CYPE Menu interface
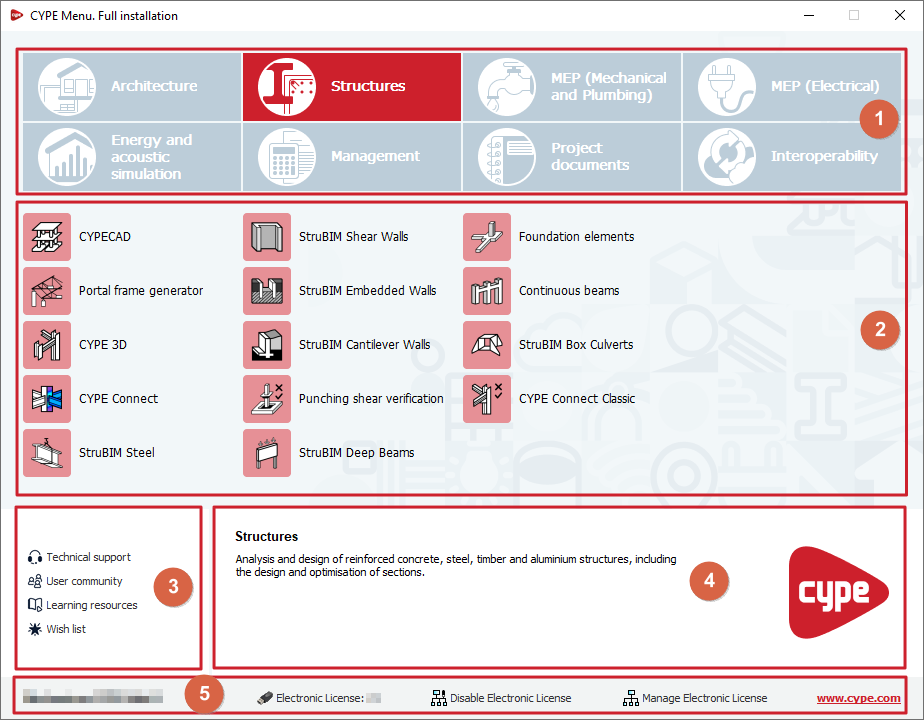
The CYPE Menu. Full installation interface consists of a single panel containing the following options:
- At the top, there is a link to each group of programs. The selected program group will be highlighted in colour.
- In the centre is the list of apps belonging to the selected group of programs. Each of these apps can be installed and run individually from here.
- At the bottom left, there is a set of options that allow you to access technical support, the user community, learning resources and the wish list.
- In the bottom-right corner, to the right of the options panel, a descriptive text is displayed for the group of programs or the app over which the mouse pointer is hovering.
- Finally, the bottom bar displays the name of the current licence holder and, further to the right, the number of the licence currently in use (from which you can view your permissions), the controls for using or releasing the electronic licence, and for managing the electronic licence, as well as a link to access the CYPE website.
List of programs included in CYPE Menu. Full installation
CYPE Menu. Full installation includes the following apps in each of these groups of programs:
Architecture
- CYPE Architecture
- Open BIM Site
- CYPEFIRE
- CYPE Construction Systems
- Open BIM Layout
- Open BIM Quantities
Structures
- CYPECAD
- Portal frame generator
- CYPE 3D
- CYPE Connect
- StruBIM Steel
- StruBIM Shear Walls
- StruBIM Embedded Walls
- StruBIM Cantilever Walls
- Punching shear verification
- StruBIM Deep Beams
- Foundation elements
- Continuous beams
- StruBIM Box Culverts
- CYPE Connect Classic
MEP (Mechanical and Plumbing)
- CYPEHVAC
- CYPEHVAC Schematics
- CYPEHVAC Radiant Floor
- CYPEPLUMBING
- CYPE Water Supply
- CYPE Sewerage
- CYPEGAS
- CYPE Gas Supply
- CYPEFIRE Hydraulic Systems
- CYPEFIRE FDS
MEP (Electrical)
- CYPELEC Electrical Mechanisms
- CYPELEC Distribution
- CYPELEC
- CYPELEC PV Systems
- Open BIM Cable Routing
- Open BIM Switchboard
- CYPELEC MULTILINE
- CYPELEC Networks
- CYPETEL
- CYPETEL Wireless
Energy and acoustic simulation
- IFC Builder
- Open BIM Analytical Model
- CYPETHERM LOADS
- CYPETHERM EPlus
- CYPETHERM HYGRO
- CYPETHERM BRIDGES
- CYPELUX
- CYPESOUND
- AcouBAT by CYPE
Management
- Arquimedes
- Open BIM Quantities
- MedBIM Plugin - Revit
- Open BIM Quantities
Project documents
- CYPEFIRE
- CYPEFIRE Pressure Systems
- CYPE Construction Works
Interoperability
- Open BIM - Revit plugin
Shortcuts to external websites
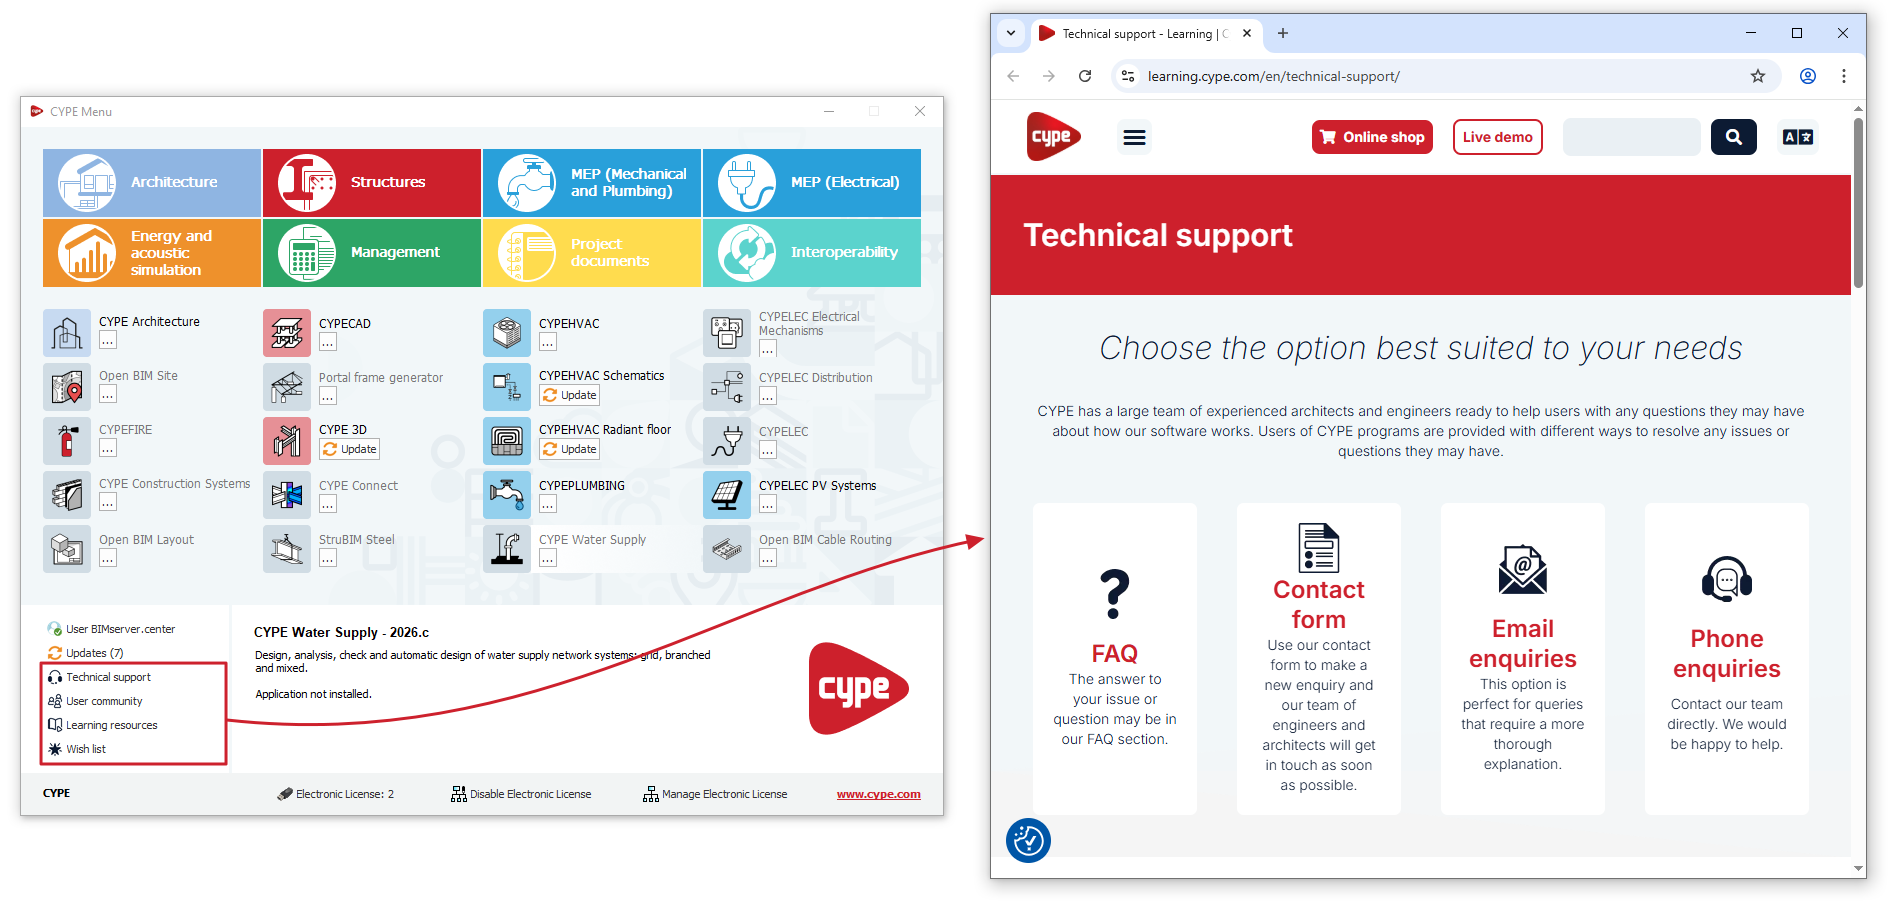
In the bottom-left corner of the window, CYPE Menu displays the following shortcuts to external websites:
- Technical Support
Link to the website containing frequently asked questions, contact forms, and details for contacting CYPE’s Technical Support team directly to make enquiries by email or telephone. - User community
Link to the website providing access to user communities for CYPE software and related specialist forums, such as BIMserver.center and Sólo Arquitectura. - Learning resources
Link to the website that provides access to the learning resources for each of CYPE's programs, including detailed information pages, audiovisual resources such as videos, tutorials and webinars, as well as a library of related documents and frequently asked questions. - Wish list
Link to a discussion thread on a specialist forum where comments, requests and suggestions are collected regarding features not currently available in the latest version of CYPE's software.
Licence management options
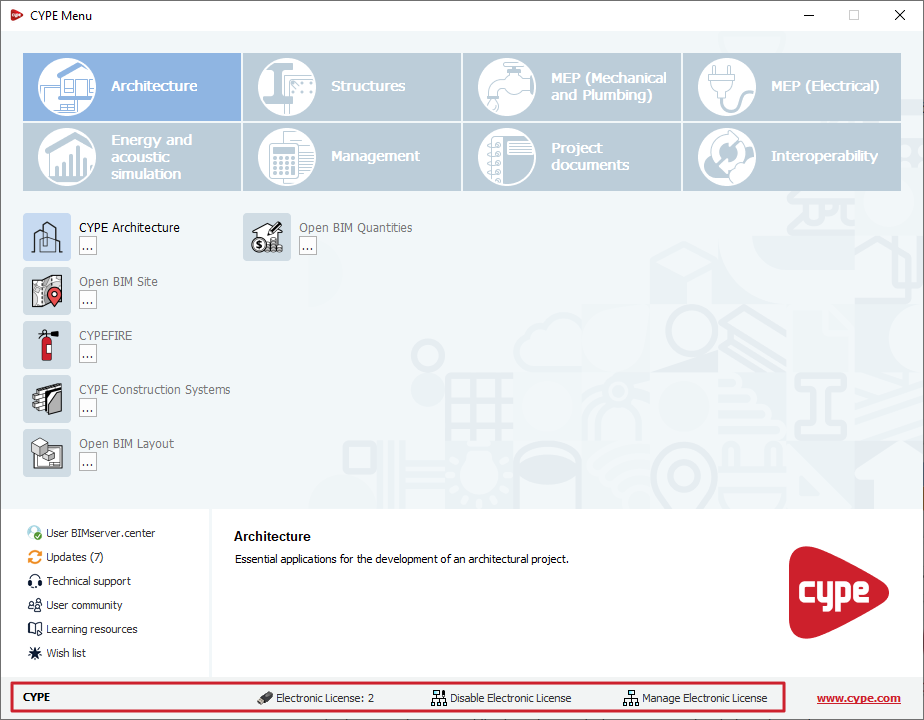
The bottom bar of the CYPE Menu window (and in CYPE Menu. Full installation) provides the following information and tools:
- The current licence number.
- The "Activating Electronic Licence" or "Deactivating Electronic Licence" option (if an electronic licence is currently in use).
- The "Manage Electronic Licence" option.
Current licence
In the section showing the licence currently in use:
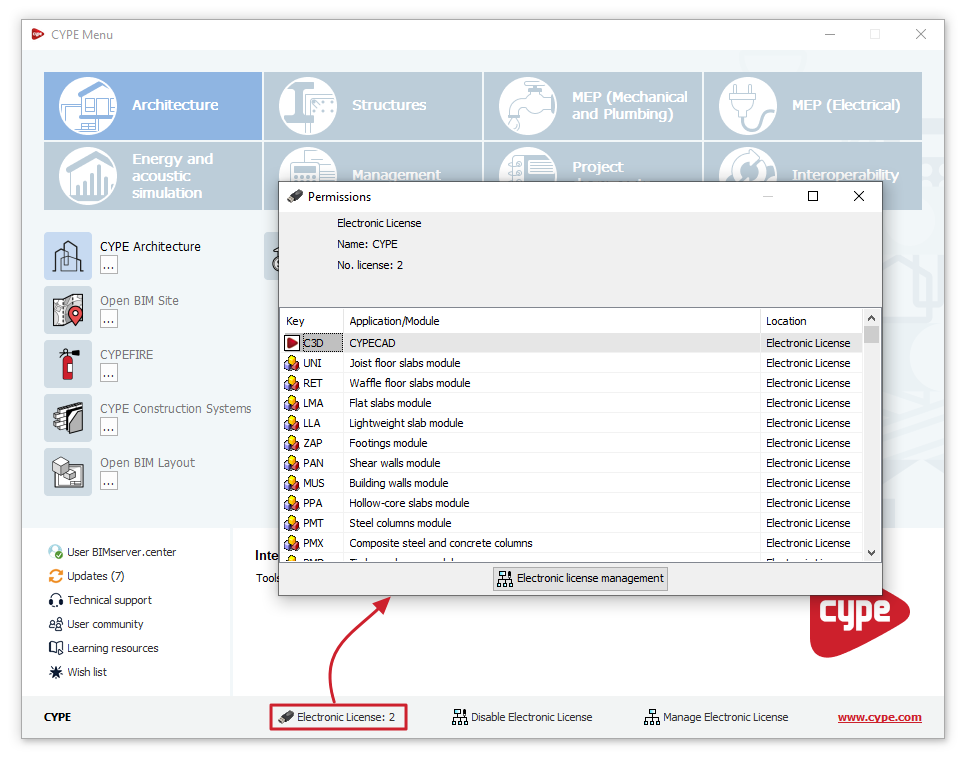
- If "Licence: licence number" appears, the licence with the number shown is currently being read or used (whether it is an electronic licence, a local hardware lock or a network hardware lock).
Clicking on this allows you to view the "Permissions" associated with the licence, as well as adjust the "Reading of the licence's keys file" or the "Configuration of network hardlock", where applicable.
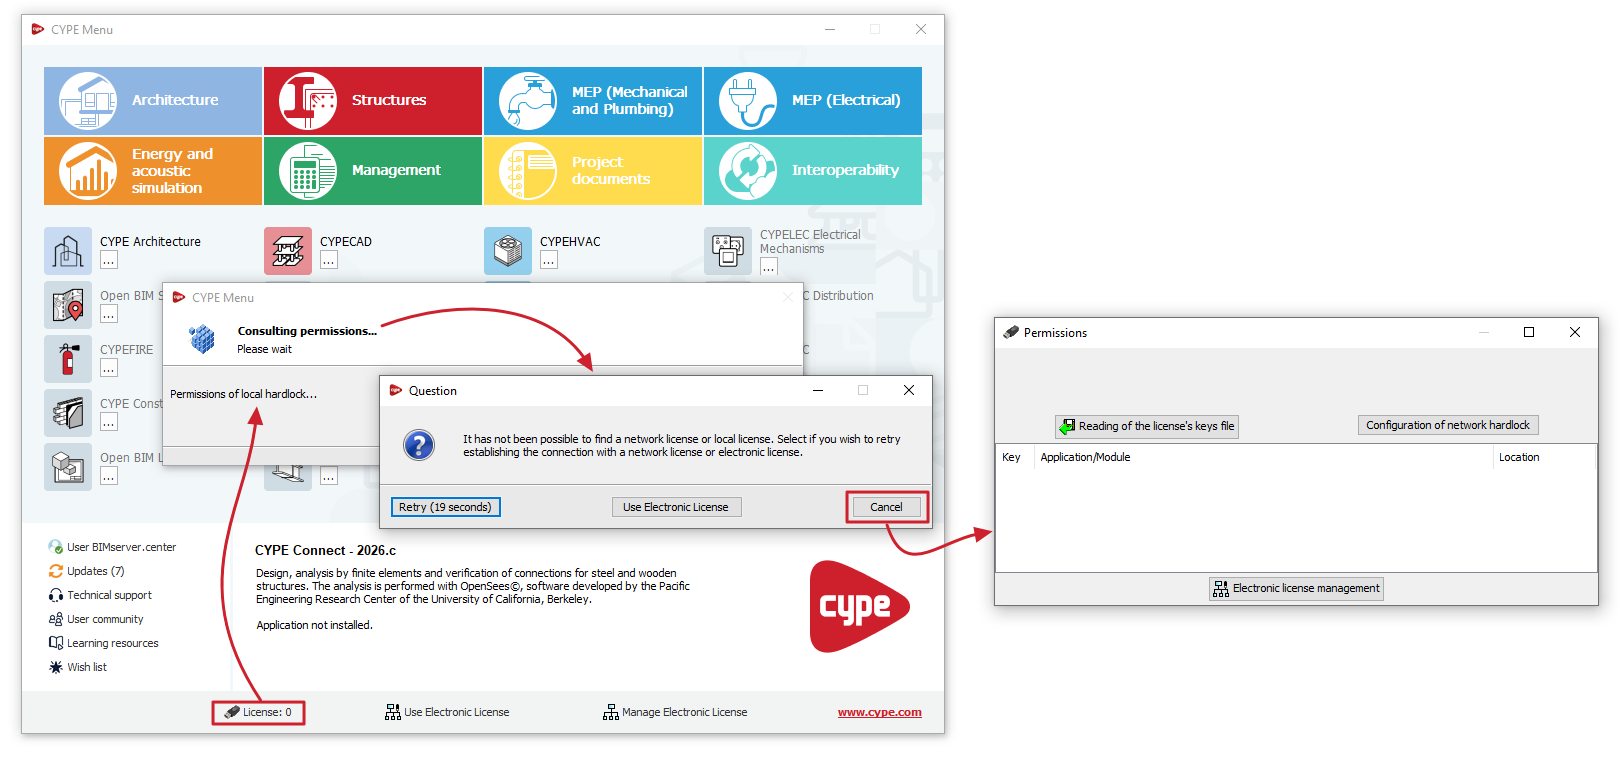
- If "Licence: 0" appears, no licence is being read. If you click on it, the program will attempt to locate licences on the local hardware lock (connected to the computer on which the program is installed) or on the network licence key (with licences distributed via the network licence key server).
If it finds none, a dialogue box will open with a "Question" asking whether you wish to "Retry" the connection to the local hardware lock or network hardware lock, "Use Electronic Licence", or "Cancel". If you select "Cancel", in the "Permissions" window, you can do the following:- Force the "Reading of the licence's keys file" process by clicking the button with this name, then selecting the key file with the .clv extension corresponding to the licence from its location on your hard drive and confirming. This may be necessary if you have a licence with a physical dongle connected to the same workstation, which requires a key file to operate with the updated permissions.
- Open the window where you can configure the "Configuration of network hardlock" by clicking on the button with the same name. This may be necessary if you have a network sensor connected to a server on the network where the Server for network hardlocks program is running.
Checking licence permissions
You can check the licences available under the CYPE licence using the following methods:
- From the CYPE Menu interface, click on the licence number at the bottom.
- Alternatively, from the interface of a CYPE program, click on the "Help" option or menu at the top of the program and select the "About" option. Then, in the pop-up window, click on the licence number displayed in the bottom-right-hand corner.
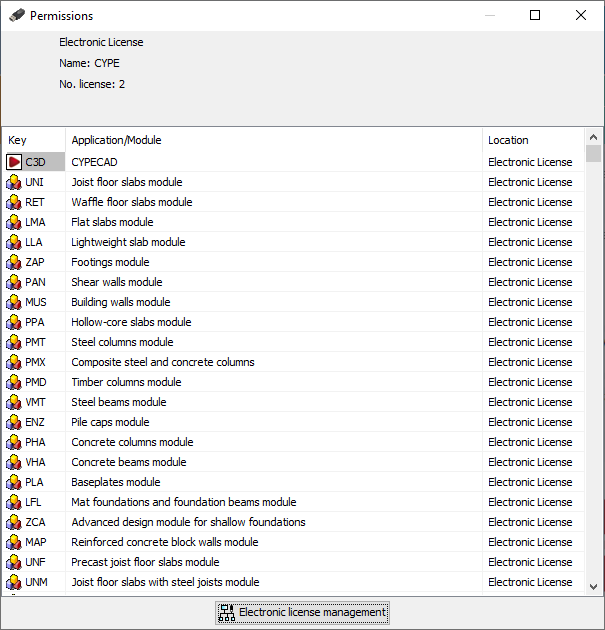
The "Permissions" window opens when you follow any of the methods described.
First shown here are the licence type, the name and the number of the licence.
The permissions available under the licence are then listed in a table that includes the permission’s "Key", its name (in the "Application/Module" column) and its "Location".
| Note: |
|---|
| If a particular permission does not appear in this table, it may be that the licence has not been read correctly or that the permission is not included in the licence you are using. You can contact CYPE to clarify and resolve any issues. |
Network hardlock configuration
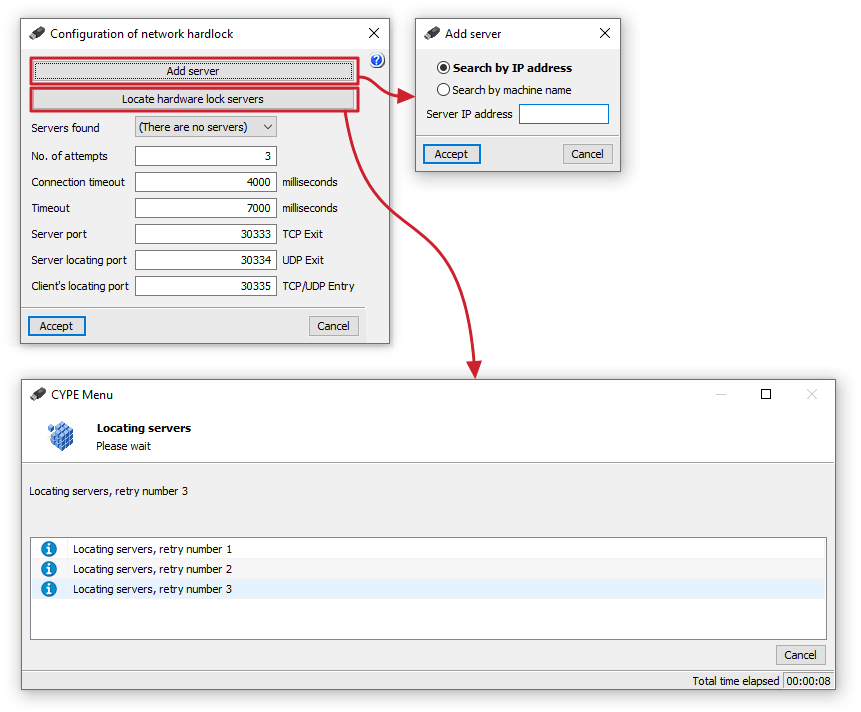
In the "Configuration of network hardlock", which can be accessed from the "Licence management" panel by selecting "Network hardlock" under "Licence type", you can make the following adjustments to ensure a connection with the network token that is providing the necessary permissions to use the program:
- The "Add server" option allows you to specify the hardlock server address directly. You can "Search by IP address" (and enter the "Server IP address") or "Search by machine name" (and enter the "Server name").
- The "Locate hardware lock servers" option allows you to initiate a process to locate tablet servers on the network, up to a specified number of retries.
The following features are shown below:
- Servers found
This drop-down menu displays the IP addresses of the servers that have been added or found via automatic detection. - Number of retries (default: 3)
The number of retries made by a client when searching for active servers. The higher the number of retries, the slower the search will be, but the greater the chance of finding all the servers. - Connection timeout (default: 4000 milliseconds)
Time, in milliseconds, taken by a client to attempt to search for active servers. The longer this time, the slower the search will be, but the greater the chance of finding all the servers. - Timeout (default: 7000 milliseconds)
This value indicates the time, in milliseconds, that the client waits before assuming that the connection to the server has been lost. It may be useful to adjust this value in the event of network delays, whether due to congestion or other reasons. - Server port (default: 30333 TCP Outbound)
This value specifies the communication port that programs will use to connect to the hardlock server. - Server discovery port (default: 30334 UDP Outbound)
This value specifies the communication port that programs will use to detect the hardlock server. - Client port for discovery (default: 30335 TCP/UDP Inbound)
This value specifies the communication port that programs will use to detect the hardlock server.
| Note: |
|---|
| To connect to the server specified using the "Add server" option, you must ensure that the server is running and that its name or address has been entered correctly. If you have a router (router) or a firewall (firewall) on the network, you can try changing the port on the hardlock server, ensuring that you also change all hardlock clients so that they use the same port as the server. Furthermore, the value entered for each communication port must always match the setting configured on the hardlock server being used, and should only be changed if there is a compatibility issue with another installed program that uses the same communication port. If this value is changed, it must be modified both in the hardlock server configuration and in the configuration of all clients using that hardlock server. |
Managing the electronic licence
The "Manage Electronic Licence" option can be found at the bottom of the CYPE Menu window or in the "File" menu of each program.
This option allows you to enter your login details to manage the electronic licence, including your username or email address and password. If you have forgotten your password, the link "Send password to my email" allows the program to send the password to the email address entered in the relevant field.
| Note: |
|---|
| These access credentials are specifically for managing the electronic licence (i.e. those of the licence administrator) and may differ from those required to use the electronic licence (i.e. those of the licence user, who will be using CYPE software). |
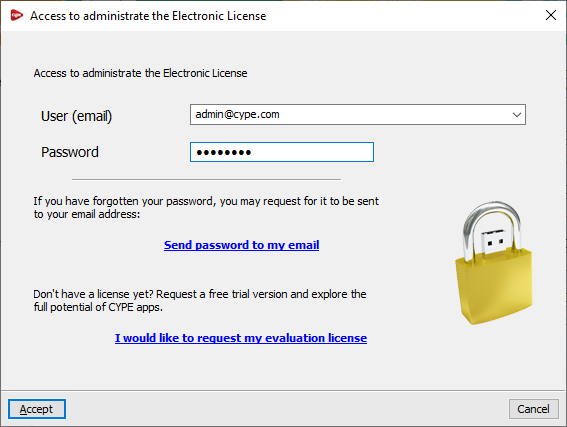
Once you have accepted, the "Manage Electronic Licence" window will open. This displays a table showing all the electronic licences managed by the licence administrator. The following details are shown for each one:
- The licence number ("Licence No.") and the "Version" to which it is updated.
- The "Email" and "Password" required to use each licence (i.e. the user’s access credentials).
- The "Notify" column shows whether the user for each licence is being notified of password changes by email.
- In the last column, you can view a description of the "Modules" included in each licence; these can be "Viewed" and displayed in a list by clicking on the relevant button.
The tools at the top of the table allow the licence administrator to perform the following actions:
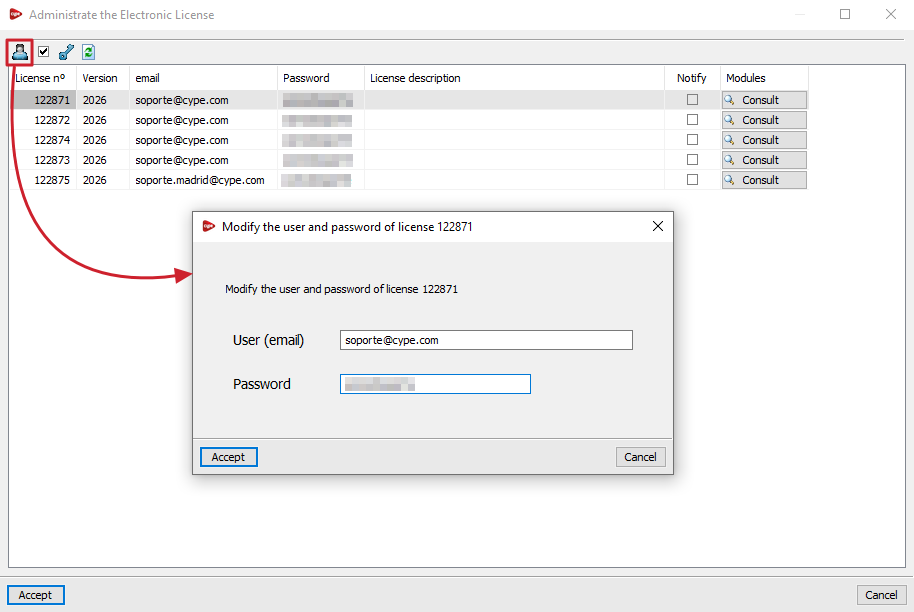
- Change the email address and password associated with the electronic licence
This allows you to freely change the login credentials (username or email address and password) for each electronic licence in the table. - Notify the user of password changes via email
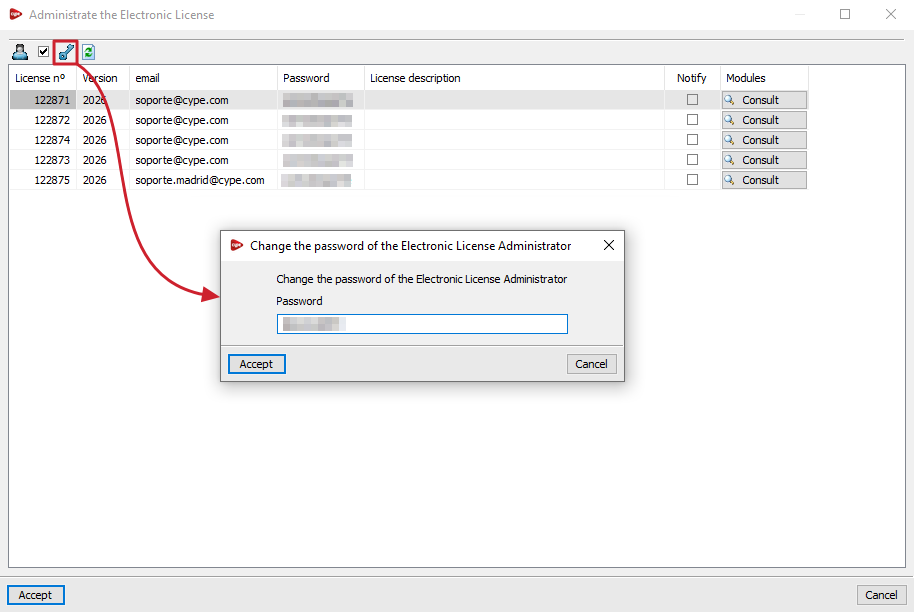
Allows you to enable or disable email notifications to the user regarding password changes made for each licence. - Change the Electronic Licence Administrator password
Allows you to change the password for the login credentials used to manage the electronic licence. - Refresh the displayed information
Refreshes the information displayed in the table if any changes have been made.