Update history​

Plugin MedBIM - Revit

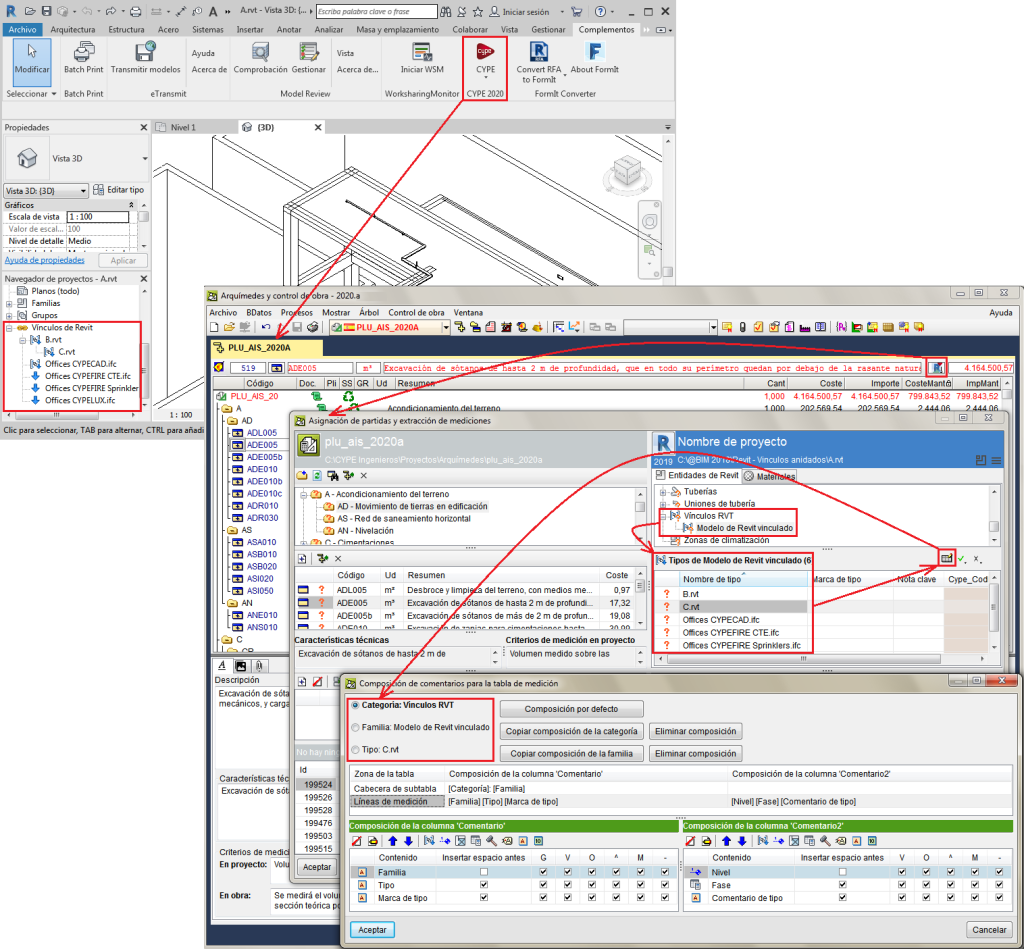
The section “RVT links” is added to the Revit entities tree

When the Revit BIM model that is linked to Archimedes contains Revit links, the "RVT Links" section appears in the Revit entities tree. This section aids users to obtain quantities and to make comments in the quantity tables of the selected Revit link.

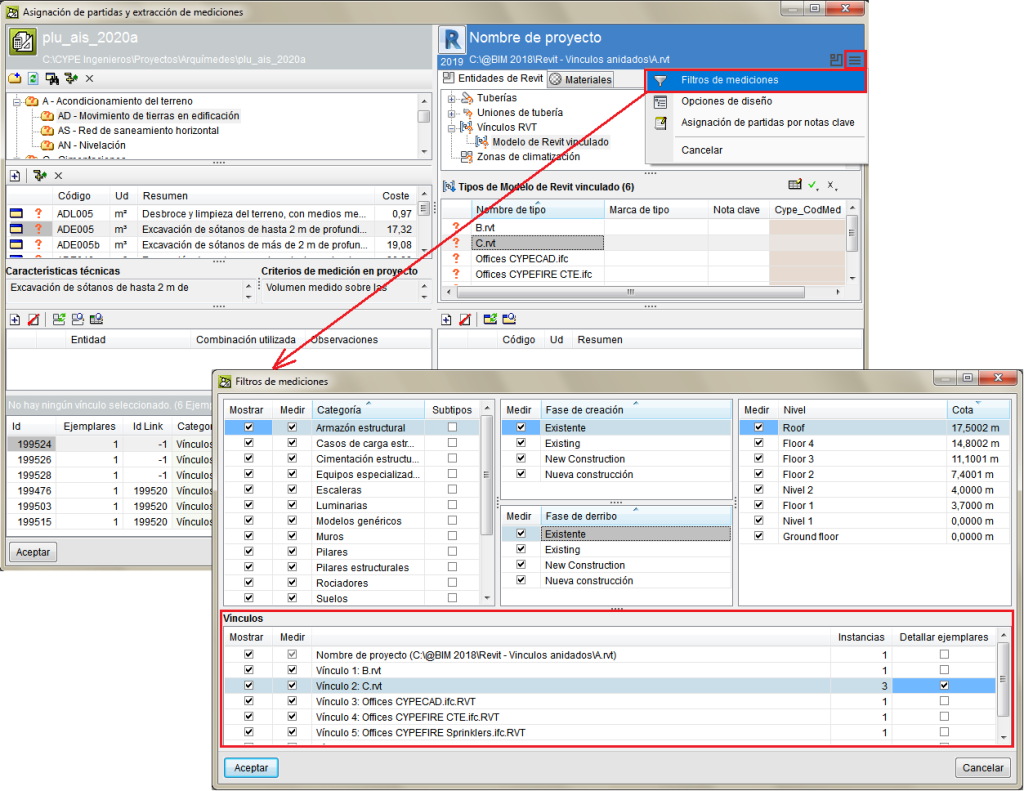
A new zone called "Links" is also included in the "Quantity filters" option that appears when the new zone button is pressed. In the "Links" area users can mark, to "Show" or "Measure" Revit links to see the number of instances that contain the links and to activate the option "Detail elements" in the quantity tables, depending on the composition of the comments that is defined.

Export the “Floors” and “Ceilings” categories of the “Rooms”

The information on rooms that use the “Floors” and “Ceilings” categories has been incorporated to the data of BIM model in Revit that is exported to Arquimedes. This way Arquimedes can indicate in the comments section of the quantity tables of the room that a specific floor or ceiling is used.

To compose the connects of the quantity lines in the quantity extraction process, having added a job item of the bill of quantities to a type of the BIM model, the “Comments composition” button Composición de comentarios , in the quantities table, must be selected, and add the element “Room” Elemento Habitación to the Category, Family, or Type.

To establish whether an element belongs to a specific room, the element must be defined in or in contact with the correspondent room.

Filter to measure duct, pipe, tube...subtypes

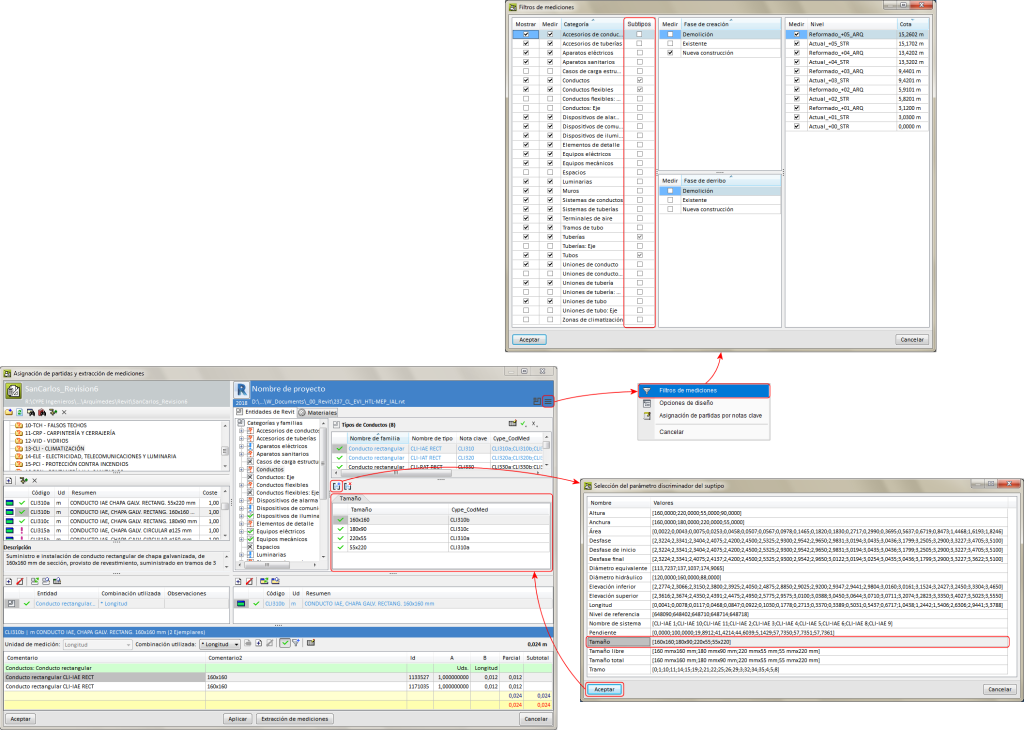
Quantities of “Ducts”, “Pipes”, “Tubes”, etc., categories can be measured more easily using the subtype filter.

As of the 2019.d version, users can define a subtype by indicating a discriminating parameter, to link its contents by grouping them in groups that share the same value for that parameter.

To add a subtype, users must tell the BIM model that is linked to the Revit project, which Subtypes are to be measured. This can be done by pressing the Filtros button and selecting the “Quantity filters” option. In the “Subtypes” column (implemented in this version), the program, by default, predefines filters for “Ducts”, “Flexible ducts”, “Pipes” and “Tubes” categories, if the Revit model contains them. Users can select other subtypes to filter.

Once the “subtype filters” have been established for the types of categories to be measured, a discriminating parameter must be added in the category by pressing on the New subtype button Nuevo subtipo. The list will show the parameters of the category and only those with more than one value are included.

Once a parameter is selected, having pressed the Accept button, a subtype will become associated to a parameter, which can then be linked to a job item of the bill of quantities to carry out the quantity extraction.

If a type already contains links to several job items of the bill of quantities, these links can be reused, as long as they use the same filter based on the same parameter. To do so, simply press the Add new subtype button. Otherwise, if the type is linked to a single job item, all the links to job items must first be eliminated to be able to define a subtype.

Quantities from Revit models and other linked Revit models

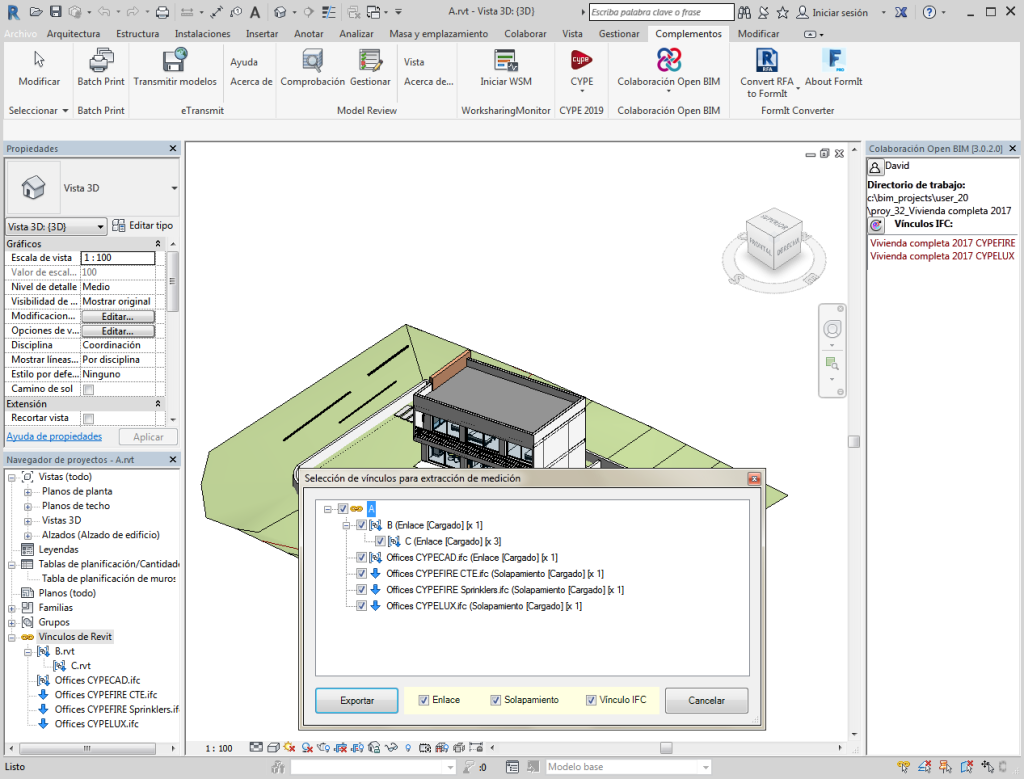
A Revit model can have links to other Revit models. As of the 2019.d version, Arquimedes can extract the quantities of Revit models that are linked to the main or central Revit model.

Arquimedes users can select the linked models whose quantities are to be extracted. The program will request the selection of links to extract the quantities (as can be seen in the attached image), when a Revit project has been linked with an Arquimedes project or when a quantities extraction file (mcsv) has been generated.

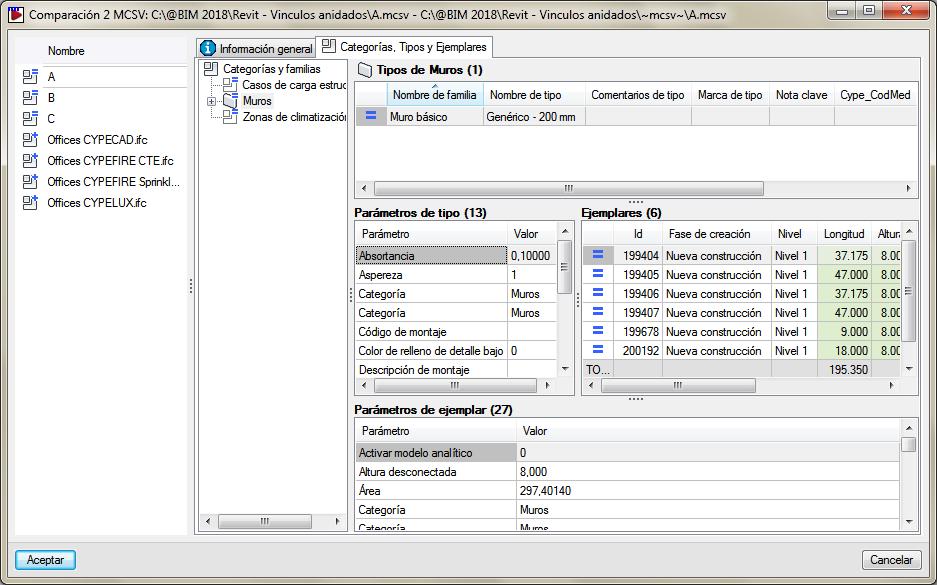
As of previous versions, if there is already a link between the Arquimedes project and the Revit project (or if a quantities extraction file of a Revit project has been generated), when the process is carried out again, a panel appears that allows the two links (or extractions) to be compared. As of the 2019.d version, this comparison includes the quantities of the Revit models that have been linked to the main Revit model.

Configuration of the Job item assignment dialogue and quantity extraction from the Revit model

The 2019.d version of Arquimedes allows users to configure the view of the “Job item assignment and quantity extraction” panel, to help them with the Revit model connection process in accordance with its preferences or types of monitors.

To access the configuration of the Revit links editor, the button New modules and programs. CYPEPLUMBING Water systems. Click to enlarge the image must be selected (quantity extraction) that is present in the Decomposition tree window, and choose the “Configure Revit links editor” option.

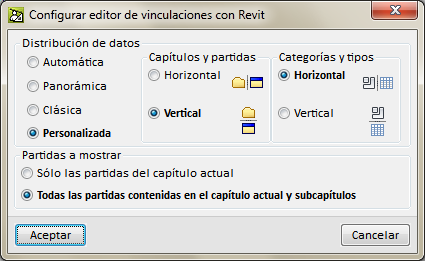
Users can choose amongst 4 types of views:

  • Automatic
    This is the option that is active by default. With it, the data distribution that will be shown in the “Job item assignment and quantity extraction” panel will depend on the type of format of the monitor that is being used (width to height ratio).
  • Panoramic
  • Classic
  • Personalised
    Using this type of view, users decide how to distribute the data of the “Job item assignment and quantity extraction” panel.

Job item assignment by key notes

If Key notes are defined in the Revit model, with job item codes (in order to assign a type of the Revit model to the job item), the program will ask for the copy origin of inexistent job items and chapters, the first time the Revit model is linked to an Arquimedes project. This way, once the Revit model has been imported, the Types that contain a Key note that can be located in the Arquimedes project (or in the referenced database or database associated to Arquimedes) will be assigned to the job item that is indicated in the Key note.

The button Job item assignment by key notes  allows users to assign a Type of the Revit model that has been defined in a Key note to a job item, if linking process has already been carried out between the Revit model and the Arquimedes project.

Quantities extraction of IFC files linked to a Revit project

As of the 2017.j version, the Bill of quantities of Revit models module of Arquimedes allows users to extract the quantities of IFC files linked to a Revit project. This way, users can obtain the global quantities of an Open BIM project composed of a Revit model and different IFC files associated with each discipline, such as the structure, lighting, electricity, air conditioning, fire safety, etc.

In previous versions, using the “Bill of quantities of Revit models” module, Arquimedes could only extract the quantities of Revit entities and could not extract those of IFC files linked to a Revit project.

Thanks to this improvement, when the quantities of a Revit model are to be extracted using the “Bill of quantities of Revit models” complement, regardless of whether users have opted to use the “Link with Arquimedes job” or “Generate quantities extraction file” option, an MCSV file will be created with the information of the main model and another for each IFC file linked to the project.

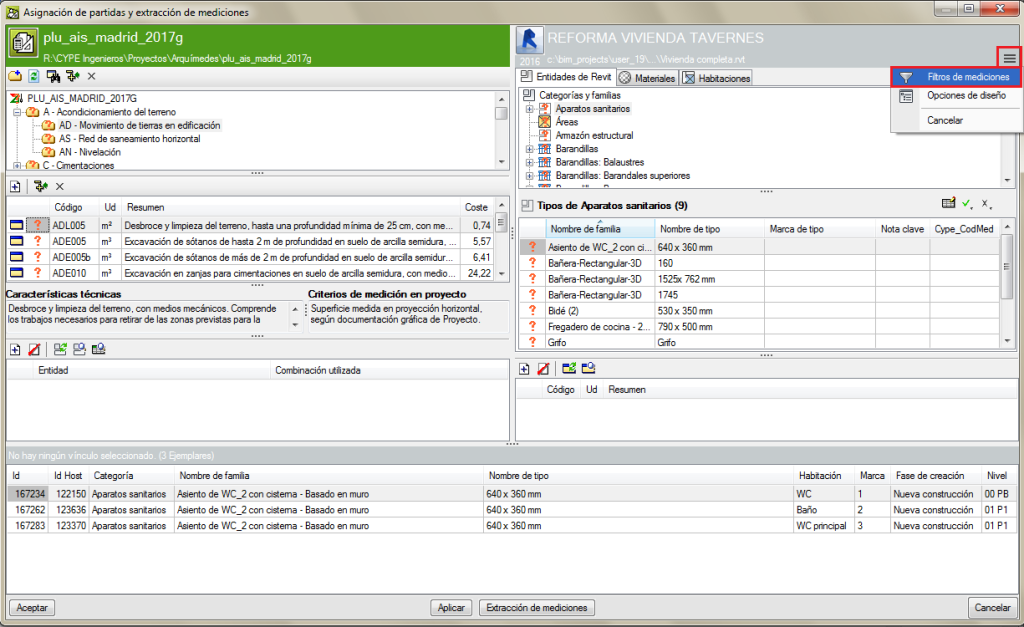
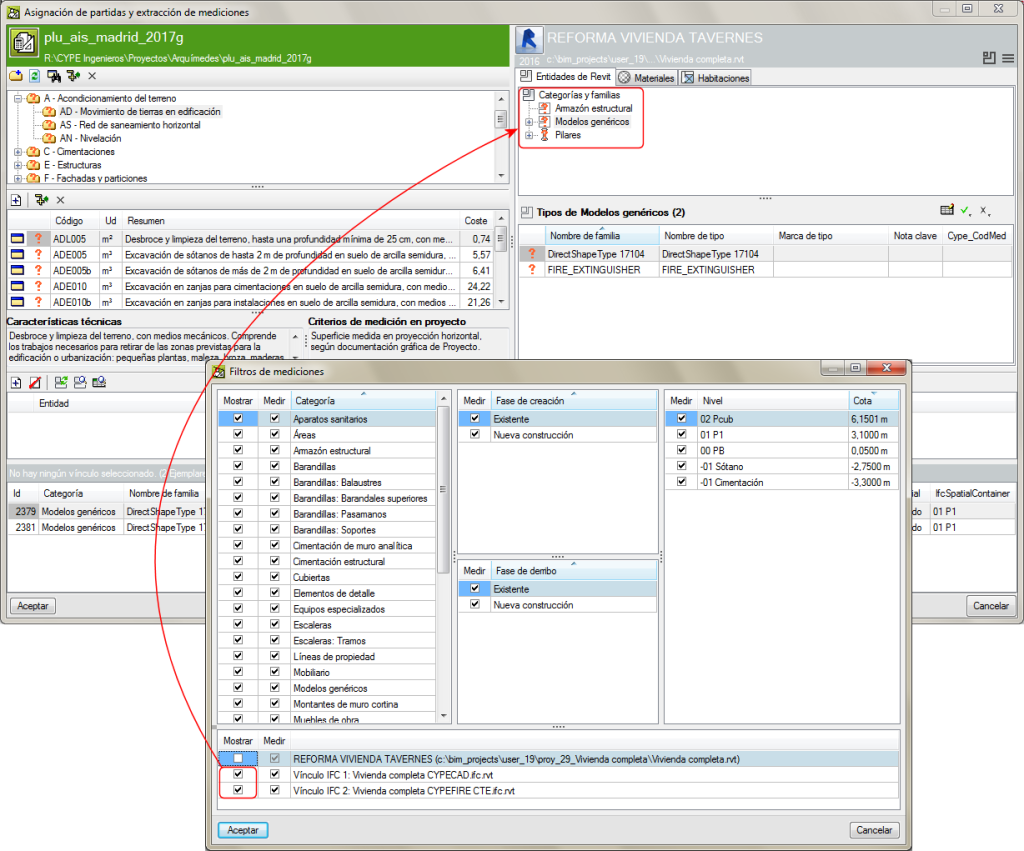
Once in Arquimedes, having linked the Revit project to a bill of quantities, whether it be directly or using the option in the “File > Connection with Revit > Import Revit quantities extraction file” menu, filters can be applied to manage the views and quantities of the information contained in the BIM project. This option is located in the “Assign job item and quantity extractions” window and is represented using the button.

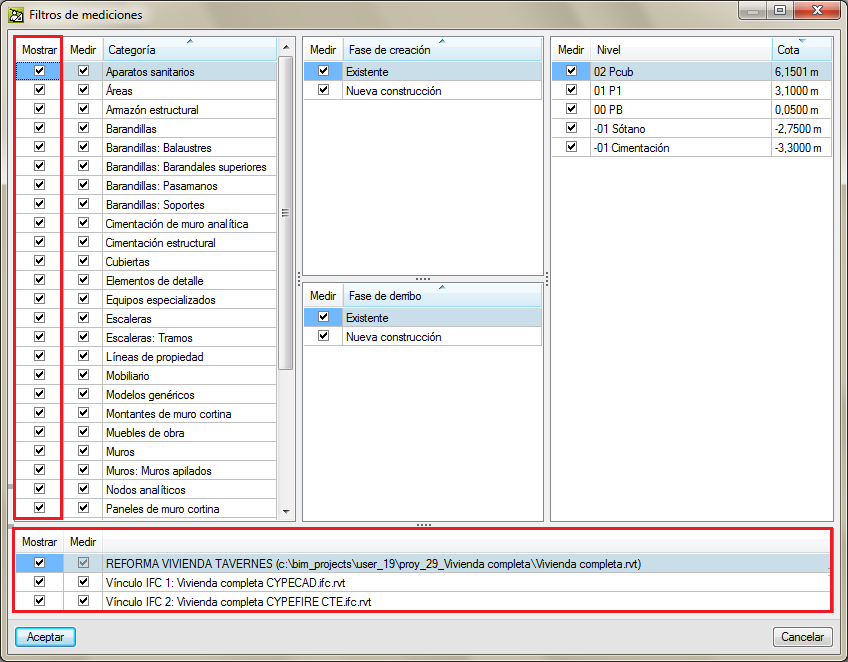
The Quantities filter dialogue box of this version allows users to mark the Categories which can be displayed in the “Assign job item and quantity extractions” dialogue box, using the selection boxes in the “Show” column. The “Measure” column allows users to mark the Categories, Phases and Levels which are to be measured upon pressing the “Quantity extraction” button. In the bottom part of the dialogue box, users can, similarly, activate or deactivate the view and quantities of the entities associated with each IFC file linked to the main model, and this way identify the information contained in each model and adjust their view and quantities.

This tool allows users to manage the quantities of all the entities and materials associated with a group of models associated to the group of models that make up a Revit Open BIM project from a single place.
Show complete quantities from the Job item assignment and quantity extraction dialogue box of Revit

As of the 2017.c version, users can view quantities that will be provided by Revit before extracting them.

To do so, the “Show complete quantities” button () has been implemented in the “Job item assignment and quantity extraction” dialogue box.

In the dialogue box that appears (Complete quantities of...), the option “Apply the numerical grouping defined in the column combination” allows users to show the appearance the table would have with lines grouped for those who are to be grouped if the dimensions coincide.

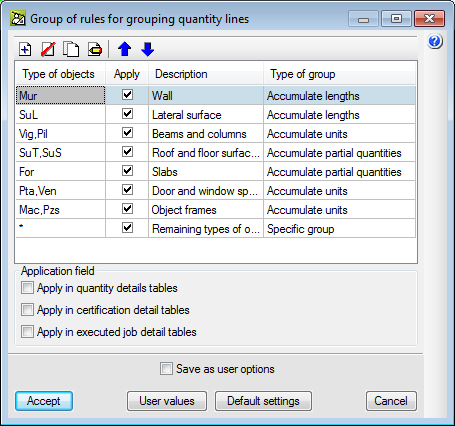
The option “Group quantity lines” (Show > Configuration), complements this new development to group quantity lines coming from the extraction from the Revit model. If the option “Apply in quantity details tables” is not activated in the dialogue box that opens (Group of rules for grouping quantity lines), the quantity details lines will not be displayed as grouped, even though the criteria for them to be grouped has been established. This dialogue allows users to define rules to group details lines of quantity tables (on-screen, when printing or when exporting). Grouping of quantity details lines is applied to those imported from CAD/BIM files, BC3 files and those introduced by users.

Quantity groups in quantity tables coming from Revit

Quantity groups in quantity tables from Revit are obtained based on a classification and organisation process depending on the contents of the comments of the quantity lines making up each quantities table.

To organise and simplify the information extracted from the quantities of Revit, a series of options have been designed, which can be accessed by pressing the “Comments composition for quantities table” button in the “Types or Materials” selection zone or from the quantities table configuration zone.

These options are:

  • Group header (column G)
    Allows for groups to be created in the quantities table. In other words, group quantity lines depending on their comment.
  • Visible (Column V)
    Displays the information of the “Contents” column in the quantities table.
  • Organise (Column O)
    Arranges, in alphanumerical order, the details lines depending on their comment.
  • Ascending order (Column ^)
    Arranges, in alphanumerical and ascending order in the table, the details lines depending on their comment. If it is not activated, they will be arranged in descending order, as long as the Organise option of column O is activated.
  • Visible in the material quantities (Column M)
    When the measurements are made depending on the material, the comment in the quantities lines is composed of the information provided by the material element, and by the information provided by the element using the material. This way, the quantities of the material can be made visible.
  • Visible in “To deduct” quantity lines (Column -)
    When openings are measured, the comment of the quantities lines is composed using the information provided by the element of the opening, as well as that provided by the information of the element containing the opening. This way, the quantities of the openings can be made visible.

“Change location of Revit model” button

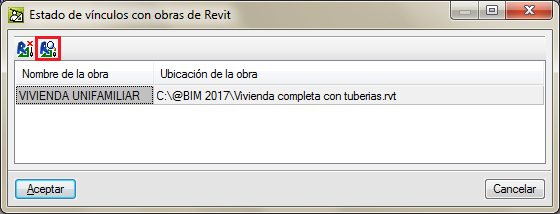
A new button: “Change the location of the Revit model” has been included in the “Link status with Revit jobs” dialogue box (File > Connection with Revit), so users can re-link the Revit project with a bill of quantities of Arquimedes in case the Revit project is duplicated or its location is modified.

Filter order memorisation in quantities

The order of filters defined in quantities to restrict elements is memorised. This order is available by accessing the filter editing option.

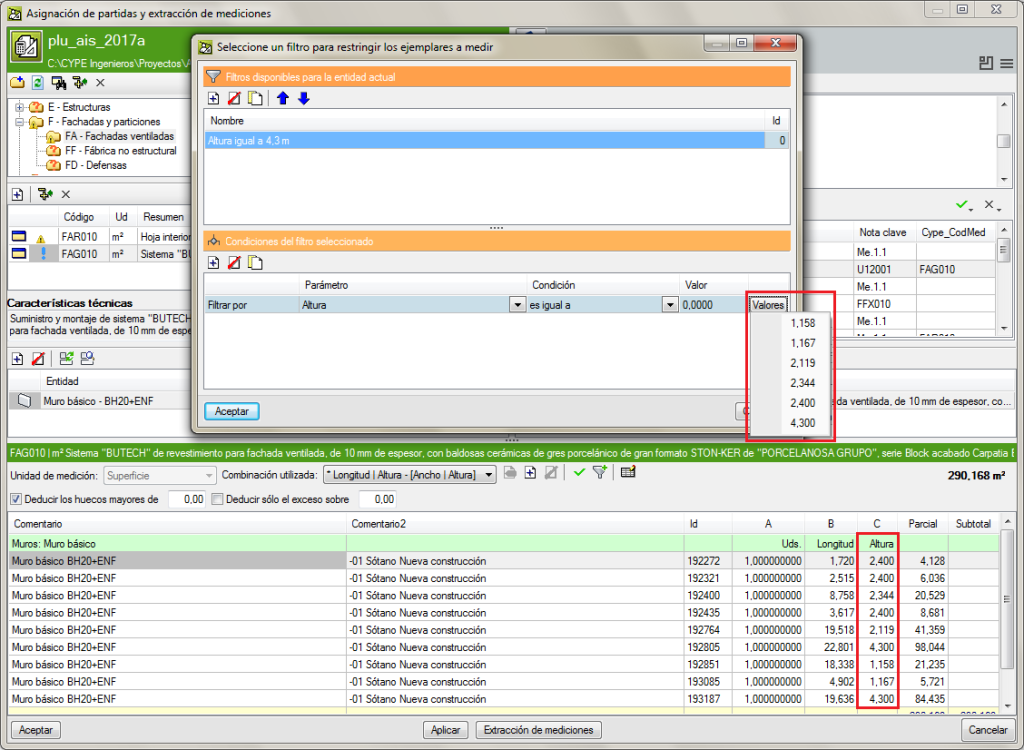
“Values” button added in the “Select a filter to limit the elements to be measured” dialogue box

The “Values” button has been added in the “Select a filter to limit the elements to be measured” to allow users to view all the available values for the selected parameter.