
Configuring the options for pad footings
The configuration options for pad footings can be accessed by selecting "Pad footings" from the "Options" menu in the "Structure" section at the top of the interface, under the "Foundations" tab.

Clicking this option opens the "Pad footings" window, which contains the following tabs:
- General
- Perimeter reinforcement
- Types
- Stiffness criteria
- Pressure increment
Each of these is detailed below.

"General" tab
The "General" tab contains a range of options for the design and verification of footings.
Firstly, you can modify the "Width increment" and "Depth increment" that the program uses for each direction in successive iterations of the design process.
Next, the "Minimum depth" for all footings on the job is specified.
Next, by ticking the relevant box, you can modify the design value of the "Minimum geometric reinforcement" required to resist bending. These values are used only in the design process, not in the verification.
The following options are shown below:
- If "Apply reduction to flexure moments" is selected, the program applies the reduction in the mechanically permissible value specified by the standards during the verification.
- The "Place top reinforcement mesh on if needed in pad footings" option allows you to place an upper reinforcement mesh if required by the structural analysis. This may be necessary if uplifts are detected in the footing that generate negative moments.
- The "Match the bends for each direction" option sets the two flanges on all bars in a given direction to the maximum value obtained by calculation.
- If "Allow uplift in the footing" is disabled, the program forces the resultant force to pass through the central core.
- You may also choose the "Do not place top reinforcement mesh if the design is successful with mass concrete" option, in which case the tensile strength of the concrete is taken into account. However, the flexural analysis is always carried out as a reinforced concrete section.
Next, select the "Default footing type" for automatic generation from the drop-down menu, choosing either "Footing of constant depth" or "Tapered footing".
The flange dimension is selected at the bottom; this can be the result of the analysis or a flange dimension greater than that of the beams.

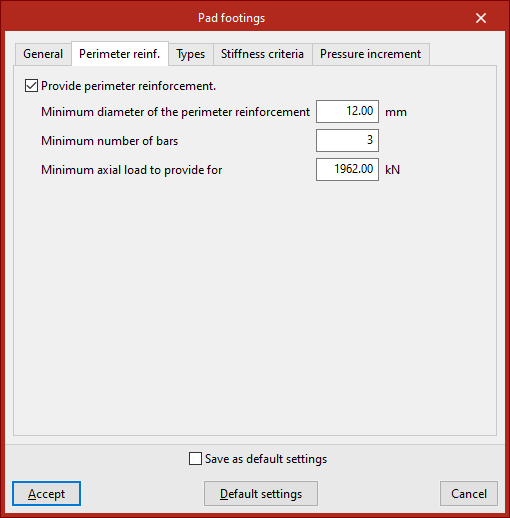
"Perimeter reinforcement" tab
The "Perimeter reinforcement" tab indicates whether you wish to include perimeter reinforcement.
The program will use the first diameter in the list that is equal to or greater than the specified "Minimum diameter". The "Minimum number of bars" and the "Minimum axial force" required for that reinforcement must also be specified; the latter must be exceeded by the maximum axial force in the most unfavourable concrete combination.
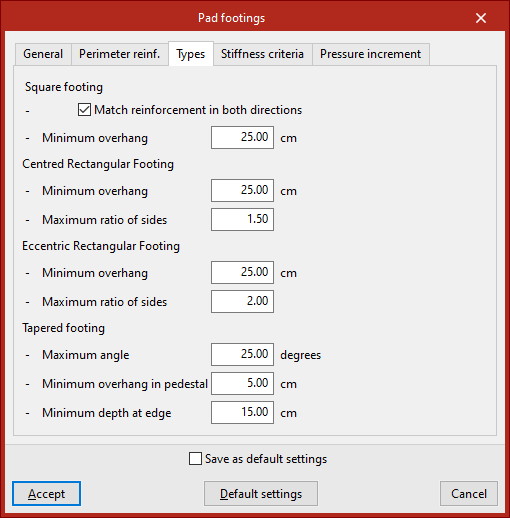
"Types" tab
This tab is used to define design criteria for different types of footings.
For square footings, you can tick the "Match reinforcement in both directions" option for each grid, as well as set the "Minimum overhang" in all directions.
For both centred and eccentric rectangular footings, in addition to the "Minimum overhang", the "Maximum aspect ratio" is specified, i.e. the ratio of the greater width to the lesser width.
For tapered footings, the "Maximum angle", the Minimum overhang in pedestal" (in directions where the building is neither a party wall nor a corner unit) and the "Minimum depth at edge" are specified; the latter is the lowest permissible value for the depth in the design calculations.
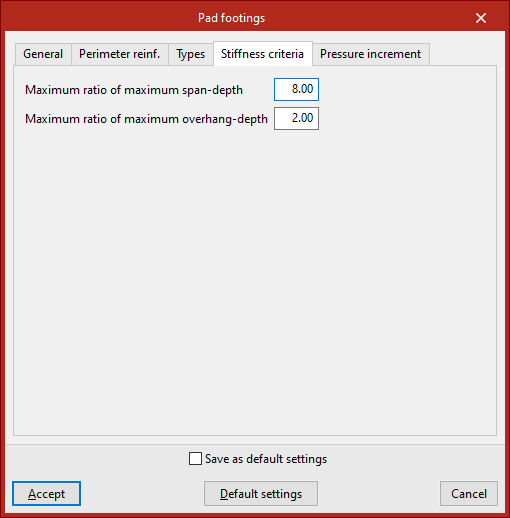
"Stiffness criteria" tab
In the "Stiffness criteria" tab, you define the "Maximum ratio of maximum span-depth" for a footing to be considered rigid, and the "Maximum ratio of maximum overhang depth" permitted in the design.
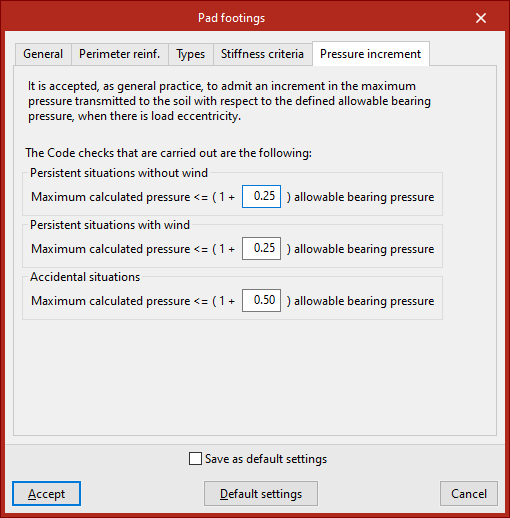
"Pressure increment" tab
In the final tab, the program allows you to set a maximum "Pressure increment" transmitted to the ground relative to the permissible value when loads are off-centre. By default, the increase is 25%.
These increments are defined for "Persistent situations without wind", "Persistent situations with wind" and "Accidental situations".
If the "Save as default settings" checkbox is ticked, the settings specified in this window will be used when opening new projects. Clicking on "Default settings" loads the default values.
To apply the changes, click "Accept".