Update history​​

Arquimedes

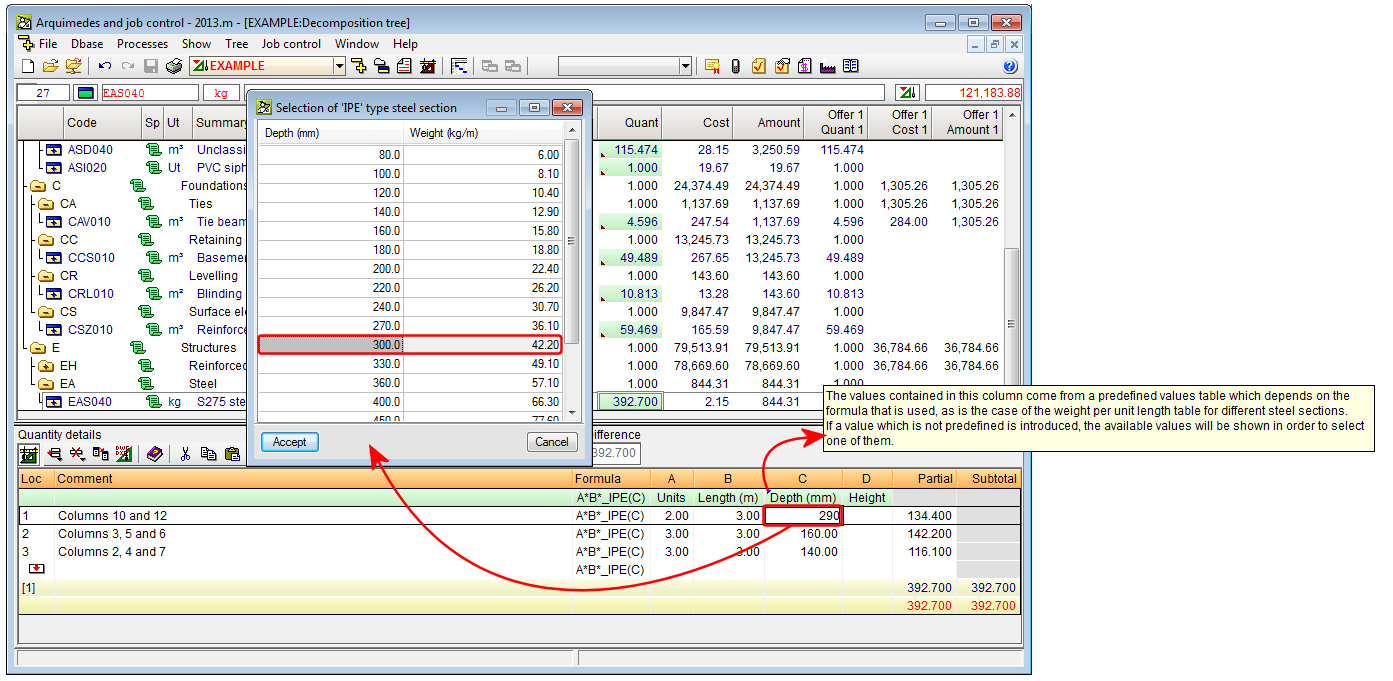
As of previous versions, users can select the type of subtable to create from a list of subtable models included with the program. Amongst these models are the "Weight of IPE type steel sections", "Weight of IPN type steel sections", "Weight of IPN type steel sections", "Weight of HEB type steel sections", etc. These subtables include a formula that calculates the weight of the section based on the data, provided by users, in the table (Depth in millimetres, Length in metres and Number of sections). Arquimedes checks that the depth of the sections that have been introduced by users coincides with a standard value located within the internal tables of the program. Before the 2013.m version, if the depth did not coincide, the program rejected the value that had been introduced leaving the Depth column empty.

As of the 2013.m version, if the value does not coincide with that contained in the table, the program displays the corresponding section table, so users can select the section to be used.

As of previous versions, users could link quantity tables or subtables belonging to the same price structure. As of the 2013.m version, one or several columns can be unlinked between the linked tables.

To do so, the option: Unlink this column from the reference, has been implemented and is contained in the contextual menu that appears on-screen upon clicking on the cell belonging to the header line of the reference and the column to be unlinked. This option has to be executed at the table at which the column to be unlinked is located, as it may occur that there may be more than two job units that have the same reference, and the user only wishes to unlink the column corresponding to one of the job units with linked tables.

This new option allows for the possibility of having two tables that are identical to one another except the contents of one (or more) of its columns.

The button, Configure Gantt chart display options, has been added in the Gantt chart dialogue box (Show > Gantt chart). This button opens a dialogue box with the same name, where users can activate or deactivate the following columns: duration of the task, start and end dates of the task and value of the tasks, so they can be viewed in the chart.

A new option has been implemented: The one which occupies the position given by the variable, located in the Attributes of image type object dialogue box of the Report template editor (File > Print > Print report > Select a template with graphical concepts –for example Price justification annex in the Images group- > Edit template button > click on a drawing type object using the right mouse button and select, from the menu that appears, Edit object).

This option allows for the selection of a whole variable (which must previously be created – Data menu of the Reports template editor > Template variables), that will contain the index of the drawing to be printed. The value of the variable is evaluated before proceeding to print the zone containing the drawing type object, so the image that occupies the order number to which the variable refers to can be printed.

New buttons have been added in the Graphical information of the concept dialogue box (select the code of a concept or the icon representing the concept in the Decomposition tree window > press the graphical information of the concept icon located in the top left-hand corner of the screen). These buttons are used to move one place up or down from the selected element and so help users to organise the graphical information that a concept (chapter, job unit...) may have.

The following report templates have been implemented:

  • Multi-language templates:
    • Valuation report with indication of the partial certification of each job item
      Template file: pl_00229.pla
      Type: Certification

      Within this template, the certified quantity lines are identified in the job items with their corresponding closed certification.
  • Valuation report summary
    Template file: pl_00230.pla
    Type: Summary certif.

    Prints the valuation report summary.
  • Templates in Portuguese for Brazil:
  • Curva ABC de materiais
    Template file: pl_br002.pla
    Type: ZG Brasil
  • Orçamento – Planilha Mo+Mat 6 colunas
    Template file: pl_br004.pla
    Type: ZG Brasil
  • Orçamento com Quantidades por insumo
    Template file: pl_br003.pla
    Type: ZG Brasil
  • Orçamento de materiais e mão de obra
    Template file: pl_br001.pla
    Type: ZG Brasil
  • Templates in French 
  • Devis estimatif
    Template file: pl_afrf001.pla
    Type: ZG Afrique Francophone

Two new options have been implemented in the contextual menu that appears in the “Decomposition tree” window when a concept is selected using the right mouse button: Change unit price to auxiliary item and Change the nature of the concept.

These options simplify the creation process of a bill of quantities or a price database by reusing existing concepts and adapting their nature or changing them to auxiliary prices if necessary. As of previous versions, a job unit with decomposition can be changed to a unit concept using the option Delete the decomposition of the concept.

To help organise the concepts at the same level, new options have been included in the contextual menu of the “Decomposition tree” window, which are used to move the selected concept upwards or downwards.

A new option has been implemented for when users wish to obtain a new concept as a duplicate of another existing concept: Paste duplicate, included in the contextual menu that appears by right clicking with the mouse button on the original concept. This option appears if the original concept has been copied previously (right click with the mouse button on the concept to be duplicated > Copy).

Once the Paste duplicate option has been selected, the Duplicate of the concept dialogue box appears, where the program proposes a new code for which users can then modify the measurement units, date, summary and description of the original concept. The quantity of the original concept is not copied during the duplication process. 

The ExecQuant and ExecPrice columns contain new data at unit price level.

  • ExecQuant
    The yield can be obtained, at unit price level, based on the direct charges to job items and on the charge repercussions to chapters. Now, the yield can be obtained of the execution of a unit of a corresponding job item (by adding all the supplied quantities charged to a job item and dividing by the executed quantity of the job item).
  • ExecPrice
    At unit level, the price of the supply is displayed in the charge, or if there is no charge, the probable price in the ProbablePrice column. This way, the price of the root chapter will reflect the foreseen cost at the end of the job as a result of the current execution and the weighted average price of all the supplies that have been contracted of that concept by the cost centre, if it has been contracted, or otherwise, the foreseen price (price in the reference budget of the job control).

The tool used to import concepts in CSV format to Arquimedes has been improved (Decomposition tree menu > Tree > Import from CSV format). In previous versions, this option was called “Import decomposition from CSV format” and allowed for a CSV file to be imported to be added as the decomposition of a chapter.

As of the 2013.k version, this option is now called Import from CSV format and allows for information to be imported from:

  • CSV format files
  • The clipboard of the operating system, where the user has copied information from Excel spreadsheets

The option, Import from CSV format, has also been included in the contextual menu that appears when users click, using the right mouse button, on a “Chapter” or “Job item” type concept (with or without decomposition) in the “Decomposition tree” window of Arquimedes.

 Additionally, the program offers several import possibilities, depending on the concept that has been selected in the Decomposition tree window of Arquimedes. These possibilities are displayed in a dialogue box before importing, when the option to Import from CSV format is selected. These are:

  • Chapter tree and its decomposition
    This option must be used when the information to be imported contains one or more chapter levels, including job items with their decomposition and, optionally, their quantity details. For the information to be extracted appropriately, each decomposed element, be it a chapter or job item, must have a line referred to as the “decomposition footer” that indicates which is the last element of its decomposition, and so be able to interpret the nested decompositions correctly. The files produced when the jobs are exported to Excel belong to this type of format.

    This option can be activated in the “Import from CSV format” dialogue box if the concept that has been selected previously is of the “Chapter” type (including the root chapter).
  • Job items tree and its decomposition
    This type of import should be used when the information to be imported only contains job items with their corresponding decompositions and details. This format is a subgroup of the previous format, and so the same rules are applicable concerning the “decomposition footer”.

    As in the previous option, it is only active when the selected concept is of the “Chapter” type.
  • Concept list with its decomposition
    The information imported using this option requires a more simple format. A “decomposition footer” is not required. In this case, the different column arrangement is used to distinguish the decomposed concepts (do not have a price or amount) from the unit items they are composed of (contain quantity and price).

    It is active with the “Chapter” and “Job item” concept types.
  • Simple concept list
    The information imported using this option requires the most simple format. It consists of a list of concepts that may or may not contain a quantity or yield, which will be added to the decomposition of the current concept.

    It is active with the “Chapter” and “Job item” concept types.

Once the option has been chosen, the program opens another dialogue box to edit the data import process.

Users can now provide a customised name to the columns in the “Decomposition tree” window, by accessing the Visible columns of the decomposition tree dialogue box (double click with the left mouse button on any part of the Decomposition tree window header). The customised name must be indicated in the Personalised column in the Available columns section within the dialogue box.

The columns, located in the top part of the Decomposition tree window, which have been assigned a customised name, are displayed with a small red triangle in the bottom right hand corner of the cell in which the customised name appears.

The customised names of the columns are stored as user data, and therefore, are saved in the computer in which the names have been introduced and not together with the job that is under edition.