Managing and creating layers
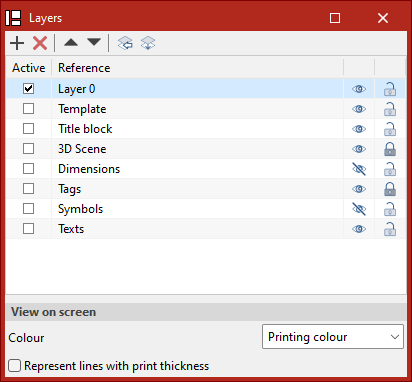
From the "Layers" section, located on the left-hand side of the "Edit sheet" window, you can easily organise and manage the various elements that make up the sheet. You can create, delete and reposition elements between the different layers as required.
This feature lets you structure your work in a systematic and organised manner, making it easier to manage the various components of the drawing. You are free to create as many layers as you need, for example, to organise the template, scenes, dimensions or titles, amongst other elements.
The options on the top bar allow you to do the following:
- To create a new layer, click on the "Add" option, located on the left-hand side of the screen. You can also "Delete" or reorder the layers in the list.
- You can manage the layers of imported DWG or DXF elements by clicking the "Layers of inserted DXF or DWG files" icon. The window that appears when you click this option displays a list of these layers. For each layer, the "Reference", "Line weight", "Print colour" and "Identification colour" are shown.
- You can change the layers that objects belong to using the "Assign to layers" icon. To do this, select the "Target layer", then select the objects in the workspace you want to assign to that layer.
The list of layers shows the "Reference" for each one. From here, you can select the "Active" layer by ticking the corresponding box on the left, on which any elements inserted into the drawing will be placed, as well as manage visibility or choose whether the elements on each layer can be snapped by toggling the buttons in the "Visible" and/or "Snappable" columns on the right.
In the "On-screen display" section, you can configure whether elements are displayed on screen using their "Printing colour" or their "Identification colour". You can also choose to "Represent lines with print thickness".