
Installing CYPE software on another computer by copying or cloning the program folders
You can clone or copy the CYPE software installation from one computer to another using a simple copy and paste procedure. To do this, follow these steps:
- Install the CYPE Menu program on each individual computer, if this is the first time CYPE programs are being installed. If desired, you can carry out an unattended remote installation of CYPE Menu on each computer by following the steps described at this link.
Installing CYPE Menu installs the dependencies required by various CYPE programs that are not transferred by simply copying the folders described in the following steps. The CYPE Menu installation folder can be downloaded to one computer and then used to install CYPE Menu on as many other computers as required: - Install the CYPE programs you want to work with as usual on the first computer:
- Once you have finished installing the CYPE programs you wish to work with, locate and copy the installation folder for those programs. This folder is located at the following path:
- C:\CYPE Ingenieros\Version 20XX, where ‘20XX’ is the year corresponding to the version (for example, ‘Version 2027’).
- Alternatively, instead of the folder mentioned above – which contains all the CYPE programs installed on that computer – you can select and copy only the installation subfolders for each individual program. These are as follows:
- C:\CYPE Ingenieros\Version 20XX\CYPE Menu\app_application_identifier
If this folder is copied, only one of the apps installed in CYPE Menu versions 2025.a and later will be cloned (each app is associated with an identification number). - C:\CYPE Ingenieros\Version 20XX\application_name
If this folder is copied, only one of the apps downloaded and installed individually from BIMserver.center will be cloned.
- C:\CYPE Ingenieros\Version 20XX\CYPE Menu\app_application_identifier
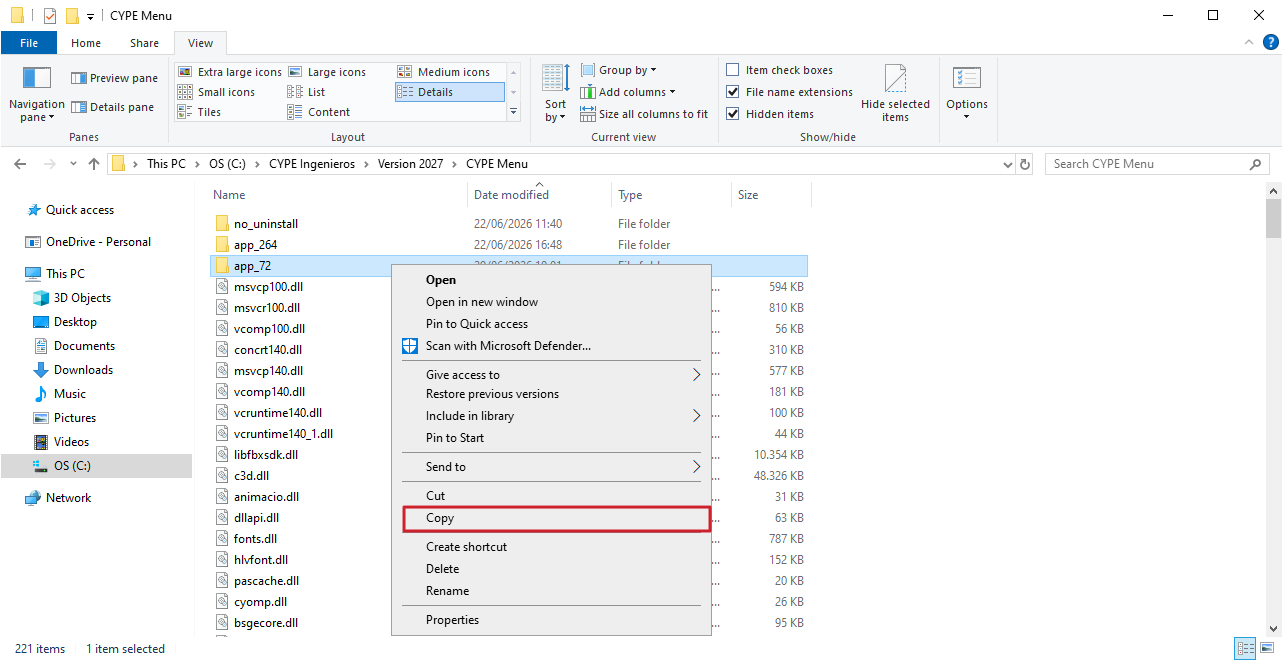
- Finally, paste the folder you copied earlier onto the other computer where you wish to install the CYPE programs. You can place it in any folder of your choice, but we recommend using a folder path equivalent to the one generated during the installation of the programs on the first computer.
Installing and using different versions of CYPE software on the same computer
Installing multiple versions
To install multiple versions of CYPE software on the same computer, there are two different procedures to follow, depending on the version you currently have installed and the one you wish to install:
- Installing versions from different years
To install a version of CYPE software from a different year whilst keeping a version from another year installed on your hard drive (for example, if you wish to install the 2027 version whilst keeping the 2026 version), please consider the following.- The new installation is saved in a different folder to the previous one, so there is no need to make any changes to the name or folder structure.
- The new installation will overwrite the shortcut for the existing version, so we recommend renaming the old shortcut before installing the new version to ensure a new shortcut is created during the process.
After installing the second version, you can also rename the new CYPE icon that has been created on the Windows desktop. This will ensure that the two shortcuts to the different versions of the CYPE programs are clearly identified, and you will be able to access one or the other via these distinct links. - If you are installing apps via CYPE Menu, we recommend keeping two CYPE Menu entries with different year numbers and installing the apps for each year within the CYPE Menu for the corresponding year.
- Installing versions from the same year
To install a new version whilst retaining a previous version with the same year number (for example, installing 2026.c whilst retaining 2026.a), the new installation will overwrite both the installation folders and the shortcut. In this case, you have several options:- Carry out the new installation on a different physical hard drive, so that the folders are created in a different location.
- Carry out the new installation on a virtual drive within the same hard drive, for the same purpose.
- Carry out the new installation on the same hard drive by renaming the folders. For details of this process, see this link.
Using multiple versions
You cannot edit a project using a version of CYPE software earlier than the one in which it was originally created or edited. Once a project has been opened in a particular version, it can only be opened and edited using that version and later versions.
If you want to install two different versions of the CYPE programs at any point, before editing a project using a version higher than the one in which it was created, we recommend making a manual backup of that project using the earlier version. This will allow you to edit and work on the copy in the newer version, whilst retaining the original project for use with the earlier version.
However, when opening a project with a later version, the program will automatically create a backup by compressing the project into .cyp format in the "Backup" folder, within the directory where the project is located. This copy is saved with the original version so that it can be decompressed and edited using that version whenever you wish to work on it.
Installing and using different versions of CYPE software from the same year on the same hard drive
The following procedure allows you to install and use two versions of CYPE software from the same year on the same hard drive (for example, CYPE 2026.a and CYPE 2026.c), without having to create virtual drives.
Installation
Firstly, install the first version of CYPE that you want to keep on your computer. This will create the following folders, where "20XX" is the version year (for example, "2026"):
C:\CYPE Ingenieros\Version 20XX
C:\Users\username\AppData\Roaming\CYPE Ingenieros\v20XX
The existing folders are then renamed, for example, by adding the following string:
C:\CYPE Ingenieros\Version 20XX.v1
C:\Users\username\AppData\Roaming\CYPE Ingenieros\v20XX.v1
Next, install the second version of CYPE that you want to keep on your computer. The following folders will be created again:
C:\CYPE Ingenieros\Version 20XX
C:\Users\username\AppData\Roaming\CYPE Ingenieros\v20XX
Therefore, the computer will contain the following four folders:
C:\CYPE Ingenieros\Version 20XX.v1
C:\Users\username\AppData\Roaming\CYPE Ingenieros\v20XX.v1
C:\CYPE Engineers\Version 20XX
C:\Users\username\AppData\Roaming\CYPE Ingenieros\v20XX
Usage
To use the second version, use the shortcuts created following the last installation.
To use the first version, you must rename the four folders again to obtain the folder structure shown in the second column:
| Settings for using the second installed version | Settings for using the first version installed |
| C:\CYPE Ingenieros\Version 20XX | C:\CYPE Ingenieros\Version 20XX.v2 |
| C:\Users\username\AppData\Roaming\CYPE Ingenieros\v20XX | C:\Users\username\AppData\Roaming\CYPE Ingenieros\v20XX.v2 |
| C:\CYPE Ingenieros\Version 20XX.v1 | C:\CYPE Ingenieros\Version 20XX |
| C:\Users\username\AppData\Roaming\CYPE Ingenieros\v20XX.v1 | C:\Users\username\AppData\Roaming\CYPE Ingenieros\v20XX |
*The table above should be interpreted as follows: the folder C:\CYPE Ingenieros\Version 20XX (no other folder) must be renamed to C:\CYPE Ingenieros\Version 20XX.v2, and so on for the rest, row by row.
You can now use the CYPE program shortcuts to open the first version installed.
To use the second installed version again, you must repeat the folder renaming procedure described above to restore the configuration shown in the first column.
You can follow this procedure with successive renaming steps to install more than two versions from the same year, adding identifying character strings (.v3, .v4, etc.) and keeping the folder for the version you wish to use without adding that additional character string.
Installation in several languages
To install CYPE in multiple languages (using CYPE Menu), you can simply download and install CYPE Menu in both languages one after the other. This creates two separate installation folders (for example, for the installation of version 2027 in English and Spanish, C:\CYPE Ingenieros\Version 2027\ and C:\CYPE Ingenieros\Versión 2027\, respectively). For greater clarity, the CYPE Menu shortcut created during the process can be renamed after each installation to indicate the language.
However, if the selected languages result in installation folders with the same name, the installation folder for one language will overwrite the existing one for the other language. In this particular case, and in any other, you can follow this general procedure:
- Download and install the program in the first language.
- Rename the installation folder that has been created. For example, from C:\CYPE Ingenieros\Version 2027\ to C:\CYPE Ingenieros\Version 2027 (English)\.
- Download and install the program in the second language. This will create a new installation folder which, if necessary, can also be renamed for greater clarity. For example, from C:\CYPE Ingenieros\Version 2027\ to C:\CYPE Ingenieros\Version 2027 (Français)\.
- Shortcuts to CYPE Menu in each language can be created manually using the executables in these folders (in this example, C:\CYPE Ingenieros\Version 2027 (English)\CYPE Menu\CYPE Menu.exe and C:\CYPE Ingenieros\Version 2027 (Français)\CYPE Menu\CYPE Menu.exe).
An alternative option in both cases is as follows:
- Download and install the software once in one of your preferred languages.
- Copy the shortcut created after installation, then edit its properties by right-clicking it. On the "Shortcut" tab, in the "Destination" field, you can add the appropriate command to make the program open its interface in that language:
- "C:\CYPE Ingenieros\Version 2027\CYPE Menu\CYPE Menu.exe" /Language:Spanish
- "C:\CYPE Ingenieros\Version 2027\CYPE Menu\CYPE Menu.exe" /Language:English
- "C:\CYPE Ingenieros\Version 2027\CYPE Menu\CYPE Menu.exe" /Language:French
- "C:\CYPE Ingenieros\Version 2027\CYPE Menu\CYPE Menu.exe" /Language:Portuguese
Unattended remote installation
CYPE programs can be installed on multiple client machines from a network server without having to respond to the installation prompts at each workstation.
Firstly, you can simply clone or copy the installation from a computer on which the CYPE programs are already installed to another computer on which you wish to install them, using a simple copy-and-paste procedure for folders. To do this, follow the steps indicated in this link.
Secondly, the following options are also available for carrying out an unattended installation of CYPE programs. With the unattended installation of CYPE programs, the CYPE Menu or any of the CYPE programs from the BIMserver.center Store can be installed under the same conditions and with the same responsibilities as the guided installation, on the understanding that all the terms of the license agreement have been read, understood and accepted.
- To do this, you need to download the installation executables by following the steps indicated in this link.
During the download, you must disable the "Install automatically after download" option if you wish to carry out an unassisted installation. Otherwise, the assisted installation will run, which will require you to respond to the questions asked during the installation process from each workstation.
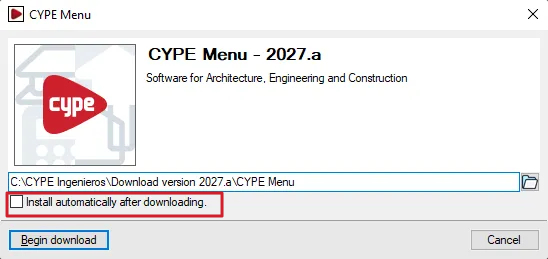
- These files can then be run using the following command and parameters. This allows you to carry out an unassisted installation of the CYPE programs:
“name.exe”{space}drive{space}/unattended{space}/hidden{space}/version_type:
| {space} | Represents a blank space. |
| “name.exe” | This is the name of the file that runs the installation you wish to carry out. It must be entered in quotation marks, as the installation executables for CYPE programs contain spaces. The executable file extension (.exe) must also be included. The default location of this file is: For the CYPE Menu app (available in versions 2025.a and later): C:\CYPE Ingenieros\Download version 20xx.x\CYPE Menu\installation_language\Install CYPE Menu.exe For any BIMserver.center program (any version): C:\CYPE Ingenieros\Download version 20xx.x\programme_name\installation_language\Install programme_name.exe This path can be edited and changed in the dialogue box that appears during the program download process. |
| unit: | This is the drive letter of the client machine’s hard disk (including the ‘:’ character), where you wish to install the program. |
| /unassisted | A mandatory parameter that prevents the installation questions from being displayed on the client machine. |
| /not_visible | An optional parameter that prevents any installation process screens from being displayed on the client machine. |
| /type_version: | Optional parameter that specifies the type of version to be installed. This is only required for versions before 2026.a (excluding 2026.a). The permitted values are: /version_type:professional /version_type:evaluation /version_type:campus /version_type:temporary . If “/version_type:” is omitted, the default value is “/version_type:professional”. |
| Note: |
|---|
| When carrying out an installation on a client machine on the network, it may be advisable to inform the relevant users (via the system used by the network administrator for remote installation) that a process is about to take place during which the machine must not be switched off or disconnected from the network. Furthermore, if the security devices for the CYPE programs you are using are single-user USB dongles, you should advise users of the client machines to remove them from the USB port to which they are connected and only to reinsert them once the installation process has been completed. |
Unattended remote uninstallation
You can run the "uninstall.exe" file from the program’s uninstaller with the "/unattended" parameter to perform a remote, unattended uninstallation.
This file is located in the following paths:
- C:\CYPE Ingenieros\Version 20XX\program_name
- C:\CYPE Ingenieros\Version 20XX\CYPE Menu\app_ID (for apps installed via CYPE Menu)
