Introduction
In the "Bill of quantities" tab, users have tools for generating and managing the bill of quantities of the system analysed by each program. Here, users can extract quantities in the model and generate real items based on this information. This process is carried out by means of a correspondence system (mapping) between the elements measured on the analysis model and the bill of quantity concepts. This equivalence is stored in a local or network directory so that it can be progressively expanded and used in future projects.
Some CYPE apps integrated into the Open BIM workflow that have the "Bill of quantities" tab are CYPEPLUMBING, CYPELEC, CYPEHVAC or CYPEFIRE Hydraulic Systems, among others.
The "Bill of quantities" tab is also included in the Open BIM Quantities program. Unlike the rest of the apps that include this tab, Open BIM Quantities allows users to extract quantities from BIM models defined using the IFC standard (in the "Quantities of the BIM model" tab). The process to generate the bill of quantities in Open BIM Quantities is carried out in the "Bill of quantities" tab, in the same way as in the rest of the Open BIM apps that include this tab.


Work environment
The "Bill of quantities" tab is used to manage the quantities and cost estimations of the installation, and displays the following:
- A top toolbar containing tools for creating and editing bills of quantities, as well as tools for managing and creating reports.
- A graphic window with its own toolbar, located on the right-hand side, where the different elements of the job can be viewed.
- A specific area for structuring the bill of quantities, on the left-hand side.
Input/output workflow
In programs that have a "Bill of quantities" tab, once the installation has been modelled in the corresponding tab, a specific workflow should be followed to ensure that the bill of quantities is generated correctly. There are several working methods, including the following:
Method 1: Entering prices manually
In this method, prices are entered directly into the project database, and this is suitable if you want to work exclusively with your own project prices, without using a cost database or performing mapping. The workflow is as follows:
- Set the general bill of quantities parameters (from "Project", "General parameters").
- View bill of quantities items (from "Update", "Update bill of quantities", "Delete current bill of quantities data", keeping the "Mapping" and "Cost database" boxes unchecked).
- Manually enter prices for items in the project database (from "Prices", "Project database"). When you close the project database window, the changes will be applied automatically.
- Finally, bill of quantities reports can be obtained directly (from "Reports").
Method 2: Directly assigning codes from a cost database
In this method, the generated items are manually linked to a cost database from the project database, when such a cost database is available, but mapping is not desired. The workflow is as follows:
- Set the general bill of quantities parameters (from "Project", "General parameters").
- View bill of quantities items (from "Update", "Update bill of quantities", "Delete current bill of quantities data").
- Create or import a cost database (from "Project", "Cost databases").
- Assign the codes, one by one, from the reference cost database to the project database (from "Prices", "Project database", "Add cost database items"). When you close the project database window, the changes will be applied automatically.
- Finally, bill of quantities reports can be obtained directly (from "Reports").
Method 3: Using mapping files (recommended method)
This is the most comprehensive and flexible method, as it automates the correspondence between the modelled elements and the items in the price database. This workflow allows cost databases and mappings to be reused, speeding up the generation of the bill of quantities. The recommended workflow is as follows:
- Set the general bill of quantities parameters (from "Project", "General parameters").
- Create or import a cost database (from "Project", "Cost databases"). The options available for this include the following:
- Create a new "Empty" cost database, adding work sections, items, and documents from scratch:
- (Optional) Add items manually (from "Add items").
- (Optional) Add items from the CYPE Cost Database (by dragging them from the FIEBDC export button that appears in this program and dropping them onto the cost database you are working on).
- (Optional) Create a new cost database from a "Template", adding items and documents.
- (Optional) Import a cost database in BC3 format ("Import BC3 file").
- (Optional) Create a new cost database based on unit concepts from the "CYPE Cost Database" for the selected country and location (only in some programs).
- (Optional) Create an "Empty" cost database and import information in CSV format.
- Create a new "Empty" cost database, adding work sections, items, and documents from scratch:
- Create a new empty mapping file (from "Project", "Mapping").
- Update the bill of quantities (from "Update", "Update bill of quantities", "Delete current bill of quantities data"), selecting both the mapping and the cost database created. In the pop-up window, you must:
- Assign the work section structure in the mapping file (from the mapping pop-up window, "Work sections").
- Assign the codes, one by one, from the reference cost database to the mapping file (from the mapping pop-up window, "Assign codes", "Assign").
- You must accept the pop-up window to apply the changes.
- Optionally, it is possible to:
- (Optional) Review or modify the mapping (from "Project", "Mapping").
- (Optional) Increase or adjust prices from the project database (from "Prices", "Project database").
- (Optional) Manually edit the bill of quantities, adding work sections, items, and/or bill of quantity detail lines (from "Edit").
- (Optional) Register and manage construction certifications (from "Project", "Certificates").
- (Optional) Export the bill of quantities to FIEBDC-3 format (from "Import/Export", "Export BC3").
- (Optional) Graphically represent the bill of quantities (section "Graphs").
- Finally, bill of quantities reports can be obtained directly (from "Reports").
In the event of changes to the installation, it is possible to update the bill of quantities to reflect them (again, from "Update", "Update bill of quantities", "Update current bill of quantities", selecting both the mapping and the cost database created).
The mapping created with this method can be reused in other works created with the same installation program. If new materials or items are added to a model and a mapping is selected that does not include them, the program will warn of the elements with incidents in the pop-up window that appears when "Update bill of quantities" is selected. In this case, the mapping can continue to be worked on and enriched with the new associations made.
The program collects various data from the "Installation" tab to compose and fill in the field in the "Reference" column in the "Classification" section of the mapping: the reference of the element types (or verification criteria), the reference of the materials, and other relevant data (such as the dimensions of a water heater). Therefore, if this data is modified (by rewriting the reference of the types of elements or materials in the "Installation" tab, or by selecting elements with other dimensions), the association with the items assigned in the mapping will be lost, so the mapping must be revised to incorporate the new cases.
Method 4: Workflow with Archimedes
This method allows you to integrate the items created in Arquimedes with the bill of quantities generated by the installation program, maintaining the structure defined in the bill of quantities. The final documents are obtained with Arquimedes. The steps are as follows:
- From Arquimedes:
- Create a new bill of quantities with items without a bill of quantities.
- Export the bill of quantities in BC3 (from "File", "Export", "Export to FIEBCD-3").
- From the installation program:
- From the "Installation" tab:
- Create the geometry of the installation.
- From the "Bill of quantities" tab:
- Create a new cost database by importing a BC3 file (from "Project", "Cost databases", "Add", "Import BC3 file"), selecting the BC3 exported from Arquimedes.
- Create the mapping by importing the BC3 file exported from Arquimedes (from "Project", "Mapping", "Add", "Import BC3 file"). This will generate the same work section structure created in Arquimedes.
- Update the bill of quantities (from "Update", "Update bill of quantities", "Delete current bill of quantities data"), selecting both the mapping and the cost database created.
- Assign codes, one by one, from the reference cost database to the mapping file (from the mapping pop-up window, "Assign codes").
- Accept (or, where necessary, set) the currency parity.
- From the toolbar of the general interface of the "Bill of quantities" tab, export the bill of quantities to FIEBDC-3 format (from "Import/Export", "Export BC3").
- From the "Installation" tab:
- Back at Arquimedes:
- Import the quantities in BC3 format (from "File", "Import", "Import FIEBDC-3 bill of quantities"), selecting the BC3 exported from the installation program, and ticking the box "Process only registers related to quantity details". This way, the bill of quantities made in the installation program will be incorporated into the Arquimedes items.
- Finally, the reports are obtained from the options available in Arquimedes (for example, from "File", "Print").
General parameters of the bill of quantities
Under the "Bill of quantities" tab, in the "Project" group of the main toolbar, the general parameters of the project can be reviewed or modified.
The "General parameters" window includes the following tabs:
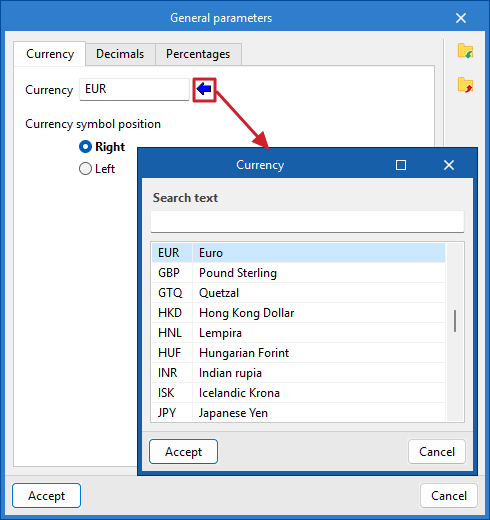
- Currency. Allows users to change the currency used and the position of the currency symbol (to the right or to the left).
- Decimals. Allows users to modify the number of decimals of amounts, prices and quantities/yields.
- Percentages. Allows users to add percentages for contingencies, general expenses, industrial profit, and the below budget coefficient, and to incorporate a series of user-defined taxes.
Cost databases
To make it easier to enter construction costs, both entire databases and individual concepts can be imported from cost databases that have been developed according to the FIEBDC-3 standard, such as the CYPE Cost Database. Cost databases in CSV format can also be imported.
Within the "Bill of quantities" tab, in the "Project" group of the main toolbar, you will find the "Cost databases" option.
The "Add" option allows users to create or import cost databases in FIEBDC-3 format, and the "Edit" option allows them to consult or edit any concept or information contained therein.
| Note: |
|---|
| Existing cost databases can be copied or deleted by clicking on the icons to the right of "Add". At the top is the "Configuration" option, which allows the database search directory to be set. |
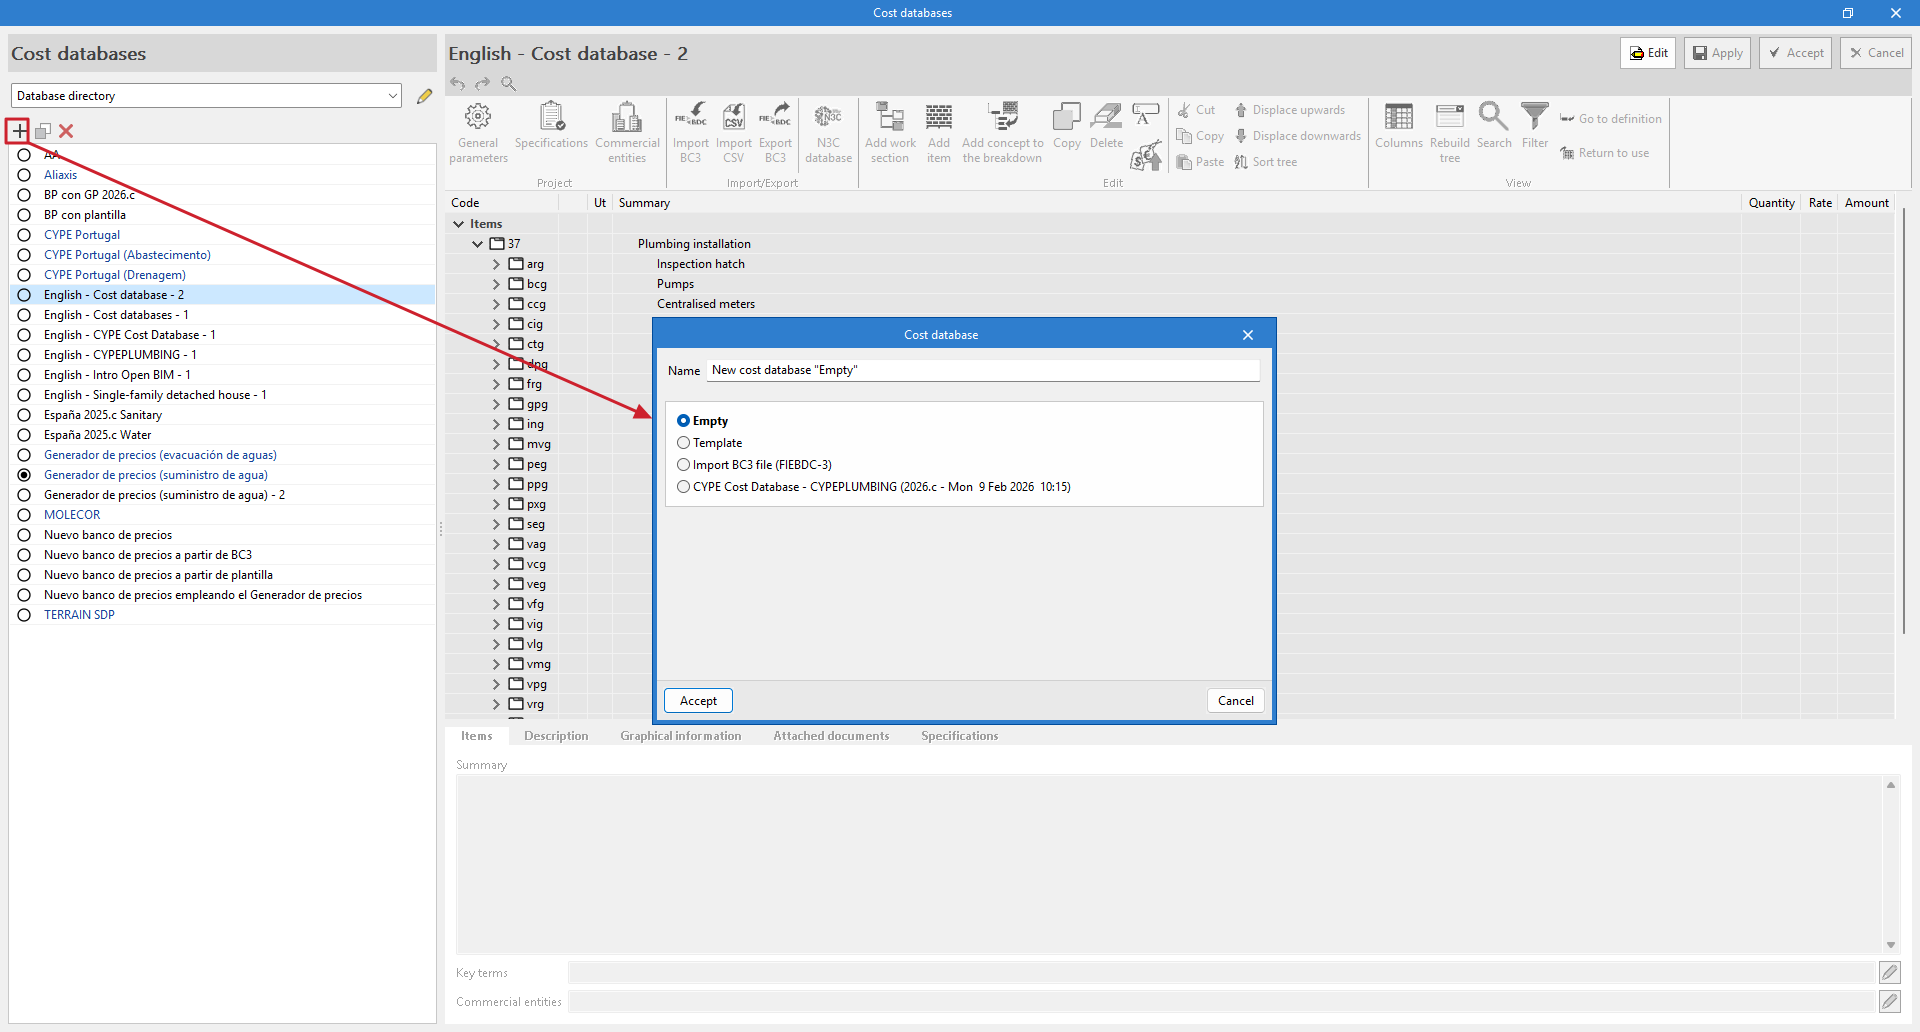
Create a new "Empty" cost database
When creating a new cost database, you must specify a name for the new file and a work section structure to keep it organised. To create a database from scratch, we recommend selecting the "Empty" option.
Edit the cost database
When accessing the editing environment, there are three different panels:
- Secondary panel or definition area
Located below the previous one, this shows information about the selected concept and allows it to be edited. - Toolbar
This contains all the necessary tools to add or edit concepts to the cost database being edited. It also allows users to import or export to FIEBDC-3 format or to activate or deactivate the visibility of environmental or waste information. - Cost breakdown structure
This displays a hierarchical outline of the complete cost database in the form of a tree.
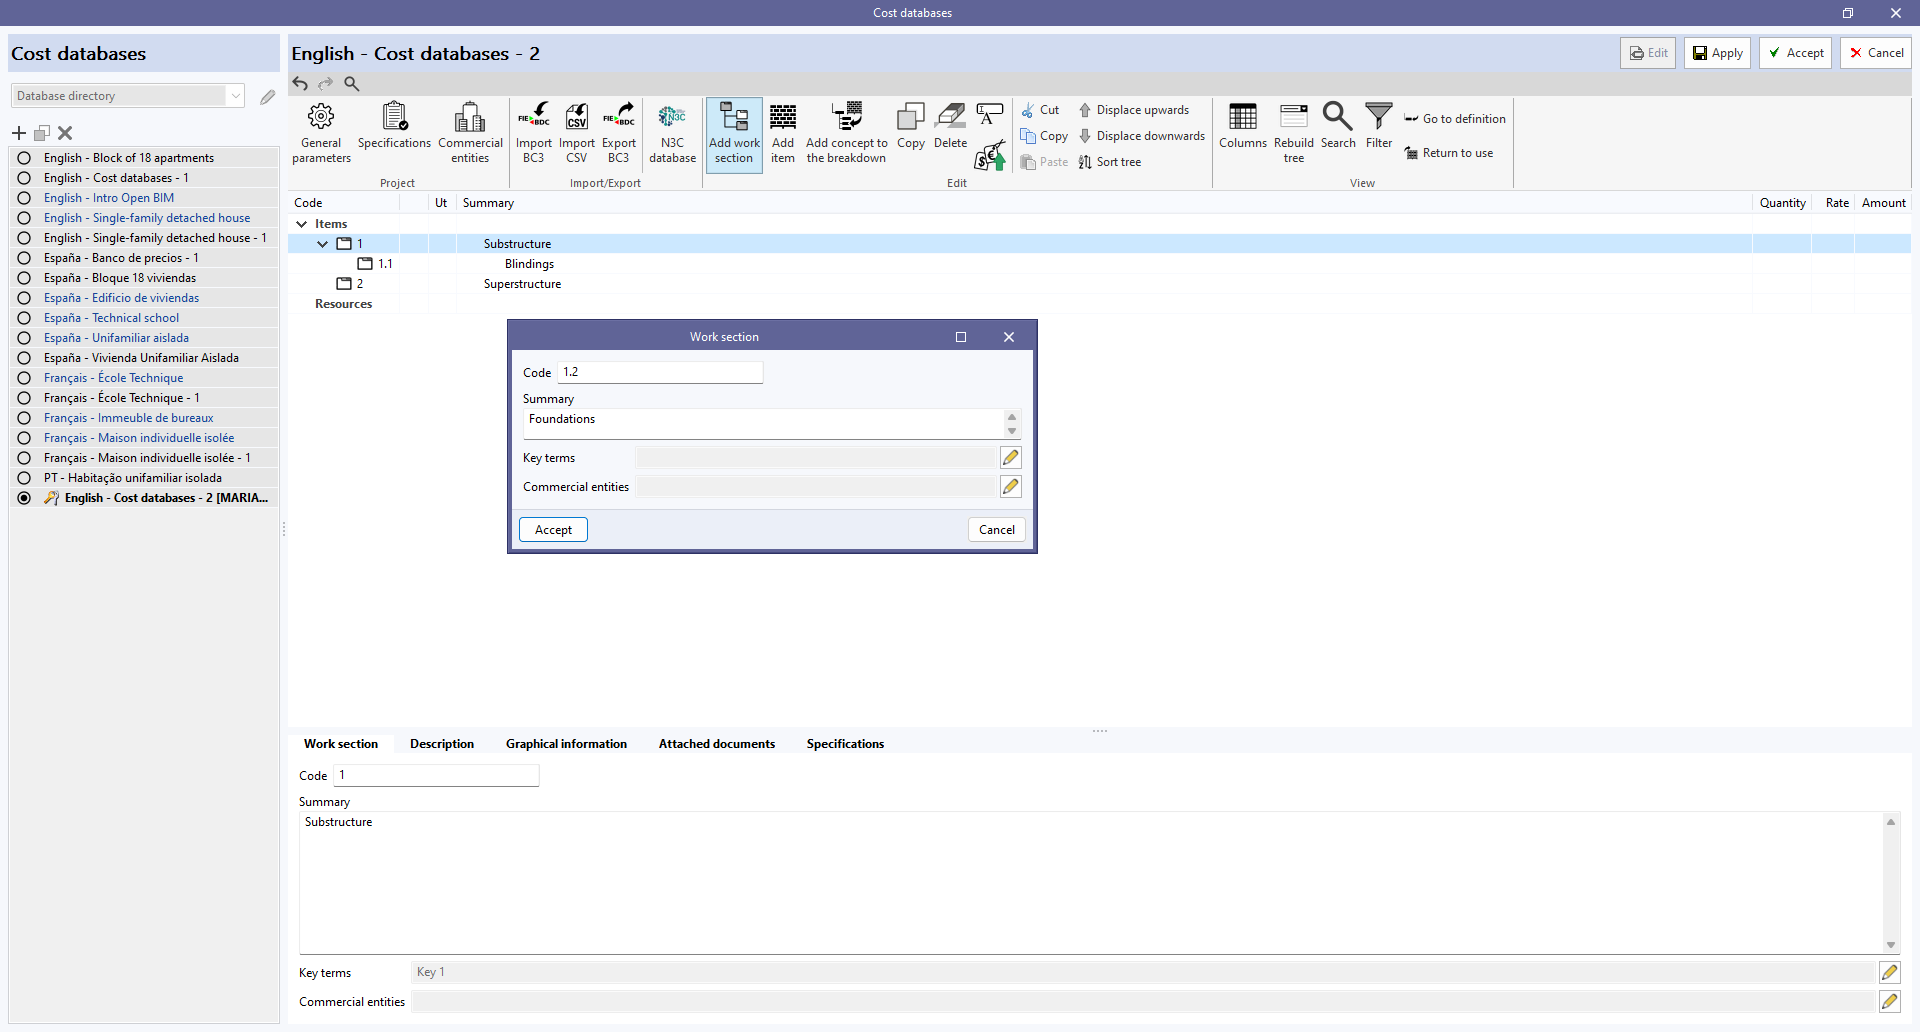
Add work sections
To add work sections, go to "Add work section" in the cost database being edited and enter a code and a summary. Key terms can also be entered, which can be detected by the "Search" tool.
Clicking on "Accept" will create the work section and display it in the centre of the window.
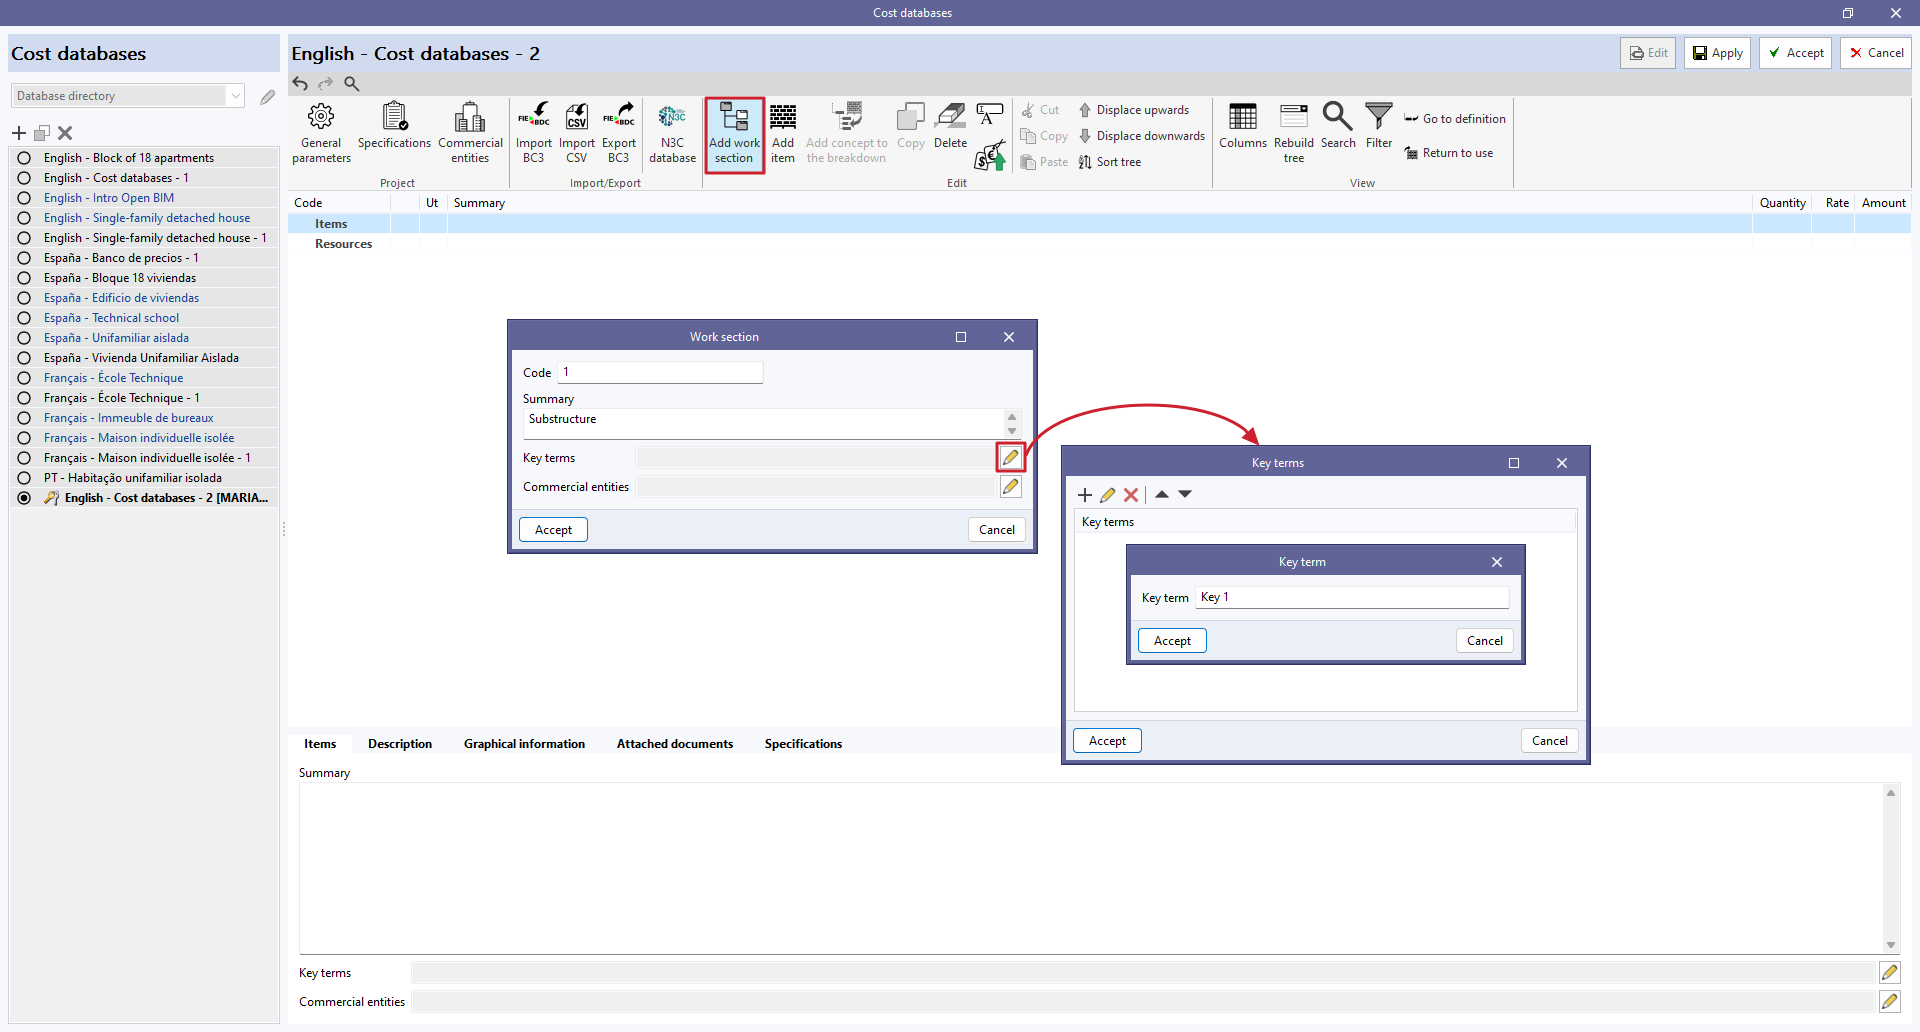
When selecting the work section created, all the data associated with it will appear in the lower part of the window. From here, the previously entered work section data can be modified.
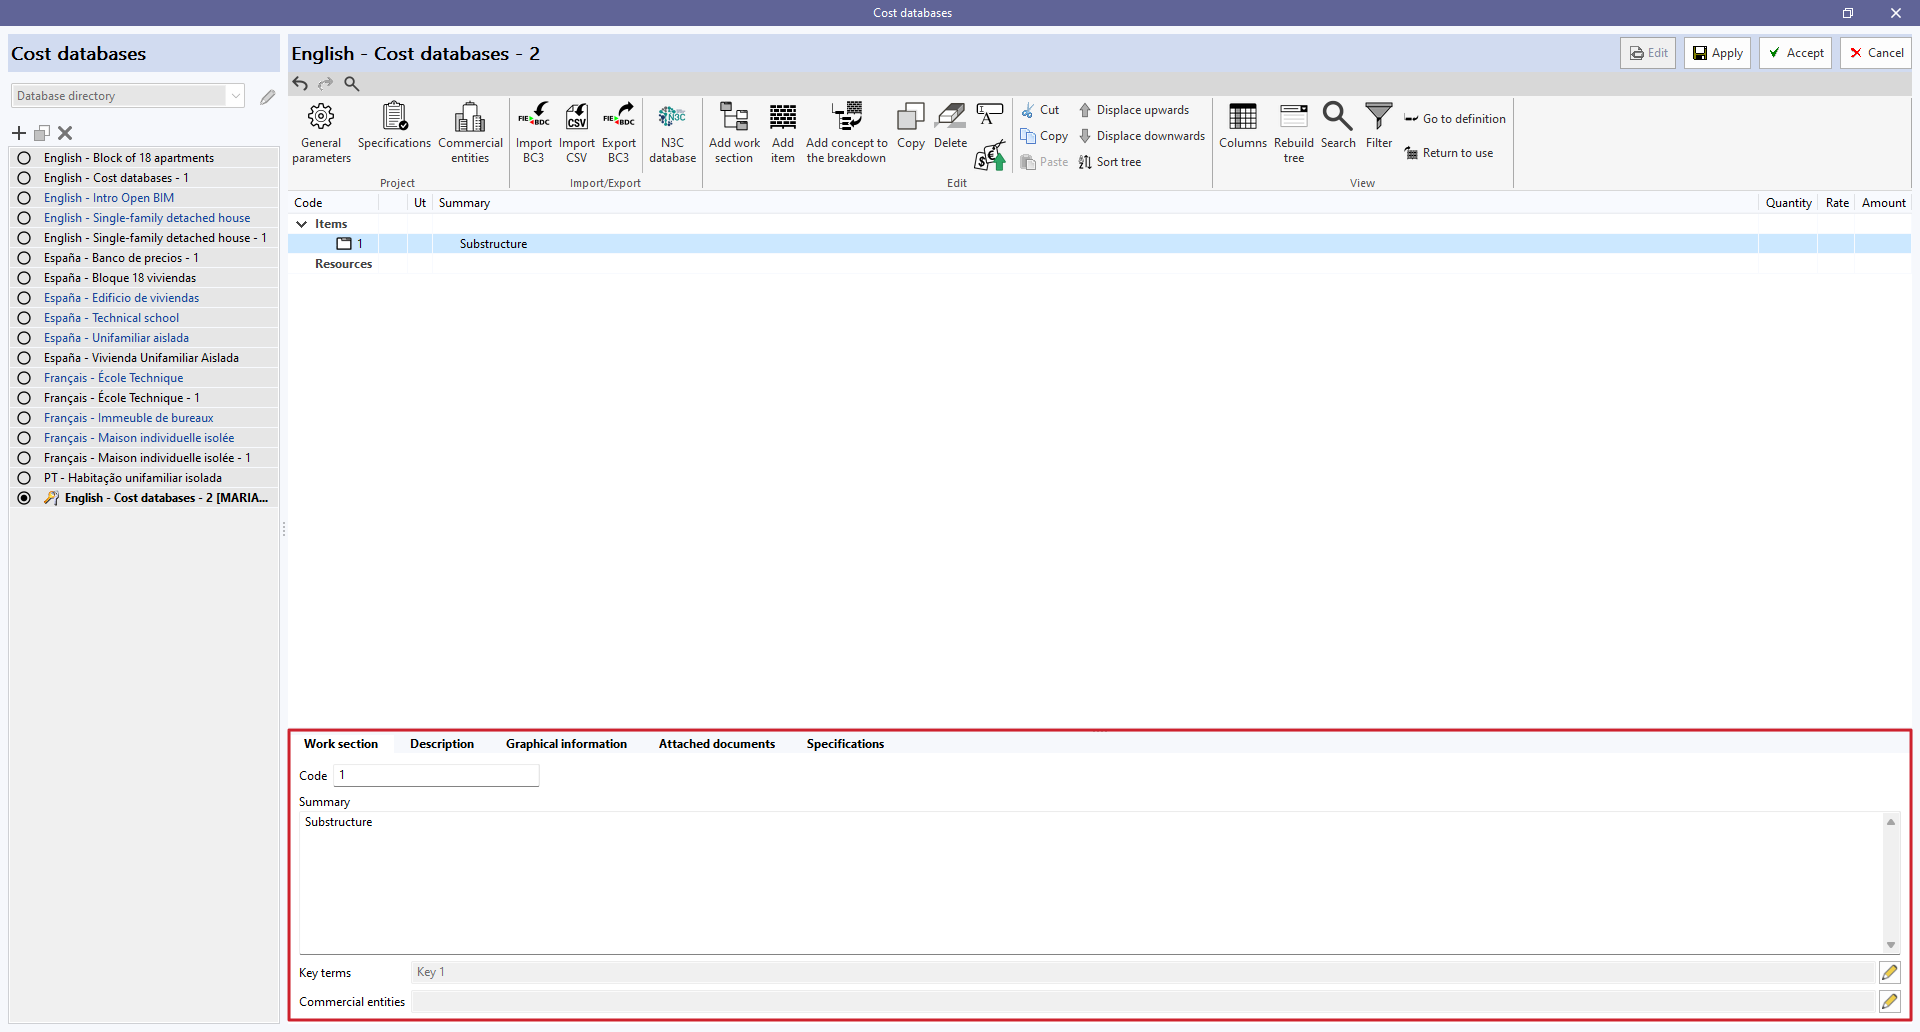
By selecting the "Specifications" tab, users can add information about the specifications and even attach RTF or HTML files.
| Note: |
|---|
| The specifications can be imported or exported via a BC3 file (FIEBDC-3), which allows them to be read by quantity surveying programs such as Arquimedes, in order to consolidate them and obtain the specifications for the entire project. They can be imported or exported using the buttons in the "Import/Export" group on the toolbar of the cost database management panel and the project database. |
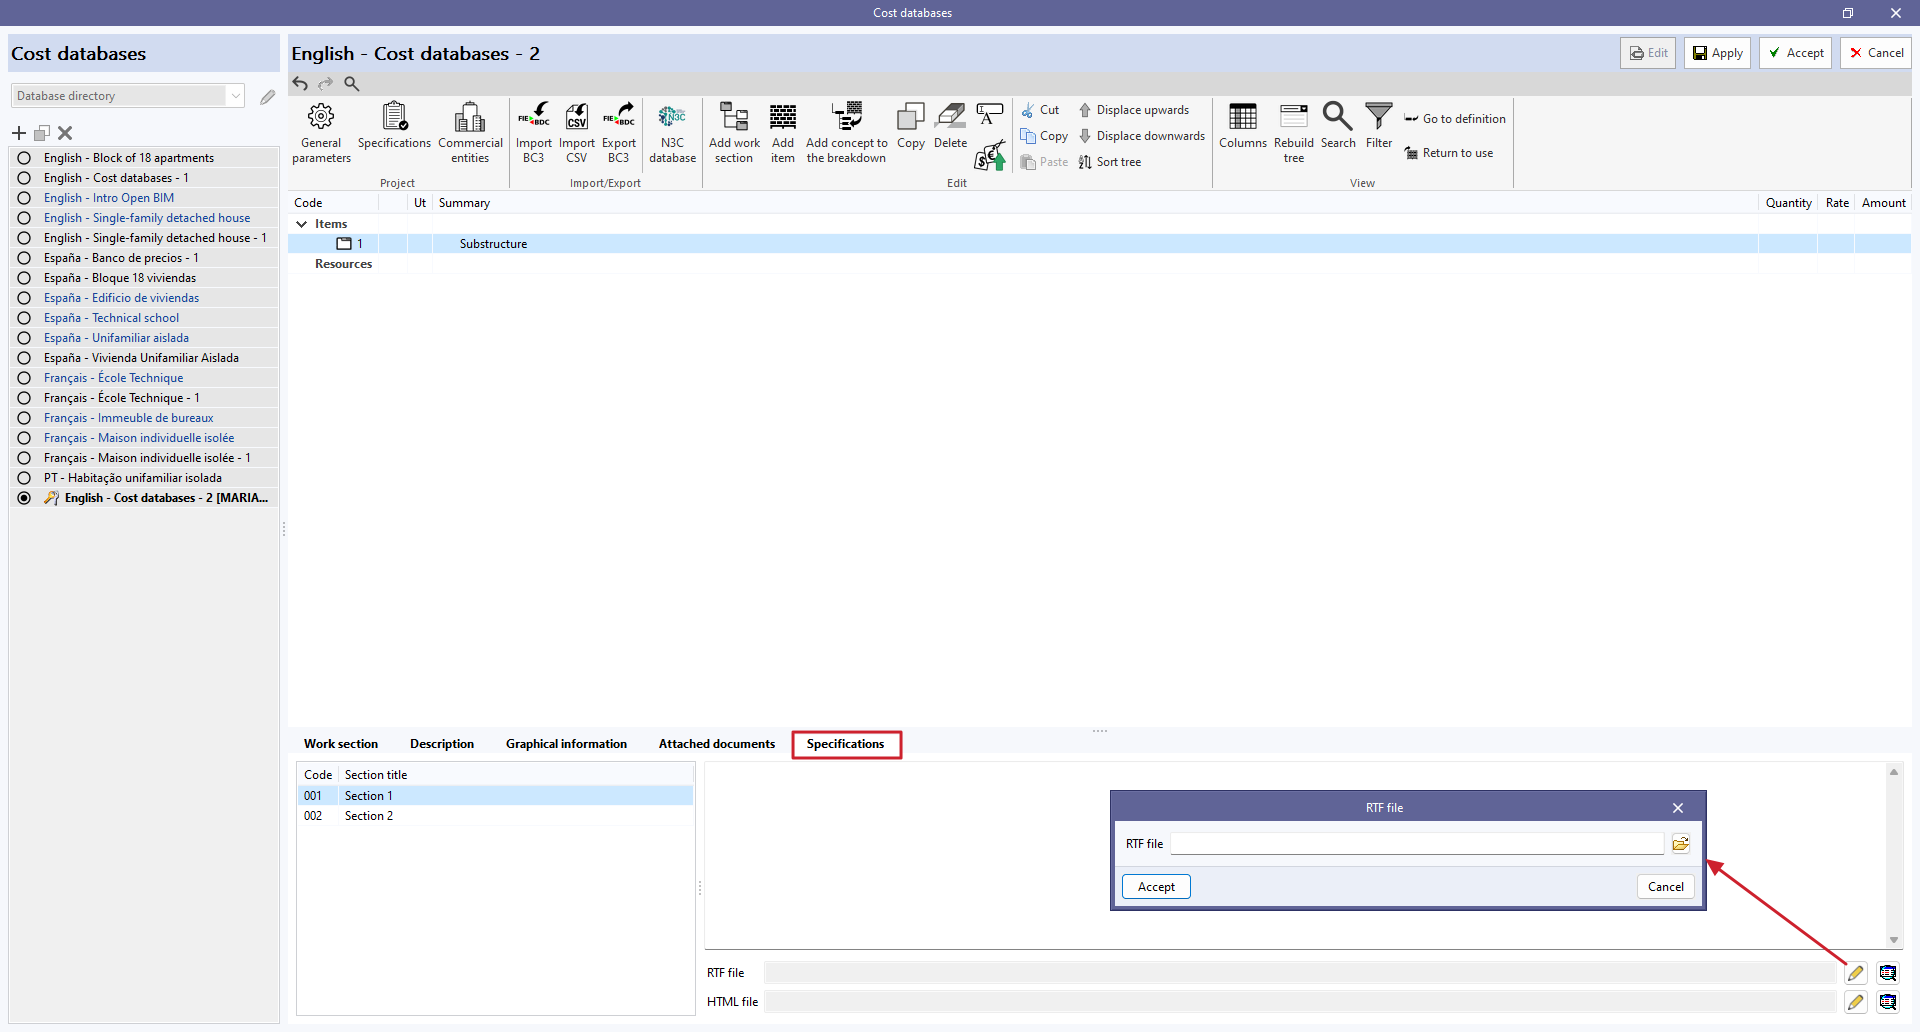
To add sections to the specifications, first click on the "Specifications" option in the "Project" group of the toolbar in the cost database management panel and project database.
When you click on it, a menu will appear where you can define the "Code" and "Section label". After accepting, the data will appear in the "Specifications" tab.

To add new work sections, users must go back to the "Items" root concept and repeat the above process.
However, to create work sub-sections, users must click on one of the created work sections, and so on.
| Nota: |
|---|
| Right-clicking on any concept in the tree opens a context menu that allows the main functions to be carried out, including the creation of work sections. |
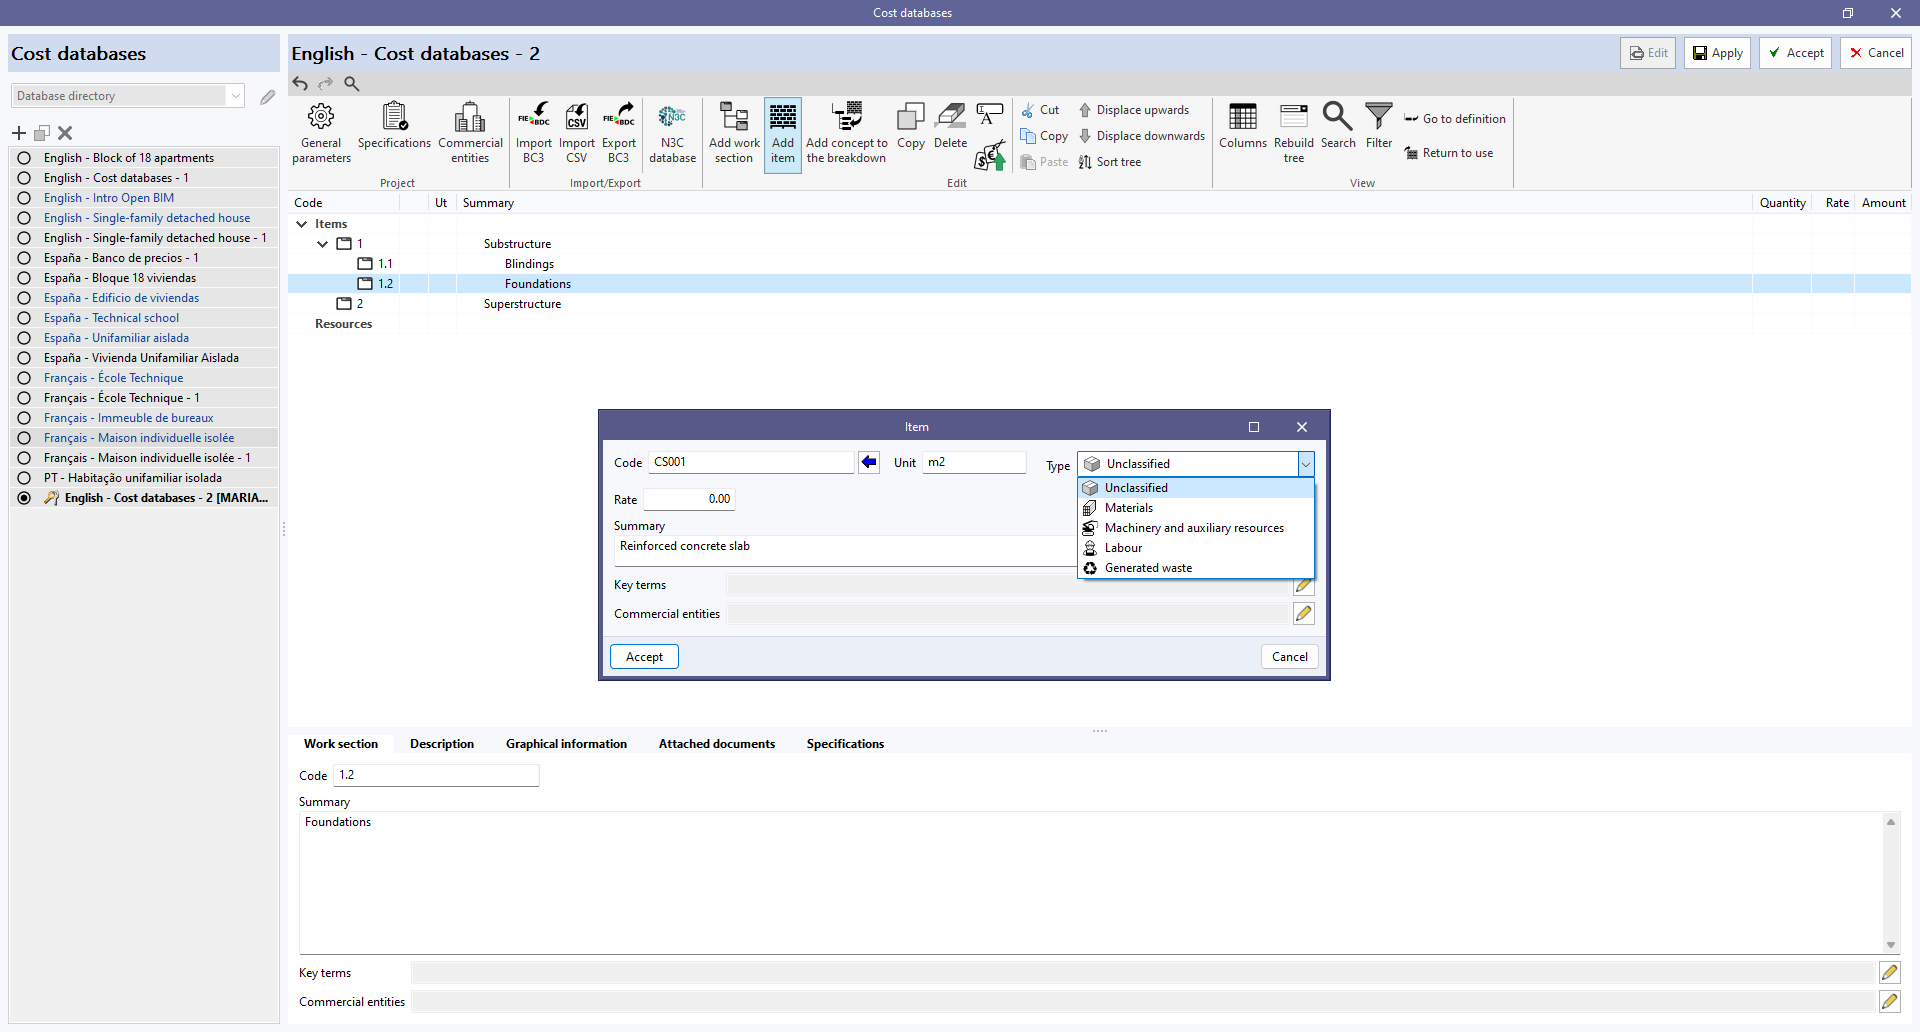
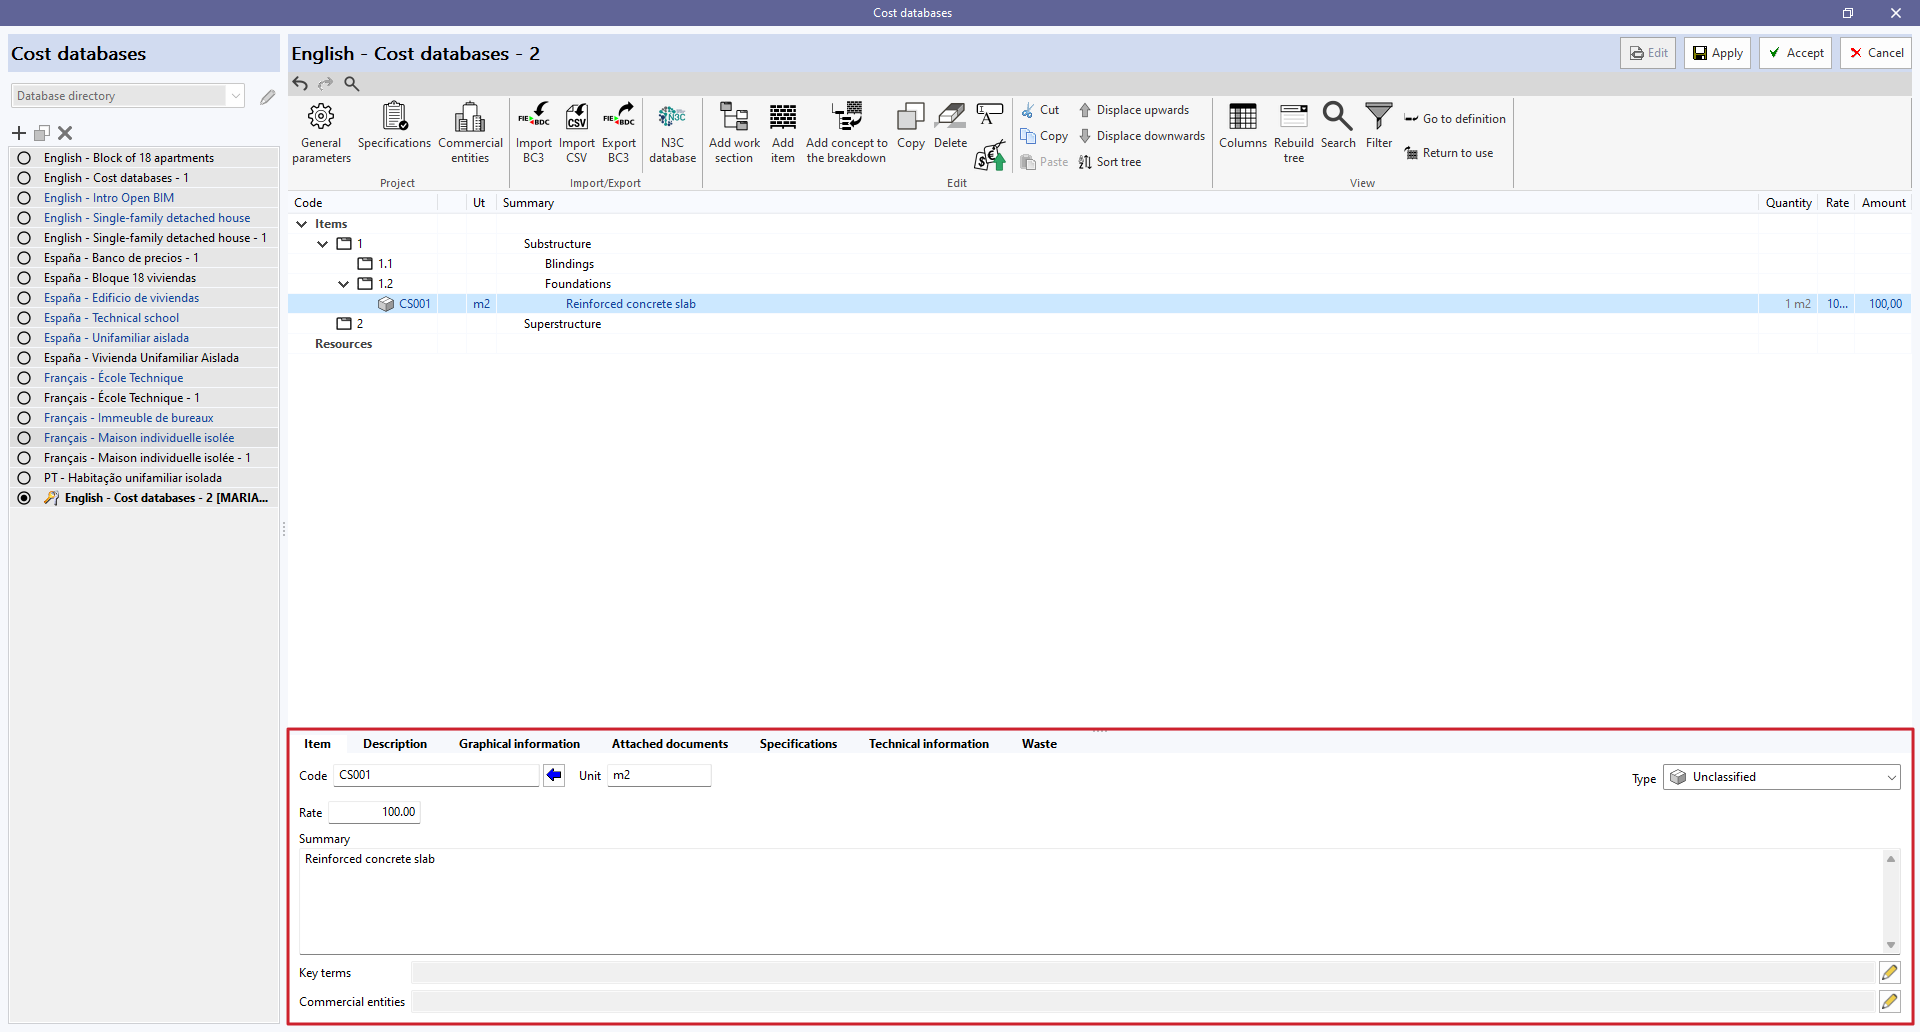
Adding items
To add items, users must select the work section where they wish to include an item and click on "Add item". In the pop-up window, users enter the code, the unit, the rate and the summary, and define the type.
In the case of an unjustified item without breakdown, it is specified as an "Unclassified" item.
If necessary, key terms can be associated.
When clicking on "Accept", the item is created and displayed in the previously mentioned work section.
When selecting the created item, the parameters entered can be modified in the lower panel. In the different tabs, users can also carry out the following:
- add a description;
- insert documents providing graphical information;
- inserting attached documents;
- enter specifications associated with the item;
- incorporate technical information such as physical properties, environmental data and the LER code of the waste;
- and/or associate the previously defined waste to the item.
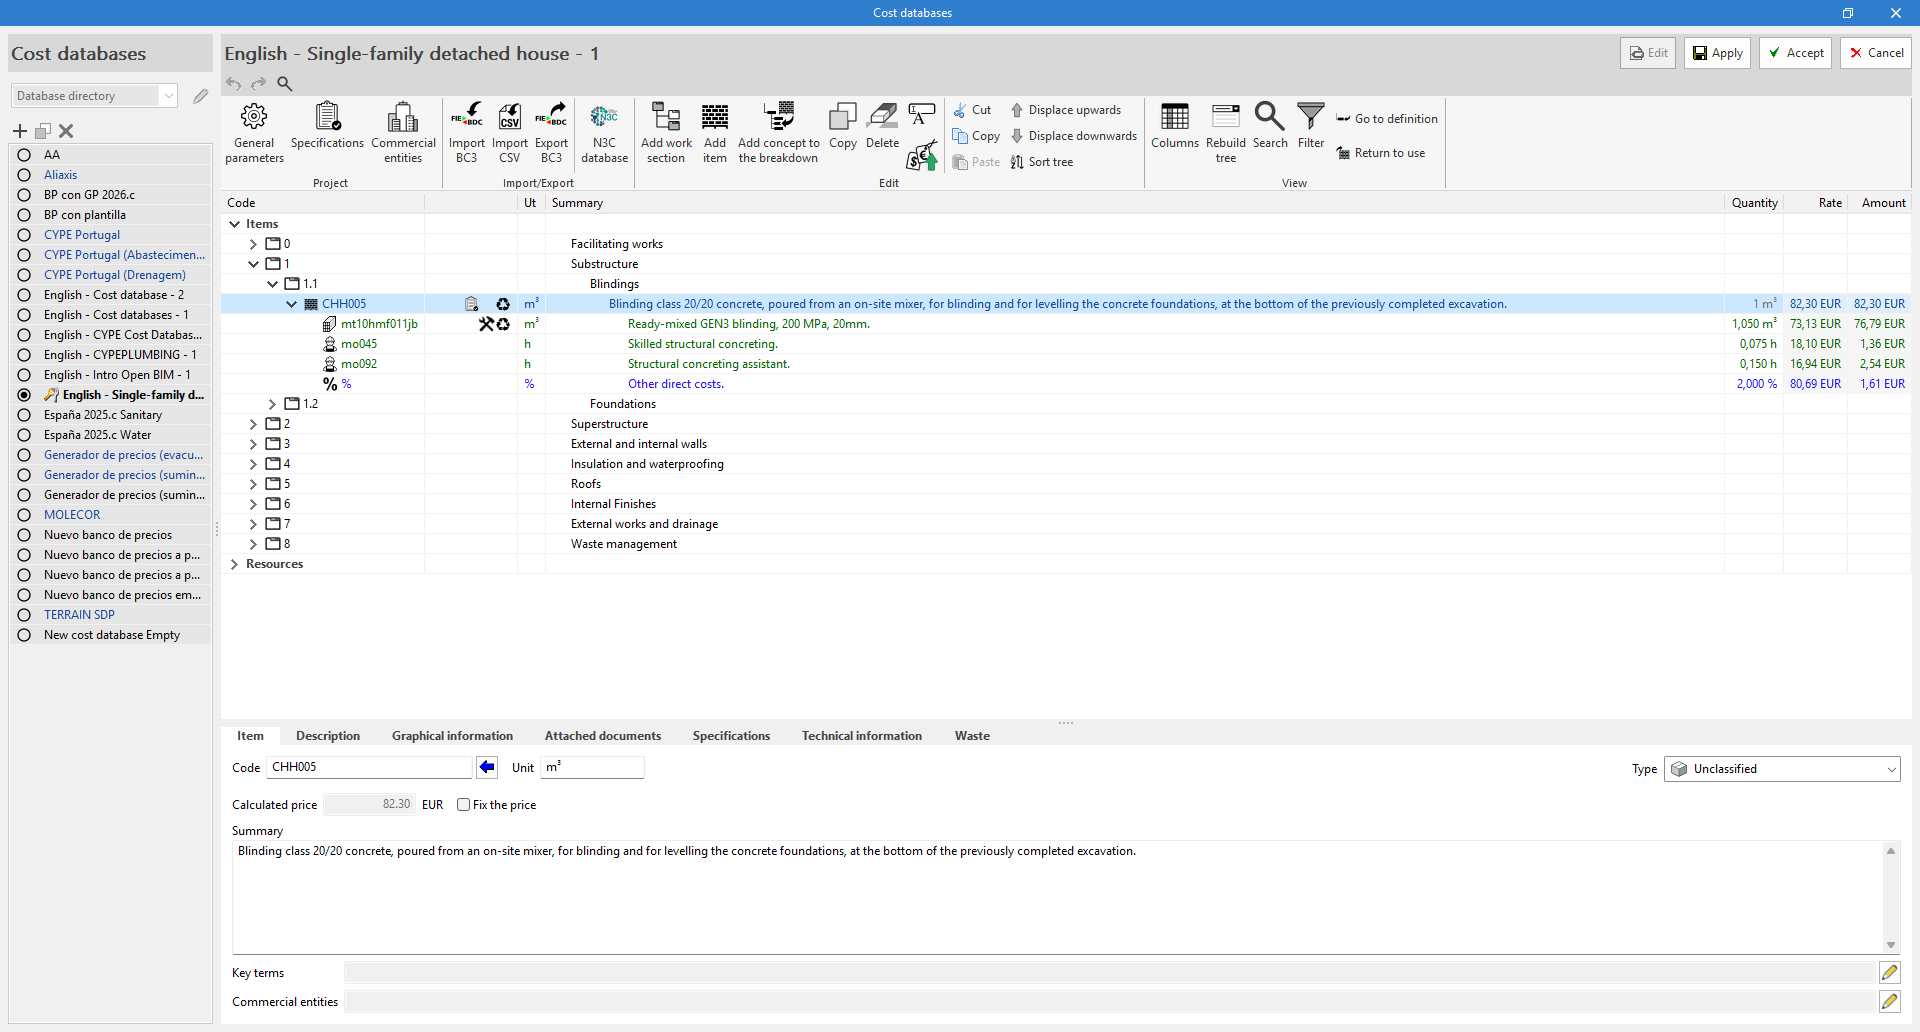
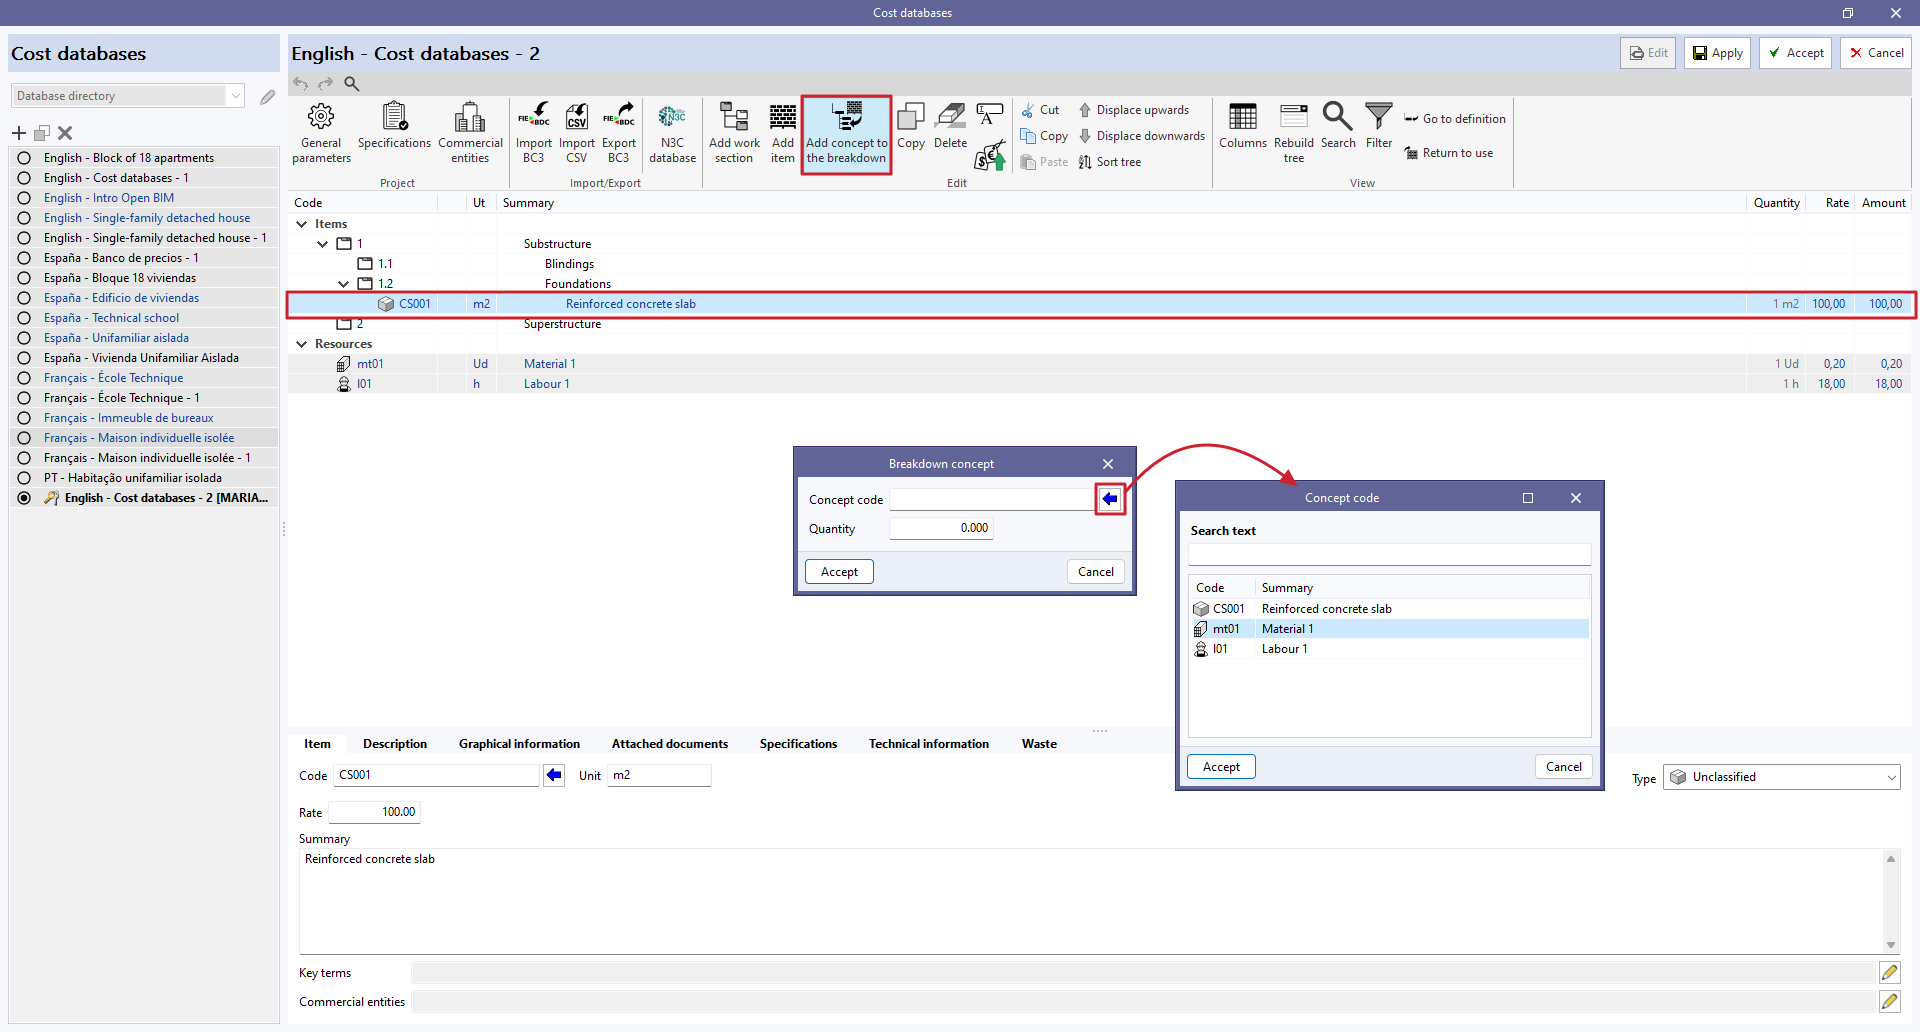
Item with breakdown
To create an item with a breakdown, the items that it is made up of must be created beforehand.
To do this, go to the "Resources" line and click on the "Add item" button. Establish the type ("Labour", "Machinery and auxiliary resources", "Materials" or "Generated waste") and write its code, unit, price and summary. Subsequently, the key terms are associated and users click on "Accept".

Once the resources have been defined, and by clicking on an existing item, the "Add concept to the breakdown" option is selected.
Enter the concept code or search by text by clicking on the blue arrow. Define the quantity per item and click on "Accept".
Once the concepts have been added, the price of the item will appear according to the defined breakdown.
| Note: |
|---|
| The calculated price can be cancelled and an alternative price can be set manually by checking the "Fix the price" box in the lower tab of the item. |
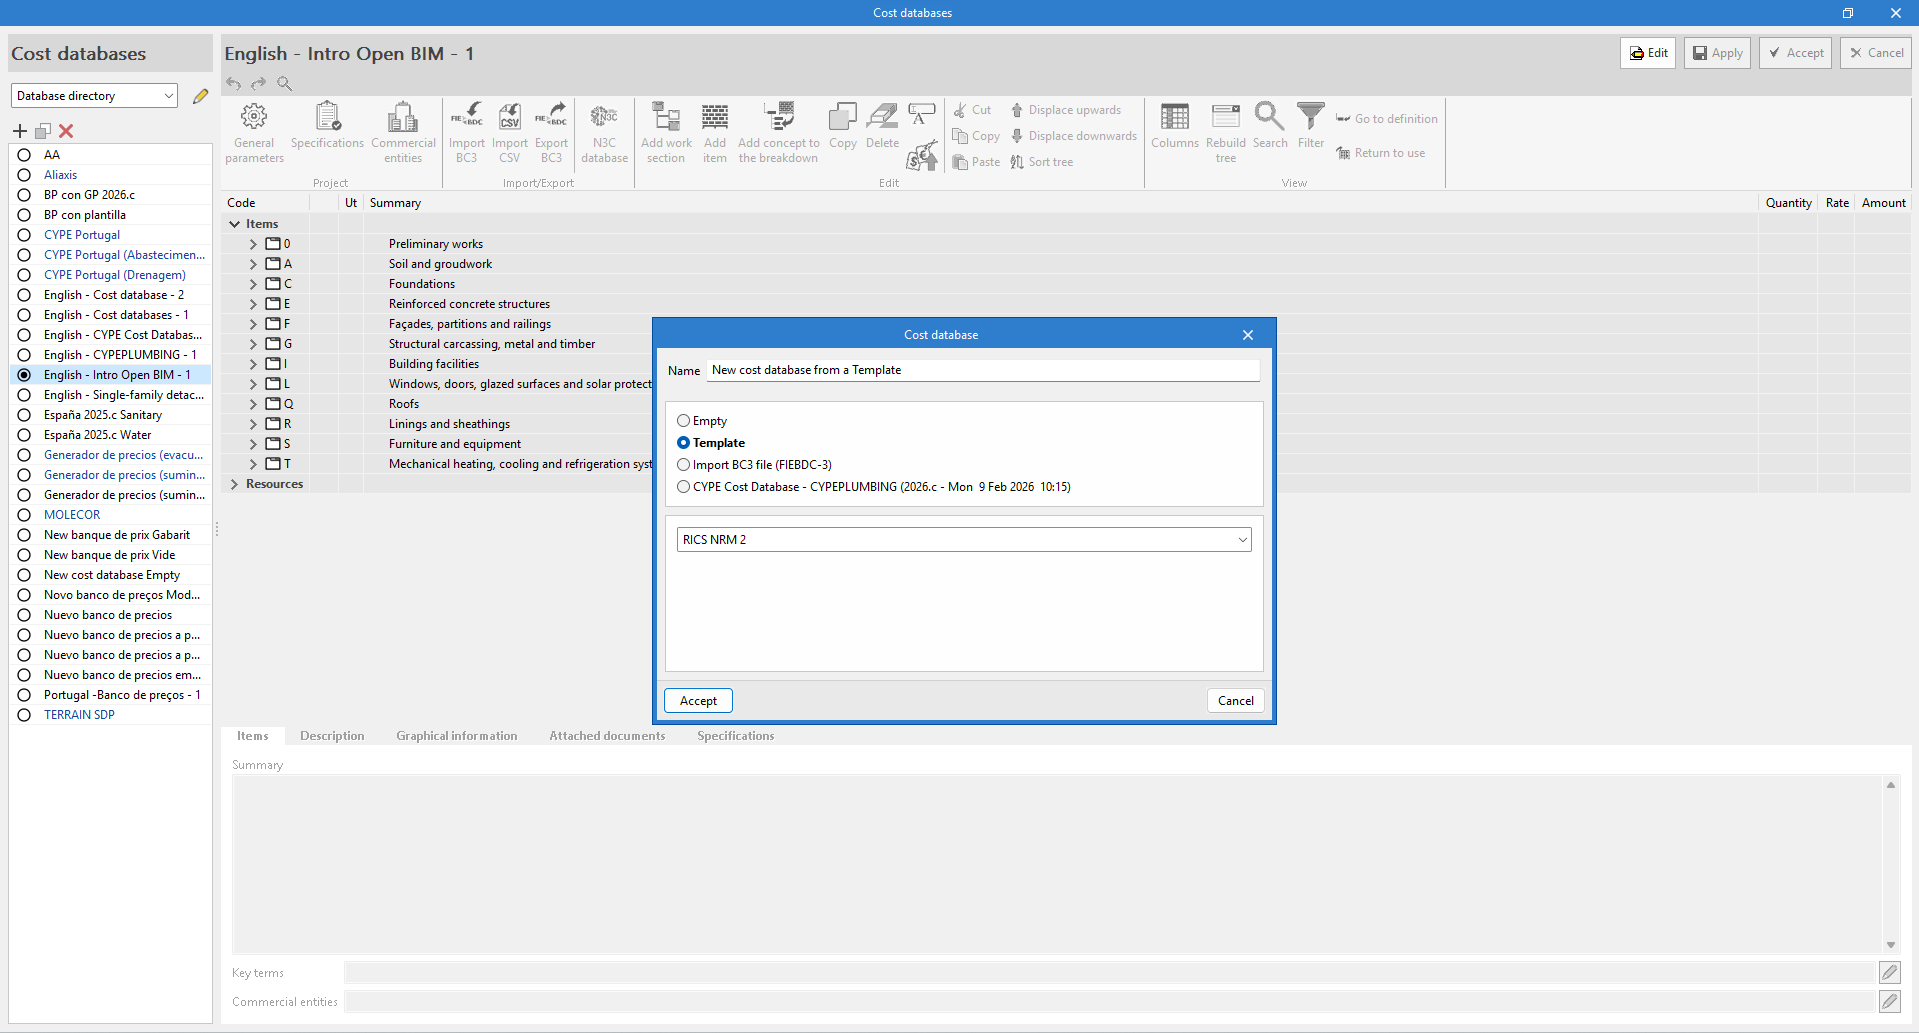
Create a new cost database from a "Template"
You can also create a cost database from a predefined work section structure using the "Template" option.
In this case, you must specify a name for the new file and select one of the configurations currently available:
- Spain
- CSI OmniClass
- France – UNTEC method
- GuBIMClass 1.2 ES
- DIN 276 2018-12
- RICS NRM 1-3
- RICS NRM 2
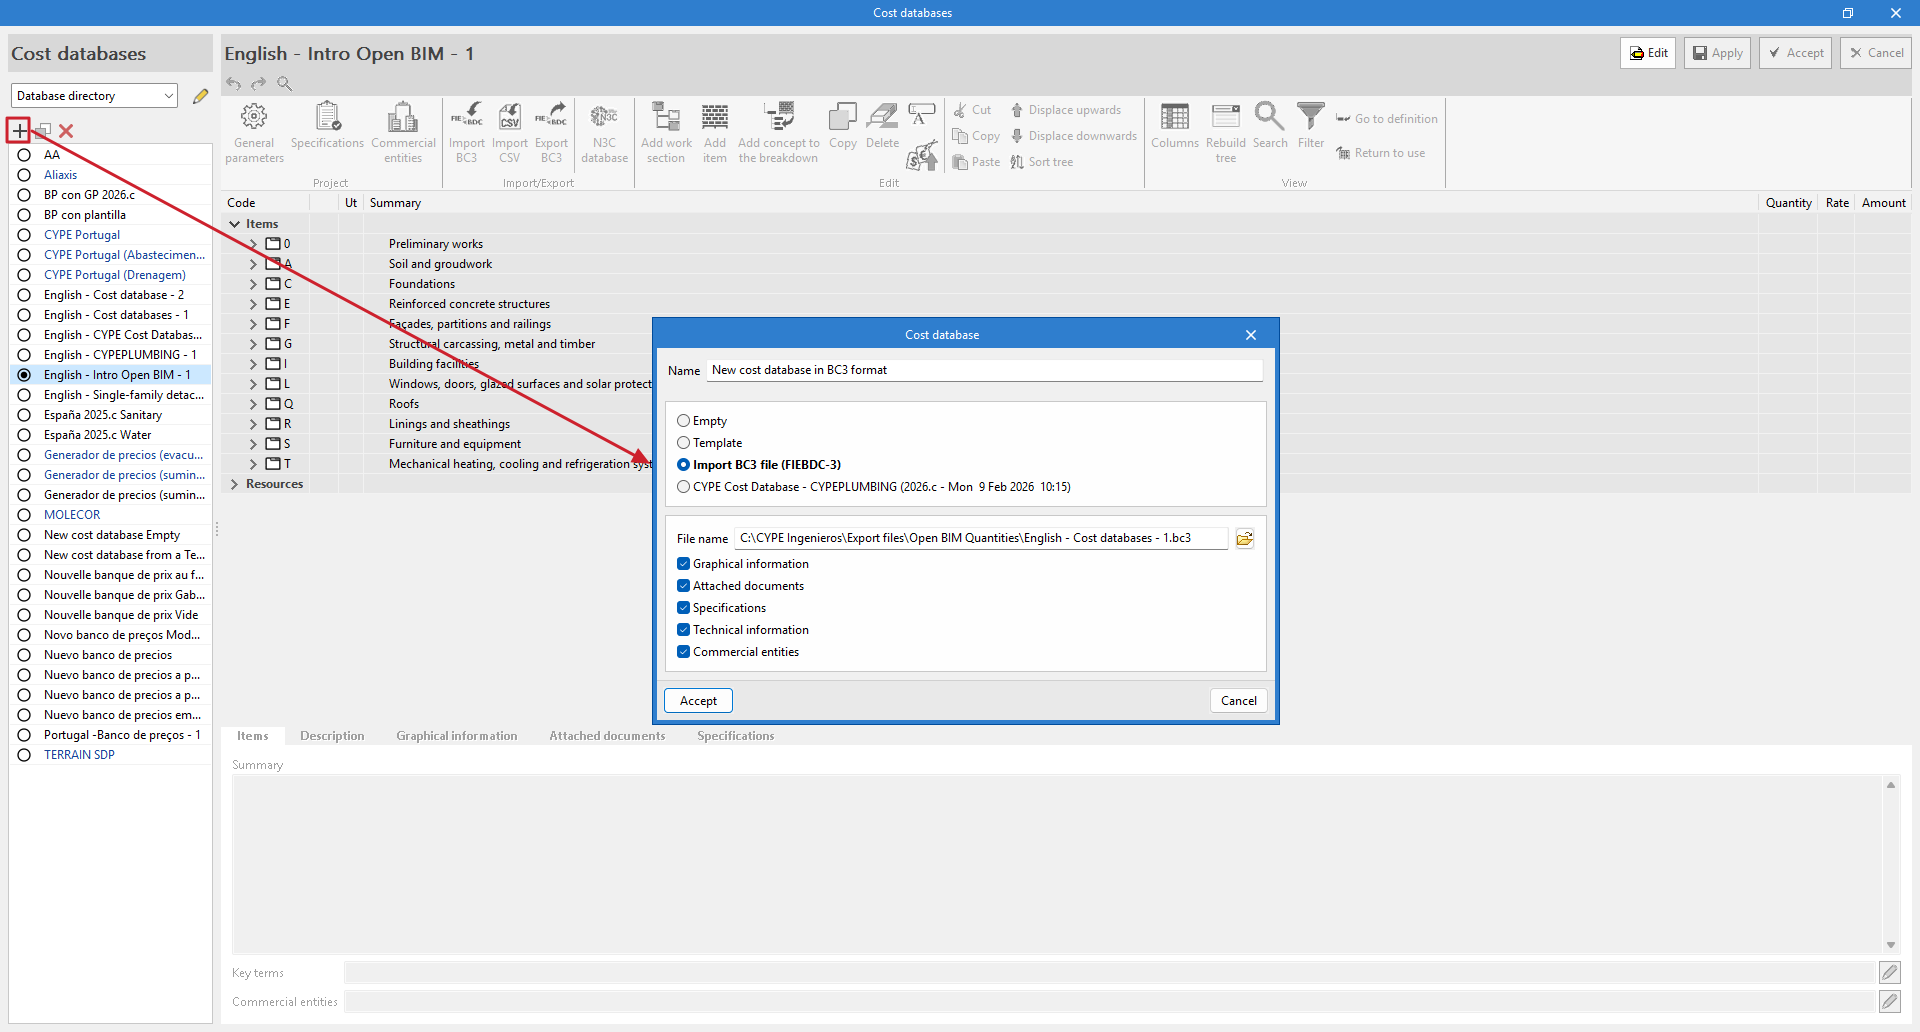
Import a cost database in BC3 format
It is possible to create a cost database from a file in FIEBDC-3 format using the "Import BC3 file" option.
In this case, you must enter a name for the new file and select the BC3 file using the button on the right. Optionally, you can enable the import of associated "Graphic information", "Attached documents", "Specifications", "Technical information" or "Commercial entities". After accepting the window, the program begins the process of reading and importing the file. When completed, it displays an "Import completed" message, which must be accepted again.
To view the imported information, you need to edit the cost database, where you will see the work section structure, items, and resources. You can make adjustments and modifications using the options in the top toolbar. You must click "Accept" to save the changes you have made.
A BC3 file can be imported into a previously created cost database. With the database open for editing, select "Import BC3" in the "Import/Export" group. In the pop-up window, in addition to selecting the BC3 file with the button on the right and marking the information you want to import, you can: "Delete the cost database data", which replaces the existing information in that bank with the information imported from the BC3 file, or "Update the cost database", which incorporates the data from the BC3 file while respecting the existing information.
Another way to import a BC3 file is by dragging and dropping it directly into the cost database table. In the import window, select "Add item" to include a single item, and "Import the complete file" to include all items in the file.
| More information: |
|---|
| You can generate BC3 files with other CYPE apps, such as Arquimedes. The main construction databases also offer information in this format. |
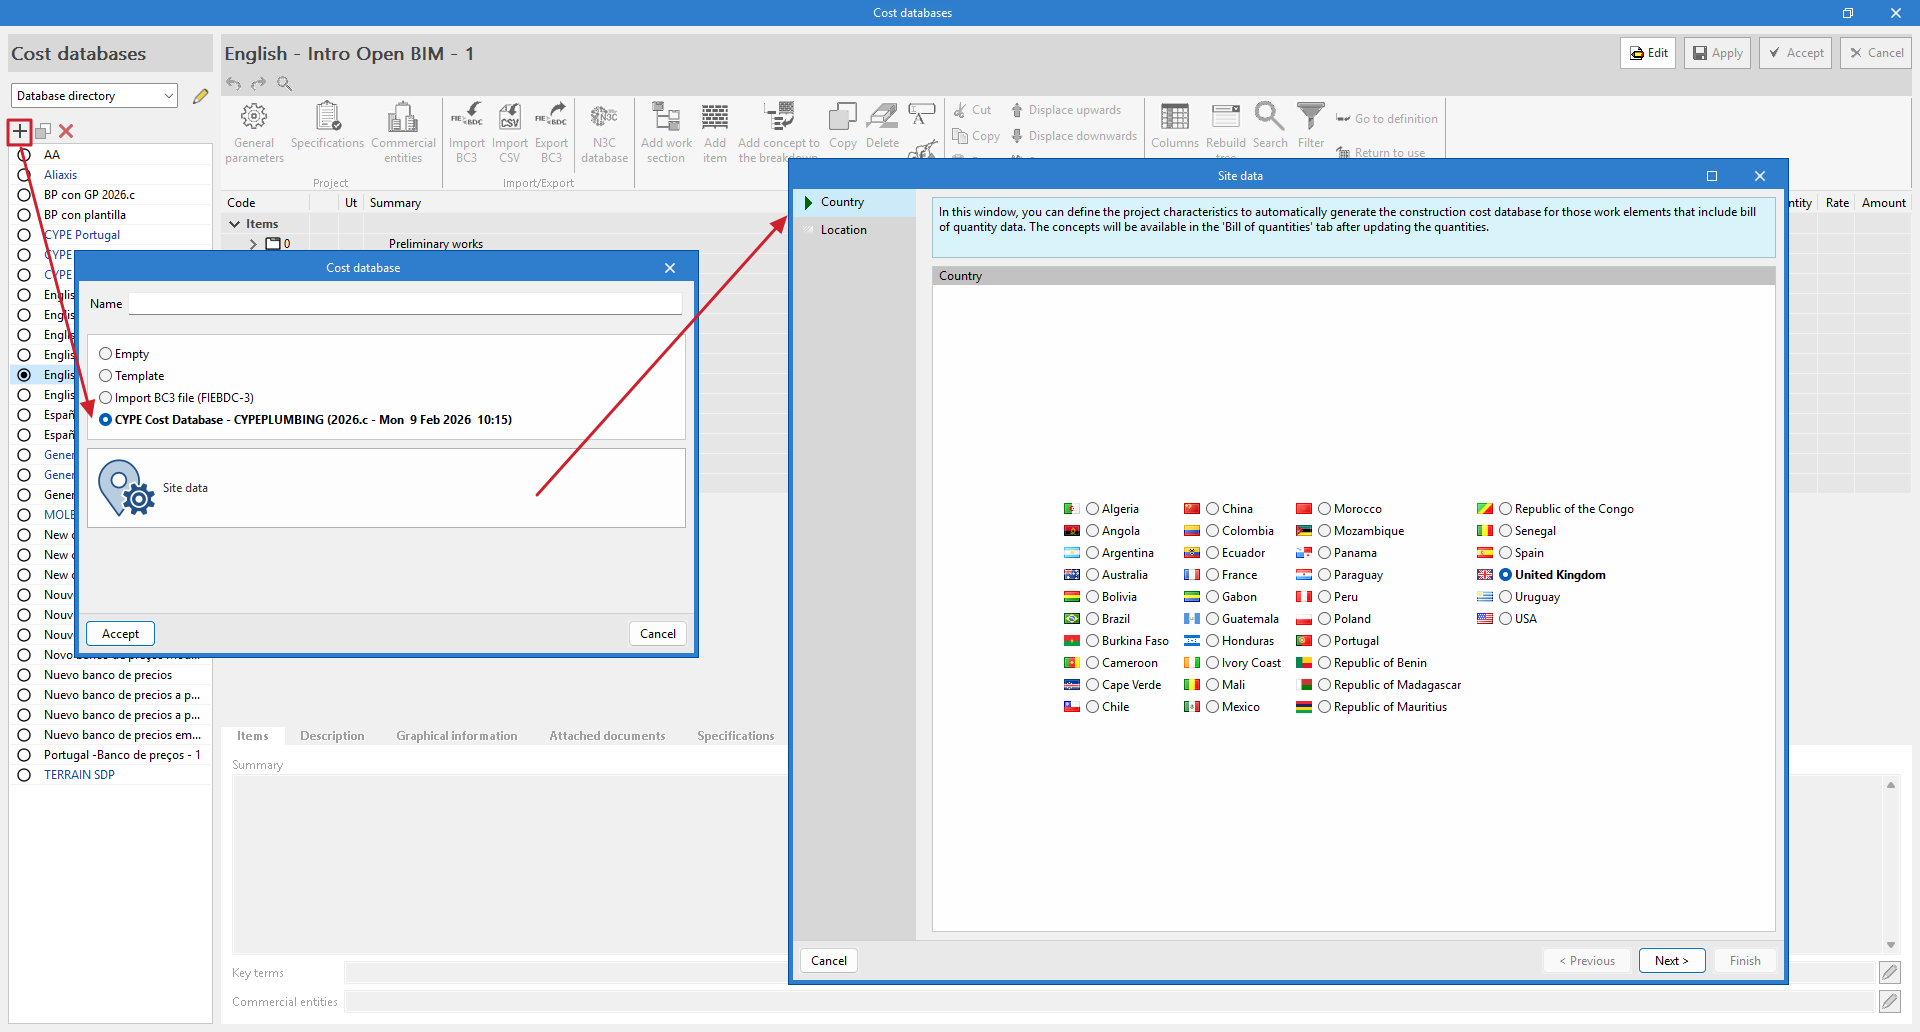
Create a new cost database based on resources from the "CYPE Cost Database"
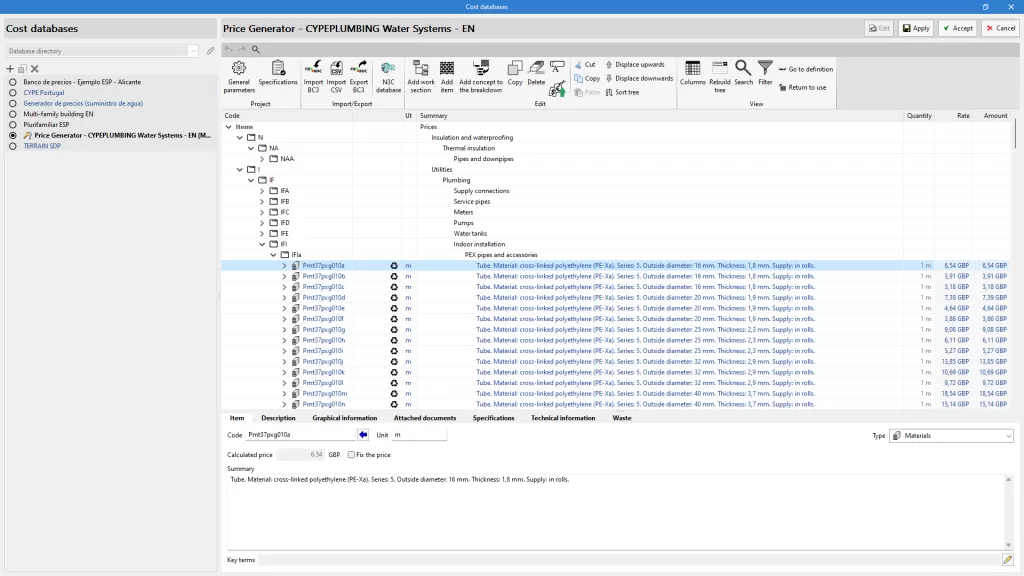
A cost database based on unit concepts from the "CYPE Cost Database" can be created for the selected country and location using the "CYPE Cost Database - CYPEPLUMBING (version - date and time)" option.
In this case, you must specify a name for the new file and define the location data. This location will be used to complete the information associated with the resources.
Once the "Location data" window is accepted, with the cost database in edit mode, you can view the items that have been generated, grouped into a work section structure. Each item corresponds to a different material and contains a breakdown that includes, in addition to that material, the labour and auxiliary materials necessary for its installation. It is important to note that, apart from the price, these items contain information relating to their physical properties, environmental data and waste.
| Note: |
|---|
| This option is only available in programs with a "Bill of quantities" tab. |
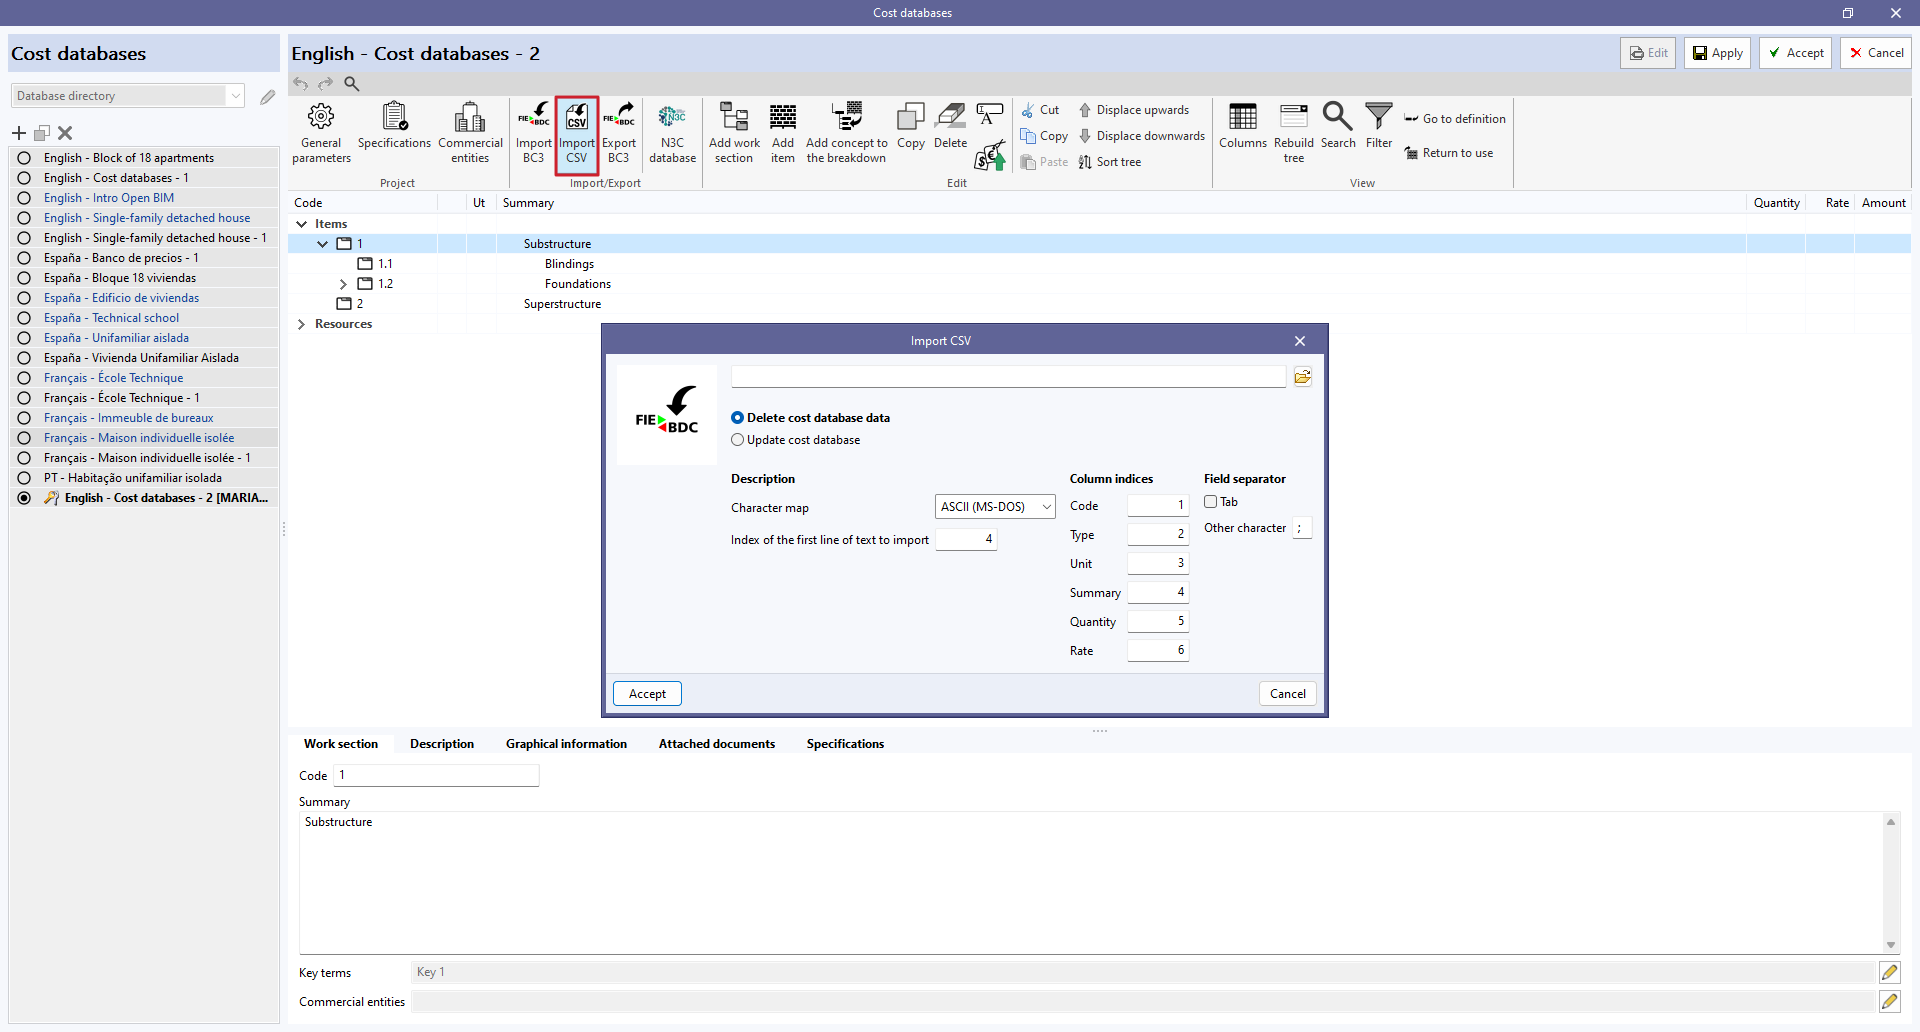
Import a cost database in CSV format
Cost databases in CSV format can be imported from the "Import CSV" option in the "Import/Export" group of the toolbar of the cost database and project database management panel.
The CSV file must contain the columns with the information for the "Code", "Type", "Unit", "Summary", "Quantity" and "Price" fields. The index of each column can be specified from the file import configuration panel. Users can also specify the character set, the index of the first line of text to be imported and the field separator.
In the same way as with FIEBDC-3 files, you can choose whether to delete the existing data from the cost database before importing or to update it.
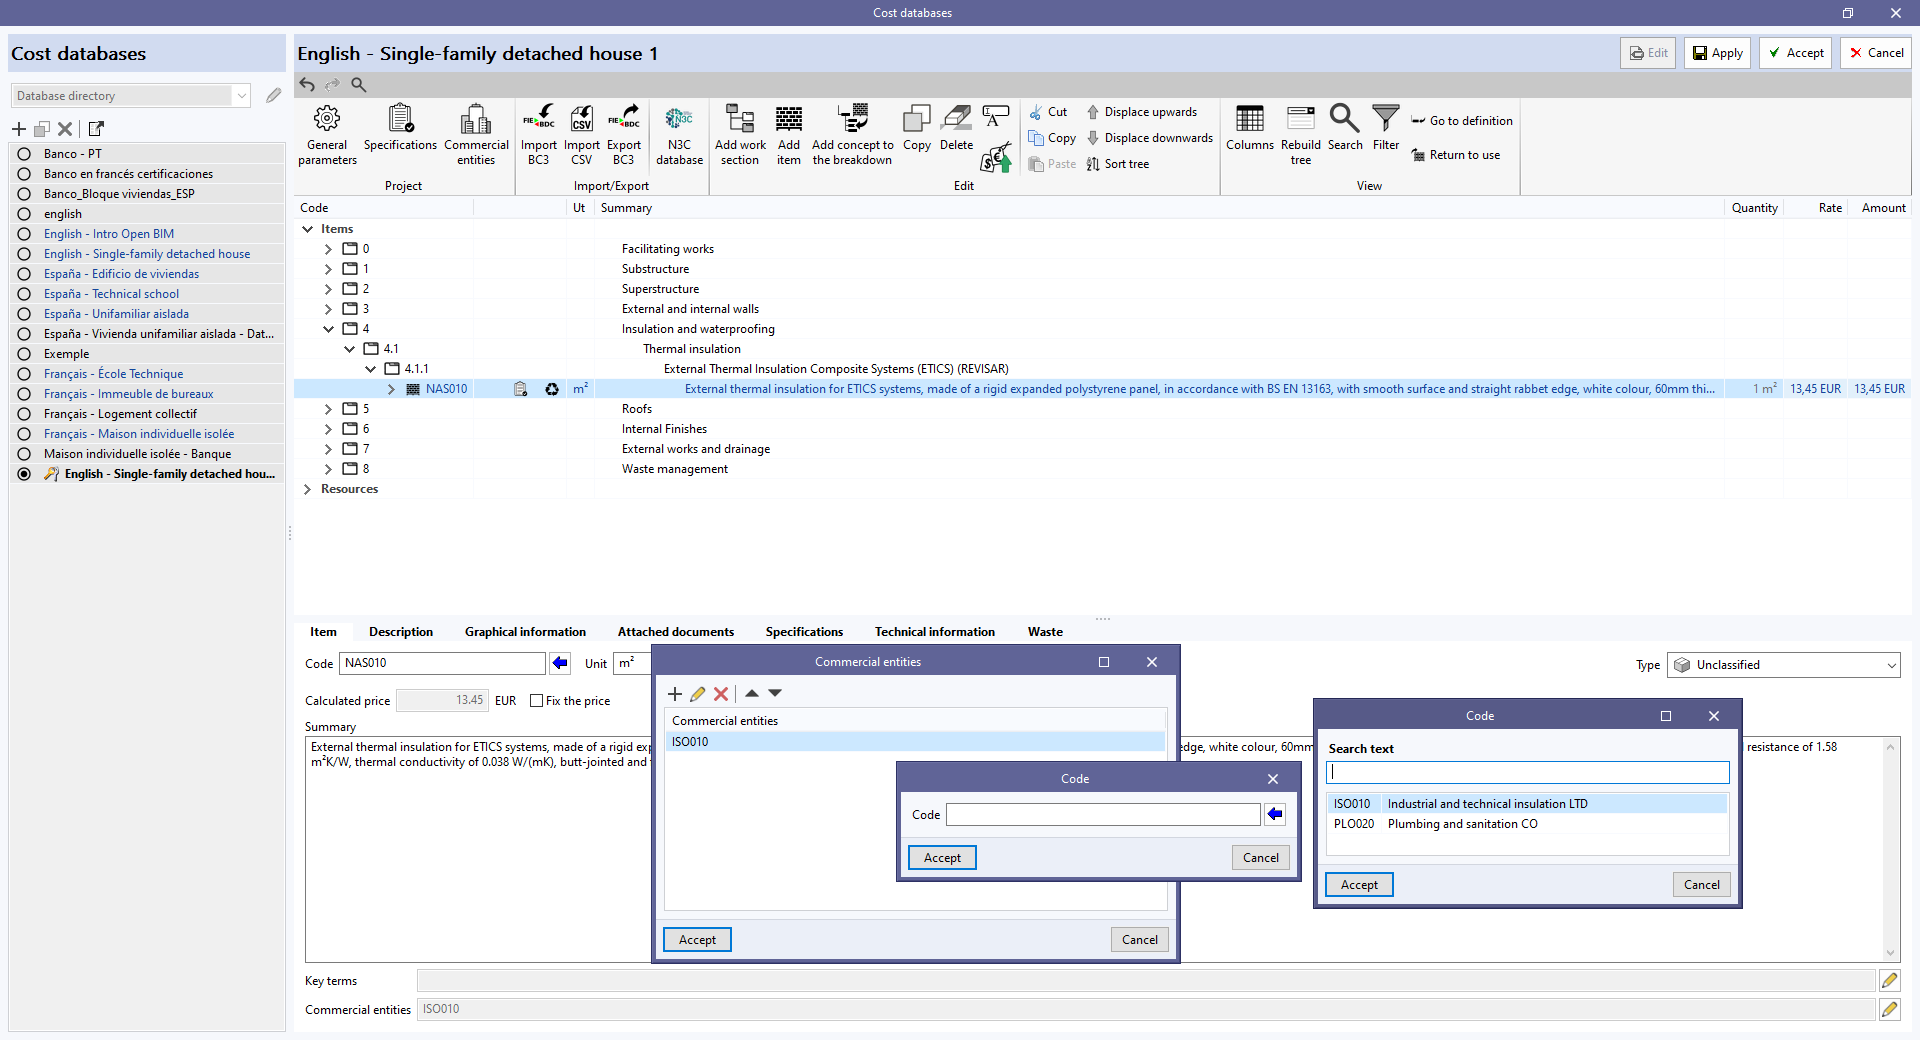
Associating commercial entities
Commercial information can be entered from the "Commercial entities" option in the "Project" group in the toolbar of the cost database management panel and the project database.
When clicking on it, a menu is displayed from which the data of the commercial entities involved in the project or the cost database can be defined. The requested fields are: "Code", "Summary", "Name", "CIF/NIF", "Web" and "E-mail". It is also possible to add several addresses for the different types of commercial entity ("Central", "Delegation" or "Representative") indicating location, telephone, fax and contact details, among others.
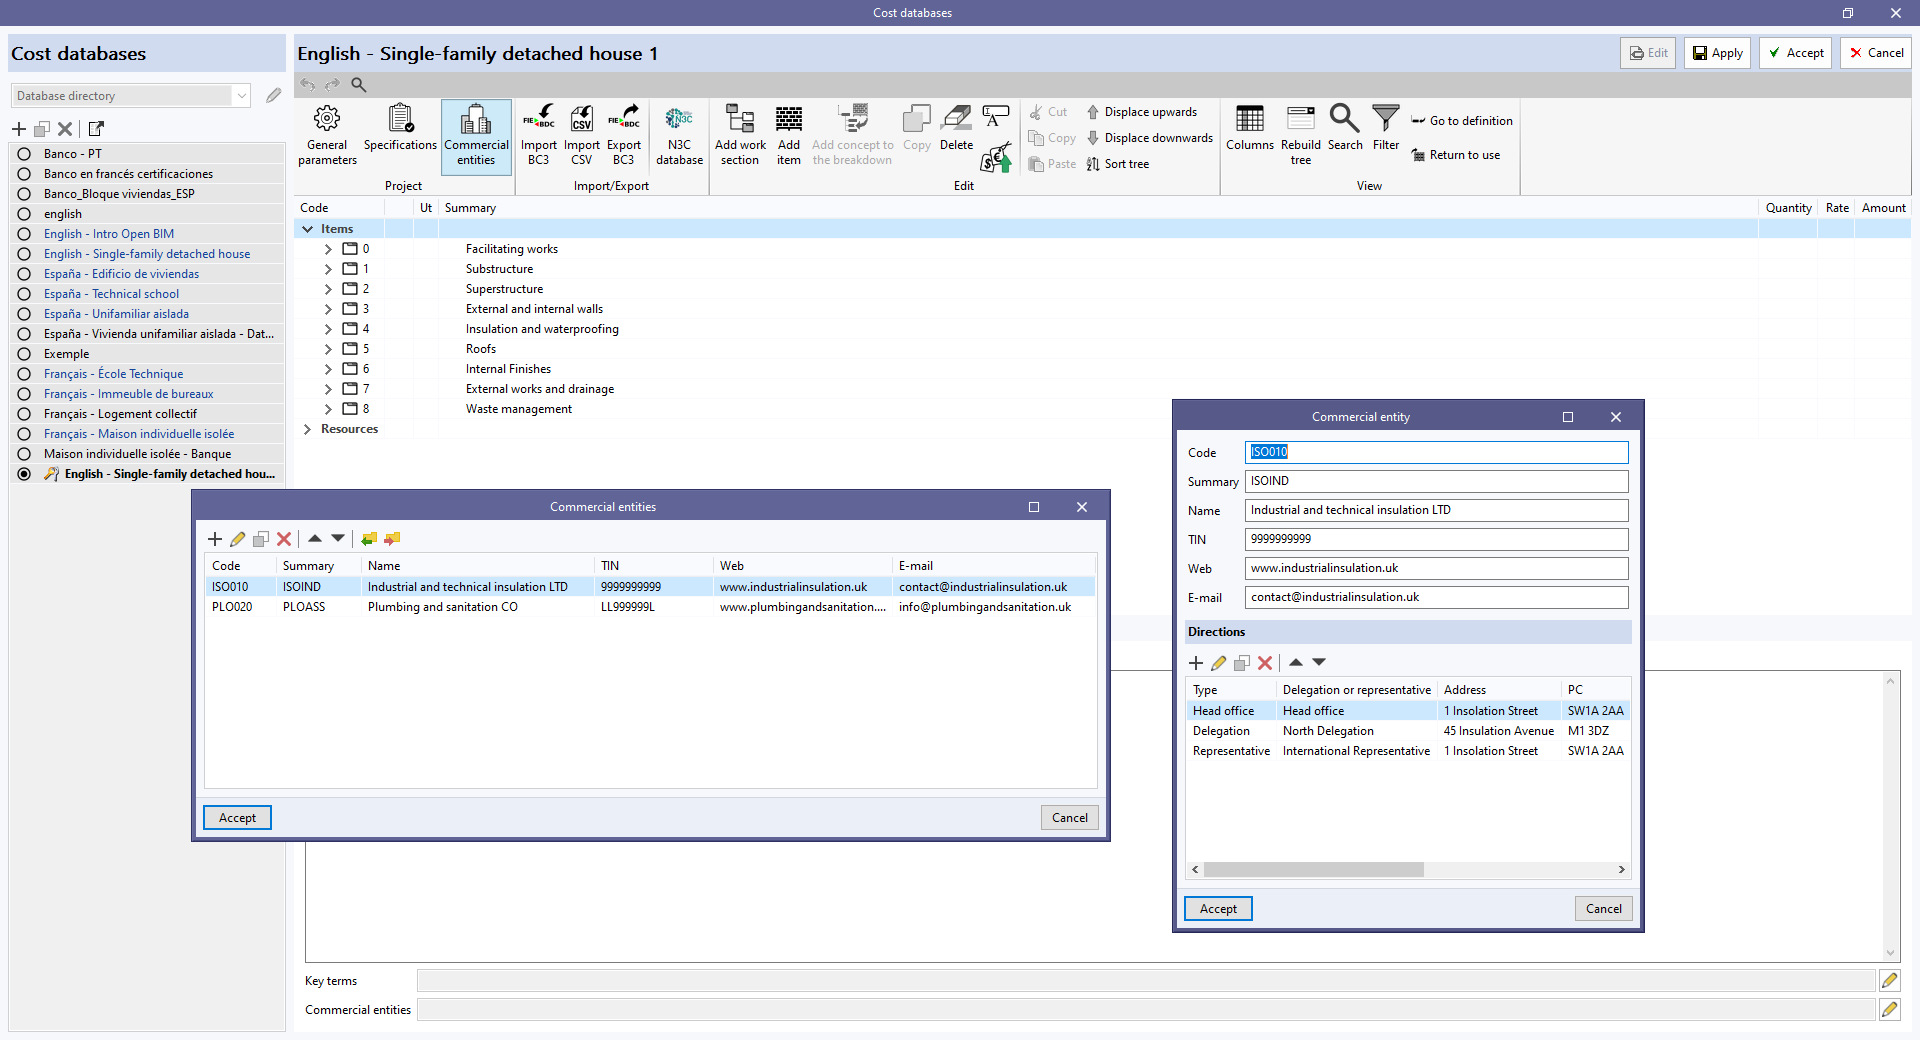
Additionally, to associate the commercial entities to the concepts, the "Commercial entities" field of the editing panel of work sections and items must be selected. The previously created code must be established or selected from a list using the blue arrow button.
| More information: |
|---|
| Commercial entities are part of the standard database interchange format for the FIEBDC-3 construction database (.bc3). Therefore, this information can be imported and exported when using the tools included in the "Bills of quantities" tab for the management of BC3 files. |
Mapping files
Apps with the "Bill of quantities" tab use "Mapping files" together with the "Cost database" in a project, in order to establish the relationship between the elements of the model, defined in the "Installation" tab, and the concepts from the database.
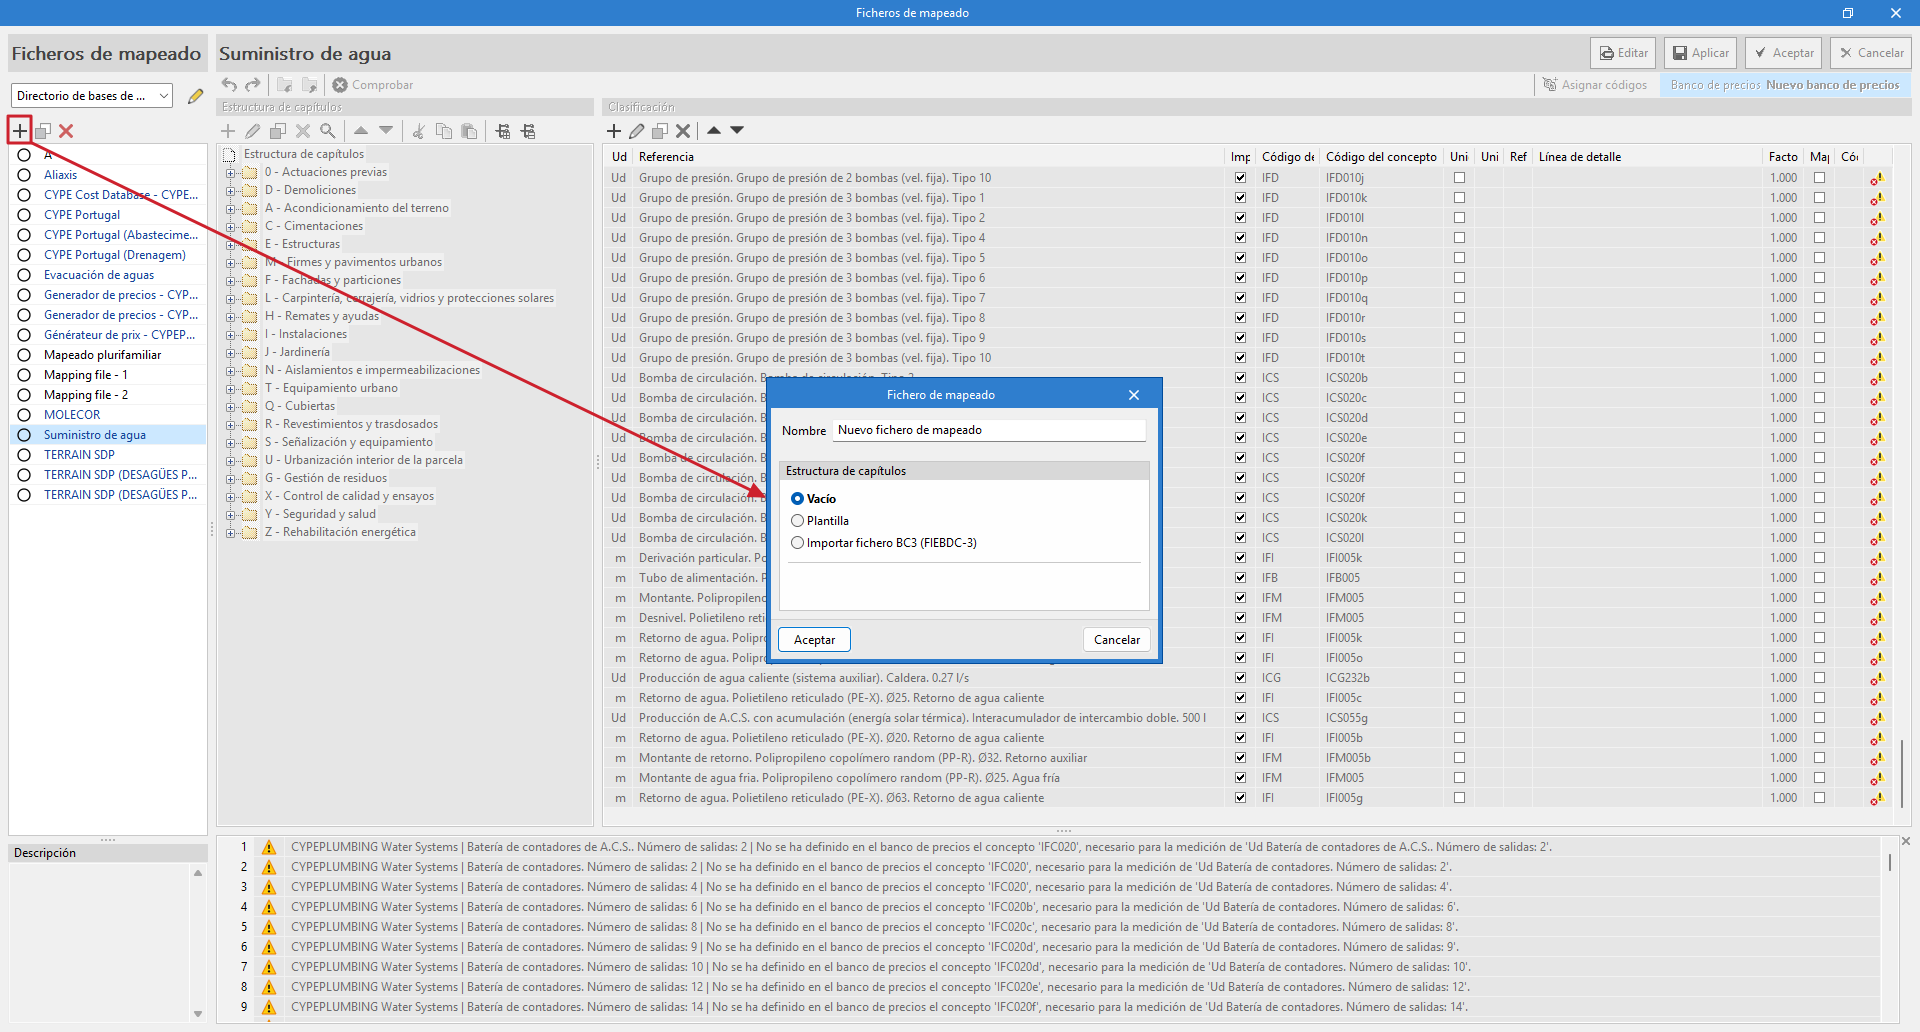
To ensure that the bill of quantities is generated correctly, you must create a new empty mapping file using the "Mapping" option in the "Project" group of the main toolbar.
Within "Mapping", the "Add" option allows you to create a new mapping file. You must enter a name for the new file you are going to create and a work section structure to keep it organised (in this case, select "Empty").
In most of the programs that have a "Bill of quantities" tab, a cost database, and a mapping example for elements in the system have been included. It should be noted that this is just an example and that users will be able to create their own mappings and cost databases.
| Note: |
|---|
| In "Mapping files" there is an option for importing the work section structure from a file in BC3 format according to the FIEBDC-3 standard. With this tool, it is easier to use the work section structure from a cost database or from a previous bill of quantities. |
| Note: |
|---|
| In CYPEPLUMBING, in order to make the association process easier, two new default files have been added to the list of "Mapping files", extracted from the EN 806-3 standard, which can be selected from the "Installation" tab using the "General options" button. These files include all the types of elements from these standards. Consequently, if only these components are used, together with the cost database created from the "CYPE Cost Database - CYPEPLUMBING (version - date and time)" option, no mapping needs to be defined for the "Bill of quantities" tab. |
Managing databases
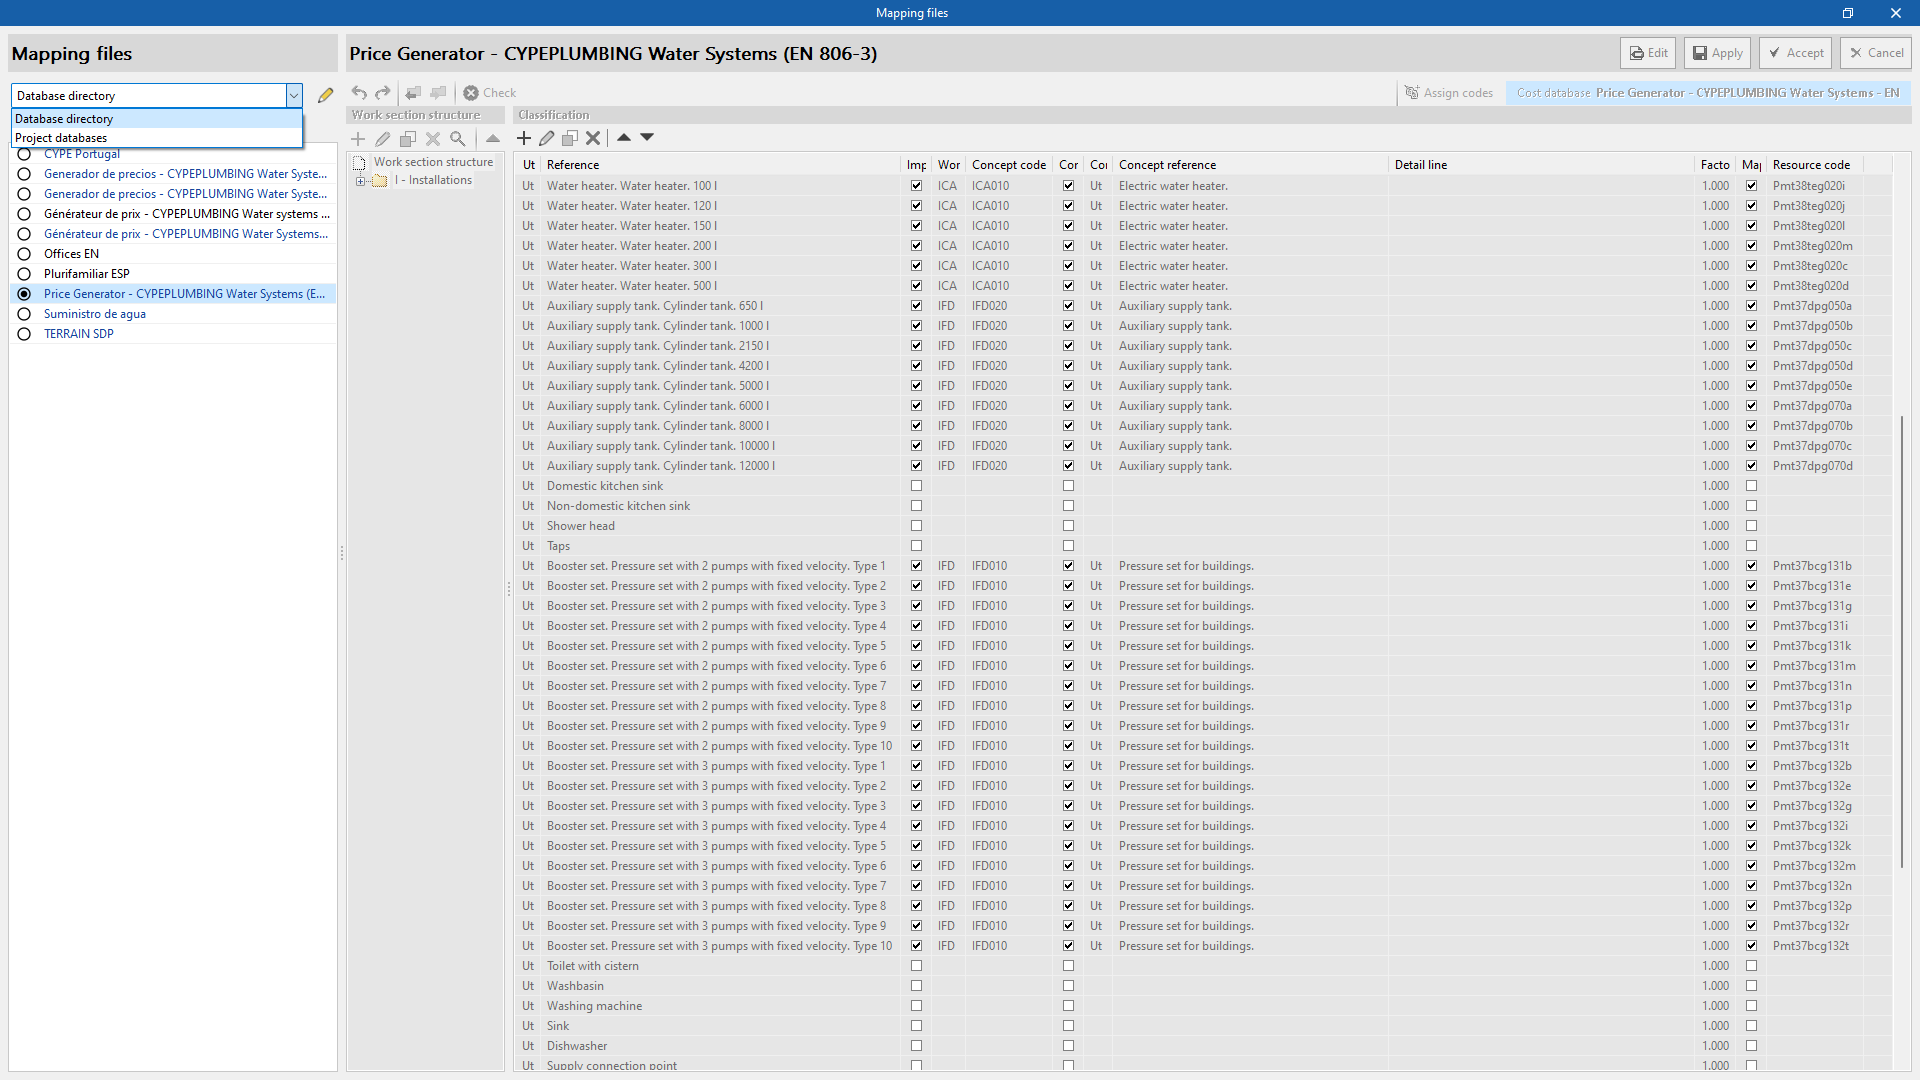
The "Mapping files" databases can be managed in two different locations, which can be toggled via a drop-down menu:
- Database directory
A directory containing the databases is provided. This facilitates the use of databases shared by several users. - Project databases
The databases are saved together with the project in the app. When compressed from the "File" menu in the app, the databases will be included in the CYP file generated. This way, the project can be shared with the databases used to obtain the bill of quantities.
Generating and updating the bill of quantities
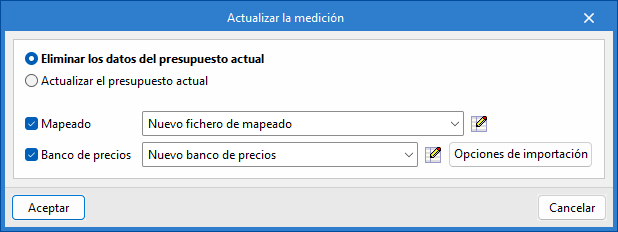
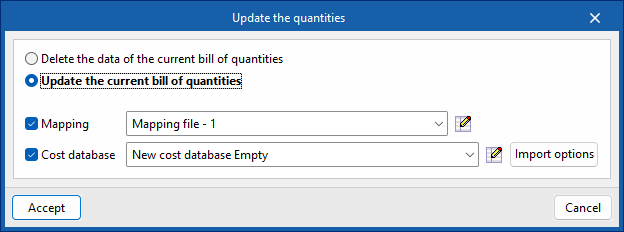
After creating the price database and the mapping file, you must update the estimate by clicking on the "Update the quantities" button in the "Update" group of the top toolbar.
To do this, you must select the "Delete the data of the current bill of quantities" option, activate and select the mapping and cost database created, and click accept. A pop-up window will then appear to link the items in the "Installation" tab and the work units in the cost database.
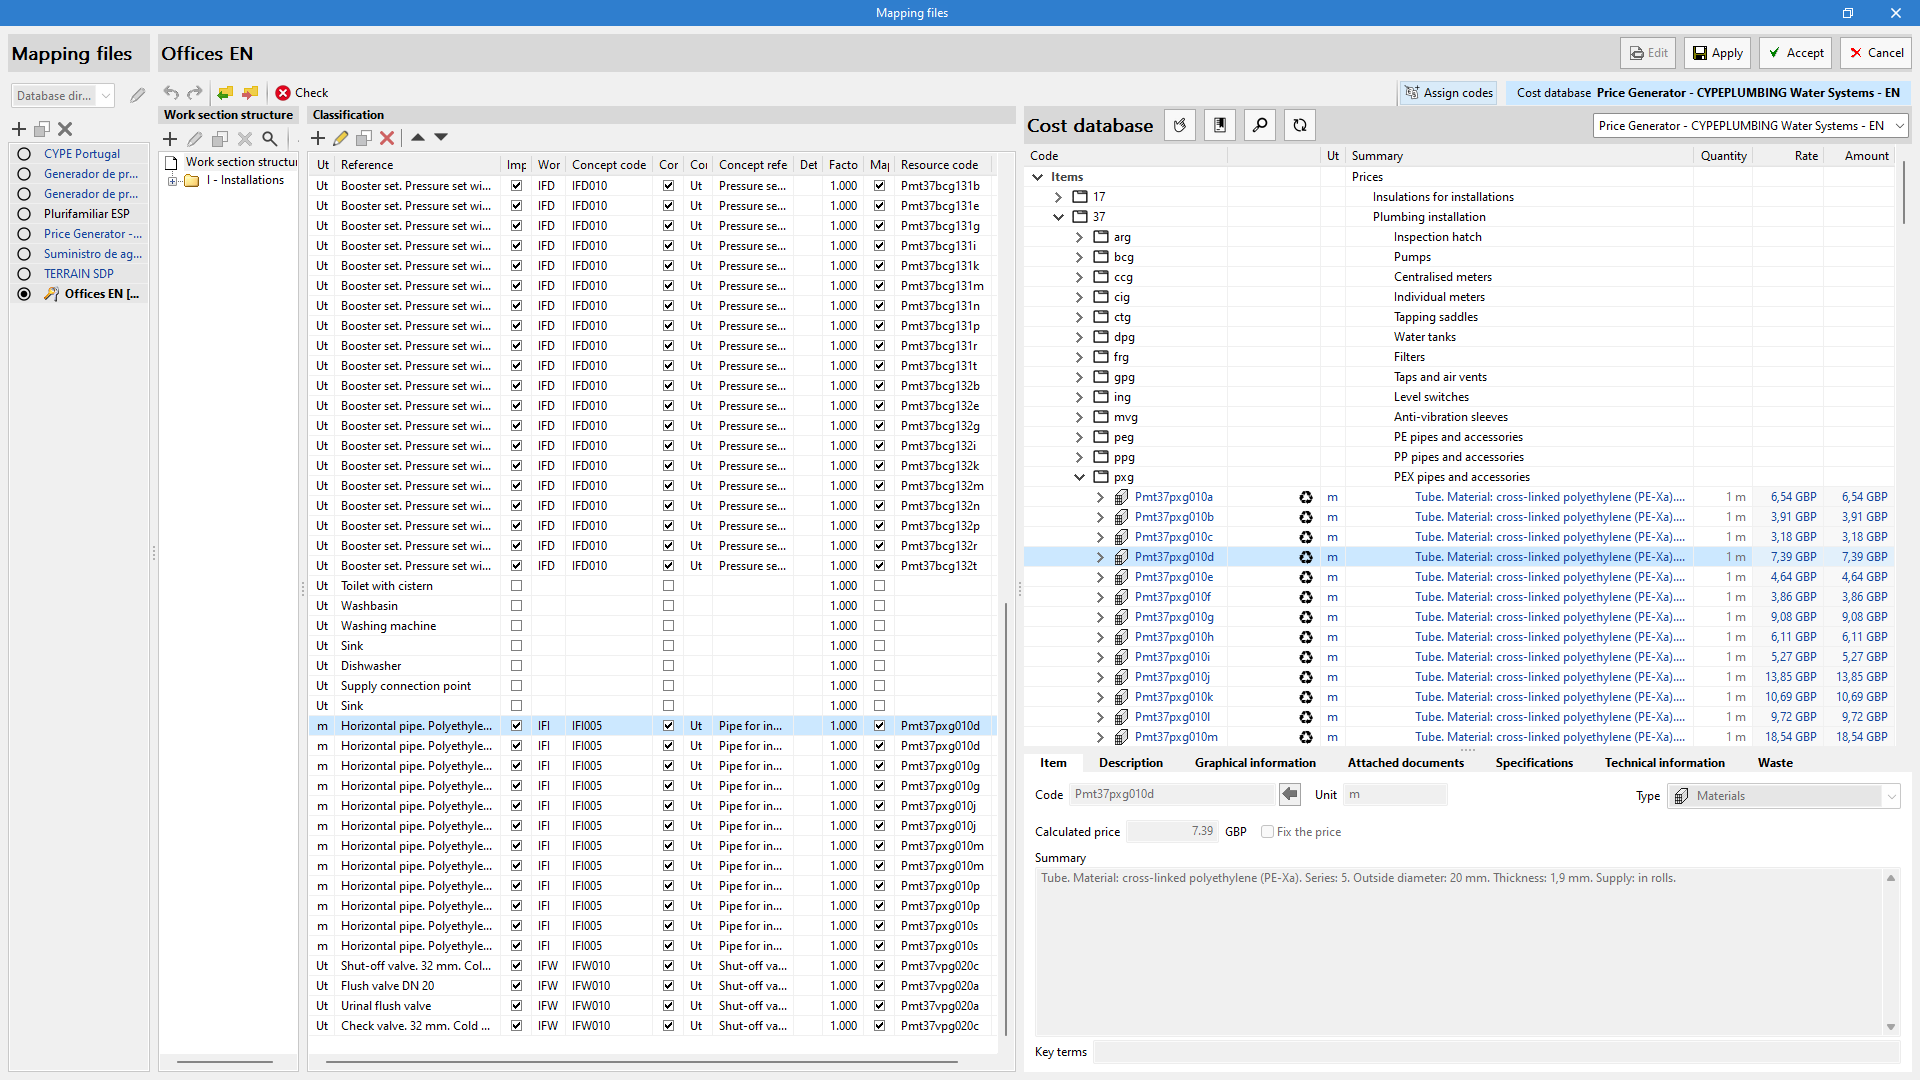
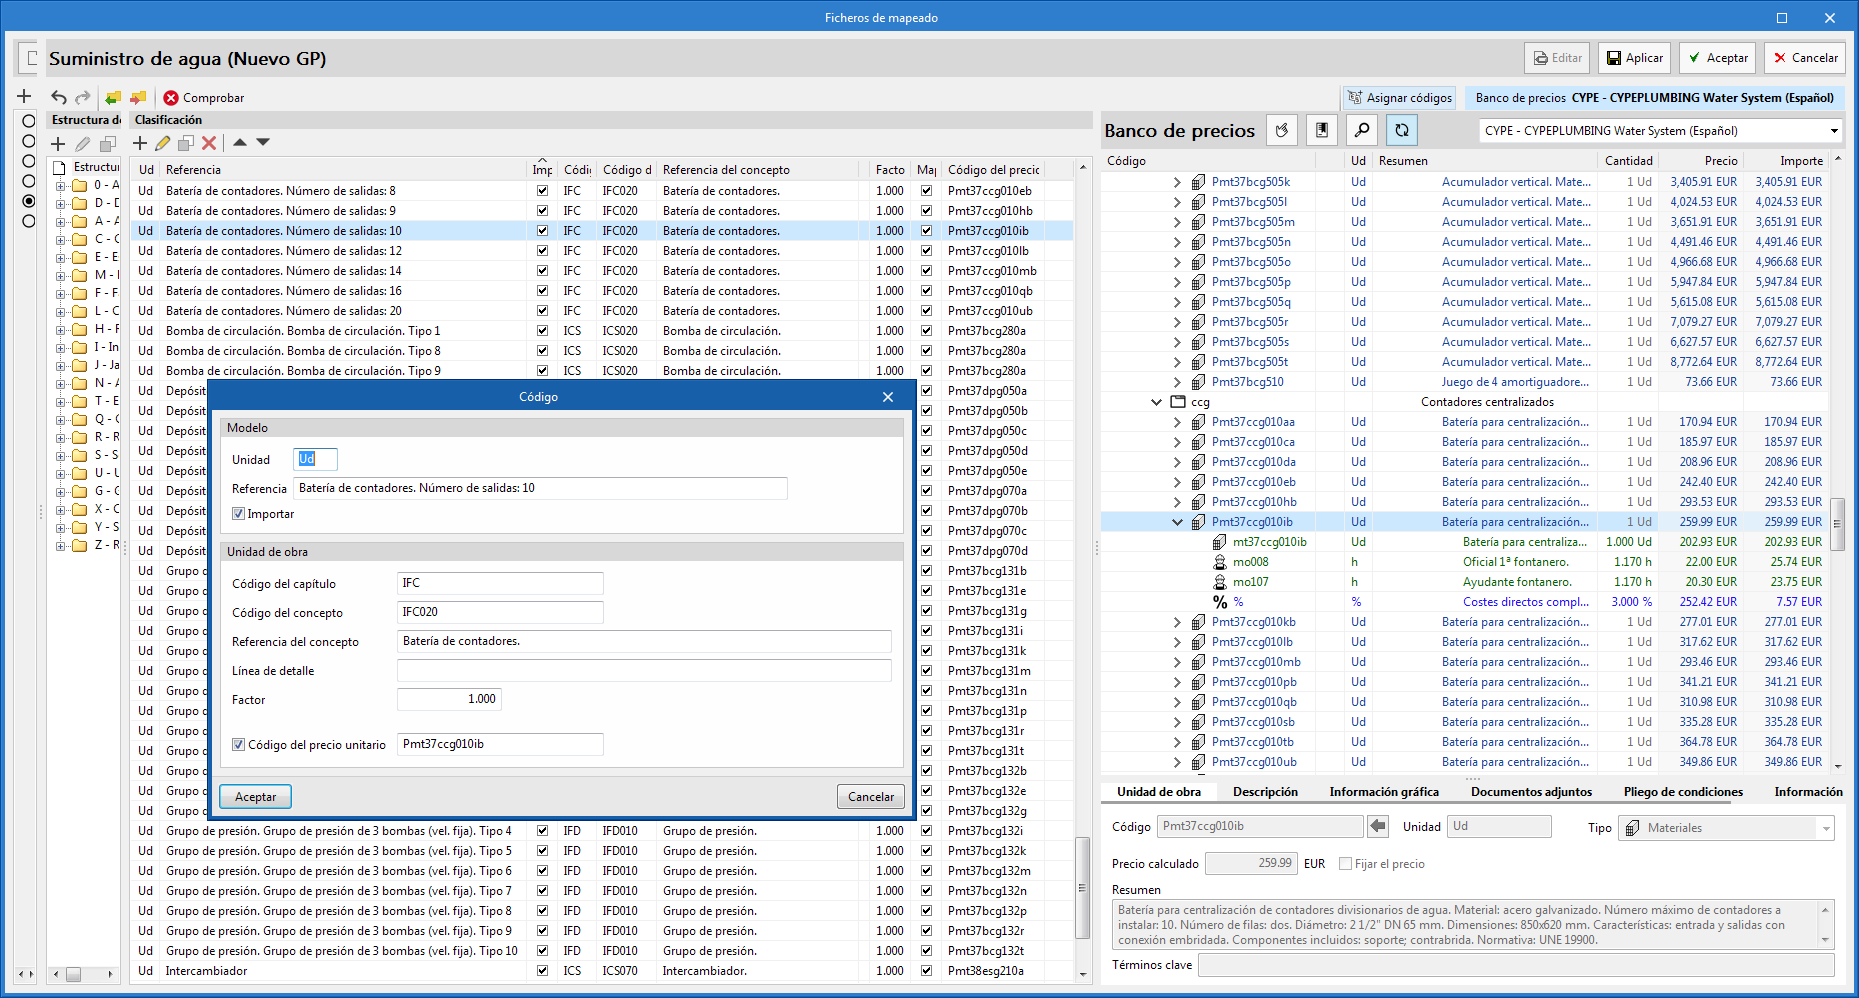
Mapping window
The pop-up window is divided into four panels:
- "Work section structure" panel
Displays the work section structure defined in the mapping file. - Classification panel
Displays a table with the items modelled in the "Installation tab", with the following columns: Unit, Reference, Import, Work section code, Concept code, Concept unit (check box), Concept unit (text field), "Concept reference", "Detail line", "Factor", "Mapped to a unit price", "Unit price code" and another column which, if applicable, displays an incident icon(*). - "Assign codes" panel
Displays the reference cost database. The following tools are included at the top of this panel:- Assign. Replace the values of "Work section code" and "Item code" in the mapping file with those of the work unit selected in the cost database.
- Work sections. Captures the work section structure from the cost database and assigns it to the mapping file.
- Search. Allows you to locate concepts in the cost database by text, summary, code or keyword.
- Synchronise. Activating this option allows you to locate any of the work units selected in the "Classification" panel in the price database.
- Selection of the reference cost database. Using a drop-down list, you can select a cost database from among those available.
- Incidents panel
Displays incidents detected in the mapping file.
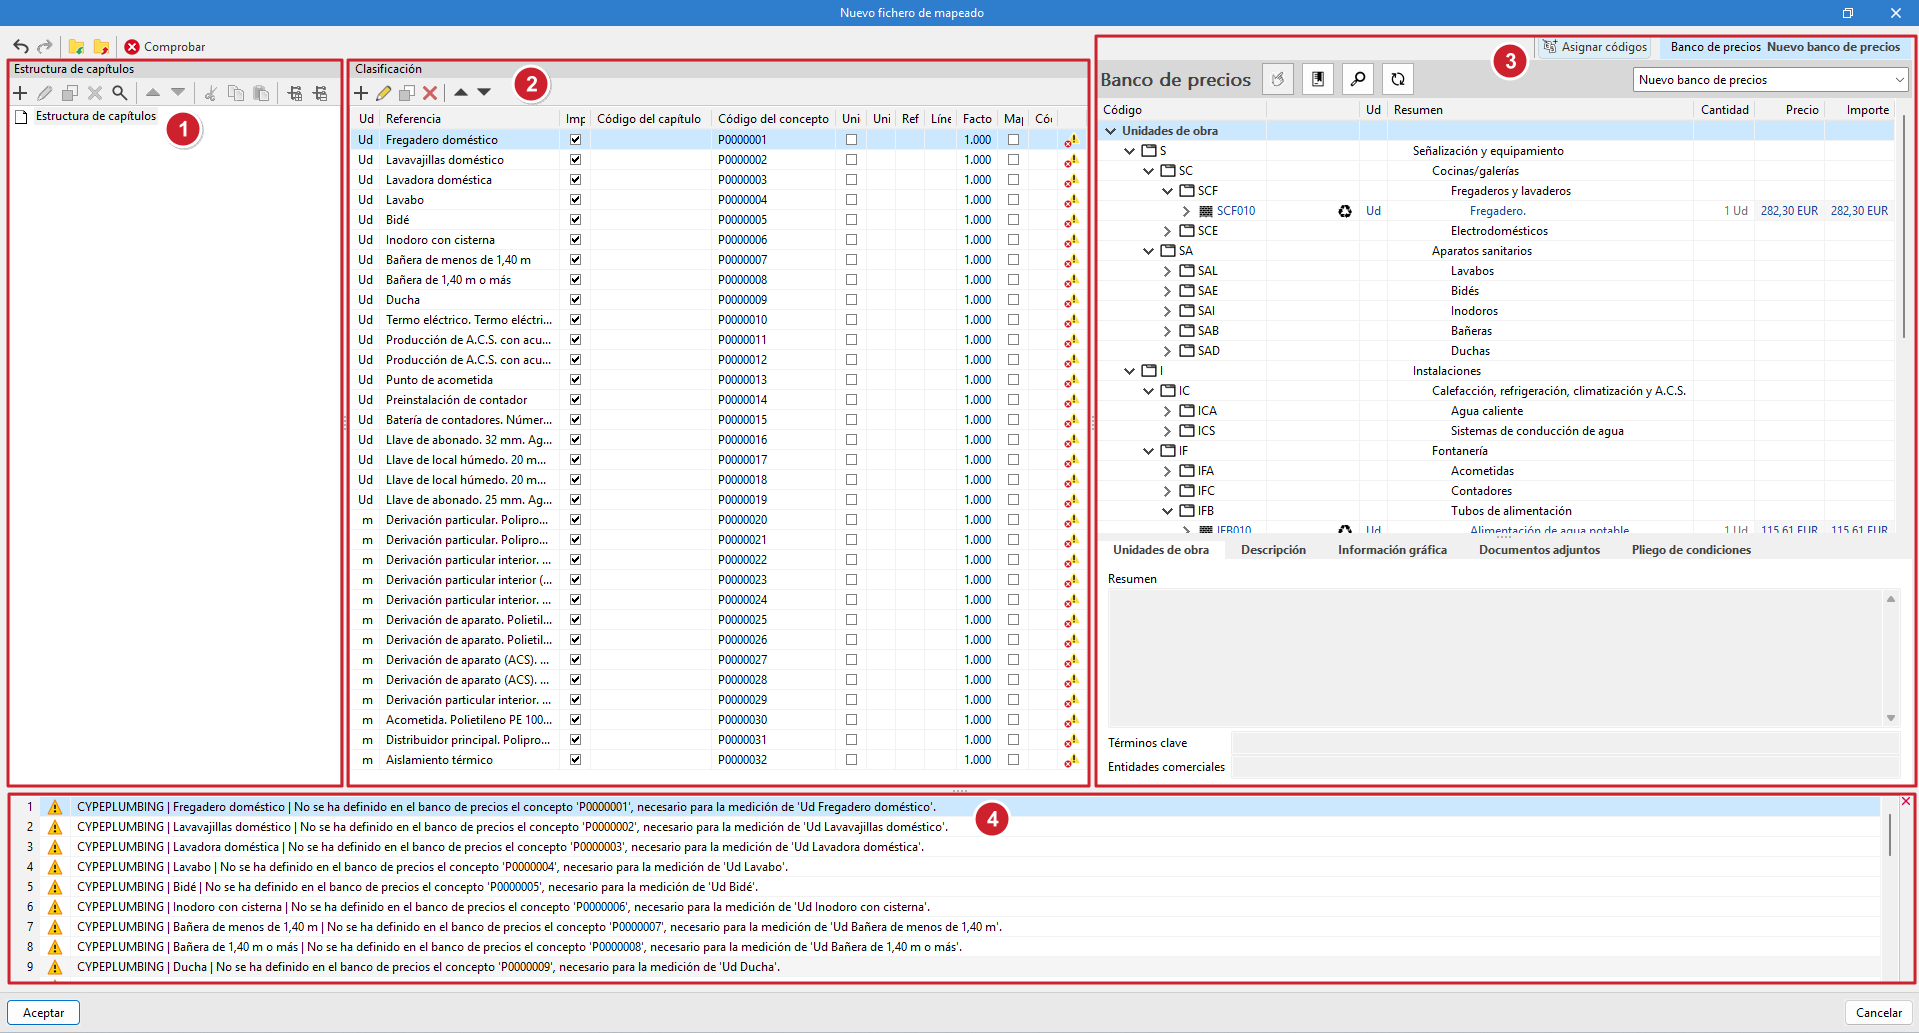
| Note (*): |
|---|
| If the cost database concept codes have not been assigned to the mapping file, the items in the "Classification" panel will display an incident icon in the last column, indicating that the concept has not been defined in thecost database and that it is necessary for measuring the unit. |
Mapping by code assignment
One way to map the elements of the model is by assigning codes, one by one, from the reference cost database to the mapping file. The process is as follows:
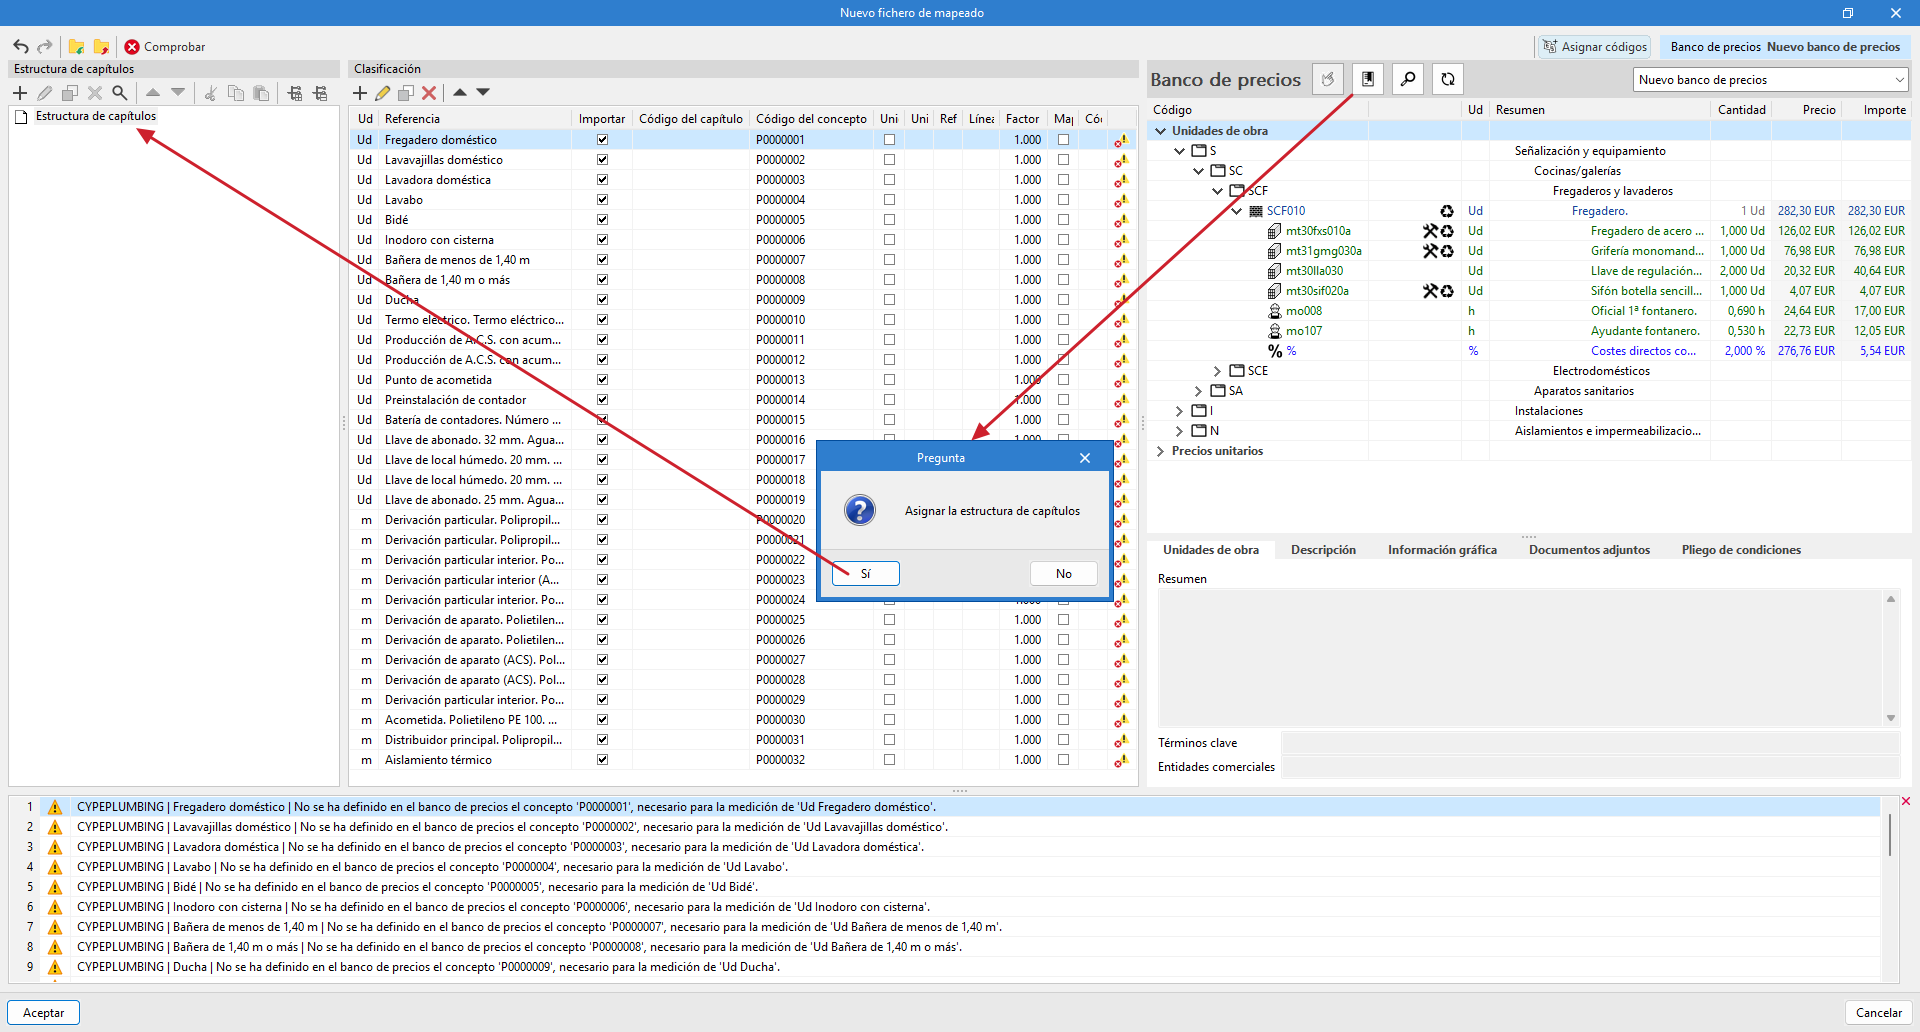
- Assign work section structure
Using the "Work sections" option in the "Assign codes" panel, the mapping file is automatically assigned the same work section structure as the reference price database. It is also possible to create the structure manually using the tools in the "Work section structure" panel, defining a code and a reference.
| Note: |
|---|
| The "Concept code" assigned to the elements in the "Classification" panel must correspond to the one established in the "Work section structure". Otherwise, an error message will appear indicating that the work section with the corresponding code has not been defined. |
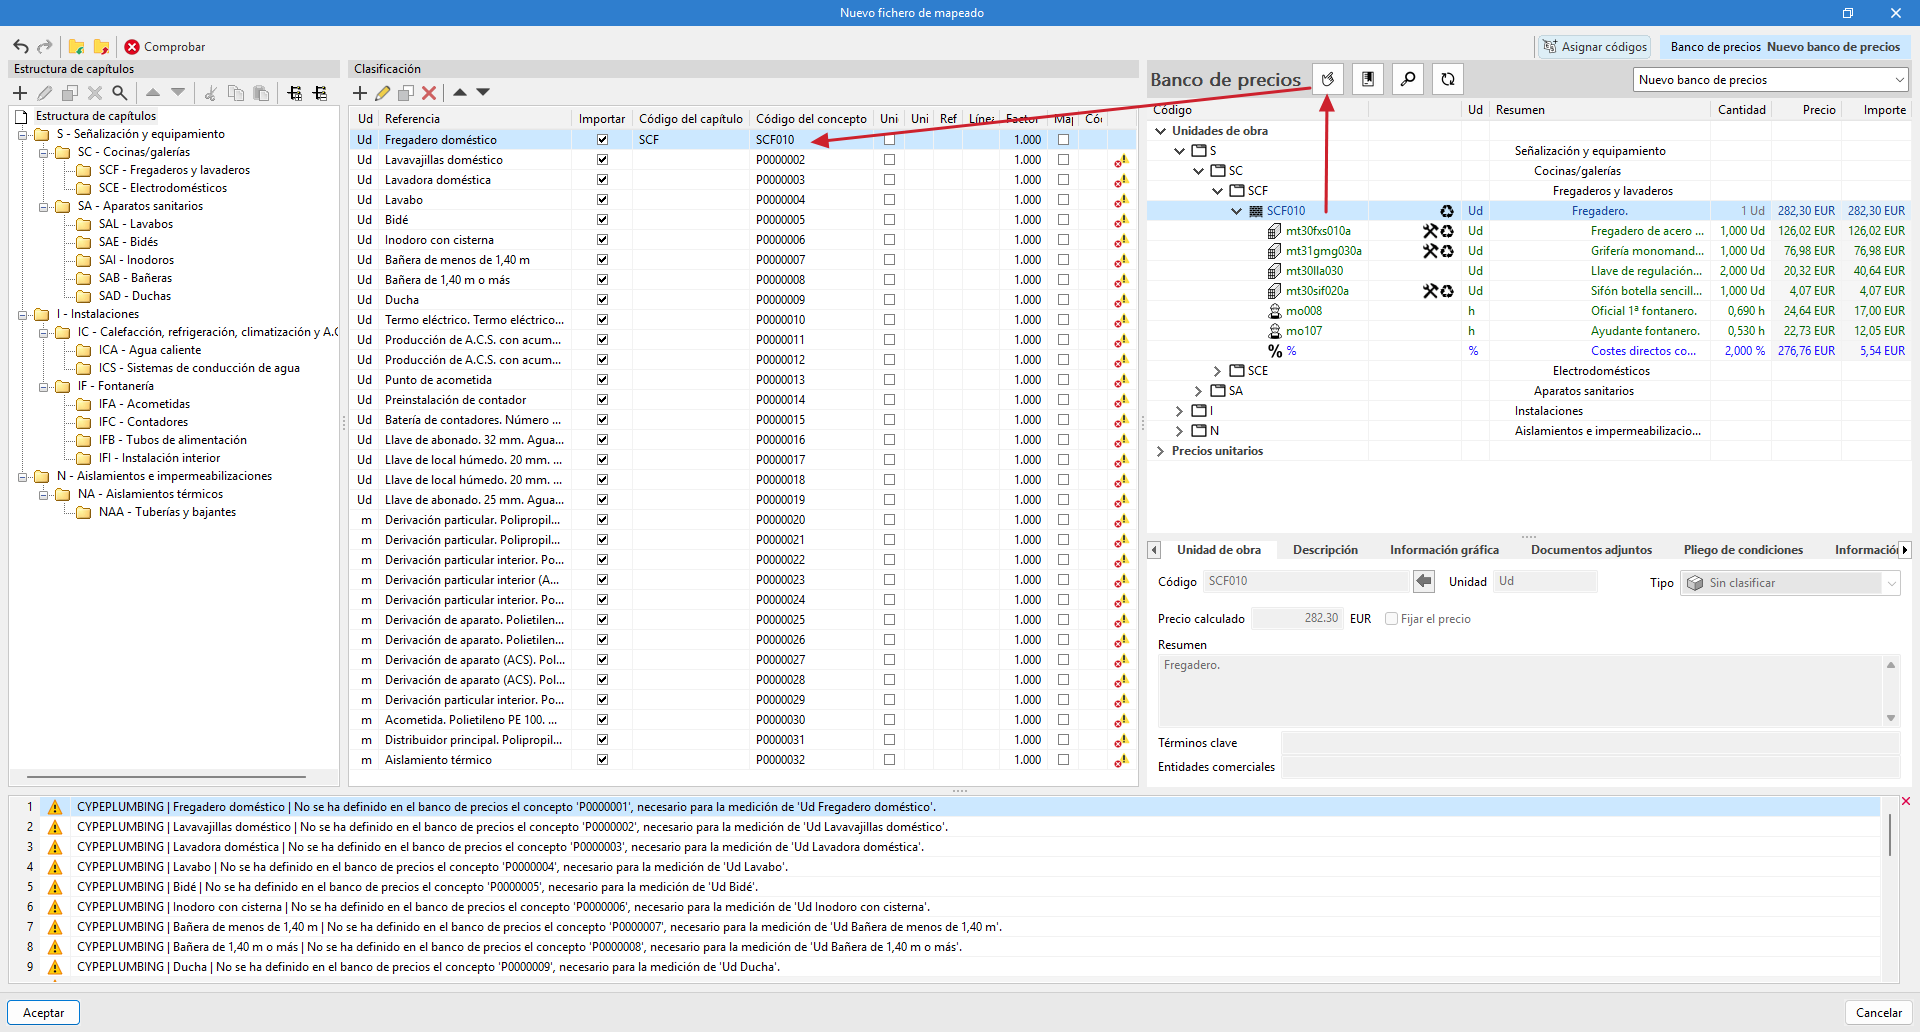
- Assign cost database codes
Select a work unit in the cost database and the corresponding item in the "Classification" panel, then click the "Assign" button in the "Assign codes" panel. This process must be repeated for each item you wish to link. - Once the assignments have been completed, you must accept the pop-up window to apply the changes.
| Note: |
|---|
| If you subsequently wish to review or modify the mapping file, you can access it from the "Mapping" option in the "Project" group. |
Mapping at unit prices
Another way to map the elements of the model is by assigning unit prices.
When editing an item in the "Classification" panel, you can activate the "Resource code" option and indicate the unit price code to which the quantity of the model item will be mapped.
In this case, it is not necessary to indicate the "Work section code" or "Concept code", as the program automatically establishes the correspondence with the relevant work section.
If the resource specified in the mapping file is a cost breakdown in the associated cost database, only the unit components of this breakdown shall be assigned to the concept.
Bill of quantities result
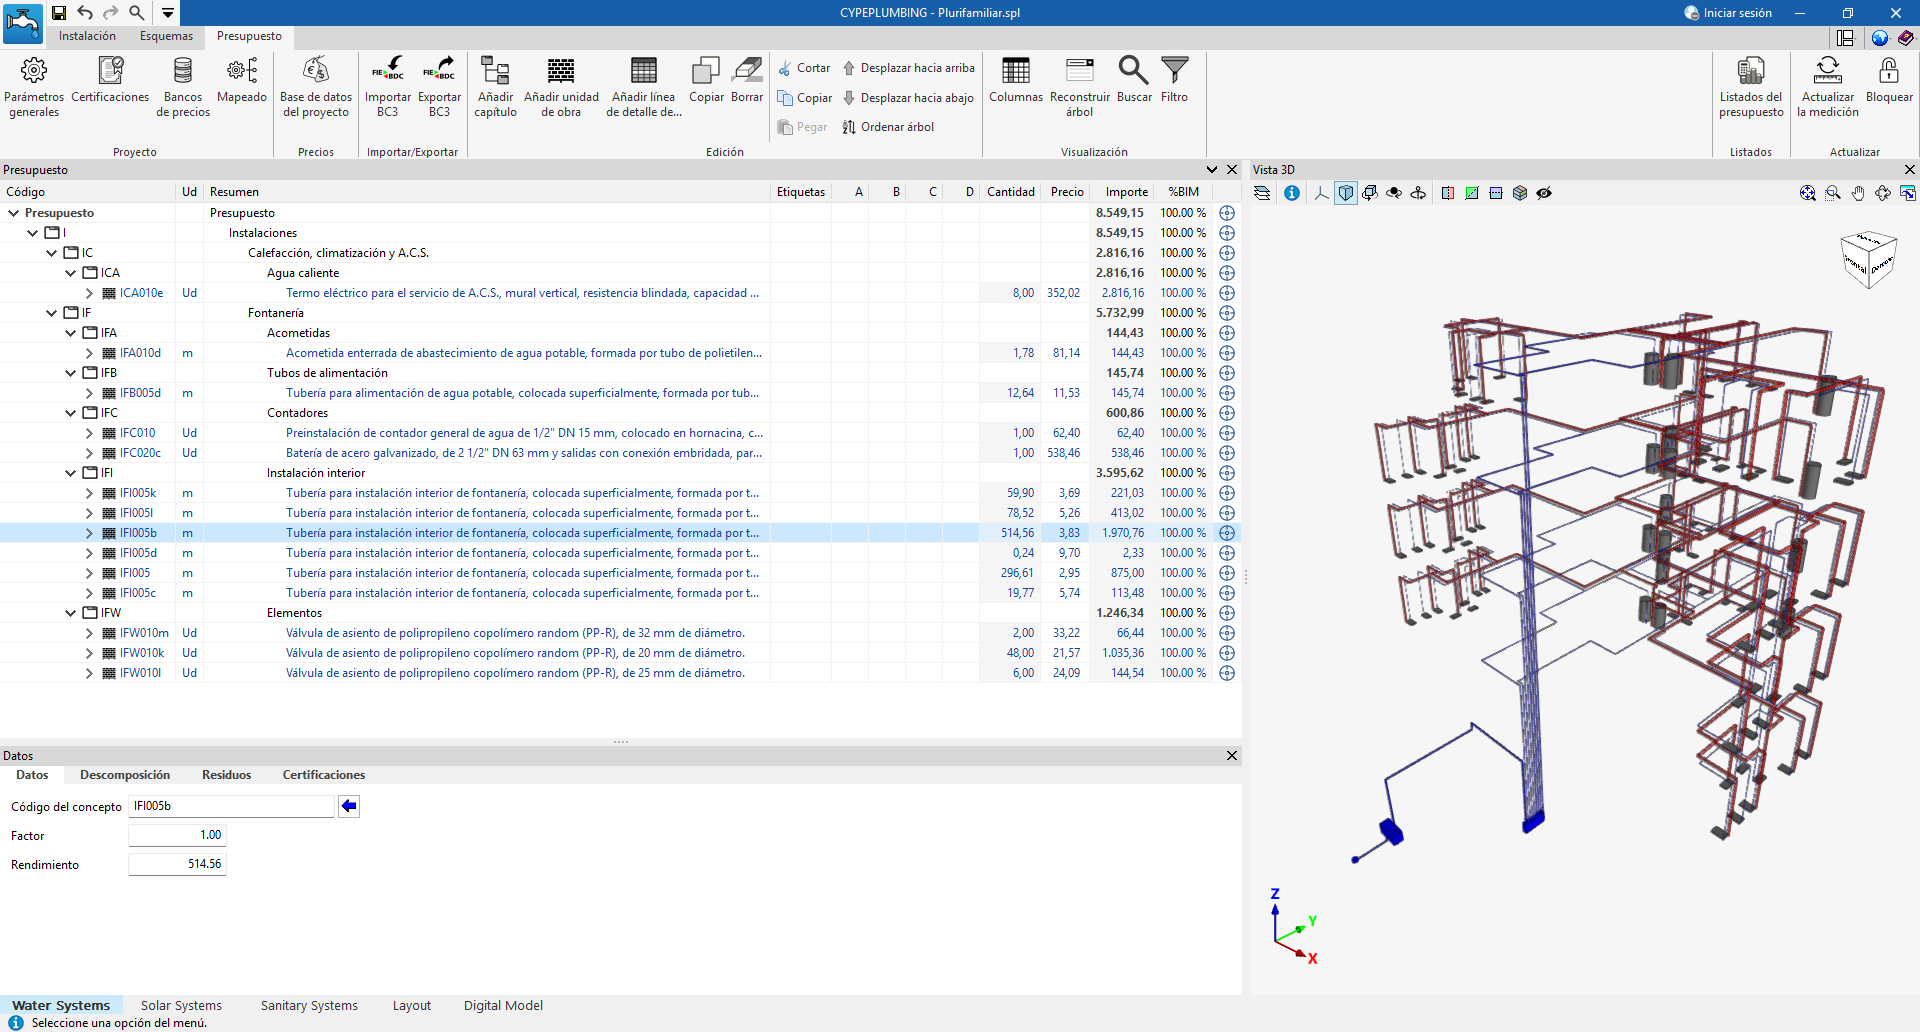
The main bill of quantities window displays the result obtained after updating the quantities. A colour code identifies the different items:
- work sections and sub work section are shown in black text;
- the items are shown in blue, if they are correctly defined (if the price of the concept has not been defined, they are shown in mustard colour, as well as the codes of the higher levels);
- and the quantity detail lines are shown in green.

The secondary bill of quantities window shows the rest of the associated information, distributed in four tabs: "Data", "Breakdown", "Waste" and "Certificates". The breakdown of items, in the "Breakdown" tab, shows the different simple concepts in green (in red if any of them does not exist in the reference database).

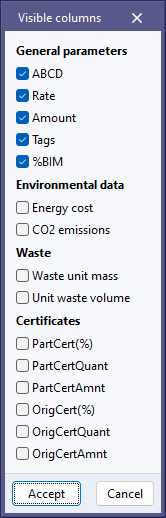
Visualisation tools in the "Bill of quantities" tab
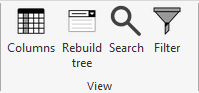
In the "Bill of quantities" tab, the "Visualisation" group of the main toolbar includes several useful tools for bill of quantities management:
- Columns. Activates the following columns:
- General parameters
Highlights the tags assigned to the quantities lines or the percentage of the quantity taken from the BIM model. - Environmental data
- Waste
- Certificates
- General parameters
- Rebuild tree. Facilitates the visualisation of work sections and items, and allows the following:
- "show only the first work section level";
- "only show work sections";
- "show work sections and items";
- "expand all".
- Search. Locates concepts based on text strings present in your code or summary.
- Filter. Filters the information displayed according to the tags previously assigned to the quantities lines.
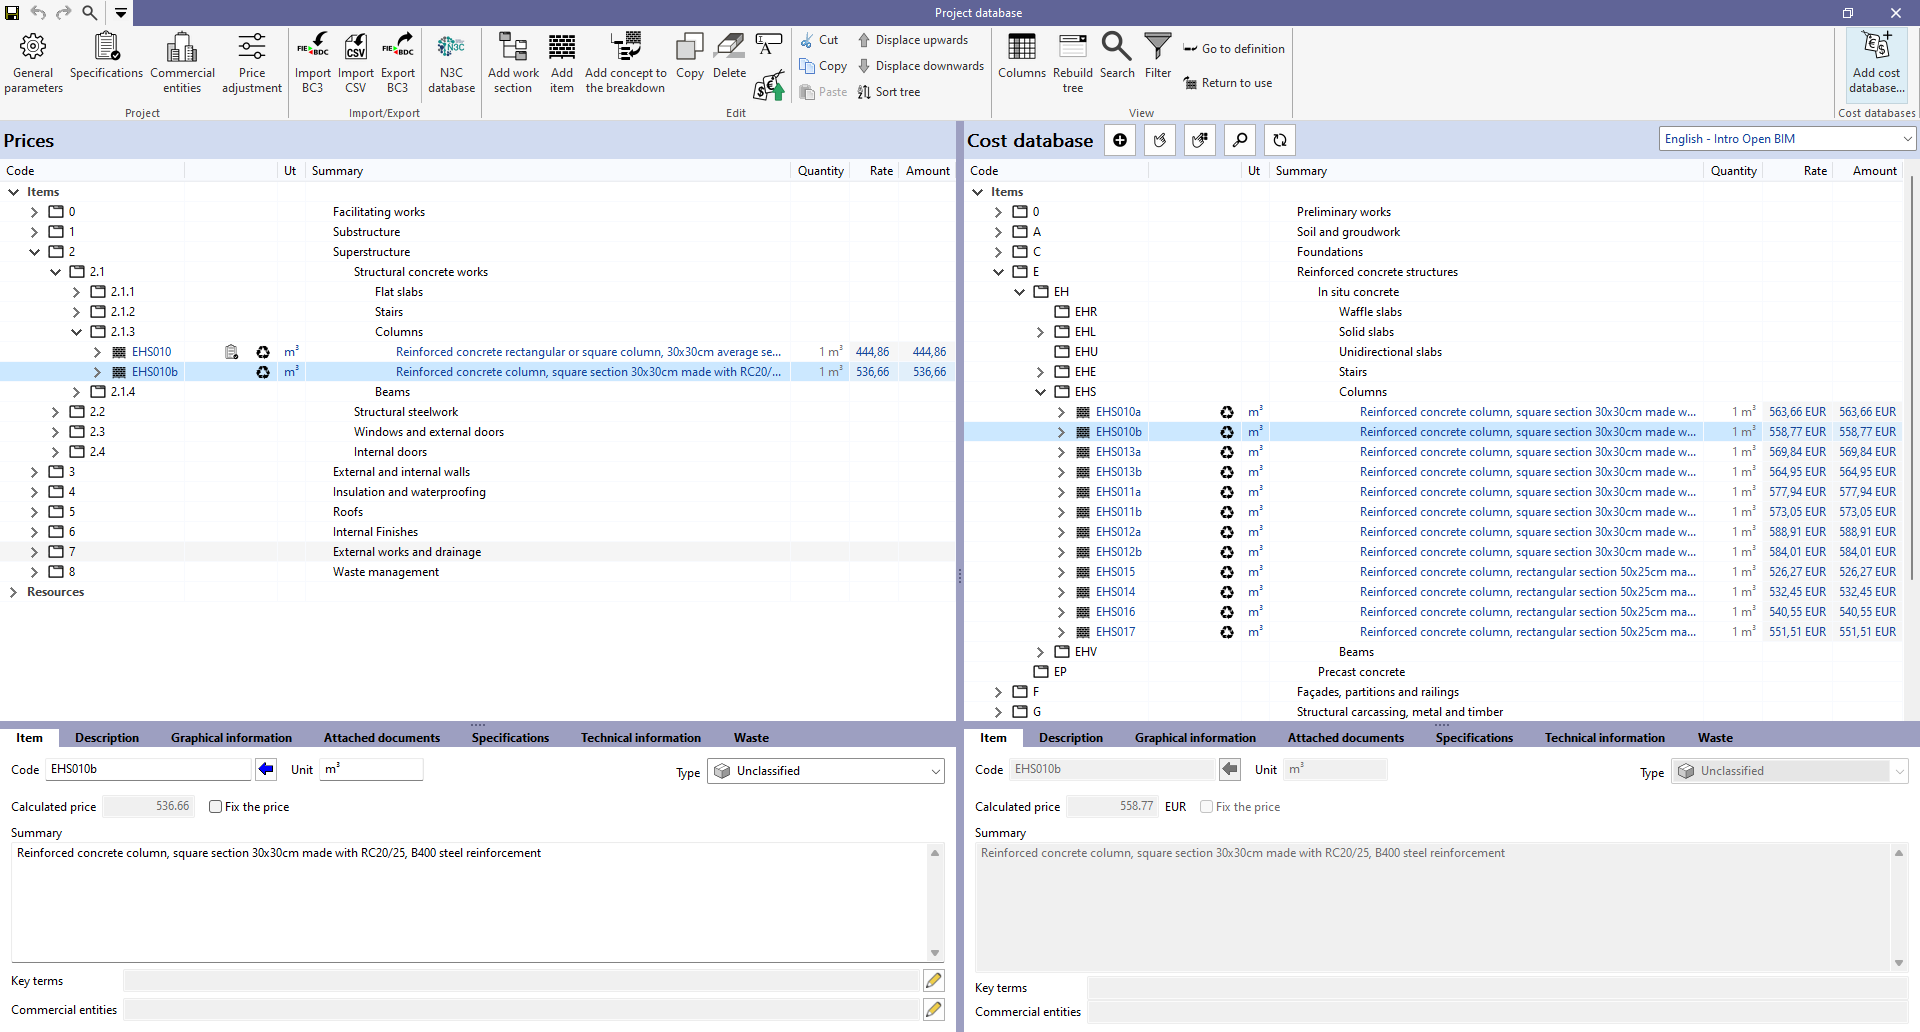
Project database
The "Project database" tool, included in the "Prices" group of the top toolbar, allows users to carry out a particular configuration of the job in progress (without affecting the active cost database).
Among the possibilities it offers, the following stand out:
Price adjustment
This button allows users to modify the performance coefficients of the original cost database (labour, machinery or price).
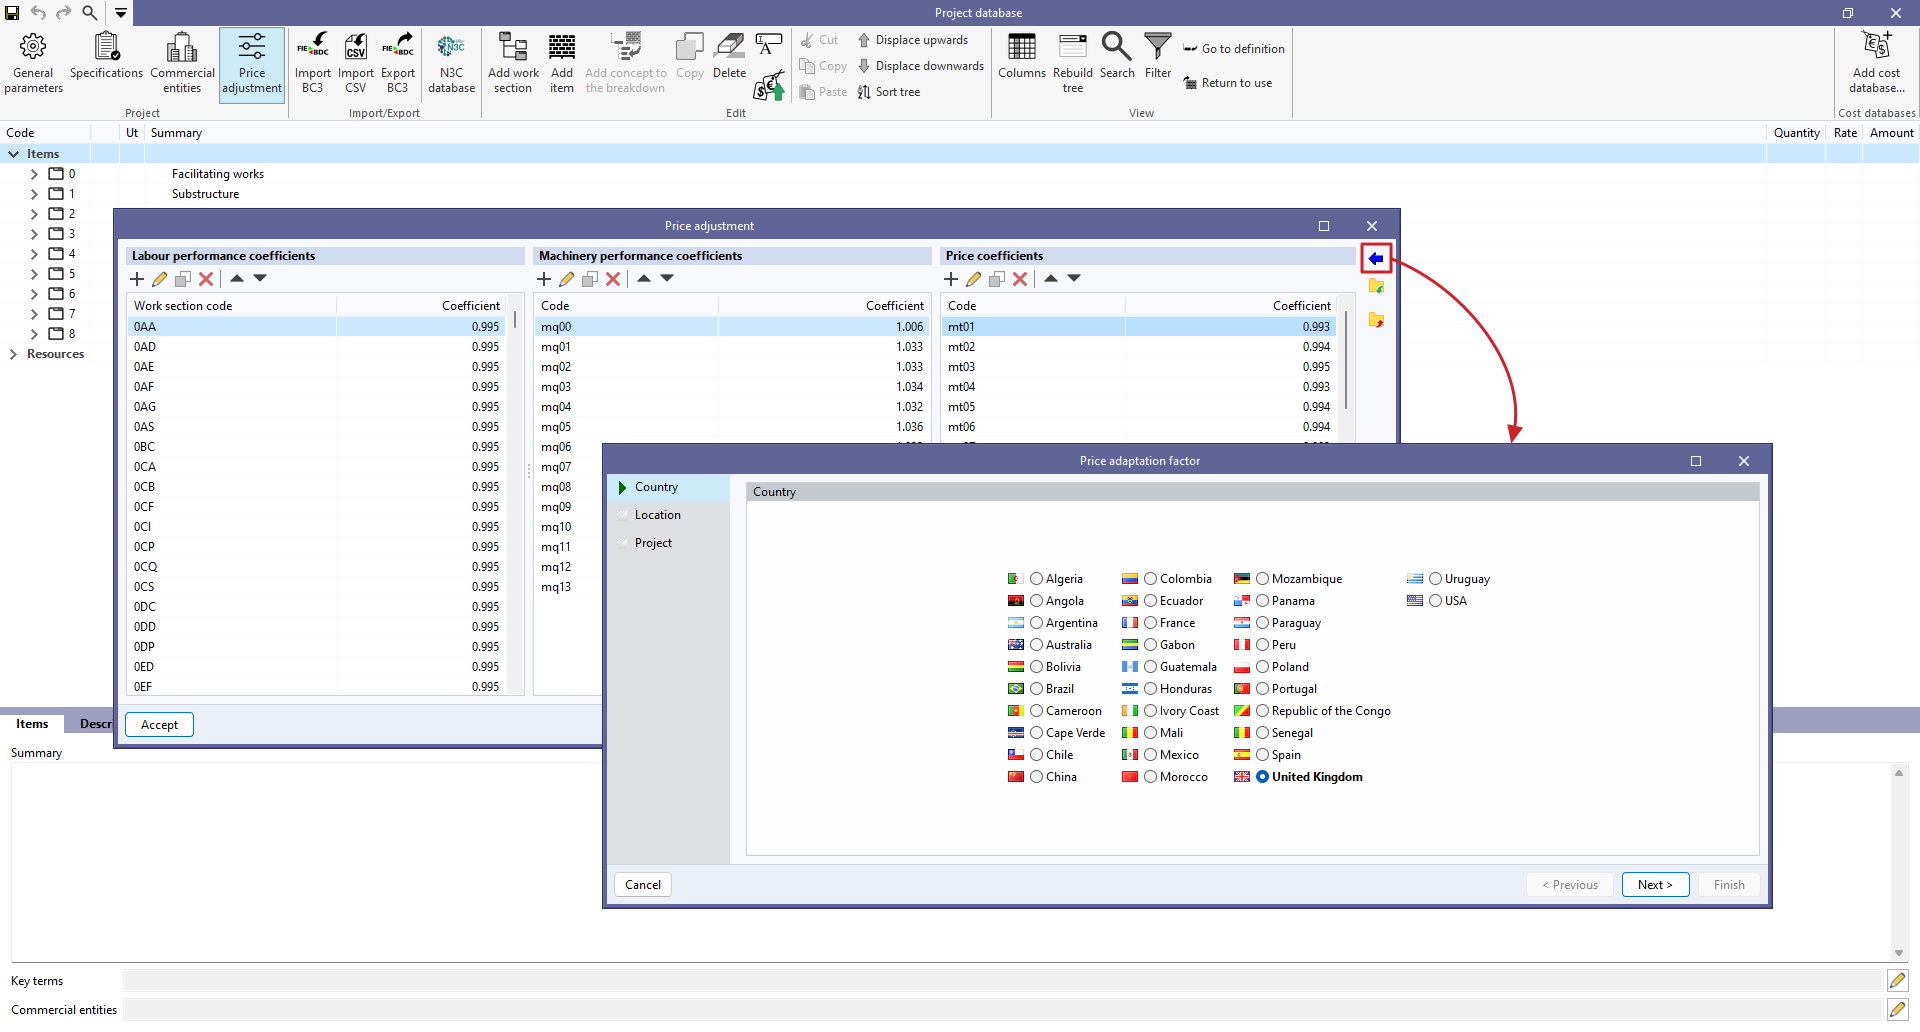
Price increment
With this tool, the prices of the concepts contained in the database can be adjusted according to a "Factor". In addition, the application allows users to indicate the nature of the concepts ("Unclassified", "Labour", "Machinery and auxiliary resources" and "Materials") on which the operation must be applied.

Adding concepts from the cost database
This tool allows users to add items from the cost database to the rule of measurement.
Manually editing the bill of quantities
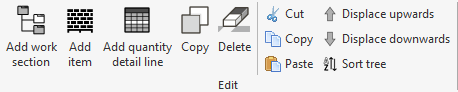
The bill of quantities can be modified manually either from the "Edit" group in the top toolbar of the "Bill of quantities" tab or from the menu that appears by right-clicking on the structure in the main window.
Adding work sections
To add a new work section, click on "Add work section". To create a new sub work section, click on the header of an existing work section, enter a "Code" and a "Summary" and click "Accept". The work section will be created in the default order and will be displayed in the main bill of quantities window. The displacement tools ("Displace upwards" or "Displace downwards") can be used to relocate the new work section in the structure. The data entered can also be modified from the bill of quantities sub-window.
Adding items
To add a new item, go to the header of the work section in which it is to be included and click on the "Add item" tool. Enter a code for the concept (the blue arrow allows an existing one to be used in the project database), and define a factor and a performance.
Adding quantity detail lines
To add new quantity detail lines, users must place themselves on the item they wish to include them in and select the "Add quantity detail line" tool. In the pop-up window, then select "Quantities", so that the detail line is of this specific type, and add a comment and tags. The quantity values in the four available fields (A, B, C and D) are also filled in and renamed if necessary. By default, the program operates by multiplying the values of these four fields and ignores values equal to zero. Additionally, the unique identifier (GUID) corresponding to the element being linked can be associated to the BIM model.
If a quantity detail line of type "Partial subtotal" or "Accumulated subtotal" is added, the quantities resulting from the previous quantity detail lines shall be added partially or accumulatively, respectively. If the "Expression" type is selected, a formula may be entered which operates on the quantity detail lines below it, using the quantity values (A, B, C and D).
Other useful tools
As well as creating concepts, the other tools allow us to copy, delete or use the clipboard tools on any existing concept ("Copy", "Cut" and "Paste"). The "Copy" tool appears twice with a different icon. One of them allows users to duplicate work sections, items and breakdown concepts, and the other one works in the same way as the "CTRL+C" command, which needs "Paste" in order to appear in the bill of quantities structure.
Another useful tool is "Sort tree", which allows users to sort the bill of quantities by work sections or by items.
Update on changes to the installation
If there are changes to the installation, simply run "Update the quantities" again to incorporate the changes into the bill of quantities. This is also used if quantities have been added manually and you want to keep the edit.
In these cases, you must select the option "Update the current bill of quantities", activate and select the mapping and cost database, and press accept.
The "Update the quantities" menu also offers the possibility to modify the active cost database, select the items to be included in the bill of quantities (summary, breakdown, graphical information, etc.), and a shortcut to the "Price adjustment" tool, which allows you to modify the performance coefficients for labour, machinery or price.
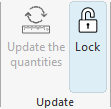
We can lock the budget to prevent modifications and make it work in "Read-only" mode. This function protects the entire budget, preventing both updates and the manual introduction of work units.
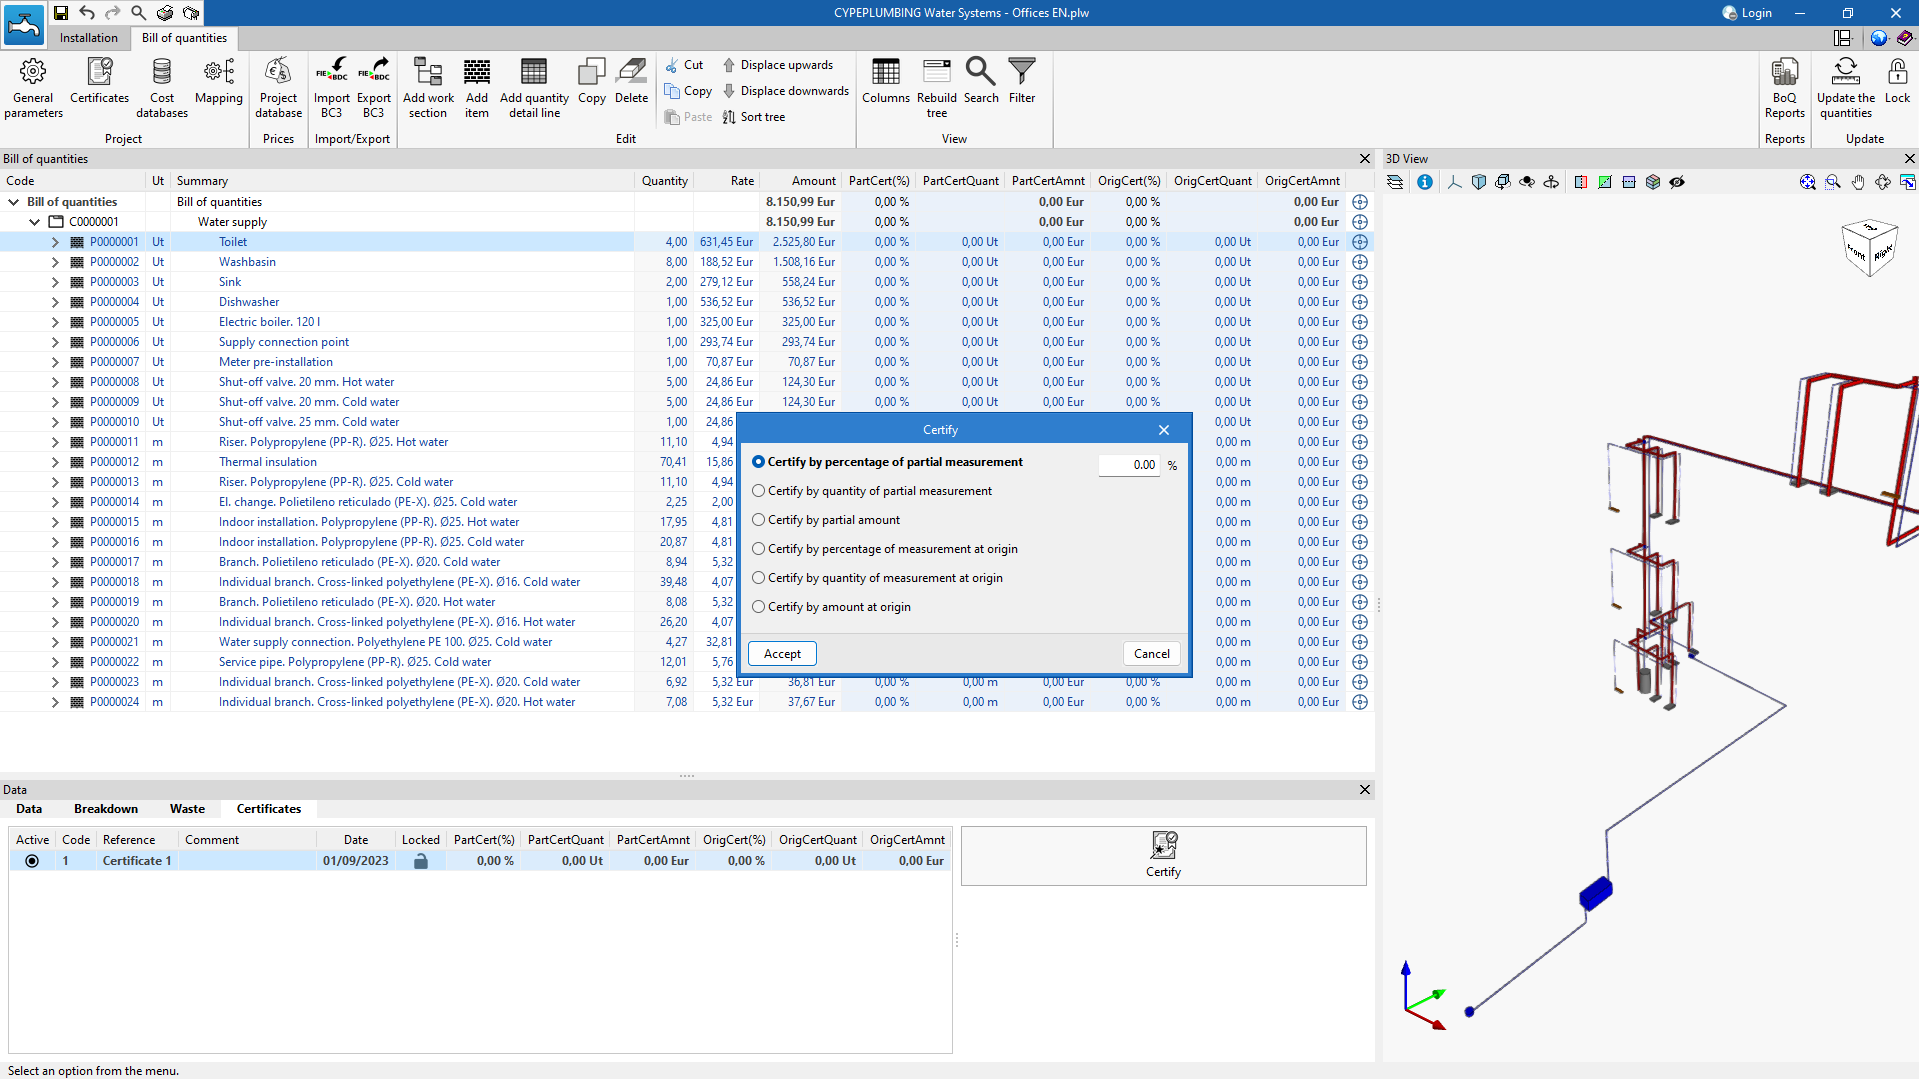
Certificates
From the "Bill of quantities" tab in each program, users can register and manage job certificates. The program allows columns displaying percentages and amounts on certificates to be activated, as well as the possibility of certifying by percentage or quantity of partial measurement, by partial amount, by percentage or quantity of measurement at origin, and by amount at origin.
| More information: |
|---|
| For further information on certificates, please click here. |
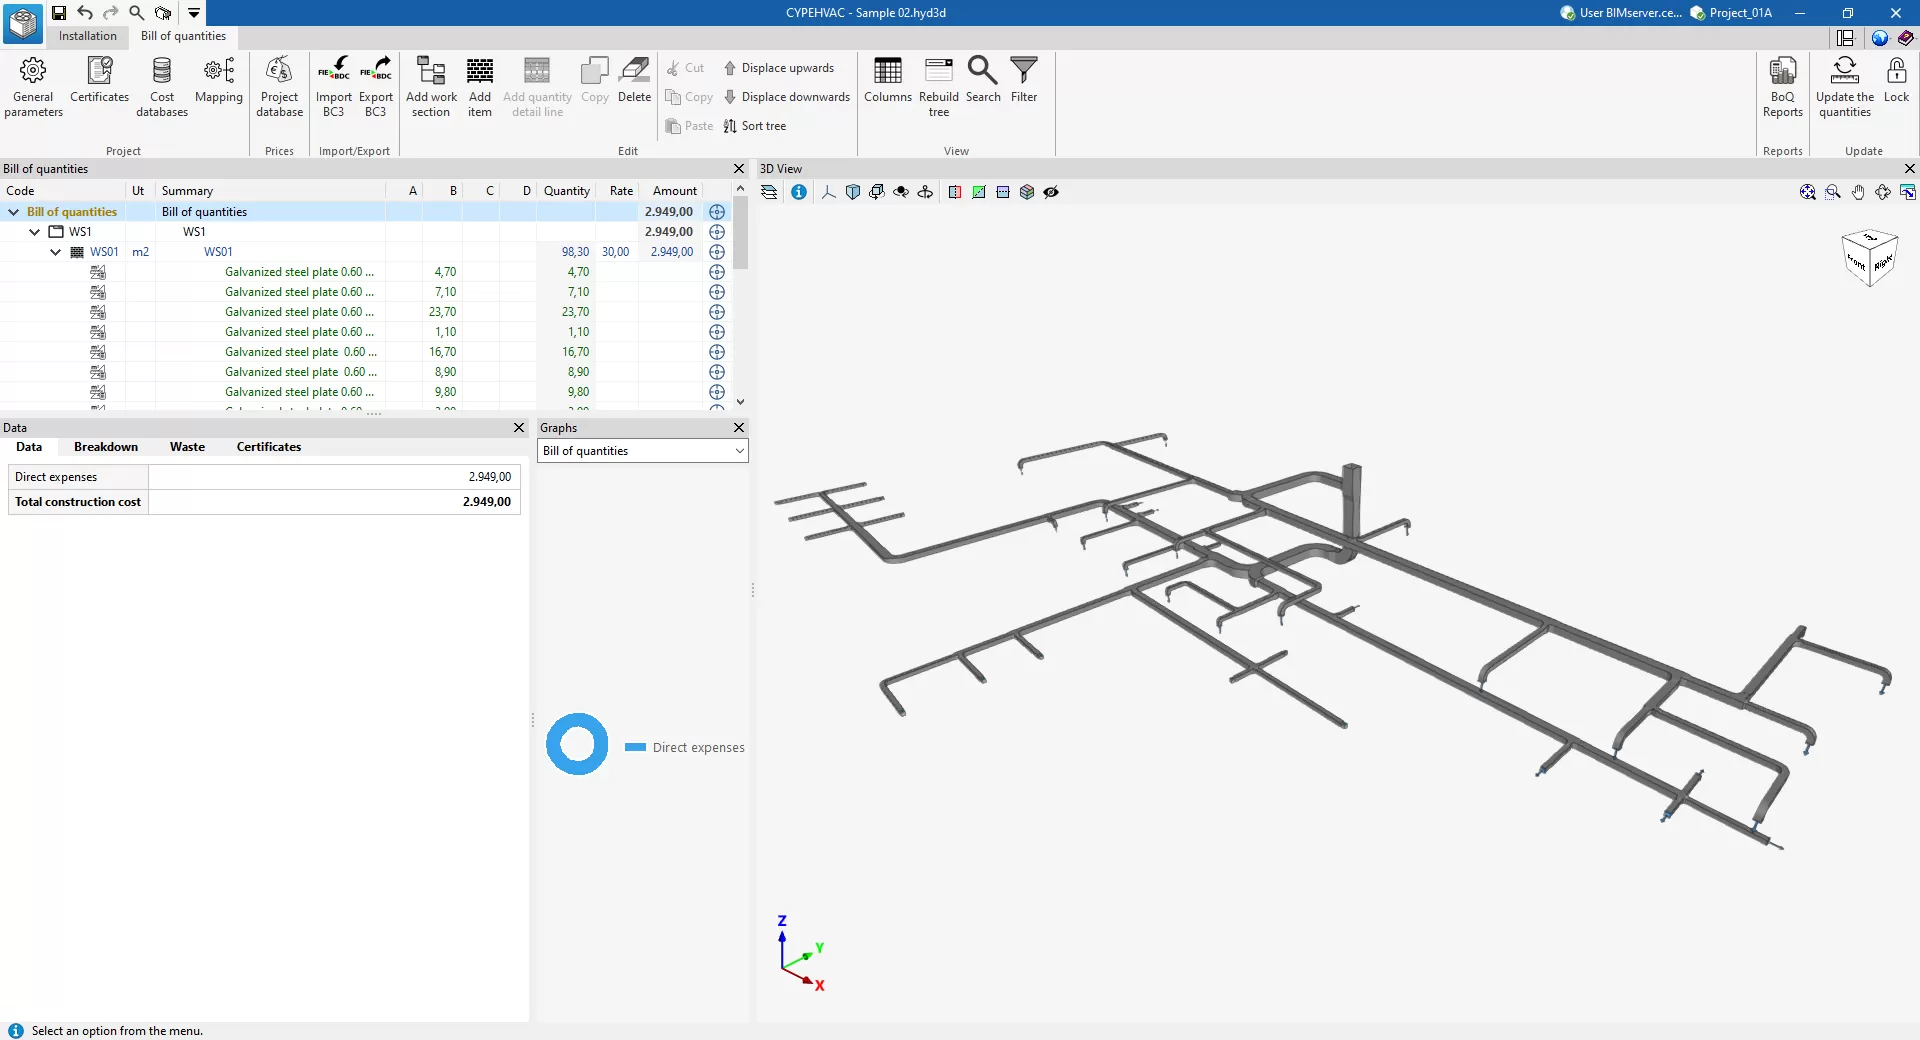
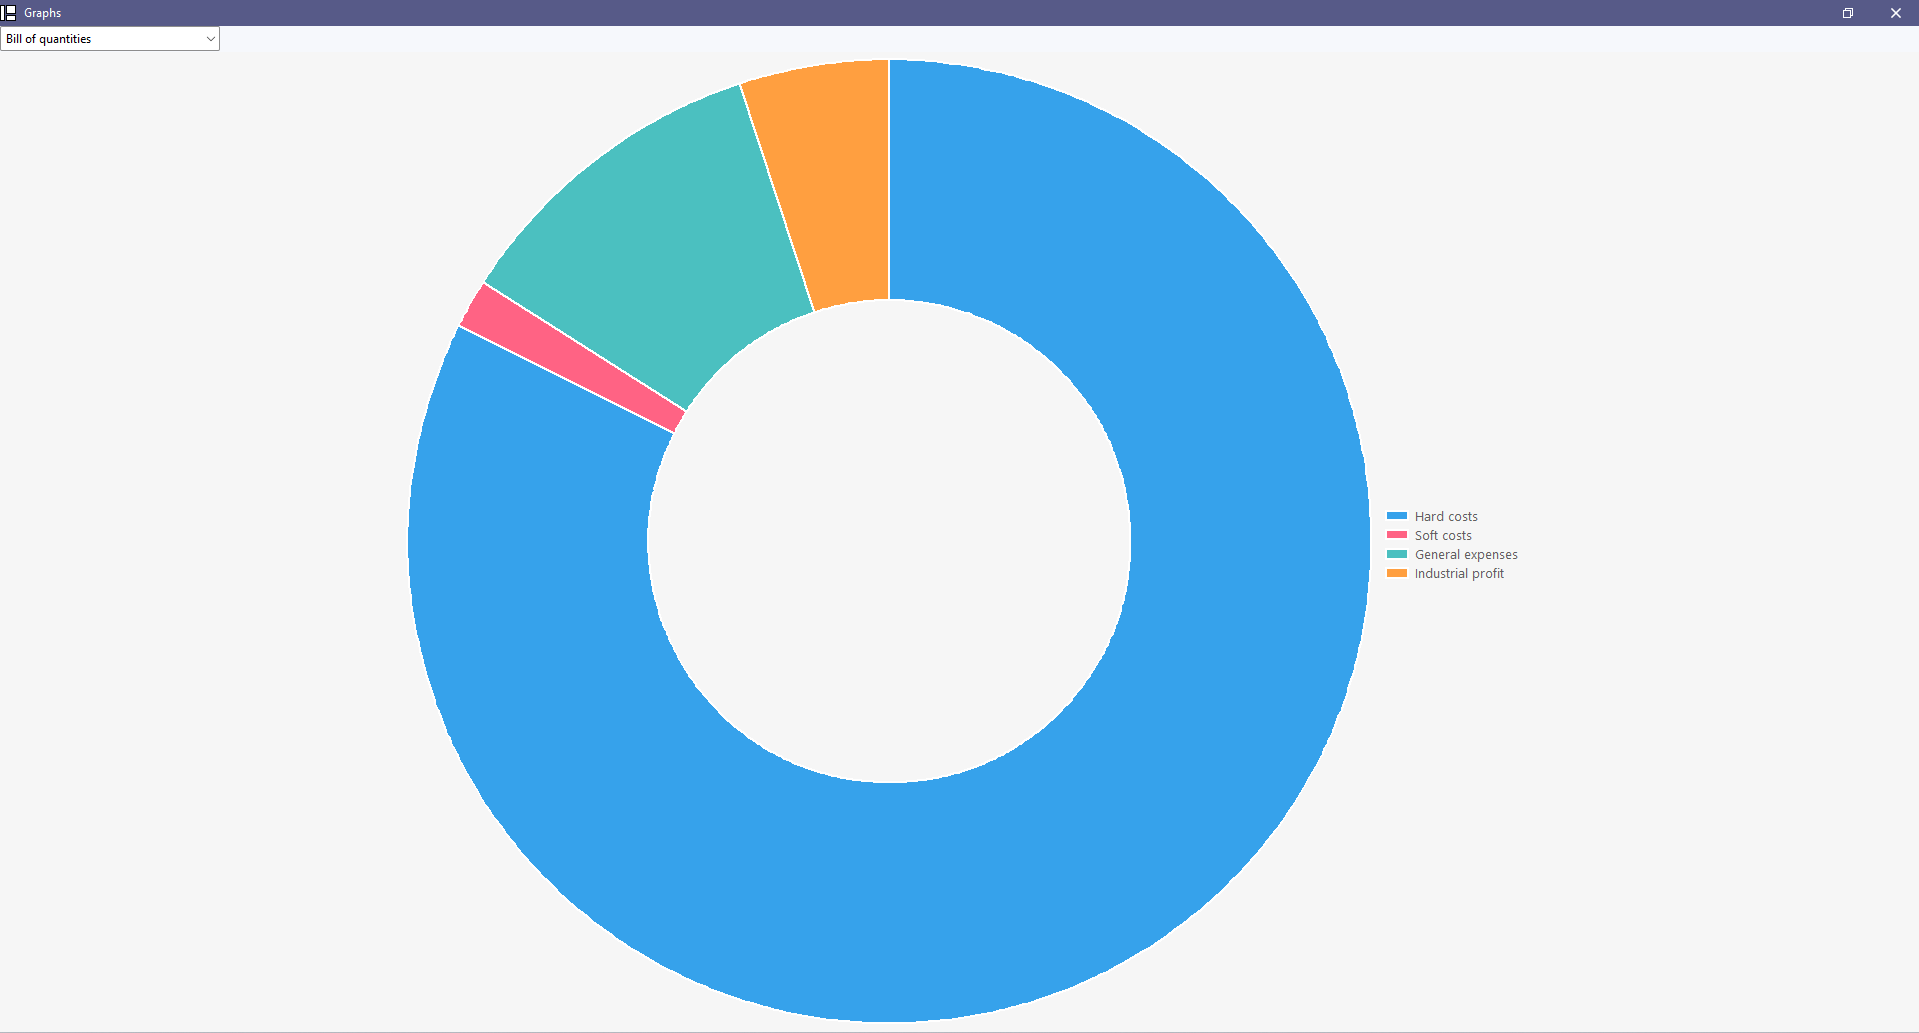
Graphical representation of the bill of quantities
The bill of quantities data can be viewed graphically from the “Graphs” section of the “Bill of quantities” tab.
In this section, there is a dropdown list where the graph to be displayed (columns, rings, lines, etc.) can be selected for the following concepts:
- Bill of quantities
- Breakdown
- Breakdown (with/without BIM link)
- Energy cost
- CO2 emissions
- Waste mass (Type)
- Waste volume (Type)
- Waste mass (Code)
- Waste volume (Code)
- Certificates (Amount)
- Certificates (Quantity)
The graph generated depends on the component of the bill of quantities table selected. By hovering the mouse over a section of the graph, a box will appear with the parameter reference and its value.

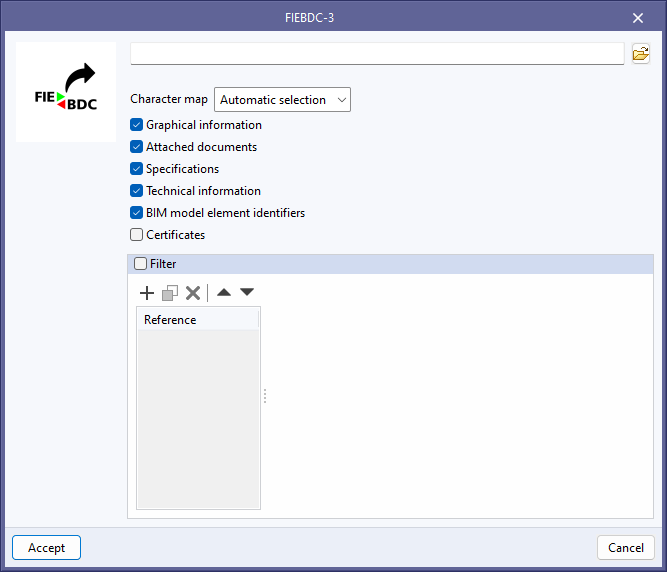
Exporting the bill of quantities to FIEBDC-3 format
As well as generating reports, the bill of quantities can be exported in standard FIEBDC-3 (.bc3) format so that it can be read by any compatible application.
To carry out the export, simply use the "Export BC3" tool in the "Import/Export" group of the "Bill of quantities" tab, assign a name to the file and activate the desired boxes to include associated information (graphic information, attached documents, specifications, technical information, etc.).
Results output
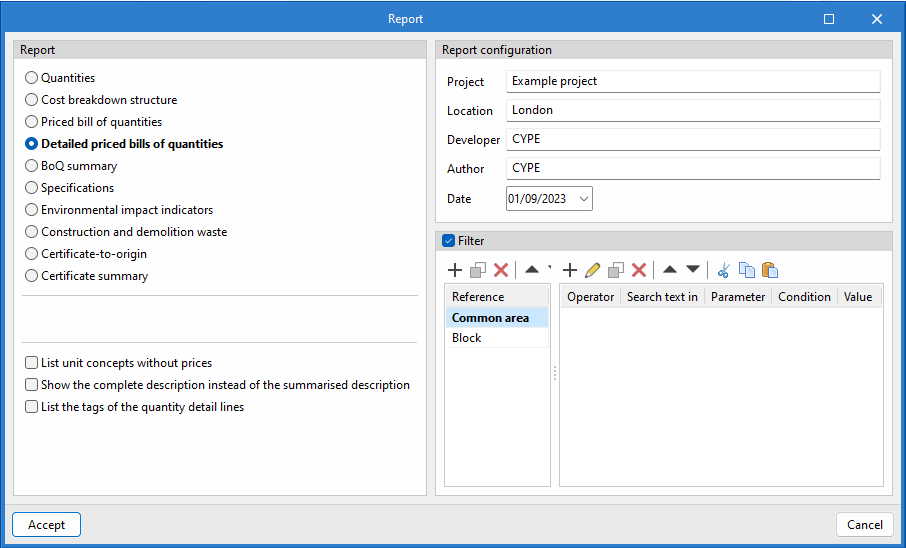
Reports
Within the "Bill of quantities" tab, in the "BoQ reports" group of the main toolbar, the necessary features for generating bill of quantities reports can be found.
The generation of reports will be performed immediately; simply click on the "BoQ reports" option and activate the required reports from those available:
- Quantities
- Cost breakdown structure
- Priced bill of quantities
- Priced bill of quantities (Table)
- Detailed priced bills of quantities
- BoQ summary
- Specifications
- Environmental impact indicators
- Construction and demolition waste
- Certificate-to-origin
- Certificate summary
The configuration of these reports allows for the inclusion of additional data (project, location, developer, author and date), visible in the different reports to be generated.
The tool also allows users to restrict the reports to those elements that meet a filter condition by tag. For example, bills of quantities can be generated by building block, by floor and even by type of elements in the system.
Bill of quantities documents can also be exported in HTML, DOCX, PDF, RTF, and TXT formats.