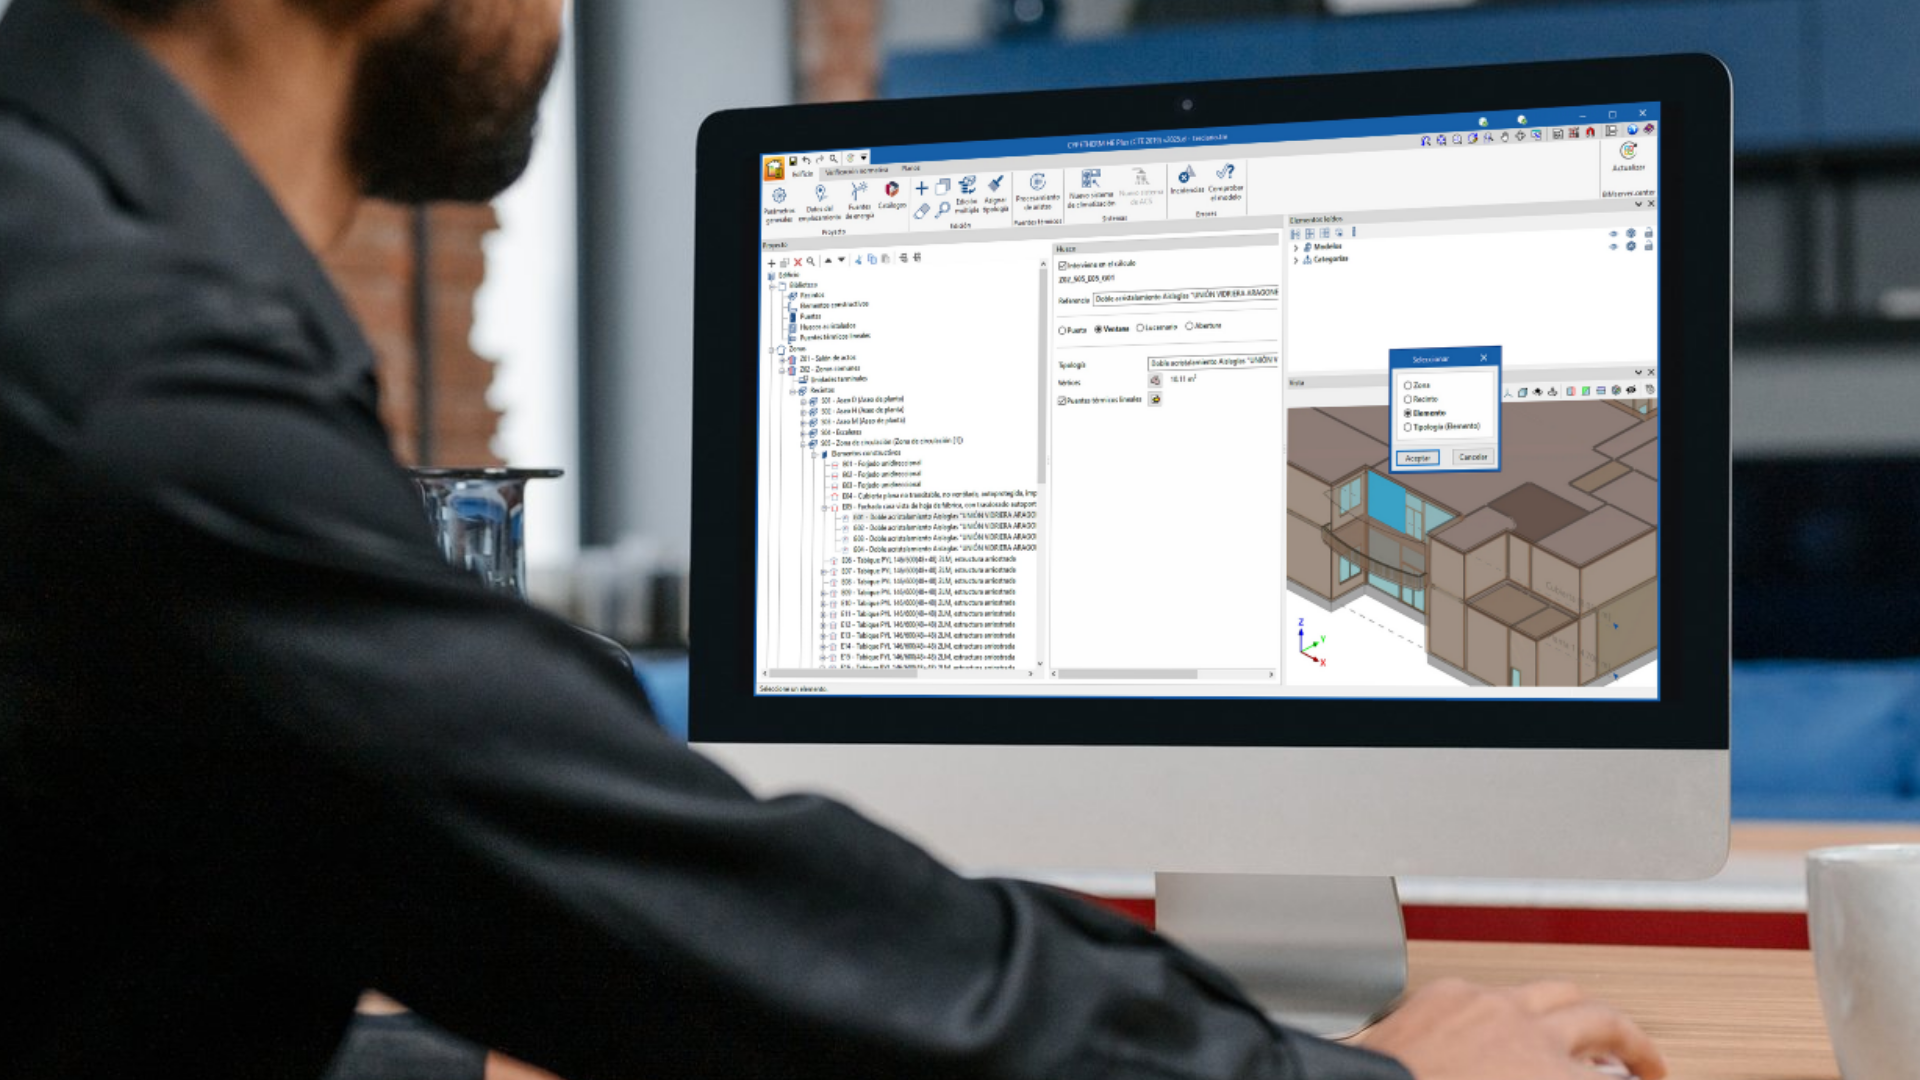
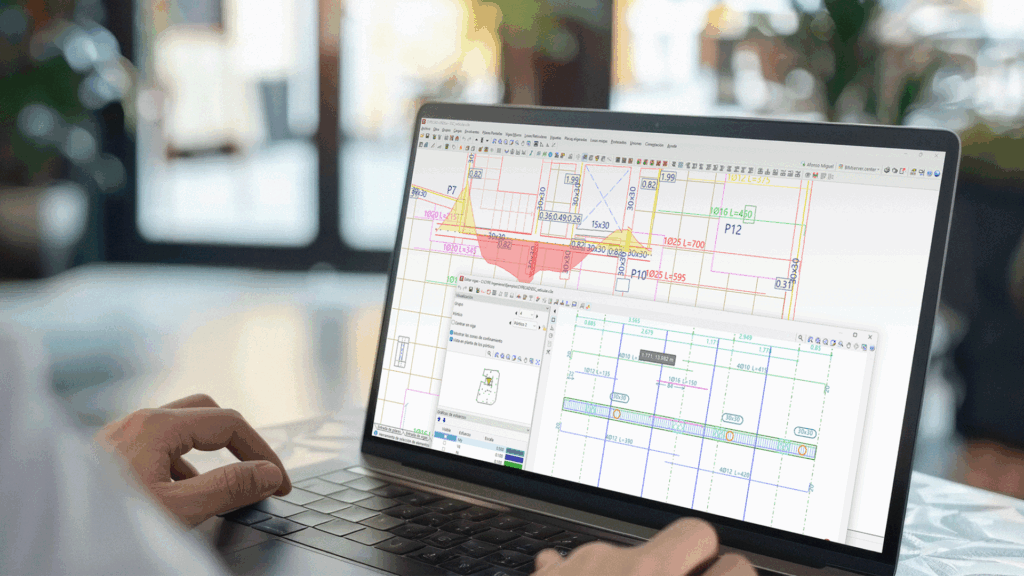
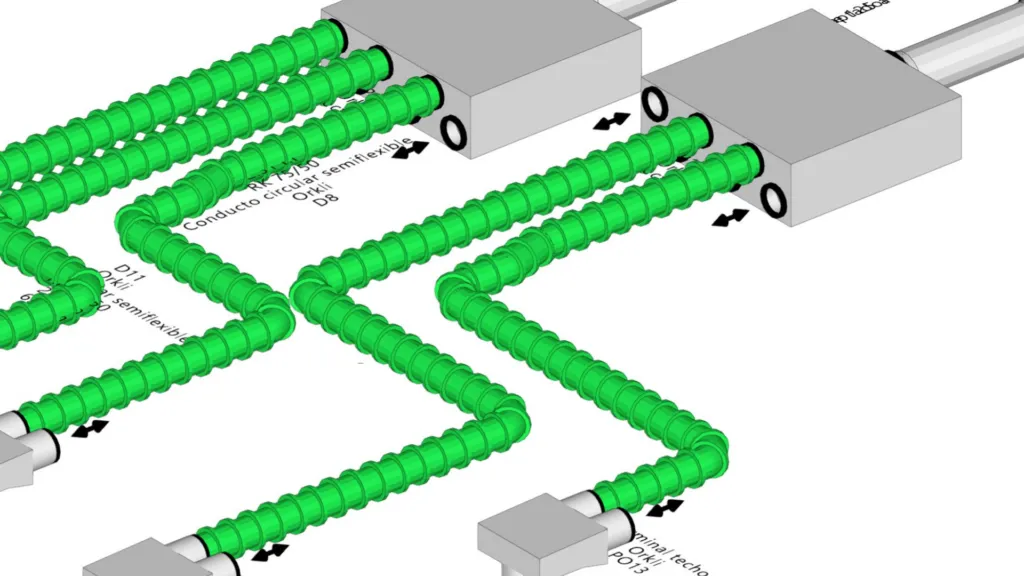
Introduction

CYPELEC PV Systems is a program for designing and analysing photovoltaic electrical systems. The program has BIM integration resources and can import architectural models generated in IFC format, and offers a library of elements to define the system properties. CYPELEC PV Systems includes an energy design tool that helps users to calculate the number of PV modules required based on energy consumption and solar irradiation data. The system elements, such as solar panels, inverters and batteries, can be entered and the calculation can be made by considering parameters such as orientation, sloping and shading. The program can also be used to define the single-line diagram of the system, calculate the wiring design, generate bills of quantities and obtain detailed results, such as the energy generated, losses and electrical parameters.

Workflows supported by the program

As CYPELEC PV Systems is an Open BIM tool and is connected to the BIMserver.center platform, it offers its users different workflow options.

  • Modelling PV systems directly in CYPELEC PV Systems.
  • Importing CAD files in 2D, such as DWG, DXF, PDF and JPG, to be used as a reference in the layout of the PV system.
  • Importing architectural models developed in BIM via the IFC standard, created with CYPE Architecture, IFC Builder or CYPECAD MEP. These three programs have native connection options with the BIMserver.center platform.
  • Importing architectural models developed in BIM, via the IFC standard, created with Autodesk Revit. Both the uploading of the model to the BIMserver.center platform and the downloading of information from the platform to Autodesk Revit is carried out via the Open BIM - Revit Plugin.
  • Importing architectural models developed in BIM via the IFC standard from other architectural modelling programs, such as Archicad or Allplan, among others. The model is uploaded to the BIMserver.center platform using the IFC Uploader application.

Work environment

The work environment in CYPELEC PV Systems is similar to that of other CYPE modelling programs.

The top toolbar contains the main tools for creating project libraries, modelling and entering the main elements of the system, managing groups and connecting to the BIMserver.center platform.

The model viewing area can be found on the right-hand side of the interface and allows the system to be modelled and all the elements of the project to be viewed in 3D, including both the models entered in the program and the models read from other applications.

The left-hand side contains the main tools for defining the views of the system and managing the visibility of both elements read and own elements.

Element library

Before starting to design the system, the application has an element library users you can define the properties of the units that are going to be used. These libraries are oriented towards the integration of elements from manufacturers.

The library includes the following:

  • solar panels;
  • inspection boxes
  • junction boxes;
  • distribution panels;
  • regulators;
  • inverters;
  • hybrid inverters;
  • monoblock batteries;
  • modular batteries.

Managing element catalogues

Within the "Photovoltaic system" tab, from the "Catalogues" option in the "Project" group of the main toolbar, the model element catalogues can be managed:

Manufacturers' catalogues

The manufacturer catalogues available in the project can be managed in the top part of the dialogue box. The information can be downloaded, updated or deleted in each of these.

  • Manufacturer
    Manufacturer reference.
  • Download
    Downloads the selected manufacturer's catalogue. The products in the catalogue will be available in the project.
  • Update
    Updates the selected manufacturer's catalogue to the latest version, deleting the version downloaded in the project.
  • Delete
    Deletes the selected manufacturer's catalogue. The products in the catalogue will no longer be available in the project.

Connection to the Open BIM Database

In the lower part of the dialogue box, the program allows users to log in with their Open BIM Database account and password.

Setting the general options

Within the "Photovoltaic installation" tab, in the “Project” group of the main toolbar, the “General options” of the project can be managed.

These are as follows:

  • Analysis and drawing options
    • References
    • General parameters
  • Material and equipment
    • Cables

References

Allows users to set the reference texts for the following types of system elements:

  • Solar panel
  • Inverter
  • Hybrid inverter
  • Regulator
  • Monoblock battery
  • Modular battery
  • Junction box
  • Inspection box
  • Distribution panel
  • Conduit
  • Grid connection point

General parameters

Allows the following general design parameters to be set:

  • Maximum allowable voltage drop in the photovoltaic generator (DC) (%)
  • Maximum allowable voltage drop between the inverter and the network connection point (AC) (%)
  • Orientation of the project with respect to the North (º)
  • Design current as a function of the maximum current of the generator (%)
  • Minimum power of the inverter with respect to the installed power (%)
  • Minimum autonomy of the installation (days)
  • Maximum loss due to orientation and slope
    • Inclined plane (%)
    • Horizontal plane (%)
    • Overlay (%)
    • Architectural integration (%)

Cables

Allows users to set up the available cable families:

  • Standard (IEC / ANSI)
  • Sections
    Cables can be defined according to the IEC standard in mm2, or according to the ANSI standard in American Wire Gauge (AWG).

Calculation conditions

The "Design conditions" option is used to enter the basic parameters of the system, the location and the irradiance or irradiation values (depending on whether the user wants to work with hourly or total values) in the horizontal plane. Furthermore, consumption values can be entered, if available.

Based on the geometrical configuration of the entered PV modules, the program analyses the orientation and slope losses. Losses due to shading are obtained based on the shadows cast by the architectural elements of the linked project, the solar panels themselves, nearby buildings and other obstacles in the surroundings.

Energy pre-design

Before starting to enter the elements, the program has an integrated tool to estimate the number of photovoltaic modules needed for future installation. This is a pre-design that requires the following data to be provided:

  • The estimated or actual electricity consumption, obtained from the data provided by the energy supplier.
  • The irradiation data of the site and the orientation and slope of the PV panels. Irradiation data can be provided by various sources, such as PVGIS (Photovoltaic Geographical Information System).

Entering the above data allows you to select the type of system. The following combinations can be selected:

  • Off-grid system with monoblock batteries.
  • Off-grid system with modular batteries. 
  • On-grid system without storage.
  • On-grid system with storage and autonomy. 
  • On-grid system with surplus storage.

Entering solar panels and rows of panels

Within the "Photovoltaic installation" tab, in the main toolbar in the "Enter elements" group, there are options for entering solar panels and rows of solar panels:

Solar panel

Allows users to enter solar panels individually.

When entering each solar panel, the program requires the following characteristics to be defined:

  • Reference
    Reference of the solar panel.
  • Manufacturer / Reference
    Reference of the manufacturer and the model of the solar panel used. The program allows the import of library data using the wizard available on the right.
  • String
    Reference of the string to which the solar panel is connected, along with other solar panels, in a row.
  • Installation
    Allows users to define the characteristics of the solar panel installation.
    • Layout
      • Vertical
      • Horizontal
    • Type of installation
      The program considers four cases to determine the installation conditions of the panels:
      • Inclined plane
        The modules are placed on an inclined surface, using brackets to arrange them in a specific orientation and inclination.
      • Horizontal plane
        The modules are placed on a horizontal surface, using brackets to arrange them in a specific orientation and inclination.
      • Overlay
        The modules are placed on top of each other and parallel to the building envelope. A horizontal layout is not acceptable in this case, to favour the self-cleaning of the modules.
      • Architectural integration
        The modules replace conventional building elements or are constituent elements of the architectural composition, thus fulfilling a dual energetic and architectural function.
        An essential rule to follow to achieve overlapping or architectural integration of solar installations is to maintain the alignment with the main axes of the building as far as possible.
      • Orientation with respect to the South (α) and slope (β) (º)
        This allows the panel to be positioned by entering its orientation and tilt angles. This data is recalculated if the panels are rotated.
      • Shade factor
        Allows the shadow factor of the panel to be consulted or edited directly. This value is updated during the analysis according to the shadows calculated by the program. The “Loss due to shading” option is deactivated if this value is locked.
      • Loss due to shading
        Allows users to view or edit the shading profile of the panel by means of a cylindrical solar chart.
      • Loss due to orientation and inclination
        This allows user to view the loss due to orientation and inclination by means of the solar gain diagram.

Solar panel library

In the "Element library" option, in the "Project" group, users can create and edit the libraries of available solar panel types.

The data associated with each type of solar panel is as follows:

  • Reference
  • Dimensions (Width x Height x Thickness) (mm)
  • Nominal power (W)
  • Nominal operating temperature of the module (TONC) (ºC)
  • Power correction coefficient due to temperature (g) (%/ºC)
  • Short circuit voltage (Isc) (A)
  • Open circuit voltage (Voc) (V)
  • Maximum current at power peak (Impp) (A)
  • Maximum voltage at power peak (Vmpp) (V)
  • Efficiency (%)

Row of panels

Enters a row of solar panels.

Users can choose between the following methods of entering rows of solar panels:

  • Enter solar panels between two points
    Select two points on the model and enter as many solar panels as possible between them.
  • Enter solar panels in one direction
    Select a point on the model and enter the “Number of solar panels” indicated in the selected address.

The properties of the solar panels in the row also need to be defined:

  • Reverse the direction of the solar panels (optional)
    This option allows the solar panels to be placed to the right of the line entered, instead of to the left by default.
  • Manufacturer / Reference
    The reference of the manufacturer and the model of the solar panel used. The program allows data to be imported from the library using the wizard on the right-hand side.
  • Installation
    Defines the installation characteristics of the solar panels in the row.
    • Layout
      • Vertical
      • Horizontal
    • Type of installation
      The program considers the following case to determine the installation conditions of the panels:
      • Horizontal plane
        The modules are placed horizontally, using brackets to arrange them in a specific orientation and inclination.
    • Slope (β) (º)
      Allows the inclination of the panels in the row to be entered.

Loss due to shading

Each solar panel's losses due to shading are obtained based on its shading profile, which is formed by the shadows cast by the architectural elements of the linked model, the solar panels themselves, nearby buildings and other obstacles in the environment.

Using the “Loss due to shading” option in the editing window of each panel, an associated shading profile can be consulted or edited:

  • Shading polygons
    At the top of the panel, users can consult or manually enter the polygons forming the shading diagram using the following tables:
    • Superior (Solar azimuth 1 (º), Elevation 1(º), Solar azimuth 2 (º), Elevation 2 (º)
      Enters shading diagrams starting from the vertical line (90° elevation).
    • Inferior (Solar azimuth 1 (º), Elevation 1(º), Solar azimuth 2 (º), Elevation 2 (º)
      Enters shading diagrams starting from the horizontal line (0° elevation).
      • Creating a polygon using the simplified option
        This option opens an assistant that allows users to generate a shading polygon by entering only the element's orientation (south, east, northeast, northwest, southeast or southwest) and the distance and height data of the obstacle's mid and end points (d, d1, d2 and h). The points of the resulting shading polygon are shown at the bottom.
  • Shading diagram
    This area displays the cylindrical solar chart, which indicates the position of the sun for each date and time of the year by solar azimuth and elevation, together with the defined or calculated shading diagram.
  • Keep the shading diagram during the analysis (optional)
    If the obstacles are not entered and the shading diagram is entered manually, this next option must be checked so that the shading diagram entered is preserved and not calculated.
Note:
Using the options available in the “Update results” tool in the ”Calculation” group, users can carry out an analysis with a simplified shading diagram with a smaller number of sun positions to reduce the analysis time.

The worst shading factor of all panels in each branch can also be considered for all panels.

Loss due to orientation or inclination

The orientation and inclination losses are calculated according to the geometrical configuration of the PV modules entered and can be consulted using the “Loss due to orientation or inclination” option in the editing window of each panel.

This provides a diagram of the solar demand capacity ratio depending on the orientation with respect to the south (α) and the slope (β) of the panel.

The minimum and maximum slopes (βmin, βmax) that allow more than a 90% demand (with orientation and inclination losses equal to or less than 10%) for the selected south orientation, including the latitude correction, are also shown, and the panel inclination is checked to ensure that it falls within this range.

Entering system elements

Within the “Photovoltaic installation” tab, in the “Enter elements” group of the main toolbar, there are options for entering the rest of the elements in the system:

Inspection box

Allows an inspection box to be inserted. The inspection boxes must be located at the outlet of a solar panel string, a junction box, an inverter or another inspection box.

When entering an inspection box, the following parameters must be specified:

  • Reference
    Inspection box reference.
  • Manufacturer / Reference
    Manufacturer reference and the model of the inspection box used. Library data can be imported into the program using the wizard on the right-hand side.
  • Output
    Reference of the element located at the outlet of the inspection box. Users can search for elements by their reference using the wizard available on the right-hand side of the program.
  • MPPT tracker
    Maximum Power Point Tracker index.

Inspection box library

In the "Elements library" option, in the "Project" group, the libraries of available inspection box types can be created and edited.

The data associated with each type of inspection box is as follows:

  • Reference
  • General data
    • Dimensions (Width x Length x Height) (mm)

Junction box

Inserts a junction box. The junction boxes must be installed at the outlet of a solar panel string, an inspection box, an inverter, a switchboard or another junction box.

When entering a junction box, the following parameters must be specified:

  • Reference
    Junction box reference.
  • Manufacturer / Reference
    Manufacturer reference and the model of the junction box used. Library data can be imported into the program using the wizard on the right-hand side.
  • Output
    Reference of the element located at the outlet of the junction box. Users can search for elements by their reference using the wizard available on the right-hand side of the program.
  • MPPT tracker
    Configures the associated Maximum Power Point Tracker.

Junction box library

In the "Elements library" option, in the "Project" group, the libraries of available junction box types can be created and edited.

The data associated with each type of junction box is as follows:

  • Reference
  • General data
    • Dimensions (Width x Length x Height) (mm)

Distribution panel

Inserts a distribution panel. The distribution panels must be installed at the outlet of an inverter. A junction box, an inspection box or a grid connection point must be provided at the outlet of the distribution panel.

When entering a distribution panel, the following parameters must be specified:

  • Reference
    Distribution panel reference.
  • Manufacturer / Reference
    Manufacturer reference and the model of the distribution panel used. Library data can be imported into the program using the wizard on the right-hand side.
  • Output
    Reference of the element located at the outlet of the distribution panel. Users can search for elements by their reference using the wizard available on the right-hand side of the program.

Distribution panel library

In the "Elements library" option, in the "Project" group, the libraries of available distribution panel types can be created and edited.

The data associated with each type of distribution panel is as follows:

  • Reference
  • General data
    • Dimensions (Width x Height x Thickness) (mm)

Regulator

Inserts a regulator. An inverter or a monoblock battery must be installed at the output of the regulator.

When entering a regulator, the following parameters must be specified:

  • Reference
    Regulator reference.
  • Manufacturer / Reference
    Manufacturer reference and the model of the regulator used. Library data can be imported into the program using the wizard on the right-hand side.
  • Output
    Reference of the element located at the outlet of the regulator. Users can search for elements by their reference using the wizard available on the right-hand side of the program.

Regulator library

In the "Elements library" option, in the "Project" group, the libraries of available regulator types can be created and edited.

The data associated with each type of regulator is as follows:

  • Reference
  • General data
    • Dimensions (Width x Height x Thickness) (mm)
    • Yield (%)
    • Nominal load current (A)
    • Nominal voltage (V)
    • Maximum open circuit input voltage (V)
    • Maximum input power (W)

Inverter

Inserts an inverter. Inverters must be installed at the output of a solar panel string, a junction box, an inspection box, a regulator or a monoblock battery. A junction box, an inspection box, an electrical panel or a grid connection point must be provided at the inverter output.

When entering an inverter, the following parameters must be specified:

  • Reference
    Inverter reference.
  • Manufacturer / Reference
    Manufacturer reference and the model of the inverter used. Library data can be imported into the program using the wizard on the right-hand side.
  • Output
    Reference of the element located at the outlet of the inverter. Users can search for elements by their reference using the wizard available on the right-hand side of the program.

Inverter library

In the "Elements library" option, in the "Project" group, the libraries of available inverter types can be created and edited.

The data associated with each type of inspection box is as follows:

  • Reference
  • General data
    • Dimensions (Width x Height x Thickness) (mm)
    • Number of MPPT trackers
    • Maximum number of inputs by MPPT (V)
    • Yield (%)
    • Minimum voltage by MPPT (V)
    • Maximum voltage by MPPT (V)
    • Nominal power (W)
    • Peak power (W)
    • Maximum input current per MPPT (A)
    • Power factor (cos φ)
    • Nominal voltage (live-neutral) (V)
    • Polarity (Single-phase/Three phase)

Hybrid inverter

Inserts a hybrid inverter. Hybrid inverters must be installed at the output of a solar panel string, a junction box, an inspection box, a regulator or a monoblock battery. A junction box, inspection box, electrical panel or grid connection point must be installed at the output of the hybrid inverter.

When entering a hybrid inverter, the following parameters must be specified:

  • Reference
    Hybrid inverter reference.
  • Manufacturer / Reference
    Manufacturer reference and the model of the hybrid inverter used. Library data can be imported into the program using the wizard on the right-hand side.
  • Output
    Reference of the element located at the outlet of the hybrid inverter. Users can search for elements by their reference using the wizard available on the right-hand side of the program.

Hybrid inverter library

In the "Elements library" option, in the "Project" group, the libraries of available hybrid inverter types can be created and edited.

The data associated with each type of hybrid inverter is as follows:

  • Reference
  • General data
    • Dimensions (Width x Height x Thickness) (mm)
    • Number of MPPT trackersMaximum number of inputs by MPPT (V)
    • Yield (%)
    • Minimum voltage by MPPT (V)
    • Maximum voltage by MPPT (V)
    • Nominal power (W)
    • Peak power (W)
    • Maximum input current per MPPT (A)
    • Power factor (cos φ)
    • Nominal voltage (live-neutral) (V)
    • Polarity (Single-phase/Three phase)
    • Connection with modular battery
      • Minimum battery input operating voltage (V)
      • Maximum battery input operating voltage (V)
      • Maximum operating current (A)
      • Maximum load power (W)
      • Maximum discharge power (W)

Monoblock battery

Inserts a monoblock battery. A regulator or inverter must be fitted at the output of the monoblock battery.

When entering a monoblock battery, the following parameters must be specified:

  • Reference
    Monoblock battery reference.
  • Manufacturer / Reference
    Manufacturer reference and the model of the monoblock battery used. Library data can be imported into the program using the wizard on the right-hand side.
  • Output
    Reference of the element located at the outlet of the monoblock battery. Users can search for elements by their reference using the wizard available on the right-hand side of the program.
  • Type of installation
    • Individual battery
    • Battery bank
      • Number of batteries in series
      • Number of strings in parallel

Monoblock battery library

In the "Elements library" option, in the "Project" group, the libraries of available monoblock battery types can be created and edited.

LThe data associated with each type of monoblock battery is as follows:

  • Reference
  • General data
    • Dimensions (Width x Height x Thickness) (mm)
    • Accumulation voltage (V)
    • Depth of discharge (%)
    • Discharge capacity (Ah)
    • Discharge period (h)

Modular battery

Inserts a modular battery. A hybrid inverter must be installed at the output of the modular battery.

When entering a modular battery, the following parameters must be specified:

  • Reference
    Modular battery reference.
  • Manufacturer / Reference
    Manufacturer reference and the model of the modular battery used. Library data can be imported into the program using the wizard on the right-hand side.
  • Output
    Reference of the element located at the outlet of the modular battery. Users can search for elements by their reference using the wizard available on the right-hand side of the program.
  • Number of modules per block
  • Number of blocks

Modular battery library

In the "Elements library" option, in the "Project" group, the libraries of available modular battery types can be created and edited.

The data associated with each type of modular battery is as follows:

  • Reference
  • General data
    • Dimensions (Width x Height x Thickness) (mm)
    • Capacity per module (Wh)
    • Nominal voltage (V)
    • Layout of the modules of each block (In series / In parallel)
    • Minimum number of modules per block
    • Maximum number of modules per block
    • Layout of the blocks (In series / In parallel)
    • Maximum number of blocks

Conduit

Enters a conduit to connect the elements in the system.

When entering a conduit, the following parameters must be specified:

  • Reference
    Conduit reference.

Grid connection point

Inserts the grid connection point. The grid connection point must be provided at the outlet of an inverter, a junction box, an inspection box or an electrical panel. Only one grid connection point may be entered in the model.

When entering a grid connection point, the following parameters must be specified:

  • Reference
    Grid connection point reference.
  • Type of connection
    • Off-grid
    • On-grid

Creating and assigning branches

In the ‘’Photovoltaic installation‘’ tab, in the ‘’Groups‘’ section of the main toolbar, there are options for defining the branches of solar panels in the system:

Branches

Allows users to access a table where they can create and edit the data of the branches in the system. The branches or strings connect a group of solar panels in a row.

The following characteristics are defined for each of the branches:

  • Reference
    Branch reference.
  • Output
    Selects the output inverter of the branch indicating its reference.
  • MPPT tracker
    Sets the Maximum Power Point Tracker associated with the branch. The program independently checks the input voltage of each MPPT tracker.

Assign branch

Assigns the branches to the solar panels of the system.

When clicking on the option, the program opens a dialogue box with the following option:

  • Reference
    Enters the reference of the branch to be assigned. Existing branches can be found using the wizard on the right.

Then, the panels assigned to the indicated branch are selected in the model.

PV system editing tools

In the “Photovoltaic installation” tab, the following options can be found in the “Edit” group of the main toolbar for editing the system:

The tools area in this group allows the following operations to be carried out:

EditEdits the parametric properties of the element selected in the model.
CopyCopies one or several elements.
Move a group of elementsMoves a group of elements.
MoveMoves an element or an element’s node.
Rotate a group of elementsRotates a group of elements.
RotateRotates an element about the "x", "y" or "z" axis.
Modify height positionModifies the height position of an element by specifying a relative displacement or absolute elevation.
DeleteDeletes a previously entered element.
MeasureMeasures lengths between defined points on the model. If a closed contour is selected, it also indicates the area.
AssignAssigns the parametric properties of the selected element to other elements.

Search tools

In the “Photovoltaic installation” tab, in the “Edit” group of the main toolbar, are the following options for searching for branches or elements in the system:

Searching for branches

Searches for branches by entering a reference text. The panels associated with the branch are highlighted so that they can be identified in the model.

  • Only whole word (optional)
    If this option is activated, only branches with a complete reference matching the entered text are displayed.

Searching for elements

Searches for any type of element by entering a reference text. The elements are highlighted so that they can be identified in the model.

  • Only whole word (optional)
    If this option is activated, only branches with a complete reference matching the entered text are displayed.

Calculations, checks and designs

In the “Photovoltaic installation” tab, in the “Edit” group of the main toolbar, the following options related to the system design can be found:

Update results

This allows the system to be analysed and designed, updating the results of the elements.

It opens the “Shading calculation” dialogue box, which allows users to manage the following options:

  • Analysis with simplified shading diagram (optional)
    Through the simplified shading analysis, the solar projection process is carried out with a smaller number of sun positions, thus reducing the analysing time.
  • Consider the most unfavourable shade factor for all the panels of the string (optional)
    With this option, the program assigns the lowest shading factor it finds in any of the panels associated with each branch to all the panels.
Note:
The program also offers the option to keep the shading diagram of the panels if it has not detected any changes in the model that would modify it.

Checking the results

The results of the last completed analysis can be checked.

By clicking on each element, the program provides a list of justification calculations.

Note:
This option does not update element data if changes have been made to the model. If modifications have been made, the "Calculation" option should be used.

Show/Hide incidents

If this option is activated, issue warnings are displayed on the elements where an error has occurred. By hovering the mouse cursor over these warnings, a message describing the error is displayed.

Single-line diagram

The program allows users to draw the single-line diagram of the system in the "Single-line" tab, located in the top left-hand corner of the main window.

In this diagram, the elements will have their electrical parameters and will be connected by means of conduits, where the type of cable with its characteristics and fittings will be defined.

This way, once the single-line diagram has been defined, the program will analyse the electrical parameters of each of the conduits and carry out the following checks based on the international IEC standard:

  • Allowable current.
  • Coordination amongst conductors and overload protection devices.
  • Voltage drop.

Bill of quantities of the system

Using the "Bill of quantities" tab, users can define their own cost database or use the one already loaded by default. By associating the items of the cost database with the elements defined in the "Photovoltaic installation" tab, the program obtains the bill of quantities for the system.

Results output

Drawings in DWG, DXF or PDF format

Drawings created in the "Single-line" tab, along with other drawings generated from the model views of the PV system, can be exported.

Project reports

The following reports can be exported from a model that has been created and analysed in CYPELEC PV Systems:

  • Justification calculations.
  • Production summary.

The program displays the following results:

  • Energy produced by each solar panel and by the whole set.
  • Loss due to orientation or inclination.
  • Loss due to shading.
  • Loss due to temperature.
  • Sections needed in the cables to support the currents generated in each section and not to exceed the maximum voltage drop value permitted.
  • Power, voltage and current values admitted by the inverter depending on the configuration adopted.
  • Power and voltage values permitted by the regulator.

IFC and glTF files, compatible with BIMserver.center

Exporting the project to the BIMserver.center platform will automatically export a 3D model in IFC and glTF format for integrating the model of the structure into the Open BIM project, allowing the following:

  • viewing the model on the online platform;
  • viewing the model in the BIMserver.center application for iOS and Android;
  • viewing the model in virtual reality and augmented reality;
  • viewing the model in other CYPE tools;
  • integrating the model in the project and compatibility with the rest of the project's disciplines with Open BIM Model Checker.

Integration into the BIMserver.center platform

Many of CYPE's programs are connected to the BIMserver.center platform and allow collaborative work to be carried out via the exchange of files in formats based on open standards.

Please note that, to work on BIMserver.center, users can register on the platform free of charge and create a profile.

When accessing a program connected to the platform, the program connects to a project in BIMserver.center. This way, the files of the projects that have been developed collaboratively in BIMserver.center are kept up to date.

More information:
For further details related to using CYPE software via the BIMserver.center platform, please click on this link.

Options available in CYPELEC PV Systems

In the “Photovoltaic installation” tab, in the “BIMserver.center” group of the main toolbar, there are the features required for using CYPELEC PV Systems together with other BIMserver.center tools:

Update

Information contained in previously imported models can be updated in the project, or new models can be imported if desired.

Allows the information of the installation developed with CYPELEC PV Systems to be exported to BIMserver.center and shared with other users, including the quantities and design reports of the installation.

During the export process, information related to the identification of the files to be exported can be defined:

  • Name
  • Description

Supported licenses and modules

CYPELEC PV Systems can be downloaded from the BIMserver.center platform and requires that the user license includes the following module:

IFV - Photovoltaic systems

The IFV module allows users to analyse photovoltaic systems in CYPELEC PV Systems.