Introduction
The MedBIM - Revit Plugin is a CYPE plug-in that is installed in Autodesk Revit and generates a quantity extraction file and links the Revit model to a bill of quantities from Arquimedes.
The "Bill of quantities of BIM models" module, enables the direct connection between Arquimedes and Revit, which allows users to assign to an element of the BIM model a code of an item belonging to the work section structure of Arquimedes, and to obtain the quantities for an existing bill of quantities or for a new one.
MedBIM - Revit Plugin features
- Integration into the Revit environment through its ribbon's "Add-ons" tab.
- Simultaneous work with Revit, Archimedes and the "Bills of quantitities of BIM models" module. Users can work with two monitors.
- Full interaction between Revit, Arquimedes and any of its modules.
- Reading of Revit model information (categories, families, types, specimens, system and user parameters, etc.). Tab area for conveniently selecting information associated with categories, types and specimens, rooms, materials and phases. Data sorting and filtering in columns. Location of specimens by ID and visually, highlighting and isolating them in the BIM model once located.
- Starting from the Revit model and with the "Bills of quantitities of BIM models" module, measurement in Arquimedes on an open bill of quantities, on an existing but not open job; or creation of a new bill of quantities starting from the BIM model. New items can be added at any time.

- Automatic assignment of items to entities of the BIM model if they contain the code of a bill of quantities item to be measured in the "Key note" parameter. The plugin can be used to have template Revit models with the entities associated with items in an Arquimedes reference database by means of the "Key note" parameter, thus reducing the subsequent manual assignment work.
- Quantities by Revit model entities and by materials. It also allows early cost estimation by rooms, or groups of items for a specific room.
- Assignment of several items to a type to obtain their measurements. For example, the "Basic wall" type can be assigned the items "Interior partition sheet of ceramic brick masonry for cladding", "Plaster coating" and "Plastic paint on interior walls of plaster or plasterboard".
- Identification in the Revit model of the elements of the selected quantities lines.
- Assigning items from the CYPE Cost Database to the Revit model. When the job units are from the CYPE Cost Database, the quantity criteria are displayed for deduction in the quantity. Revit provides quantity lines for discounting openings. If the area for discounting openings is specified based on the quantity criteria in the project, those lines that meet the criteria will be discounted. It takes into account both the deduction of openings in surfaces and the deduction of excesses.
- Linking several jobs or several Revit projects to the same Arquimedes bill of quantities. It is common practice to have several Revit models linked to the same bill of quantities: architecture, structures and MEP systems. In this case, the Arquimedes "Consolidation of bills of quantities" module is essential, as it allows the work sections and items of the bill of quantities obtained by the CYPECAD, Detailed priced bill of quantities estimators and Budget generators programs to be combined in a single bill of quantities. This saves time and work, and minimises errors or omissions of items.
- Automatic detection of the quantity unit when assigning an item to the BIM model element and assigning the most appropriate combination of dimensions to obtain the quantity lines per item. The combination used to obtain the quantities can be changed to a user combination. Comments for the quantity lines can also be edited.
- Customisation of the formula to obtain the quantities. Users can change how the quantities of a specific category are calculated according to their criteria, even by using formulas.

- With change control, identification of "Categories", "Types" and "Specimens" that have changed after extracting the quantities, and differentiation in the bill of quantities of the quantity lines from the Revit model from the user's quantity lines.
- After exporting or extracting the quantities, the Revit license is free. The company is not obliged to have a license assigned to the person carrying out the quantities, as there is no need to work with Revit.
- The person carrying out the quantities does not need to be familiar with Revit. With a few hours of training, you can understand what a Revit BIM model looks like and manage it with Arquimedes.
- There is no need to carry out the quantities in Revit, as what you get is the Revit model to be able to work with it. Therefore, there is no need to be on the same network to share the central file of the project.
Obtaining the quantities from the Revit BIM model
The process of obtaining the quantities in Arquimedes from the Revit BIM model can be started in two ways, which will differ in the use of the Revit license:
Option 1: After modelling the project in Revit, a file is generated and imported from Arquimedes to extract the quantities
In this case, the Revit license is only required until this file is generated. When the file is imported from Arquimedes, the license for Arquimedes and the "Bill of quantities of BIM models" module is required. To use the CYPE Cost Database and other Arquimedes modules the corresponding licences must also be obtained.
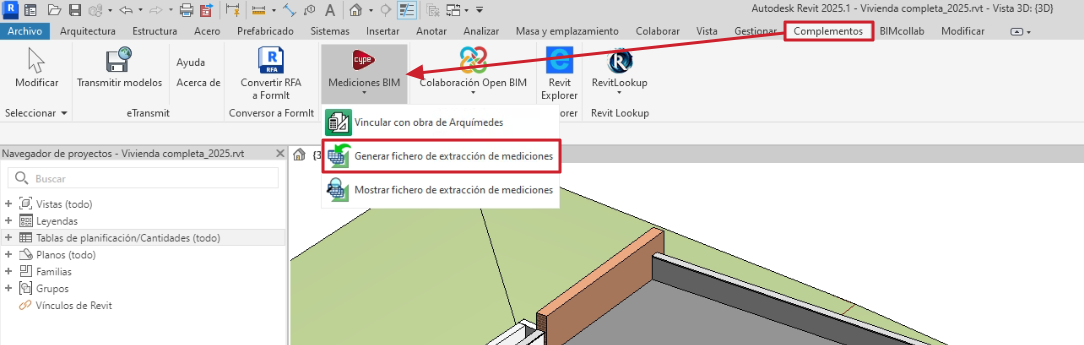
The file is generated using the "Generate quantities extraction file" option in the Revit "Complements" tab. It will have the same name as the Revit job but with a .mcsv extension and will be created in the directory where the Revit job is located. The "Show quantities extraction file" option displays the generated files.
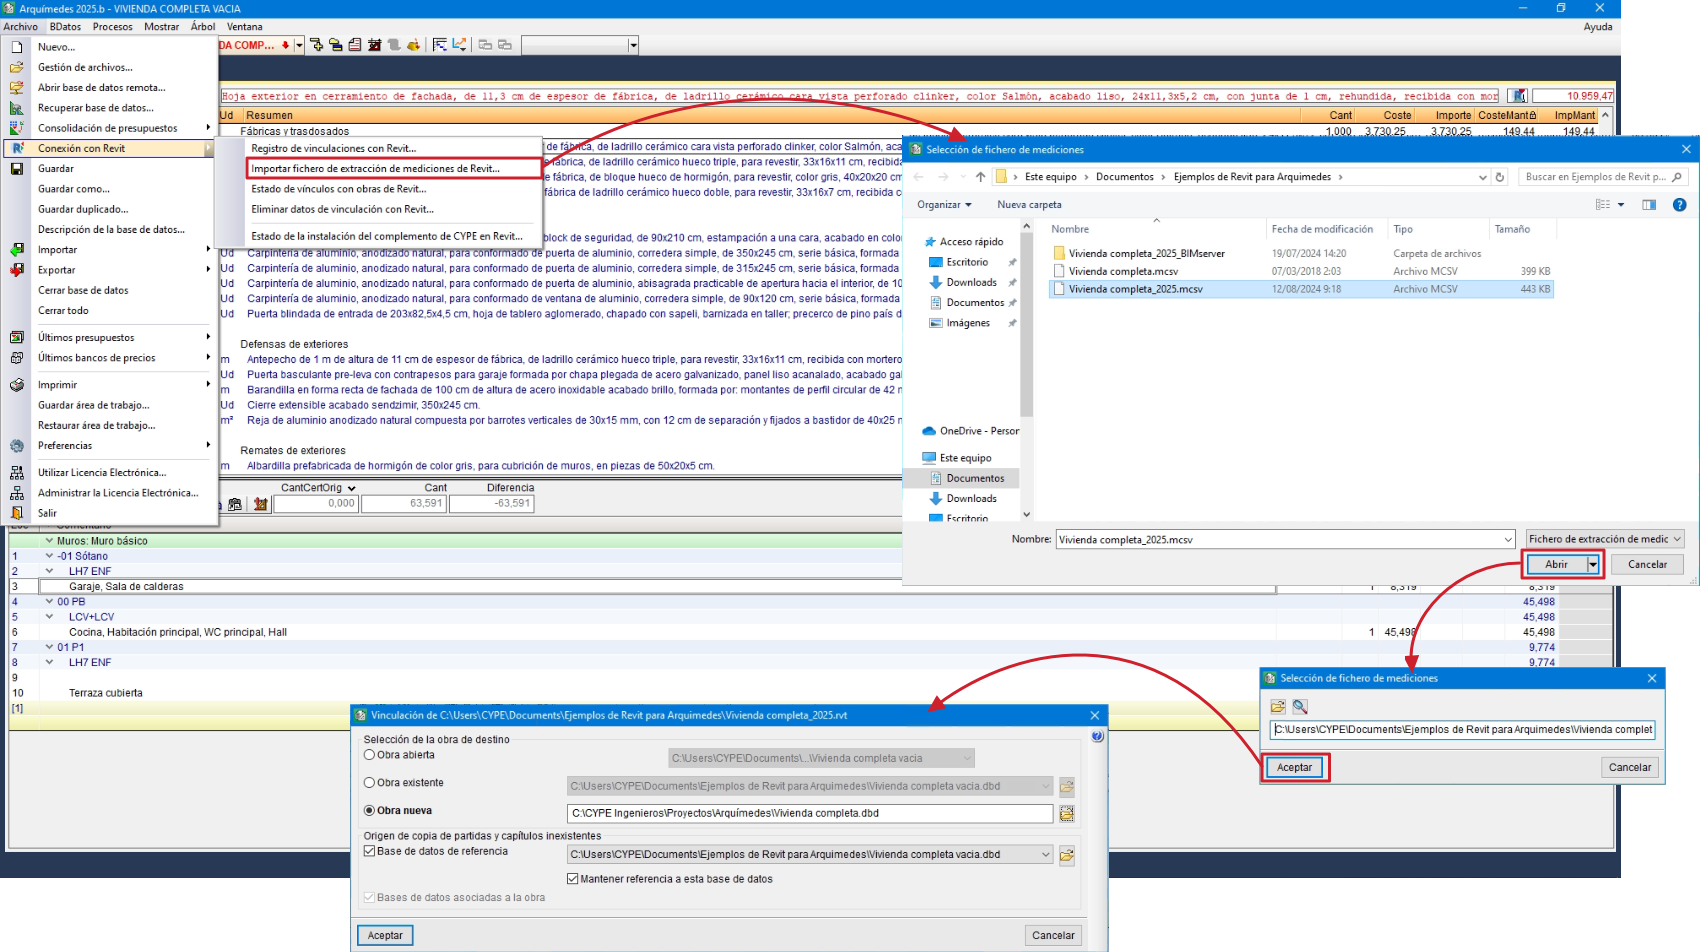
To import the .mcsv file from Arquimedes and extract the quantities from the Revit model, the "Import Revit quantities extraction file" option is used, which can be accessed from the "File" menu, "Connection with Revit".
Option 2: After modelling in Revit, from this same program the job is linked to an Arquimedes bill of quantities to extract the quantities
In this case, the licenses for Revit, Arquimedes and the "Bills of quantities of BIM models" module must be available at the same time. To use the CYPE Cost Database and other Arquimedes modules the corresponding licenses are also required.
The "Link with Arquimedes job" option in the Revit "Complements" tab must be used. This option opens the "Link to Arquimedes" dialogue box, the options for which vary:
- If no Arquimedes bill of quantities has been previously linked, the "Link with Arquimedes job" and "Cancel operation" will be displayed.
- If there is already a previous link, the "Update changes carried out in Revit, in Arquimedes", "Link with Arquimedes job" and "Cancel the operation" options will be displayed.
After linking, users can work in Revit, Arquimedes and the "Assign items and quantity extraction" window simultaneously.

Both modes, initiated with the Revit options "Generate quantities extraction file" or "Link with Arquimedes job", present the dialogue box "Linking of [Revit model path]", in which an Arquimedes job is linked to another Revit job; and then the dialogue box "Assign items and quantity extraction", in which the whole process of assigning items to Revit building elements and extracting the quantities of each of them is carried out.
Linking jobs from Revit and Arquimedes
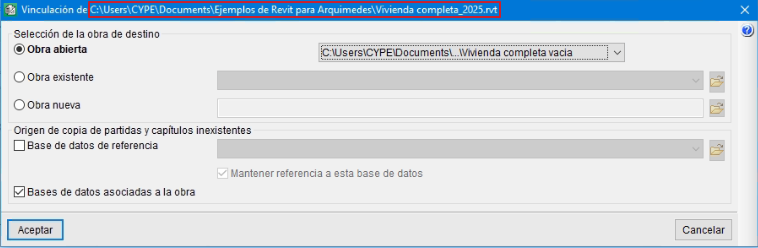
The two procedures described above in "Obtaining the quantities from the Revit BIM model" introduce the "Linking from (Revit model path)" dialogue box. In it, the Arquimedes bill of quantities to which the quantity extracted from Revit is to be transferred and the databases from which the items and work sections that do not exist in the bill of quantities are to be copied are selected. The selected bill of quantities can be:
- A job that is open in Arquimedes
To do this, users select the open bill of quantities to which they are going to add the quantities from Revit. - A job that exists but is not open
Users look for the bill of quantities to which the Revit quantities are going to be incorporated from a path.
This option and the previous one are perfect when you have a pre-design of the bill of quantities prior to the project. - Create a new job
A new bill of quantities is generated in Archimedes with the information obtained from the cost estimation made by Revit (codes of items associated to "Types") and with the help of a database associated to the bill of quantities, which includes all the necessary information for its construction (work sections, items, units, yields, prices, etc.).
This dialogue box also indicates the "Copy origin of inexistent items and work sections". This way, when the Revit job from which the quantities are extracted contains key notes with codes of items that are not defined in the Arquimedes bill of quantities, this part of the configuration establishes in which databases the items should be searched for in order to copy them to the job.
- The first place to look will be the reference database, which should be the same as the one being used in the connection with Revit to associate codes to the building elements.
- If it is not found there, or if the name of the reference database is simply not provided, the program can search for the items among the databases associated with the job. As the items are located, the program reconstructs the work section structure of the source database.
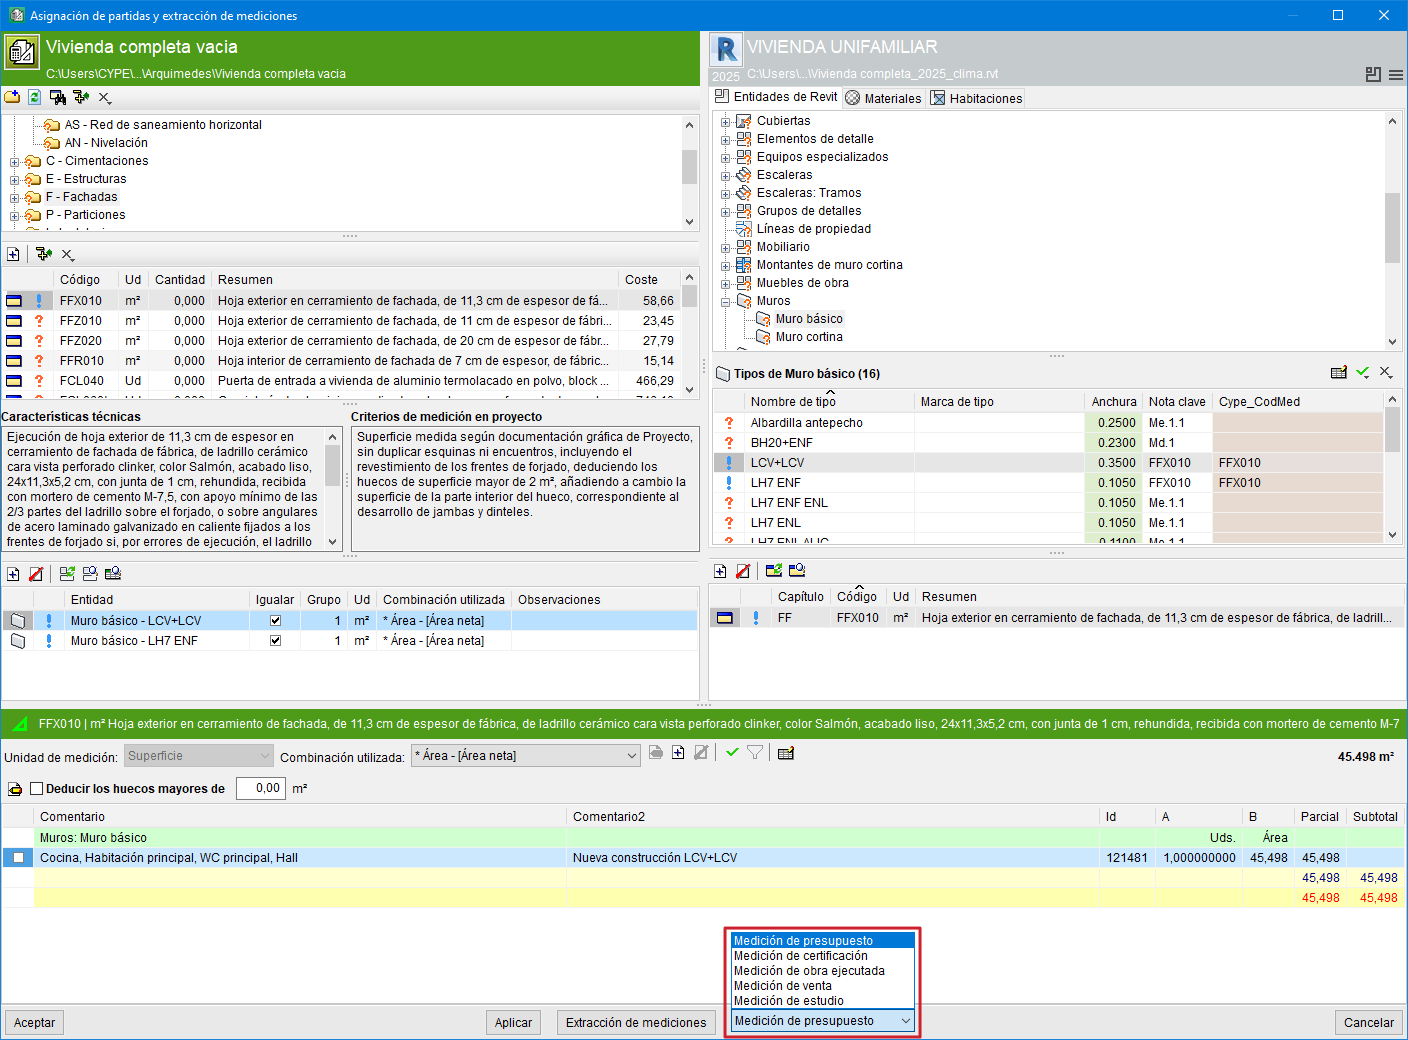
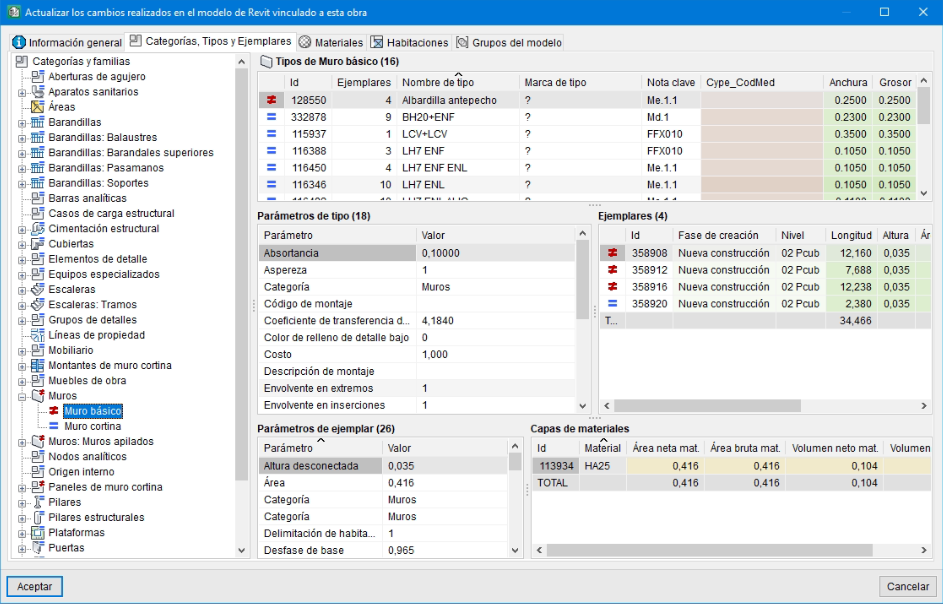
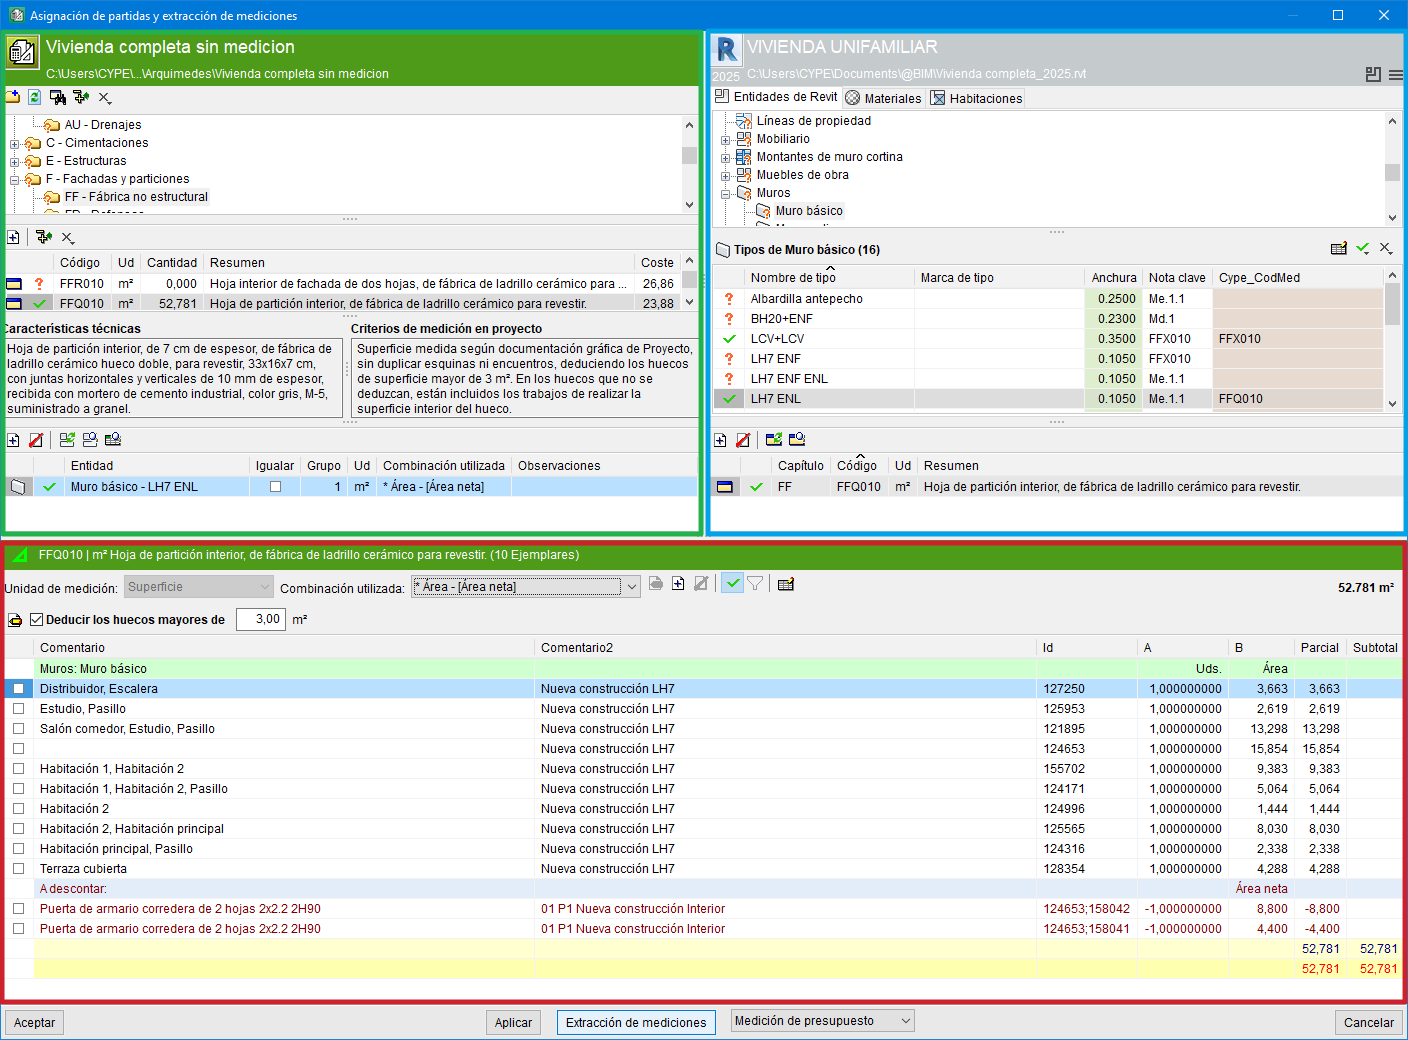
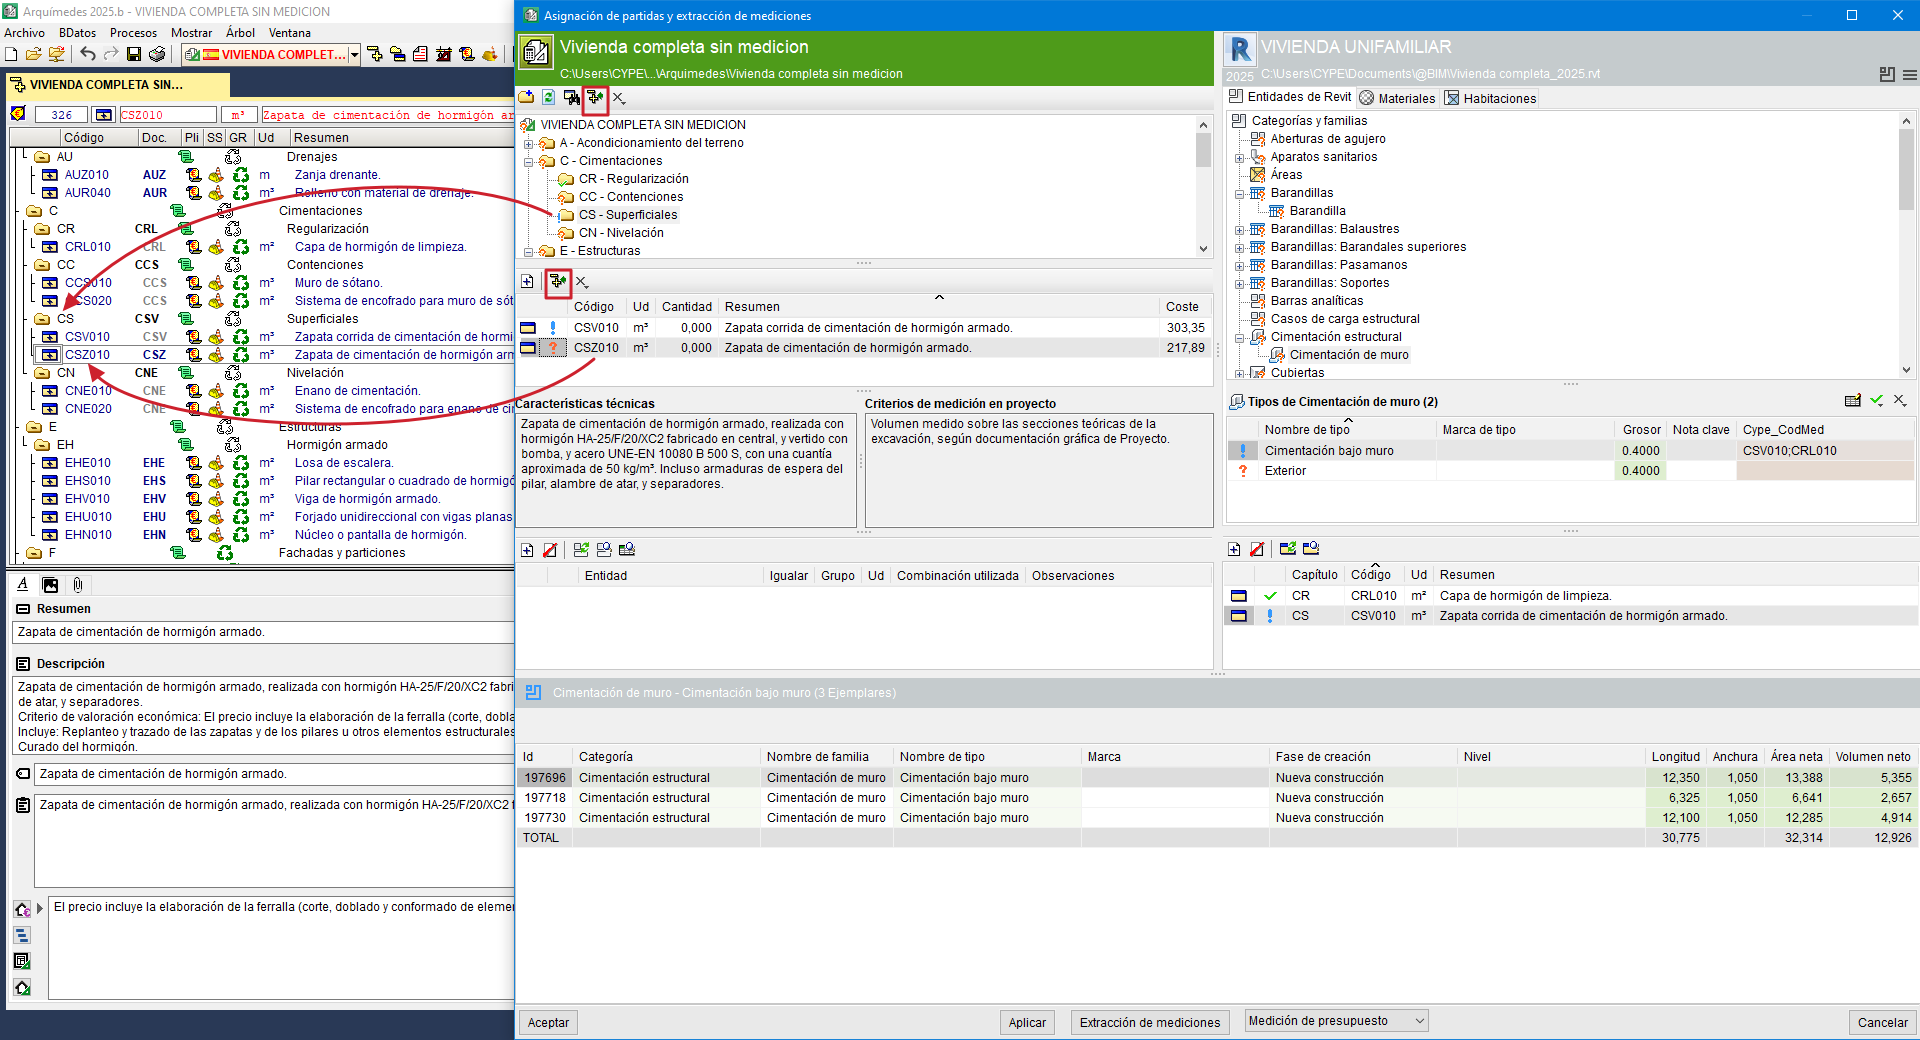
"Assign items and quantity extraction" dialogue box
After linking an Arquimedes estimate to a Revit project, if Arquimedes is not currently open, the CYPE plug-in in Revit opens it. Then, the "Assign items and quantity extraction" dialogue box appears. The quantities contained in the Revit model elements can be extracted using this dialogue box.
Work environment
This dialogue box is divided into two main parts, which are framed in green and blue in the image; and a third part, framed in red, which contains the quantity detail table.
- Green part
The green part shows the chapter and line item structure of the bill of quantities linked to the Revit model. From here users can link entities of the Revit model to bill of quantity items. This tree is updated every time there is a change in the work section structure in the "Breakdown tree" window of the Arquimedes budget linked to the Revit model. - Blue part
The blue part uses tabs to display Revit model elements ("Revit entities", "Materials" and "Rooms"). From here it is possible to link budget items to Revit model entities. - Quantity detail table
The lower part of the dialogue box shows the quantity detail table assigned to the selected item in the green area. As long as the item has not been linked to the entity, when hovering over the Revit entity in the blue area, the lower part will not show the detail, but the list of copies of the selected entity.
Between the "Accept" and "Cancel" command buttons in the dialogue box, there are two further buttons to "Apply" changes and to "Extract quantities".
Adding new work sections and items
In the green part, from the toolbar of the chapters area, it is possible to add a new work section to the work section structure of the bill of quantities with the "New work section" button (1). In the dialogue box that appears, filling in at least the "Code" and "Summary" fields is required.
To create a sub-work section within an existing work section, simply go to that work section and use the "New work section" option (1).
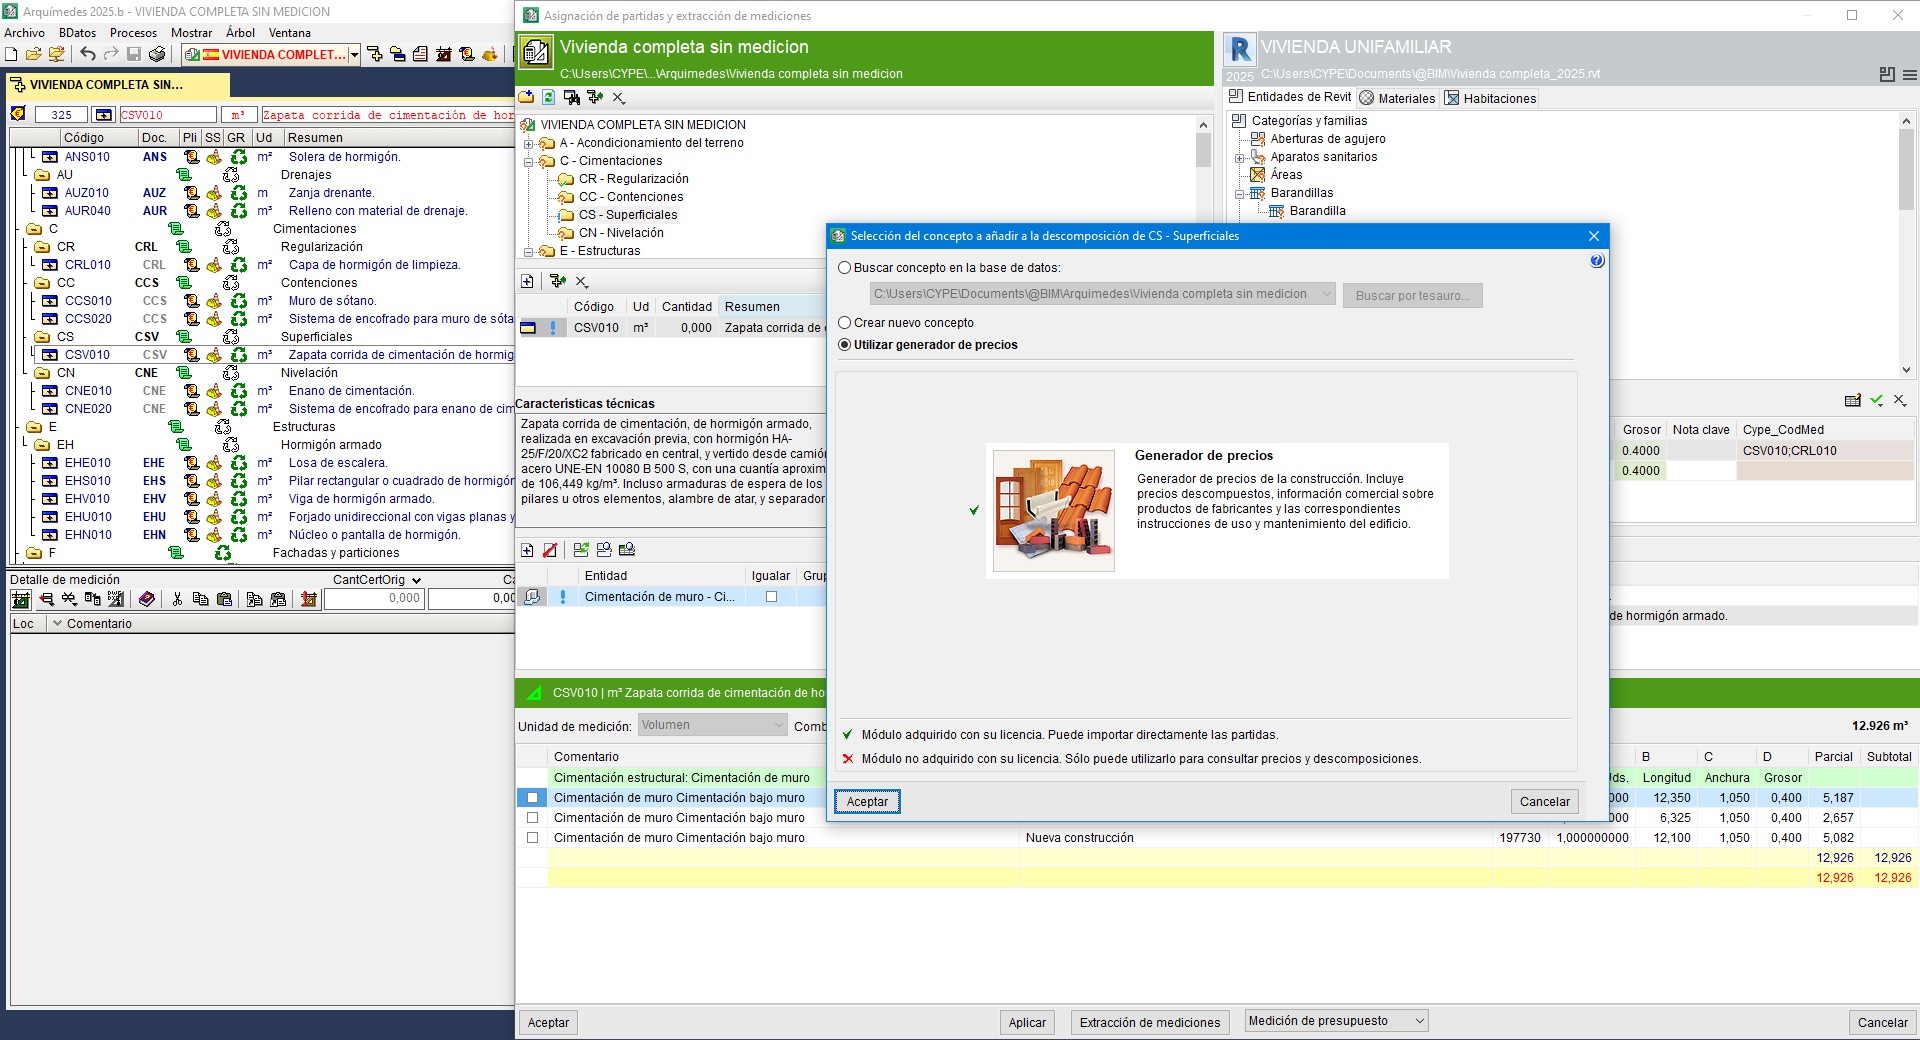
Then, a new item can be added, within a work section or sub-work section, with the "Add new item to the report" button (2) in the toolbar of the items area. From the dialogue box shown, "Selection of the concept to add to the breakdown of %s", the following is possible:
- Add an item from an open database, using the "Search in" option.
- Create a new line item type concept (with breakdown or lift), from the "Create new concept" option.
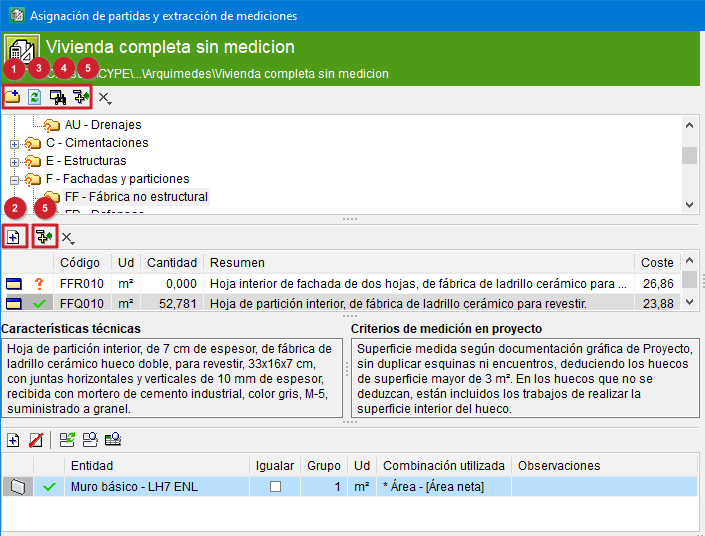
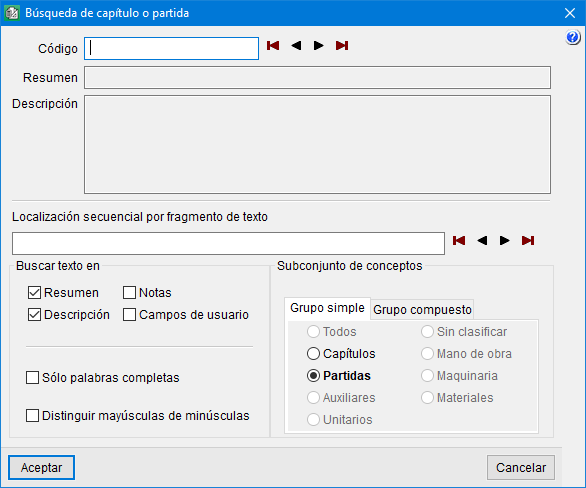
To locate a work section or a line, simply click on the "Search work section or item" button (4) on the toolbar in the chapters area. From the "Search for work section or item" dialogue box that appears, users can search for the item by:
- Code
By entering it in the corresponding field and pressing any of the buttons on the right. - Sequential location by text fragment
By typing the complete words or only an initial part of them separated by spaces.
Finally, the "Show in "Breakdown tree" window" button (5), located on both toolbars, is used to locate the work section or line item selected in the "Assign items and quantity extraction" dialogue box in the Arquimedes "Breakdown tree" window.
Linking Revit model entities to bill of quantity items
Quantities can be extracted or updated from the green part by linking entities in the Revit model to bill of quantities items.
In this part, below the description of the selected item, the toolbar offers the following options:
- Add a new element to the report (1)
Links a Revit entity from one of the tabs in the blue part to an item in the chapter tree in the green part. After selecting both the entity and the item, click this button, which will make the linked entity appear in the list below. - Remove selected item from the report (2)
Removes a linked entity from the lower list. - Replace entity (3)
Selects an entity already linked to an item and change it to another entity by selecting it from the entities on the tabs in the blue part. - Locate linked entity (4)
Selects an entity already linked to a line item and position on it in the corresponding Revit entities tab in the blue part.
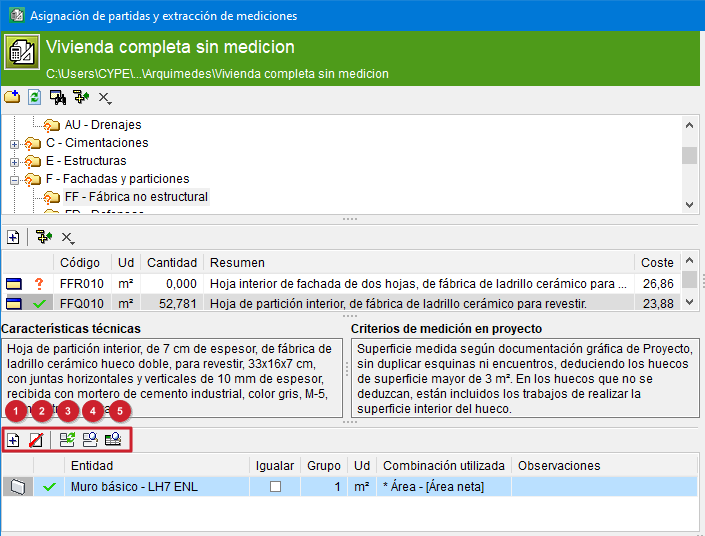
- Show complete quantities (5)
This enables users to visualise how the quantities would look like if they were extracted, without having to extract the quantities and leave the "Assign items and quantity extraction" dialogue box.
The "Group quantities lines" option complements this option for grouping quantities lines, which can be found in detail in the "Options to simplify the number of detail lines" section..

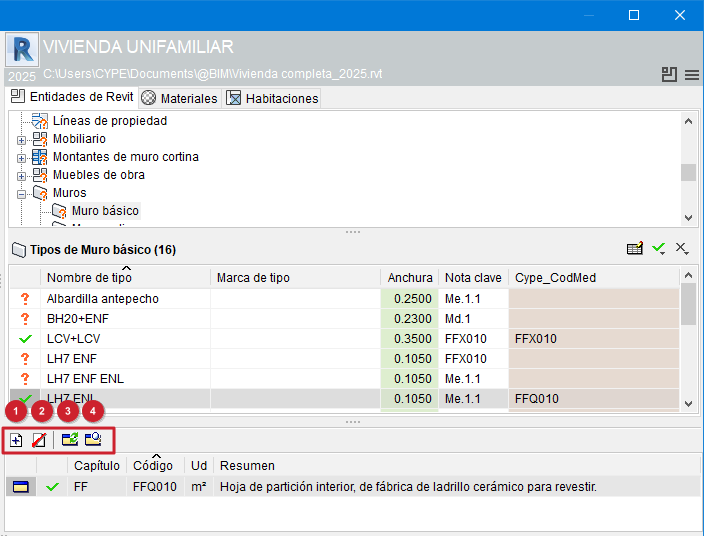
Linking bill of quantities items to entities in the Revit model
From the blue part, the quantities can be extracted or updated by linking bill of quantities items to entities in the Revit model.
In this part, just below the list of Revit model elements, the toolbar offers the following options:
- Add new item to the report (1)
Links an item from the chapter tree in the green part to a Revit entity from one of the upper tabs in the blue part. After selecting both the line item and the entity, this button must be clicked, which will make the linked line item appear in the list below. - Remove selected item from the report (2)
Removes a linked item from the lower list. - Replace entity (3)
Selects an item already linked to a Revit entity and changes it to another line item by selecting it from the line items in the green part. - Locate linked entity (4)
Selects an item already linked to a Revit entity and places it on the list of items in the green part.
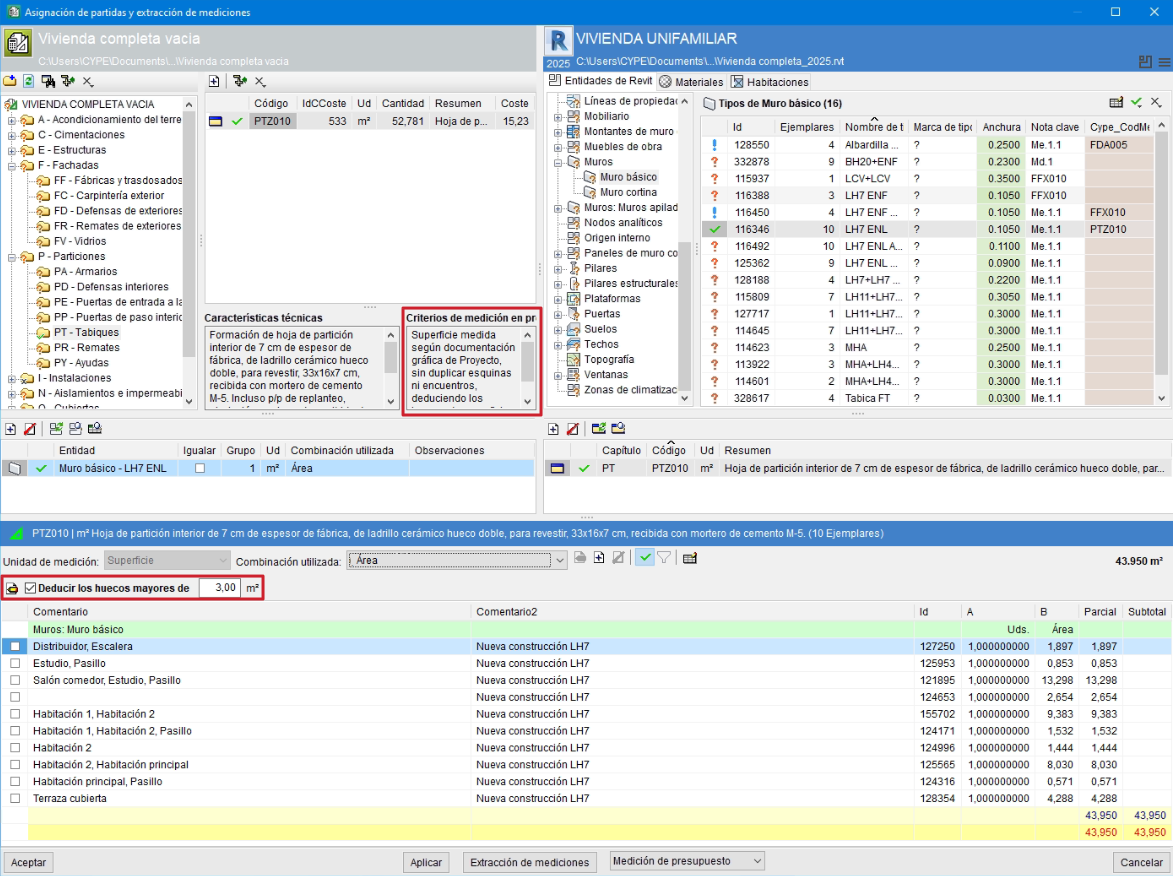
Quantity details table
In the lower part of the "Assign items and quantity extraction" dialogue box, the quantity detail table assigned to the selected item in the green part is displayed.
- If an item has not been linked to a Revit entity, when hovering over the Revit entity in the blue part, the lower area does not show any detail.
- For the quantity detail to be displayed, there must be a link between the item and the Revit entity and the item must contain a recognised unit of measurement (pc, m, m2, m3, kg, etc.).
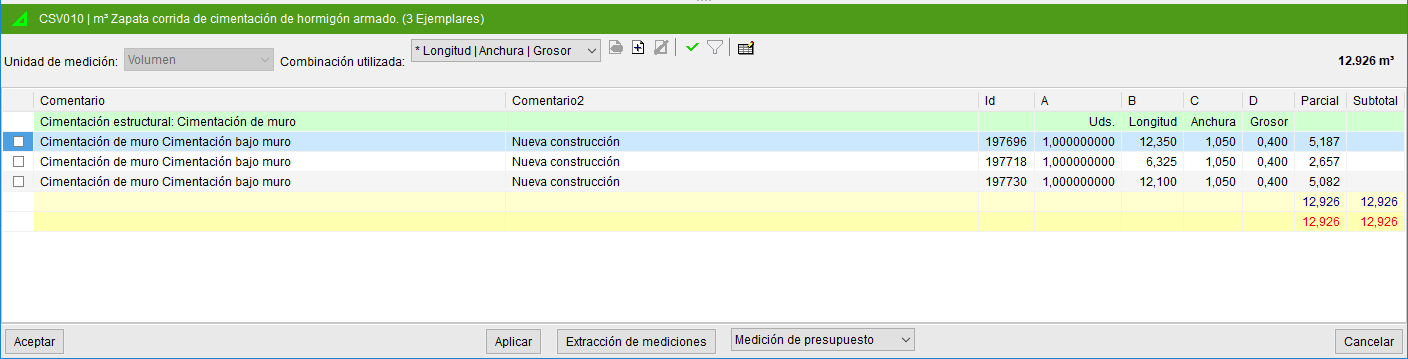
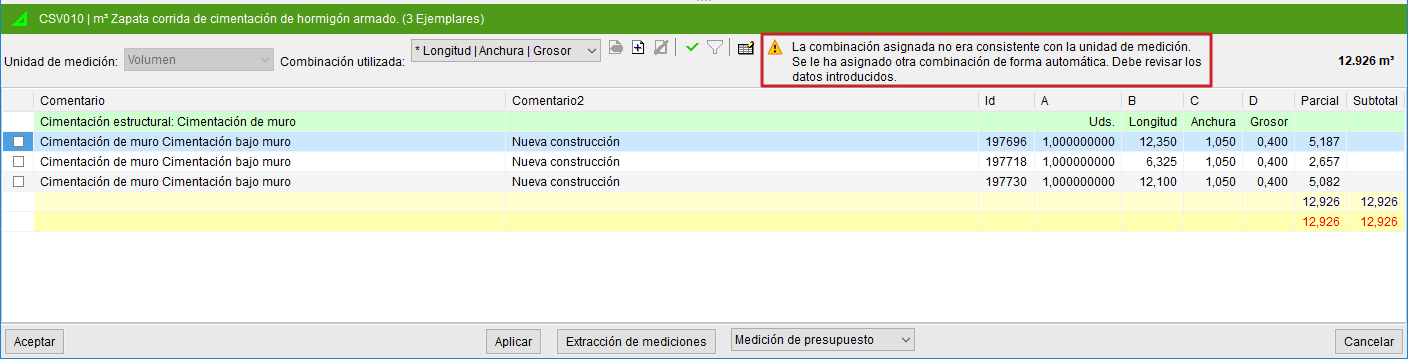
Each quantity line in the quantity table for each item corresponds to an "Instance". The "Id" column uniquely identifies them.

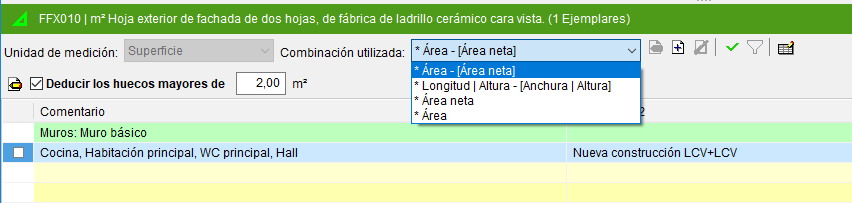
In the configuration area of the quantities table, the "Quantity units" section is displayed. This is obtained by reading the quantity units contained in the item linked to the Revit entity.
A combination of parameters is used to obtain the quantities from the Revit entity. The selection in the drop-down menu "Combination used" depends on the quantities units to be used. For example, to measure surfaces, combinations such as "Area" or "Length x Height" can be used; for volumes, options such as "Volume" or "Net Area x Width" can be used; and for weights, the "Density x Volume" formula can be used.
From "Combination used", a default combination can be selected or, via the icons on the right, a new one can be added, edited or deleted.
If the quantities of an item cannot be extracted directly, a suitable parameter combination must be defined. The program will display a warning with a yellow warning symbol ![]() in the quantities table.
in the quantities table.
Selecting the type of quantity table
Next to the "Extract quantities" button, a drop-down menu appears that can select the type of quantities table where the quantities extraction is to be carried out.
For example, if the quantity is to be extracted for a certification table, it should be noted that quantity extractions are not cumulative, but partial (the contents of the quantity in the "Assign items and quantity extraction" window are always dumped to the quantity tables). Therefore, this table provides a partial quantity in progress and not at source. In other words, this certification has not been closed. The same happens if the quantity is extracted for the completed job table.