
Budgetary control of the job
The "Budgetary control of the job" module includes tools related to the budgetary control of the job in Arquimedes.
With this module, users can carry out the budgetary control of the job (financial control, purchasing control and cost centre control), accounting and allocation to work sections and items, as well as all the features included in the "Arquimedes" module. Various levels of control can be used. Each level includes the possibilities and checks of the previous one.
Other features
The features of this version of Arquimedes and Job control can be enhanced by adding any of the modules listed on the "Arquimedes modules" page to the user license.
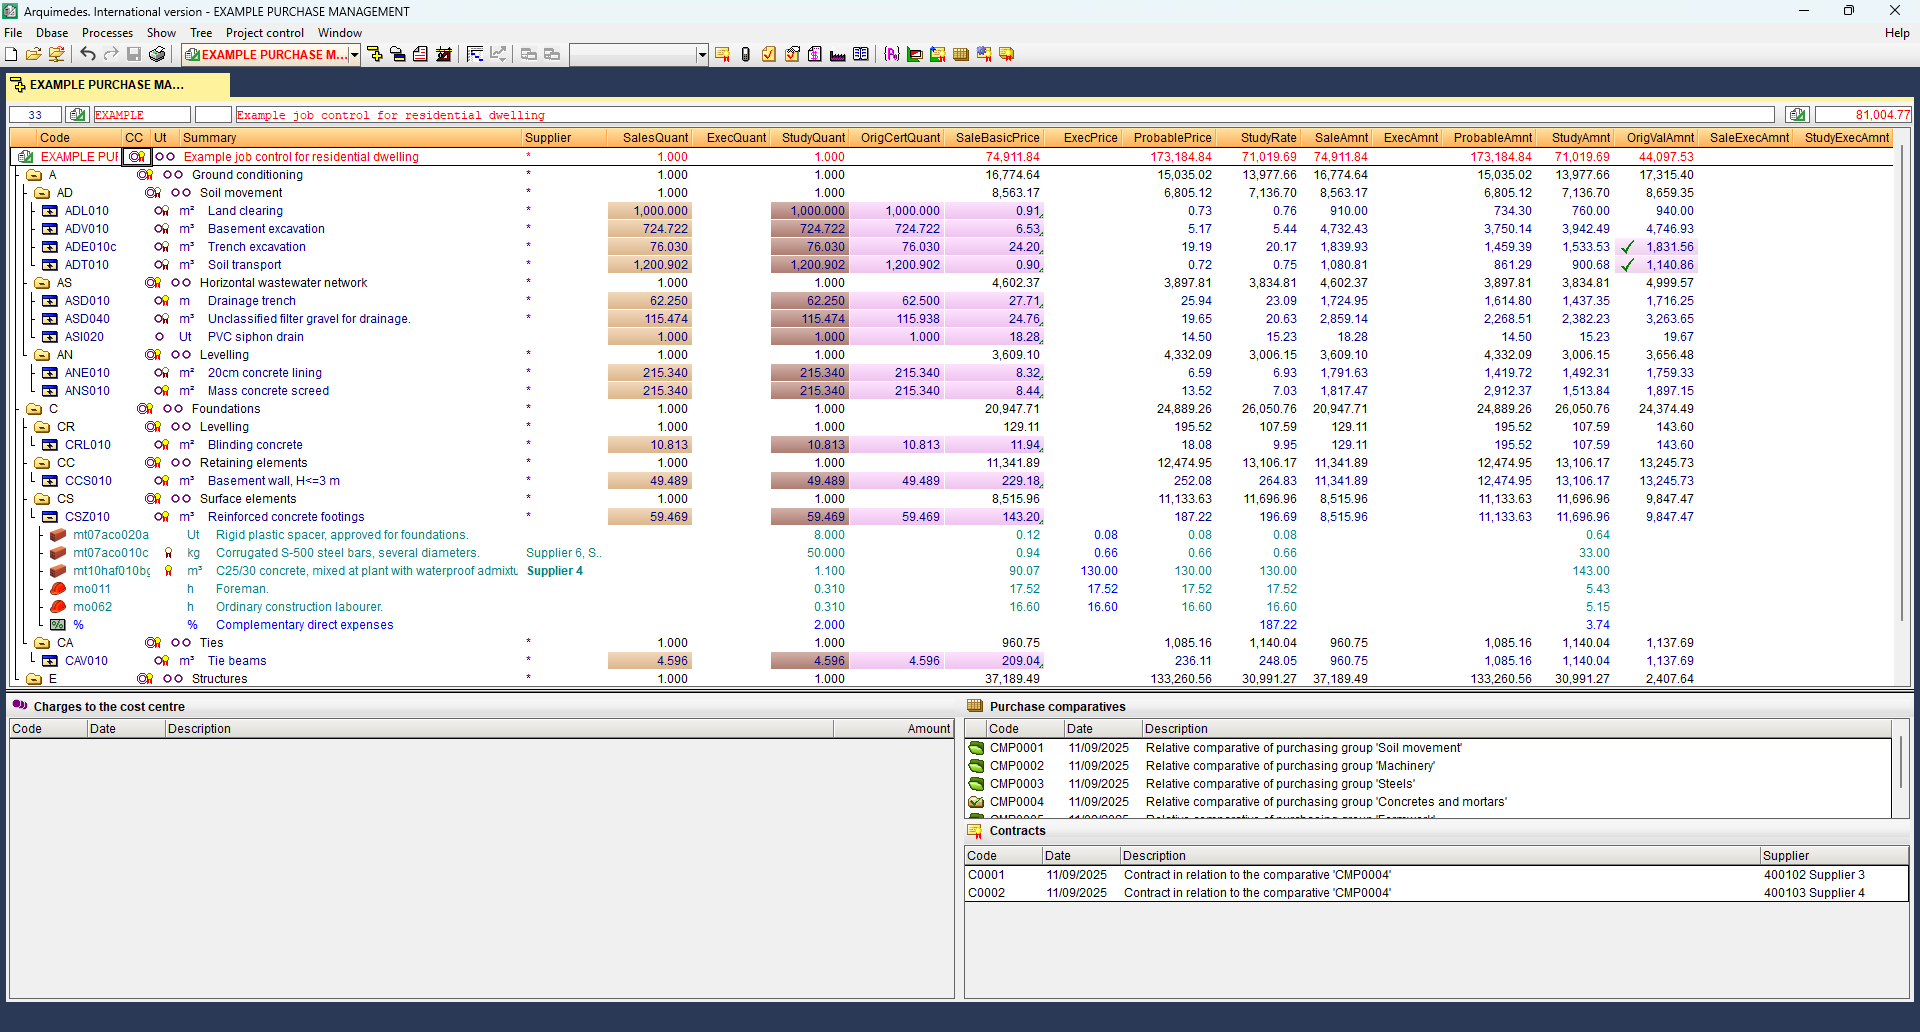
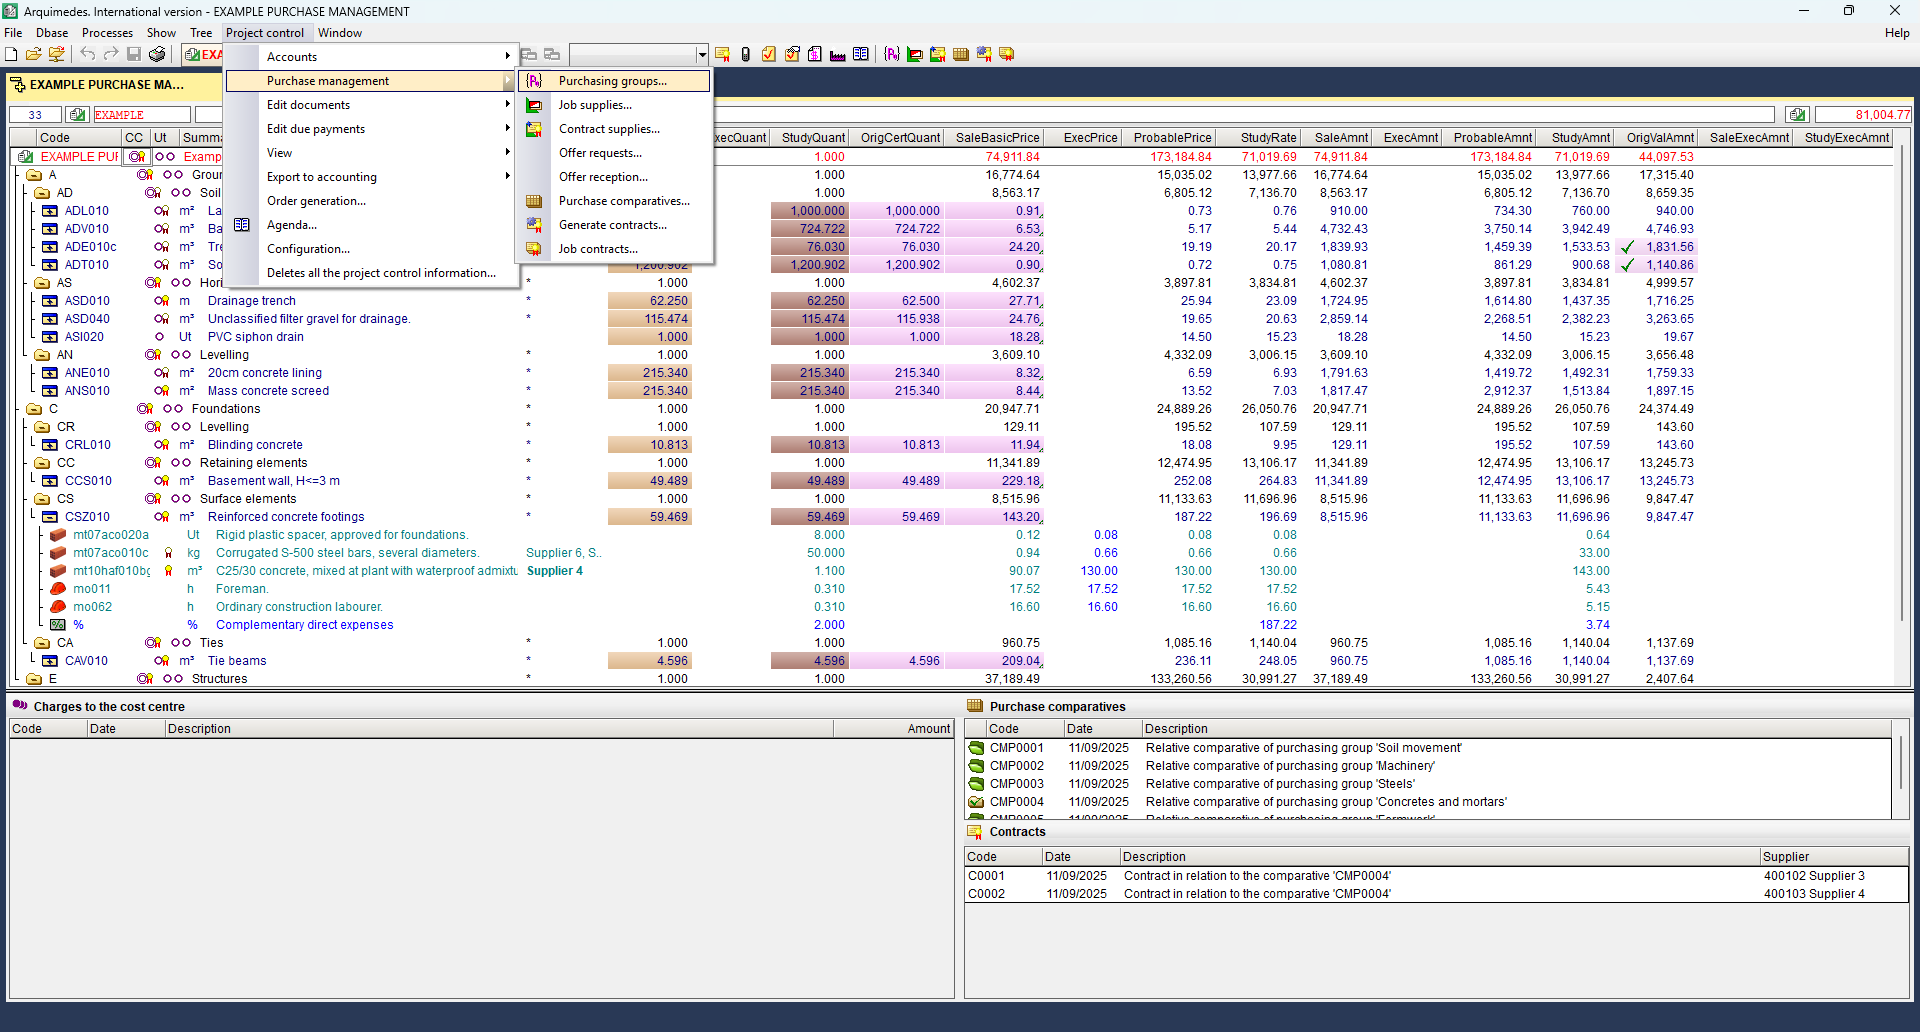
Options in the "Project control" menu
In the top menu bar, you will find the "Project control" menu, which brings together all the tools for the economic, administrative, and financial monitoring of the project. The drop-down menu includes:
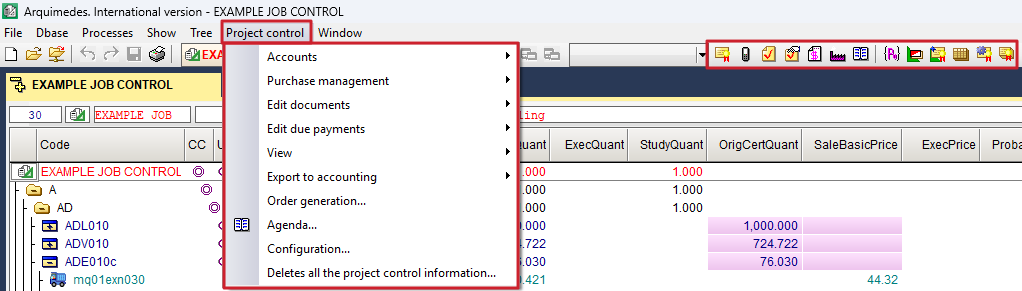
- in the "Accounts" section, the options for defining and managing data on supplier accounts, customer accounts, financial accounts, purchasing accounts, sales accounts, input and output VAT, supplier and customer income tax, and equivalence surcharge;
- in the "Purchase management" section, the options to create purchasing groups and supplies for the project, contract supplies, request and receive bids, view purchasing comparisons, generate contracts, and view project contracts;
- In the "Edit documents" section, you will find options for managing all project documentation: contracts, orders, delivery notes, invoices, and allocations.
- in the "Editing due payments" section, the options for setting the payment or collection deadline for an invoice;
- in the "View" section, the options to check the status of accounts with suppliers and customers, view a comparison of reference prices and supplied prices, view a summary of allocations for the project or items, check payments to subcontractors and suppliers, and view a history of supplies by document;
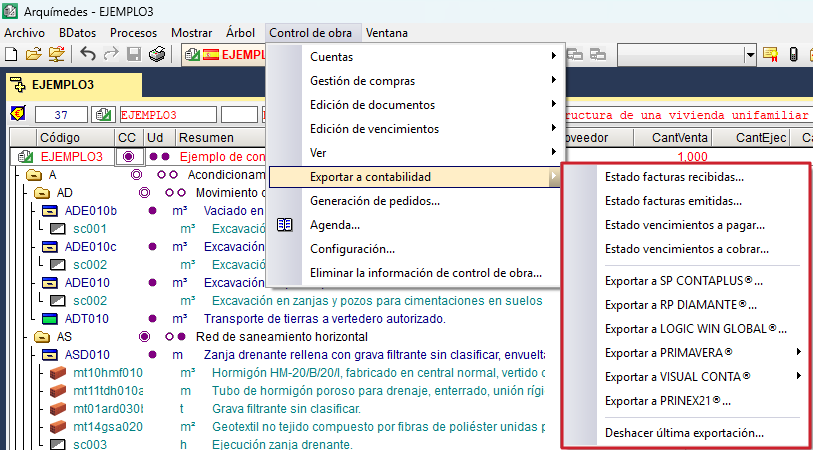
- in the "Export to accounting" section, the options for exporting to compatible accounting programs;
- the "Order generation" option works automatically;
- the "Agenda" option, to view orders, delivery notes, invoices, and due dates sorted by date, as well as to calculate cash flow;
- the "Settings" option, to edit the project options;
- and the option "Delete site control information", which, as its name suggests, deletes all information related to site control.
In the bar immediately below the menus, there is a set of quick access icons linked to site management, organised into two functional blocks.
- The first block brings together those focused on document management for the project: "Contract editing", "Order editing", "Delivery note editing", "Quick entry of delivery notes against supplier orders ", "Editing invoices received", "Editing suppliers" and "Construction site schedule".
- The second block groups together tools related to purchasing management: "Purchasing groups", "Site supplies", "Contracting supplies", "Purchasing comparisons", "Generating contracts" and "Site contracts".
Job control options and settings
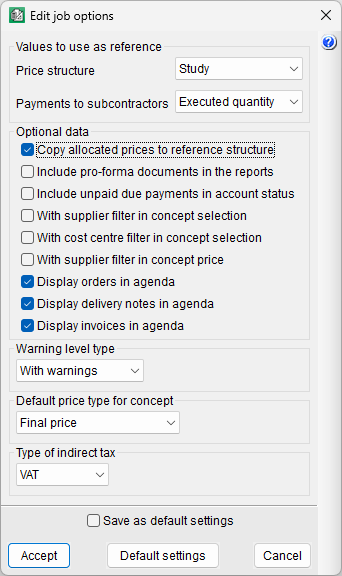
The first time you access any of the options in the "Job control" menu, the "Edit job options" dialog box will appear. After that, you can access it via "Settings" in the "Job control" menu.
The options that appear are the following:
- Values to use as reference
- Price structure
This allows you to choose between bill of quantities, sale or study, and determines the source of concept prices in purchase comparisons and documents (such as purchase orders, delivery notes, invoices and cost allocations). It also affects the calculation of site supplies. - Payments to subcontractors
This allows you to choose between certified quantity or quantity completed, and serves as the basis for the program to calculate payments to subcontractors at each stage of the project.
- Price structure
- Optional data
- Copy allocated prices to reference structure
When this box is ticked, whenever a supply price is awarded to a supplier in a purchase comparison, the price will be copied into the reference price structure for the concept representing the supply. - Include pro-forma documents in the reports
Ticking this box includes documents defined as "Not firm" in the case of purchase orders; "Pro forma" in the case of delivery notes, issued invoices and received invoices in the windows and lists. - Include unpaid due payments in account status
Ticking this box will include due dates that are not marked as paid in account statement lists. They will appear as "Unpaid" in the list. This is used to preview account statements. - With supplier filter in concept selection
Ticking this box will display only those supplies related to the selected supplier. This will occur when clicking the "Concept selection" button in purchase orders, delivery notes, received invoices and supplier allocations. - With cost centre filter in concept selection
Ticking this box will ensure that only concepts related to the cost centre appear when you click the "Concept selection" button when editing supply allocations. - With supplier filter in concept price
Ticking this box will take the supplier into account when calculating concept prices, selecting only those related to the selected supplier, according to the "Price type" option. This option does not affect the "None" and "Metered price" fields. This will occur when clicking the "Concept selection" button in purchase orders, delivery notes, received invoices and supplier allocations. - Display orders in agenda
With this box ticked, orders can be viewed in the calendar. - Display delivery notes in agenda
With this box ticked, delivery notes can be viewed in the calendar. - Display invoices in agenda
With this box ticked, both issued and received invoices can be viewed in the calendar.
- Copy allocated prices to reference structure
- Warning level type
Allows you to choose between no warnings or with warnings. When this option is enabled, the program will prompt you whilst editing supplies linked to more than one document, before making any changes to their values. This will occur when you click the "Edit supplies" button in purchase orders, delivery notes, received invoices and cost allocations. - Default price type for concept
Allows you to define the source of the price for concepts when editing documents. You can choose between none (zero price), last price, minimum price, average price, maximum price or concept reference price. Depending on the option chosen, the program will automatically apply the corresponding price when entering a new concept. These options are modified by the "With supplier filter in concept price" option. - Indirect tax type
Allows you to select between VAT or miscellaneous taxes, defined via the "Percentages" option in the "Display" section of the "Settings" menu.
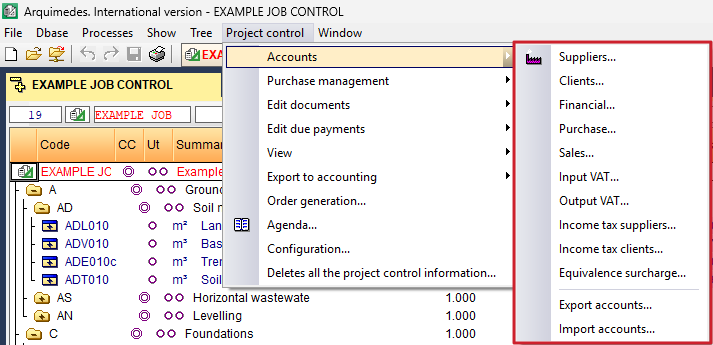
Accounts
You must define the supplier and customer accounts for document definition. If you wish to export data to the accounting system, you will need to define the remaining accounts. The accounts that can be defined are located in the "Accounts" section of the "Job control" menu, and are as follows:
- Suppliers. List of suppliers and subcontractors (external or in-house). It is possible to import .csv files containing data on these suppliers.
- Clients. List of customers to whom invoices are issued. It is possible to import .csv files containing data on these customers.
- Financial accounts. Accounts against which due dates are generated.
- Purchases. Accounts against which issued invoices are generated.
- Sales. Accounts against which received invoices are generated.
- Input VAT. VAT/IGIC account for received invoices.
- Output VAT. VAT/IGIC account for issued invoices.
- Income tax suppliers. Income tax account for received invoices.
- Income tax clients. Income tax account for received invoices.
- Equivalence surcharge. Account used by companies operating under this regime. These companies bear the supplier’s VAT and issue invoices with an equivalent surcharge percentage instead of output VAT.
| More information: |
|---|
| The accounts for input and output VAT, supplier and customer income tax, and the equivalent surcharge cannot be defined until the invoices have been issued. |
Data relating to supplier accounts, customer accounts, financial accounts, purchase accounts, sales accounts, input VAT, output VAT and the equivalence surcharge can be exported to a file named cuentas.bin for subsequent import into another computer or project. This option is located in the "Job control" menu under "Accounts", under the "Export accounts" option. Similarly, this data can be imported via the "Import accounts" option by selecting the type of import. If accounts with the same code exist, the program will ask you to confirm whether to keep them, overwrite them or import them with a different code.
Editing documents
In the "Edit documents" section of the "Job control" menu, you can manage the various documents relating to budget control:
- Incoming documents (linked to a supplier or, in the case of issued invoices, to a client)
- Contracts
- Orders
- Delivery notes
- Delivery notes against orders
- Invoices received
- Invoices issued
- Outgoing documents (always linked to a cost centre):
- Charges
- Charges with supplier
The program allows you to work in "Multi-project" mode, selecting whether documents relate to a specific project or to several projects simultaneously.
Editing documents requires you to first select the relevant supplier (except for charges), which facilitates the chained generation of related documents. In addition, quick search tools by code or supplier name are included, along with configurable filters (by supplier, cost centre or price type) via the "Settings" option in the "Job control" menu.
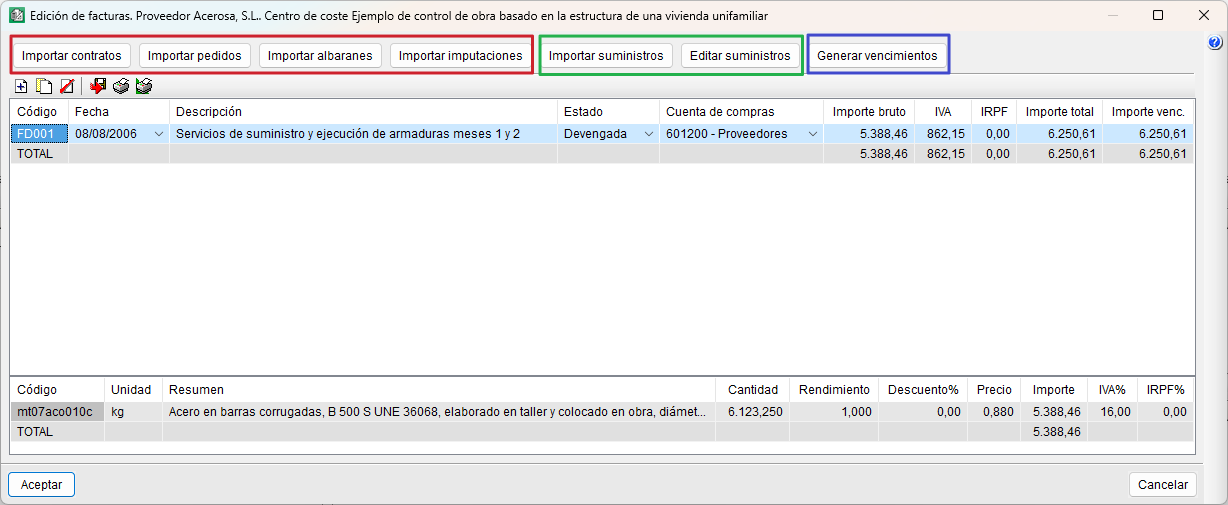
When editing a document, there are options to import documents or supplies from others belonging to the same supplier, which streamlines the management of orders, delivery notes or invoices.
With the exception of contracts and issued invoices, the following options will be available for all other documents: "Import contracts", "Import delivery notes", "Import invoices", "Import charges", "Import supplies" and "Edit supplies". The buttons available vary depending on the type of document being edited. For these buttons to be active, you must first have created a document using the "Add new item to list" option on the bar.
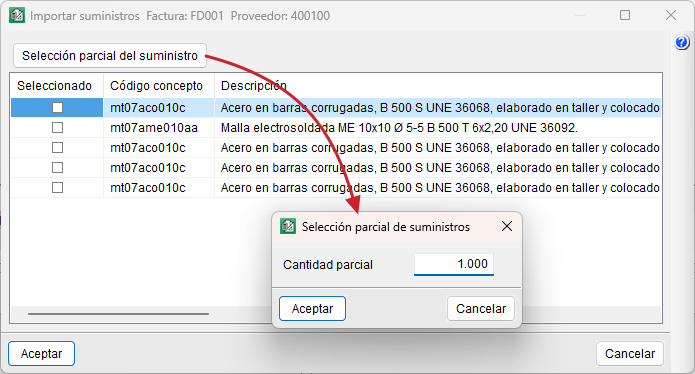
From "Import supplies" and "Edit supplies", you can perform a "Partial supply selection", which allows you to split the quantity of the selected supply into two different quantities, leaving a portion to be used in another document.
The "Generate due dates" button only appears in the invoices received document type and allows you to generate due dates to calculate cash flow, export to accounting, or view the status of accounts with suppliers or customers.
Editing due payments
Due payments can be generated in two ways:
- From the edit screen for received and issued invoices, using the "Generate due payments" button.
- From the "Due payments" section of the "Job control" menu, under the "To charge" (customers) and "To pay" (suppliers) options.
Due payments allow you to set the deadline for collecting or paying an invoice, and are shown in the "Calendar" to help you manage your cash flow.
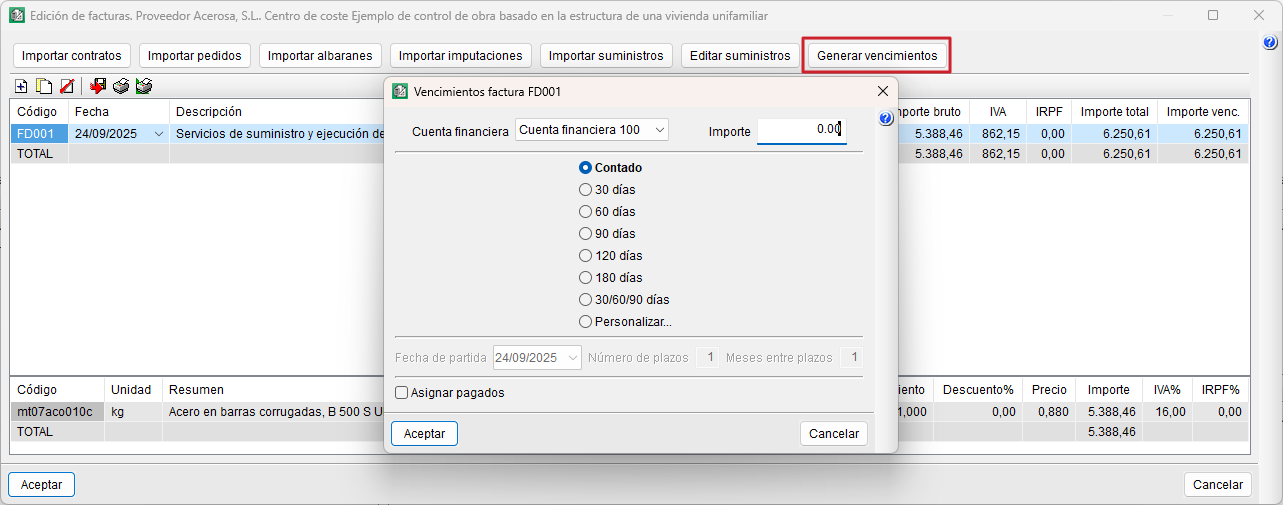
Generate due payments from invoices
When creating a document from an invoice, you must specify:
- The financial account to be debited.
- The amount.
- The payment plan (cash, 30, 60, 120, 180 days, 30/60/90 or custom).
- The "Assign paid" box automatically marks the due date as paid.
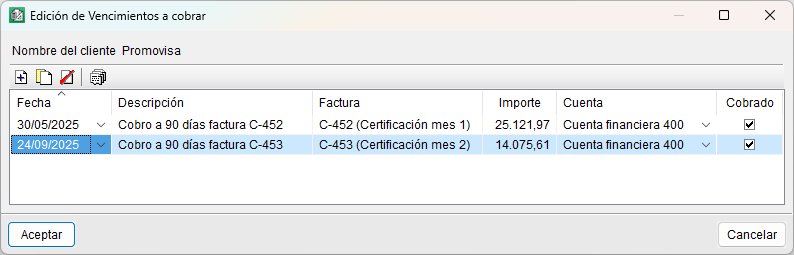
Generate due payments from the "Edit due payments" section
In this case, you first select the relevant customer or supplier. The dialog box that appears will display the due dates already generated from invoices, but it is also possible to create standalone due dates that are not linked to any invoice. These can be added via "Add new element to the list" by specifying the following:
- Due payment.
- Description.
- Amount.
- Associated financial account.
- Collection status.
Manually created due payments will appear in the list with no text in the "Invoice" column, thus distinguishing them from those generated automatically from documents.

View job control details
From the "View" section of the "Job control" menu, you can view:
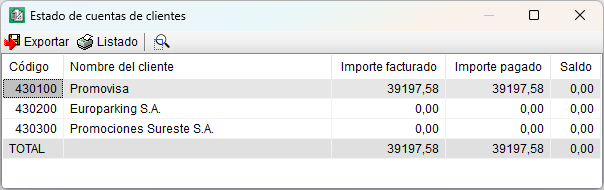
- Account status
- Suppliers
This option displays the code, name, invoice amount, amount paid and balance for each supplier.
Clicking the "See detail" button displays a breakdown of all invoices relating to that supplier, along with their respective due dates and payment statuses. - Clients
As with suppliers, this option displays the same information.
- Suppliers
- Price comparison
This option displays a list of all supplies, showing their prices, quantities and total amounts, for both the reference bill of quantities (target or preliminary estimate) and the actual supplies. It also shows the variances between the reference bill of quantities and the actual bill of quantities.

- Summary of project charges
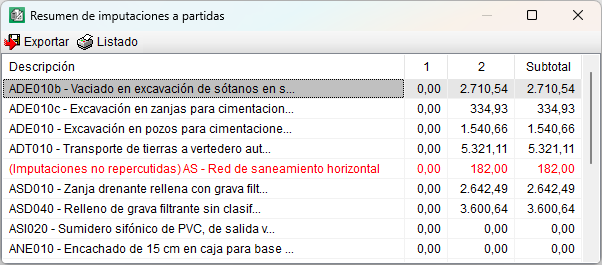
This option displays the total amount spent on the project, calculated based on direct and passed-on charges categorised by phase, according to the date of each charge. - Summary of charges for items
This option displays the amount spent on each item, calculated from both direct and reallocated charges at each stage of the project.
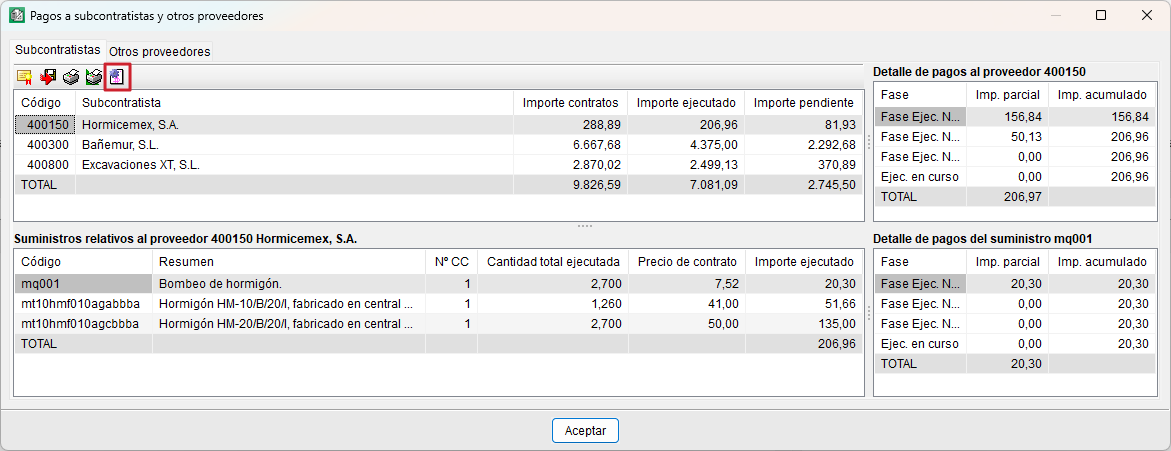
- Payments to subcontractors and other suppliers
This option displays a list of projected payments to subcontractors (based on certificates or the quantities completed for each item) and to suppliers (based on supply contracts and delivery notes received). The payments are calculated using the amount selected in the "Values to use as reference" option under "Settings" in the "Job control" menu.
The dialog box is divided into two tabs: "Subcontractors" and "Other suppliers". These tabs differ only in the "Generate subcontractor invoices" button, which allows you to create an invoice with the quantities completed by each subcontractor in the month of the certificate closure.
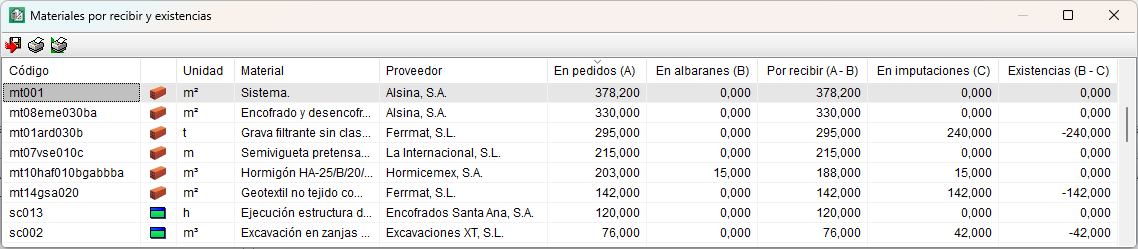
- Pending receipt materials and stock
This option displays a list showing goods to be received and the corresponding stock levels.
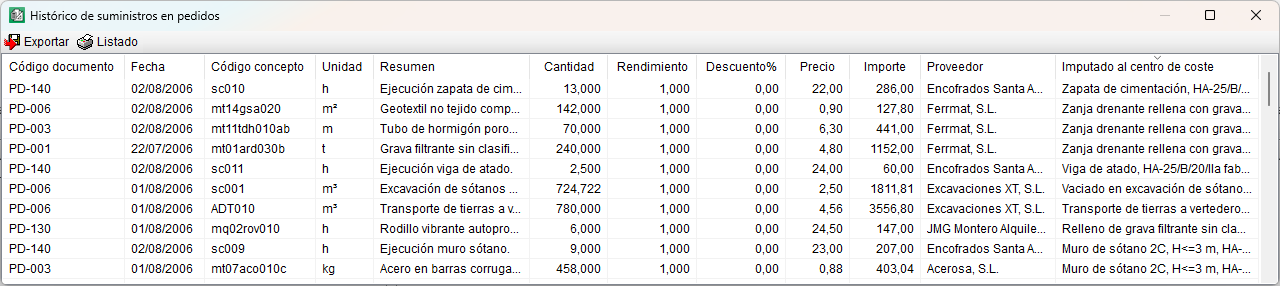
- History of supplies in orders
- Regroup supplies
This option allows you to regroup supplies that have been ungrouped as a result of various operations performed on them, thereby reducing the number of entries in the "Supply history". - Orders
This option displays, in a list sorted by date, the supplies included in orders, along with the information associated with each document. - Delivery notes
This option displays, in a list sorted by date, the supplies included in delivery notes, along with the information associated with each document. - Invoices received
This option displays, in a list sorted by date, the supplies included in invoices received, along with the information associated with each document. - Charges
This option displays, in a list sorted by date, the supplies included in charges, along with the information associated with each document.
- Regroup supplies
Export to accounting
The "Export to accounting" section of the "Job control" menu contains the tools for exporting data to external accounting software.
The data exported consists of the definitions of accounts and accounting entries. Therefore, before exporting, you must have already defined the accounts (see the "Accounts" section).
Sub-accounts may include: suppliers, customers, financial, purchases, sales, input and output VAT, suppliers’ and customers’ income tax, and equivalence surcharge.
Invoices and due payments are exported as accounting entries, although only accrued invoices and paid due payments will be exported. You can check the export status via the following options:
- Received invoice status
- Emitted invoices status
- Status of due payments to pay
- Status of due payments to charge
You can also undo the last export using the last option available in the "Export to accounting" section.
Supported accounting programs
The programs to which data can be exported are as follows:
- SP CONTAPLUS®
- RP DIAMANTE®
- LOGIC WIN GLOBAL®
- PRIMAVERA®
- VISUAL CONTA®
- PRINEX 21®
| Note: |
|---|
| We recommend that the account codes match those defined in the company’s chart of accounts if you wish to export data to an accounting program. |
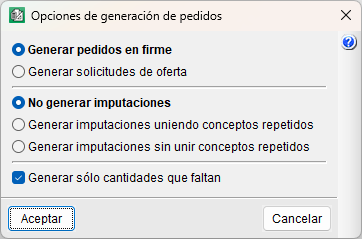
Generating orders
From "Order generation" in the "Job control" menu, you can automatically generate orders and also place an order using the supplies from the bill of quantities for the selected cost centre.
Among the available options, you can choose to generate firm orders or offer requests (pro forma orders). It is also possible to generate charges at the same time. To do this, you must first select a cost centre (an item, a work section or the root work section).
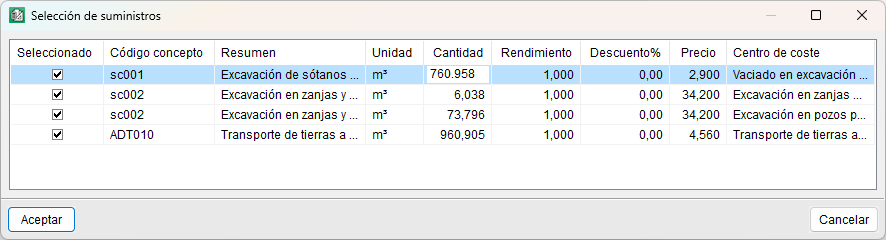
After selecting one of the options and confirming, you must select the items to be included in the order. These items will be the same as those included in the selected cost centre, with their corresponding prices and quantities, which can be modified as required at this stage.
Next, you must select the supplier to whom the order will be assigned.
Finally, you must enter the description of the order.
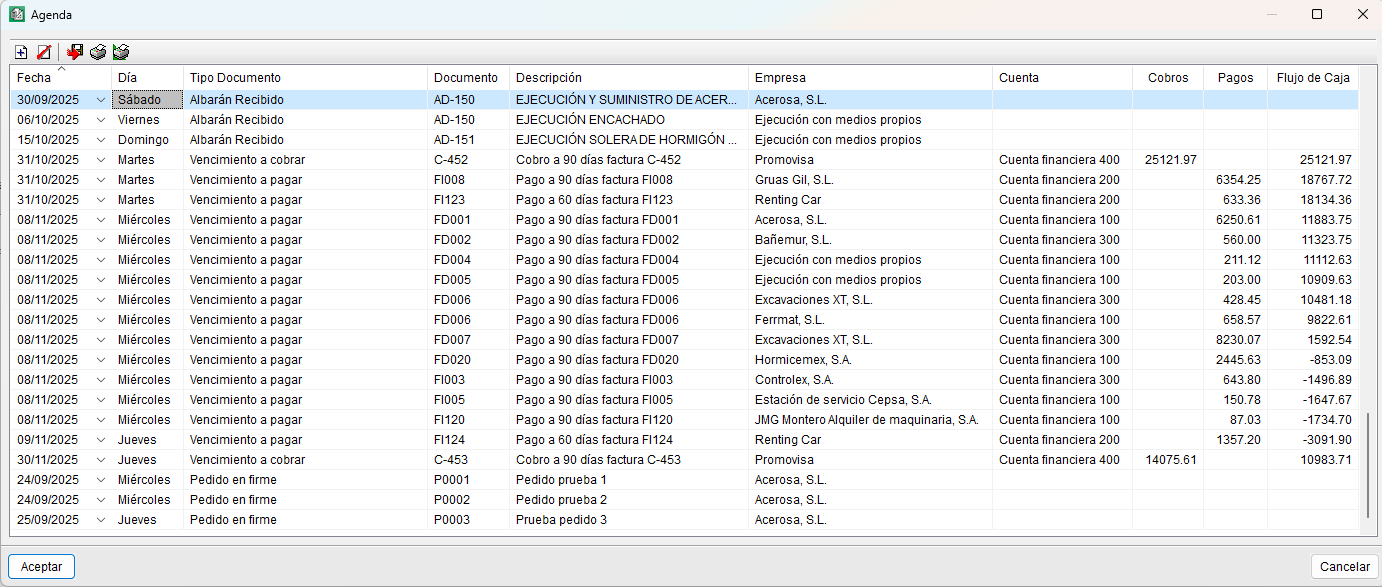
Agenda
From the "Agenda" section of the "Job control" menu, you can view, sorted by date, the issuing of orders, the receipt of delivery notes and invoices, and the due dates of issued and received invoices (paid or pro forma). The calendar always displays forecast information (unpaid due dates). It also allows you to insert notes wherever you wish to reflect other details, although these are for information purposes only (the "Description" field). Furthermore, it enables you to calculate the cash flow for the project.
The information displayed in the agenda depends on the options selected under "Settings" in the "Job control" menu: "Show orders in agenda", "Show delivery notes in agenda" and "Show invoices in agenda". See the "Job control options and settings".
The fields displayed in the agenda are as follows:
- Date. This can be edited by the user, in which case the events or lines in the calendar are reordered.
- Day of the week. Corresponds to the date. Cannot be edited directly.
- Document type. Whether it is an order, delivery note, invoice or due date.
- Document. Document code.
- Description. Summary of the document.
- Company. Name of the supplier or customer associated with the document.
- Account. Description or title of the financial account.
- Receipts. Incoming amounts.
- Payments. Outgoing amounts.
- Cash flow. Cash position. A positive sign indicates a positive cash balance.
Purchase management
The "Purchase management" module of Arquimedes allows users to calculate the supplies required to execute a job and foresee invoice payments from suppliers and subcontractors.
Purchase management module options
The options of the "Purchase management" module can be found in "Job Control", "Purchase management":
- Purchasing groups
- Job supplies
- Contract supplies
- Offer requests
- Offer reception
- Purchase comparatives
- Generate contracts
- Job contracts
Payments to subcontractors and other suppliers can be viewed in the Payments to subcontractors and other suppliers option ("Job Control", "View").
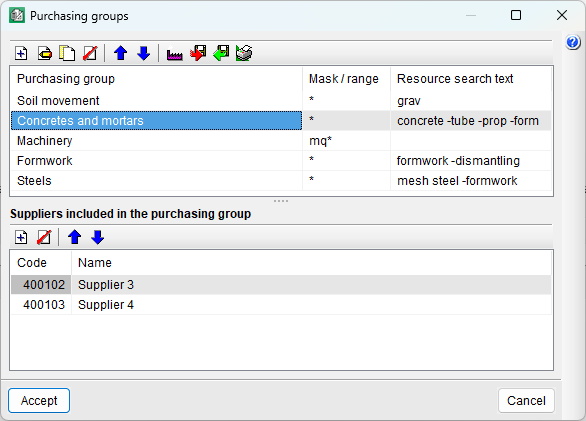
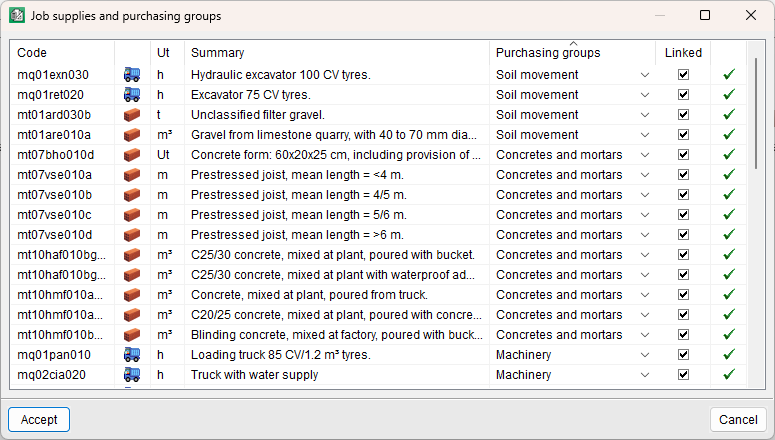
Purchasing groups and Job supplies
Using the "Purchasing groups" option, the program allows users to create purchasing groups and incorporate, within them, suppliers or subcontractors selected from the suppliers' list of the job. Using the "Job supplies" option, the existing supplies of the job can be linked to each purchasing group.
Generating these groups makes it easier to request offers. For example, when the need to purchase concrete is detected, offers can be requested from the suppliers of the "Concretes and mortars" purchasing group, which will include all the supplies of that purchasing group.
Contract supplies
Using this option, users can select the supplies to be purchased or subcontracted classified into purchasing groups.
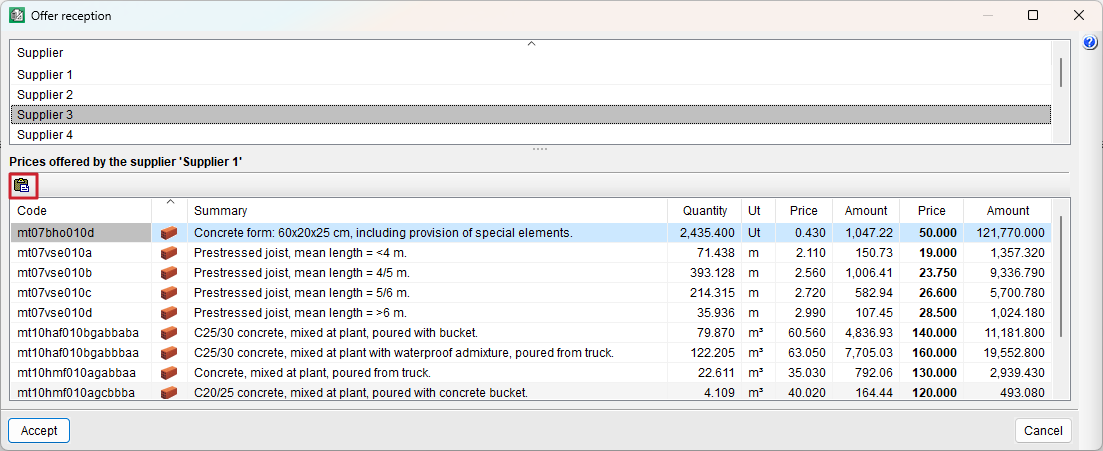
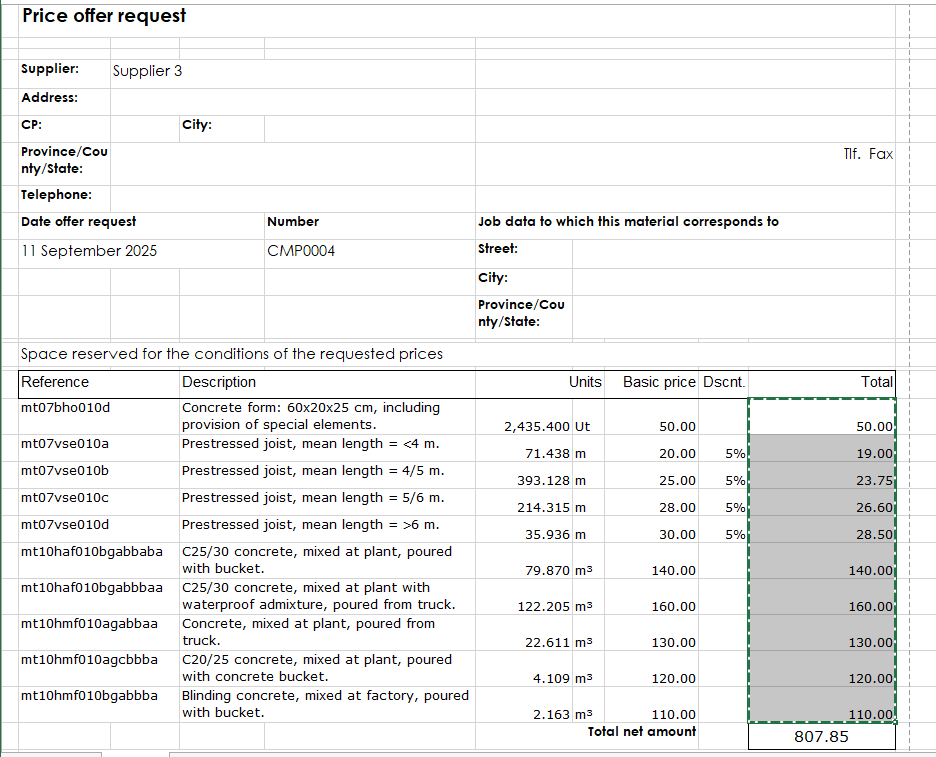
Offer requests and Offer reception
The "Offer requests" and "Offer reception" options, provide users with the tools required to control the offers which have been requested and received.
Using the "Paste" option within the "Offer reception" dialogue box ("Job Control", "Purchase management", "Offer reception"), the contents of the clipboard are copied to the offer reception table of the selected supplier. In order for Arquimedes to use the data contained in the Windows clipboard, a table of the document sent by the supplier must first be copied to the clipboard. This table can be copied from any file format used by the suppliers to send their offers (spreadsheet, word processor, PDF, etc.). The procedure to be carried out is as follows:
- Open the document that has been received from the supplier. The information Arquimedes requires from this document are the prices offered by the supplier and their corresponding code.
- In this document, select the table or part of the table containing the prices that are to be pasted in Arquimedes, in such a way that the first column of the selected table contains the concept codes and the last contains the price of each concept. This way, Arquimedes can identify to which concept each price corresponds. Only the prices of concepts that are identified by their code will be taken.
Another option is to only select the column containing the prices. In this case, users must ensure that the order of the prices coincides with the contents of the list.
- Copy the selected data to the clipboard, return to Arquimedes and click on the "Paste" button to import the received prices.
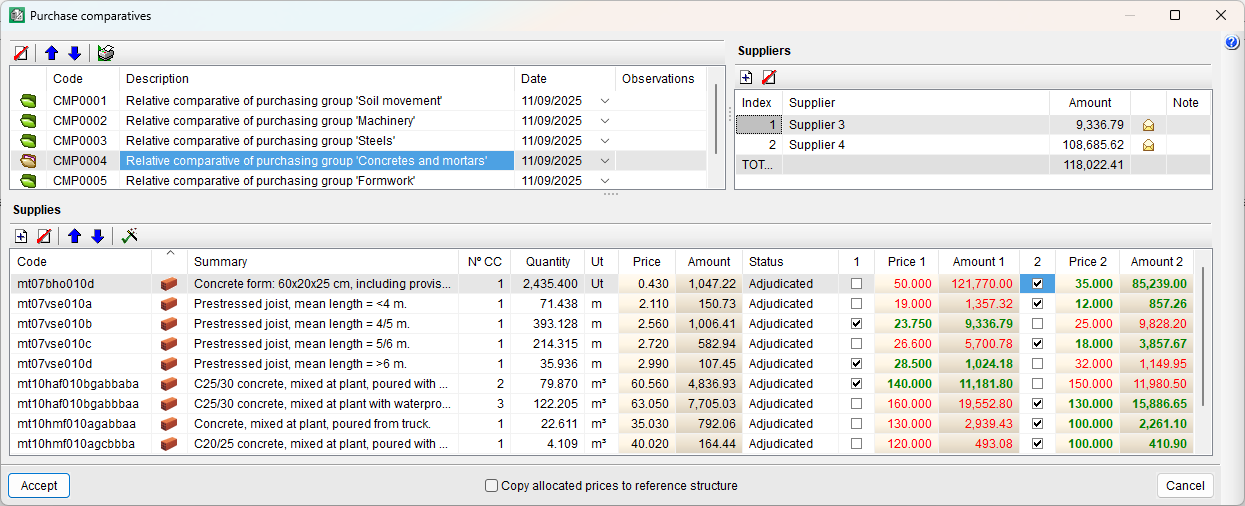
Purchase comparatives
Using the "Purchase comparatives" option, the offers that have been received can be viewed, so the best can be selected and then be able to prepare the contracts. To help users, within the dialogue where the purchase comparative is viewed, the lowest prices are displayed in green and the highest in red. Also displayed are the supplies for each supplier and future contract.
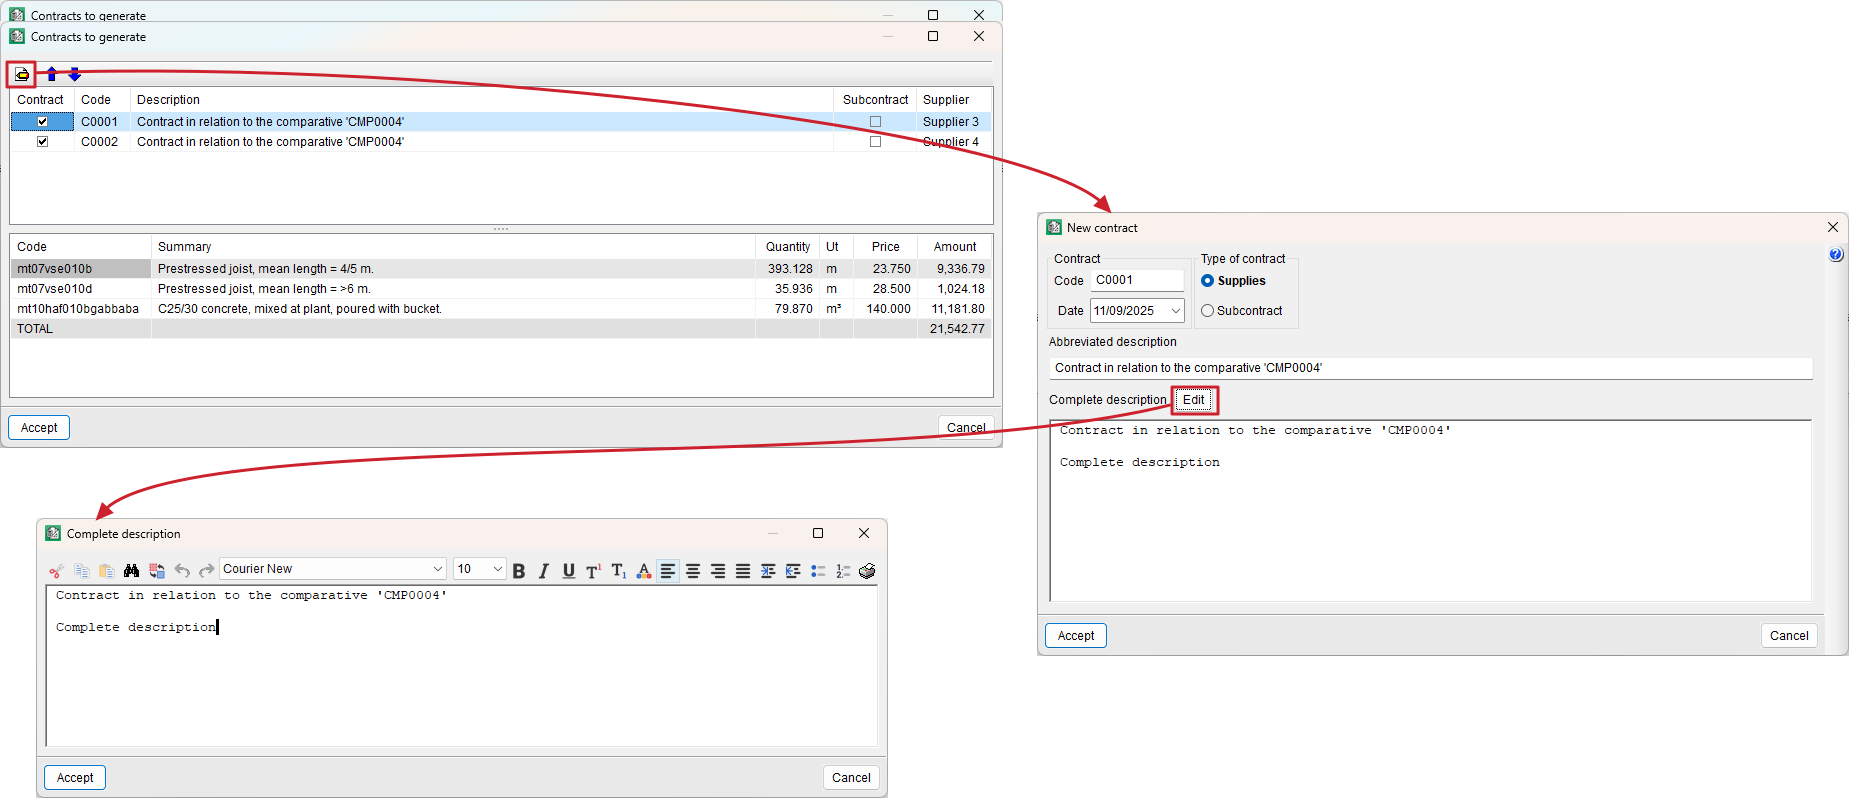
Generate contracts
Using the "Generate contracts" option, users can create contracts of the suppliers (supplies or rent) and of the subcontractors (execution contracts) which are awaiting a contract. The "Job contracts" option opens a dialogue box containing a list of the contracts that have been generated so users can view and edit them. When a contract is edited, a text editor opens where users can:
- Manually modify the text
- Cut, copy, paste, search for or substitute texts
- Modify the format (type, font and size of the text, text alignment, paragraph numbering, etc.)
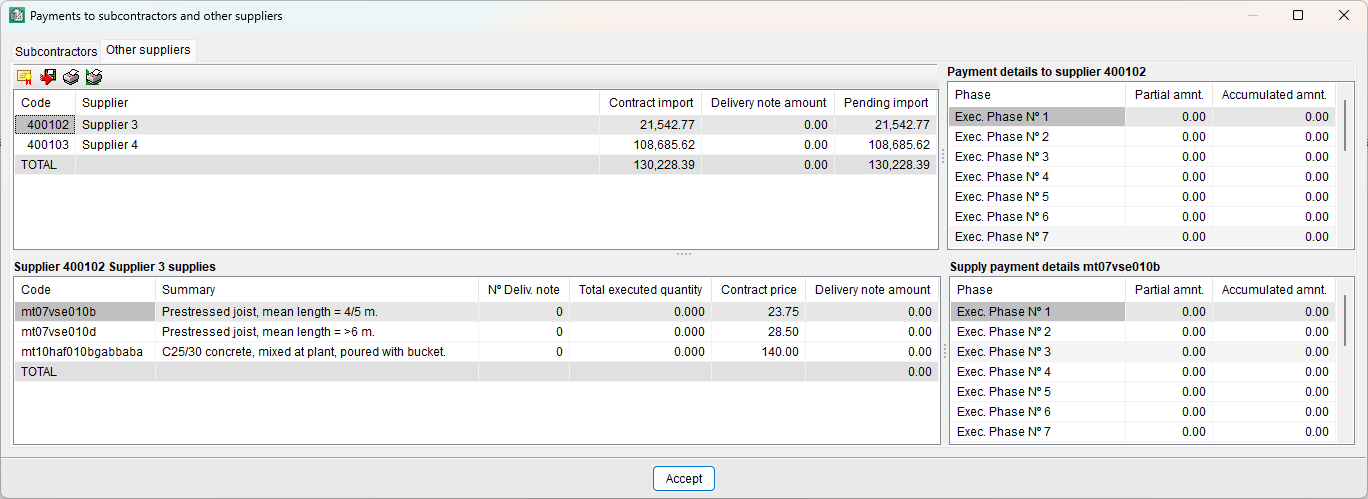
Payments to subcontractors and other suppliers
Using the "Payments to subcontractors and other suppliers" dialogue box ("Job control", "View", "Payments to subcontractors" and other suppliers), users can view the foreseen payments to be made to subcontractors and other suppliers, displayed for each supplier and for each execution phase or month. The supplies of each supplier and payment details of each supply can also be consulted.
Consolidation of bills of quantities
The "Consolidation of bills of quantities" module of Arquimedes allows for several existing bills of quantities to be included in a base bill of quantities (which can be empty), and maintain the link between the incorporated items and their original bills of quantities. This way, the base bill of quantities can be updated with the changes which are carried out in the original bills of quantities.
This module is especially useful for managing two bill of quantity elaboration methods: Joining of partial bills of quantities generated by other CYPE programs or Joining of partial bills of quantities carried out by different project collaborators.
How the "Consolidation of bills of quantities" module works
All the units of a job from a bill of quantities or several bills of quantities (linked bills of quantities) can be imported to an existing bill of quantities (which can be empty), referred to as the base bill of quantities. The items that are imported in this way are linked to their original bills of quantities, which allows for the base bill of quantities to be updated after any changes have been undertaken in the linked bills of quantities. The different options to update the bill of quantities are described in the Updating modifications carried out in linked bills of quantities section.
The items that are linked to other bills of quantities have a small triangle in the bottom left-hand corner of the cell containing the quantity ("Decomposition tree view"). This way, they can easily be distinguished from those that are not linked to other bills of quantities. Additionally, the quantities of each linked job contain a details table which includes, within a subtable, the quantities that come from the linked bill of quantities. The quantities table contains a column labelled "Origin". The rows of the subtable linked to another bill of quantities are displayed in this column, with a reference identifying the job from which the quantities originate. The lines in the sub-table linked to another bill of quantities include a reference in the "Origin" column that identifies the job from which the quantities originate.
| More information: |
|---|
| The "Origin" column can be activated in two ways: by double-clicking the column header with the left mouse button and checking the "View" box, or by right-clicking on the column header and selecting "Visible columns..." from the context menu, then checking the "View" box. |
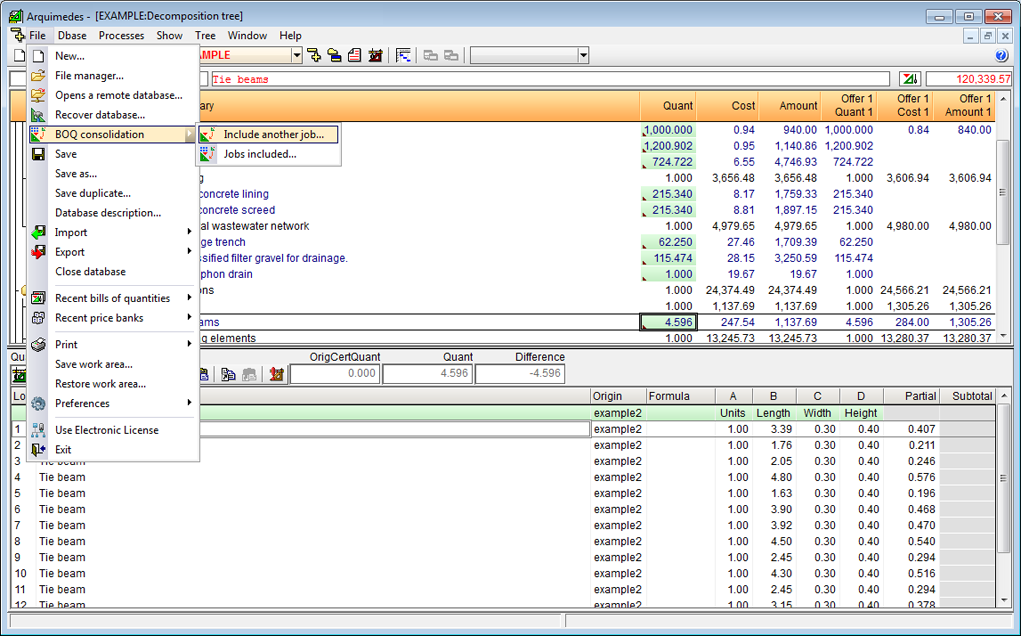
The tools managing the import and linking to other bills of quantities in the base bill of quantities can be activated using the "BOQ consolidation" option within the "File" menu. These are:
- Include another bill of quantities
Using this option, a bill of quantities can be selected so to include it in the current bill of quantities. - Bills of quantities included
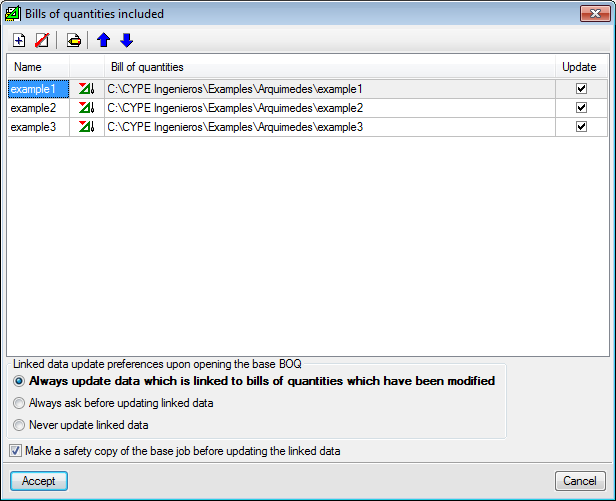
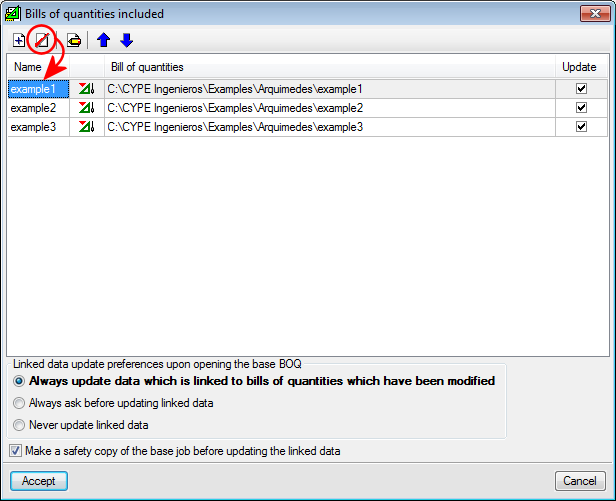
This option opens the "Bills of quantities included" dialogue box. This window displays a list of the bills of quantities included in the current bill of quantities. From this dialogue box, the following operations can be carried out:
- Include another bill of quantities in the current bill of quantities
- Delete the link of the linked bill of quantities selected from the list
- Edit the name and description of the linked bill of quantities selected from the list
- Change the order of the linked bills of quantities of the list
- Update linked data of the current bill of quantities
- Configure the updating preferences of the linked data upon opening the base bill of quantities
- Make a safety copy of the base job before updating the linked data
Updating modifications carried out in linked bills of quantities
If the linked bills of quantities are modified, the items of the base bill of quantities which are linked to those bills of quantities can be updated in two ways:
- Data update when the base bill of quantities is opened
Each time the base bill of quantities is opened, Arquimedes updates the job items linked to other bills of quantities (only from the bills of quantities that have been modified since the last update). This update is carried out in accordance with the option that has been selected in the "Bills of quantities included" dialogue box ("File", "BOQ consolidation", "Jobs included").
These options allow users to carry out the following:
- Always update data which is linked to bills of quantities which have been modified
- Always ask before updating linked data
- Never update linked data
This option is useful for the user to be able to carry out the update only when deemed necessary, using the method detailed below.
- Data update whilst the base bill of quantities is open
Any bills of quantities that are linked to the current base bill of quantities are displayed in the "Included bill of quantities" dialogue box ("File", "BOQ consolidation", "Jobs included"). Each of them has a box ("Update column"), which the user can activate to update the data of the selected bills of quantities, by pressing the "Accept button" of this dialogue box. This update is independent of the options located below the bill of quantities table, which only allow users to configure the update when the base bill of quantities is opened.
Each box of the "Update" column will be activated by default if the corresponding linked bill of quantities has been modified. Users can activate or deactivate these boxes as they wish, allowing them to update only the data of a specific bill of quantities and not of all those present.

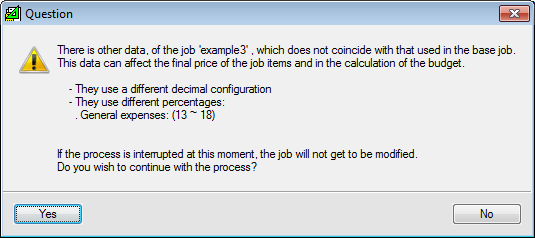
Contradiction control between the base bill of quantities and the imported bills of quantities
When a bill of quantities is imported into the base bill of quantities, it is logical that they both have the same configuration, and that the imported concepts come from the same price bank and with the same conditions. In other words, both bills of quantities must have the same number of decimal places and percentages used, repeated unit items (description and cost), and the items that have the same code must also coincide (in their decomposition and in the yield of their unit items).
If these indications are not applied, Arquimedes will inform the user of the existing contradictions between the base bill of quantities and the imported bill of quantities. The program will offer the user the possibility of not carrying out the import so to correct the differences. If the user decides to continue with the import, the program elaborates a report detailing all the contradictions, which can be printed or exported to different file formats.
It is also possible that an item that has been imported from the linked bill of quantities already exists in the base bill of quantities. This is not a contradiction. In this case, Arquimedes includes a quantities subtable in the detailed quantities of the base bill of quantities, containing the quantities of the item of the imported bill of quantities. A reference is present within the subtable indicating the linked bill of quantities from which it comes from.
Unlink items from the original bills of quantities
Items that have been imported from other bills of quantities can be unlinked from the base bill of quantities.
- Deleting the link to a bill of quantities for all the items imported from other bills of quantities
The bill of quantities to be deleted is selected from the list in the "Bills of quantities included" dialogue box, then by clicking on the "Delete selected element from the list" button, the connection to the selected bill of quantities is deleted and all the items imported from that bill of quantities will be unlinked. If one of those items has links to several bills of quantities, only the link to the selected bill of quantities will be deleted.
Before unlinking, the program informs the user that the link of all the items related to the bill of quantities selected from the list is going to be deleted. The user has three options:
- Unlink quantities
The existing reference within the quantities subtable of the selected bill of quantities will be deleted, without altering the quantity details. Therefore, there is no possibility of updating any changes in the base job which occur in the unlinked bill of quantities. - Delete quantities
In addition to eliminating the reference and possibility to update ("Unlink quantities" option), the quantity details related to the selected bill of quantities are also deleted. However, details of other bills of quantities which could be linked or unlinked details are not altered. The job item will not be deleted in any case, even if the total resulting quantity is zero. - Delete quantities and the item without quantities
Deletes the quantity details linked to the selected bill of quantities and the items that have zero quantities.
- Unlink quantities

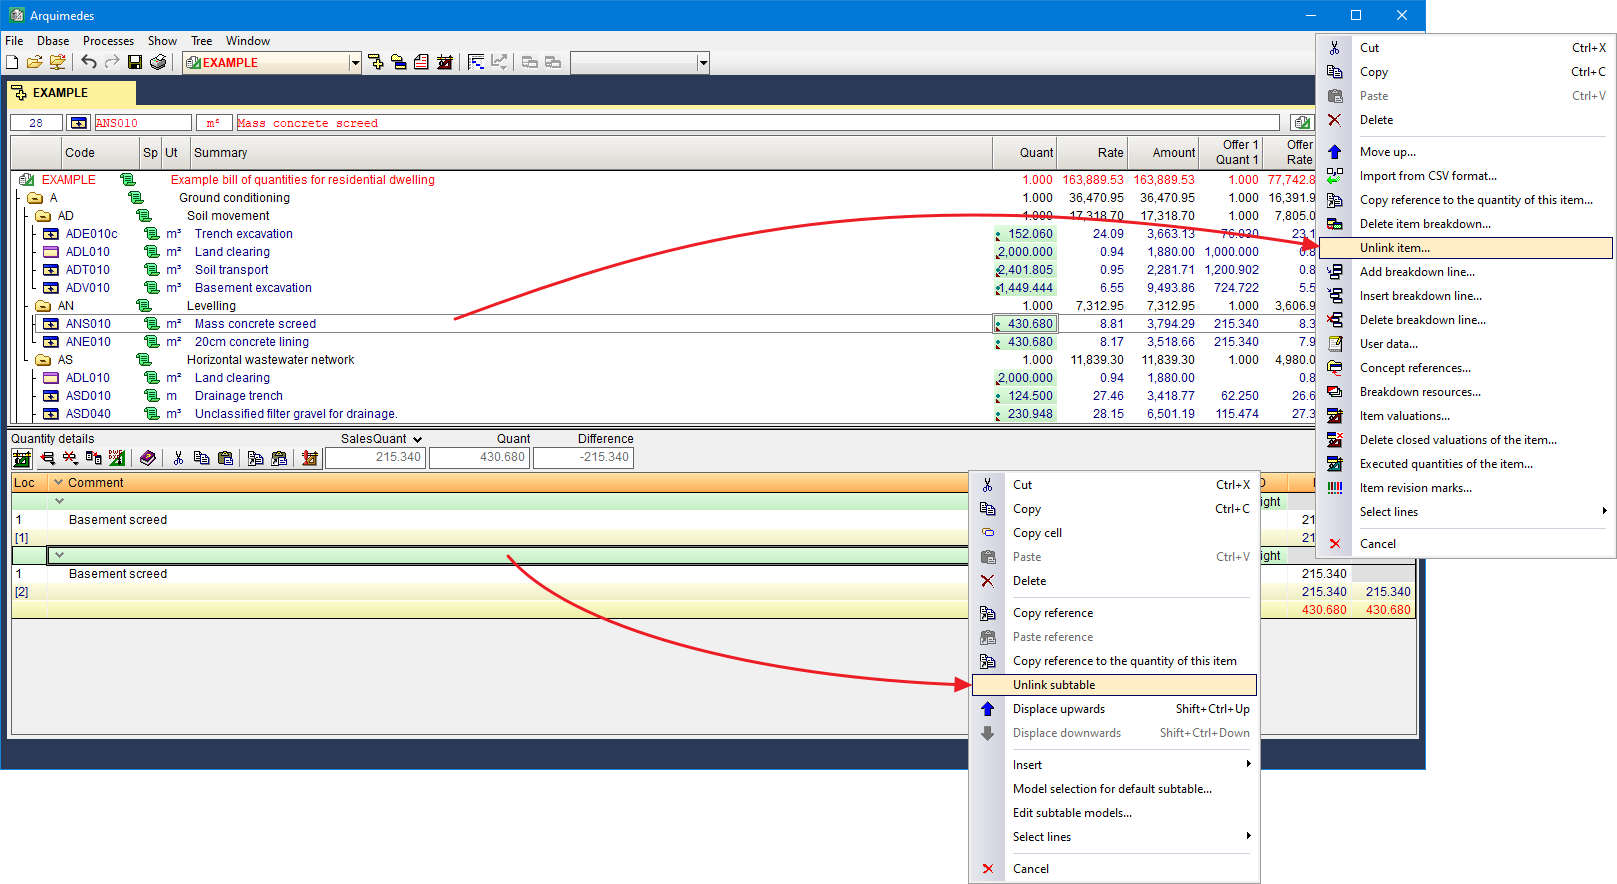
- Delete the links between an item and all the bills of quantities to which it is linked
Items that are linked to one or more bills of quantities, when clicked on using the right mouse button in the "Decomposition tree" window, will display a menu containing, amongst other options, "Unlink item". If this option is selected, all the links the chosen job may have with other bills of quantities will be deleted, as well as the reference to each of them which exists in each quantities subtable. Neither the item nor its quantities are deleted. - Delete the link between an item and one of the bills of quantities to which it is linked
A quantities subtable for each linked bill of quantities is present in the quantity details table of an item linked to one or more bills of quantities. By right-clicking the header of one of these subtables, a menu appears containing the "Unlink subtable" option. This option deletes the link and reference to the chosen item with respect to the bill of quantities to which the selected subtable belongs. Neither the item nor its quantities are deleted.
Re-link items
Users have three options to re-link a job to a deleted connection:
- Using the "Undo" option ("Undo" button of the toolbar)
Please note that the "Undo" option only undoes a number of consecutive changes ("File", "Preferences", "Undo/Redo Settings") and only those made since the job was last opened. In other words, if the base bill of quantities is closed after unlinking, and is then re-opened, the "Undo" option cannot be used to re-link the data that has been unlinked before closing the base bill of quantities. - Recover the safety copy
The safety copy that has been carried out before deleting the link can be recovered ("Processes", "Safety copies of the database") if the option: "Make a safety copy of the base job before updating the linked data" within the "Bills of quantities included" dialogue box ("File", "BOQ consolidation", "Jobs included") has not been deactivated. - Re-link the bill of quantities
If the link to a bill of quantities has been deleted using the "Delete the quantities and the item without quantities" option, the bill of quantities can be re-linked correctly using the "Include another job" option or from the "Bills of quantities included" dialogue box ("File", "BOQ consolidation").
Please note that a bill or quantities can always be re-linked, but if the quantities which were previously linked have not been deleted (process which can be carried out automatically using the "Delete the quantities and the item without quantities" option), the quantities of the bill of quantities that is re-linked will be duplicated. It is also recommended that items that have no quantities be deleted before re-linking the bill of quantities, which is also done automatically using the "Delete the quantities and the item without quantities" option.
Creation of the complete bill of quantities of the job based on different partial bills of quantities
The "Consolidation of bills of quantities" module is a very useful tool for managing the elaboration methods of a bill of quantities. It also includes the following:
- Joining bills of quantities carried out by different project collaborators
Several collaborators may be involved in a single project where each person is in charge of providing the documents required for the part of the project they are responsible for (structure, installations, acoustic and thermal performance of the building, etc.). This collaboration implies the existence of several partial bills of quantities for the same project, which should be properly combined.
However, someone must coordinate the creation of the complete bill of quantities by joining the different partial BOQ's that have been created. The person combining these bills of quantities must pay special attention to the configuration options that have been selected for each of them (decimals and percentages) and control any modifications that are made to the partial bills of quantities after the combination has begun.
The "Consolidation of bills of quantities" module controls any possible contradictions between the configuration of the base bill of quantities and the partial bill of quantities, and also allows for the base bill of quantities to be updated at any time after the partial bills of quantities have been modified. These properties make the "Consolidation of bills of quantities" module an essential tool for appropriate coordination when preparing the complete bill of quantities of the project, based on various partial bills of quantities.
Job certificate
Arquimedes allows for the regular recording of progress reports as the project progresses. You simply need to enter the initial or partial quantities completed in each period, and the program automatically generates the progress reports.
Two windows are used for recording and viewing certificates: the "Quantities/Certificates" window, which allows you to record, close and edit certificates; and the "Cost breakdown structure" window, which allows you to record and view other information not available in the other window. In the latter, you must first enable the display of the "Execution" or "Certificates" columns (by right-clicking on the column header).
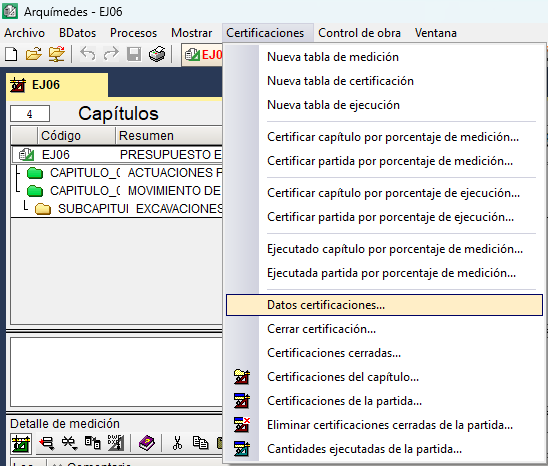
Certificate configuration data
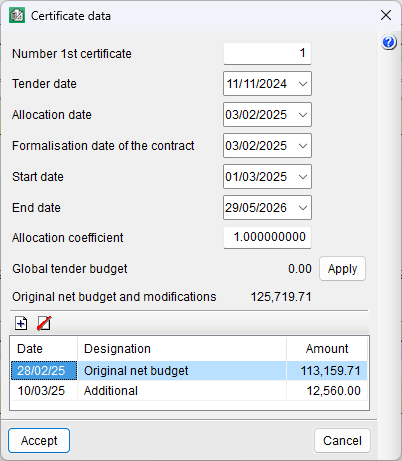
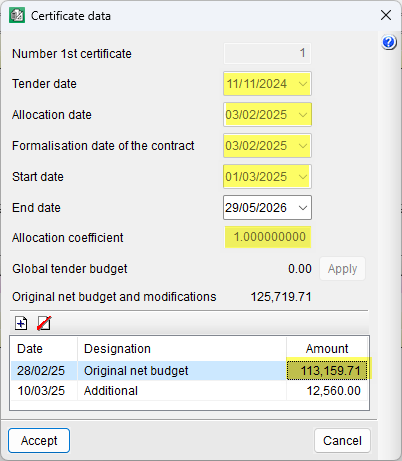
Before starting to record quantities, you must enter the data required for generating and processing certificates in the "Certification data" dialog box under the "Certificates" menu within the "Quantities/Certificates" window.
This data includes the number of the first certificate, key dates (tender, award, contract formalisation, start and completion of works), the award coefficient, the total tender bill of quantities and the original net bill of quantities together with the approved modifications. The "Apply" button transfers the tender amount affected by the award coefficient to the table below.
Certificates regarding the job quantities already completed
Once the initial data has been entered, the quantities completed must be recorded. One way to do this is via the "Quantities/Certificates" window. After selecting the desired item, enter the quantity to be certified (which does not necessarily have to match the quantity completed) in the "PartCertQuant" (partial certified quantity) or "OrigCertQuant" (certified quantity at origin) column. If this is the first certificate, the method for storing certified quantities (partial or at origin) will be requested during the closing process.
The certified quantity can be entered with or without quantity details:
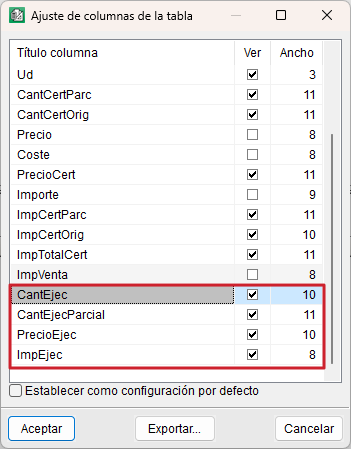
- If the item to be certified does not include any details, you can enter the figures directly in the "Items" section, in the relevant columns: "ExecQuant" or "PartialExecQuant" and "PartCertQuant" or "OrigCertQuant".
The columns in this section also show the "ValuationPrice" (certificate price for the item), the "PartValAmnt" (partial amount for the month) and the "OrigCertAmnt" (cumulative amount).

| Best practice: |
|---|
| To load the columns relating to the test, double-click on the column header in the "Items" section. You can also tick the "Establish as default settings" box so that the test columns are displayed every time you reopen the "Quantities/Certificates" window. |
- If, on the other hand, the item to be certified contains details, then these must be entered in the relevant table.
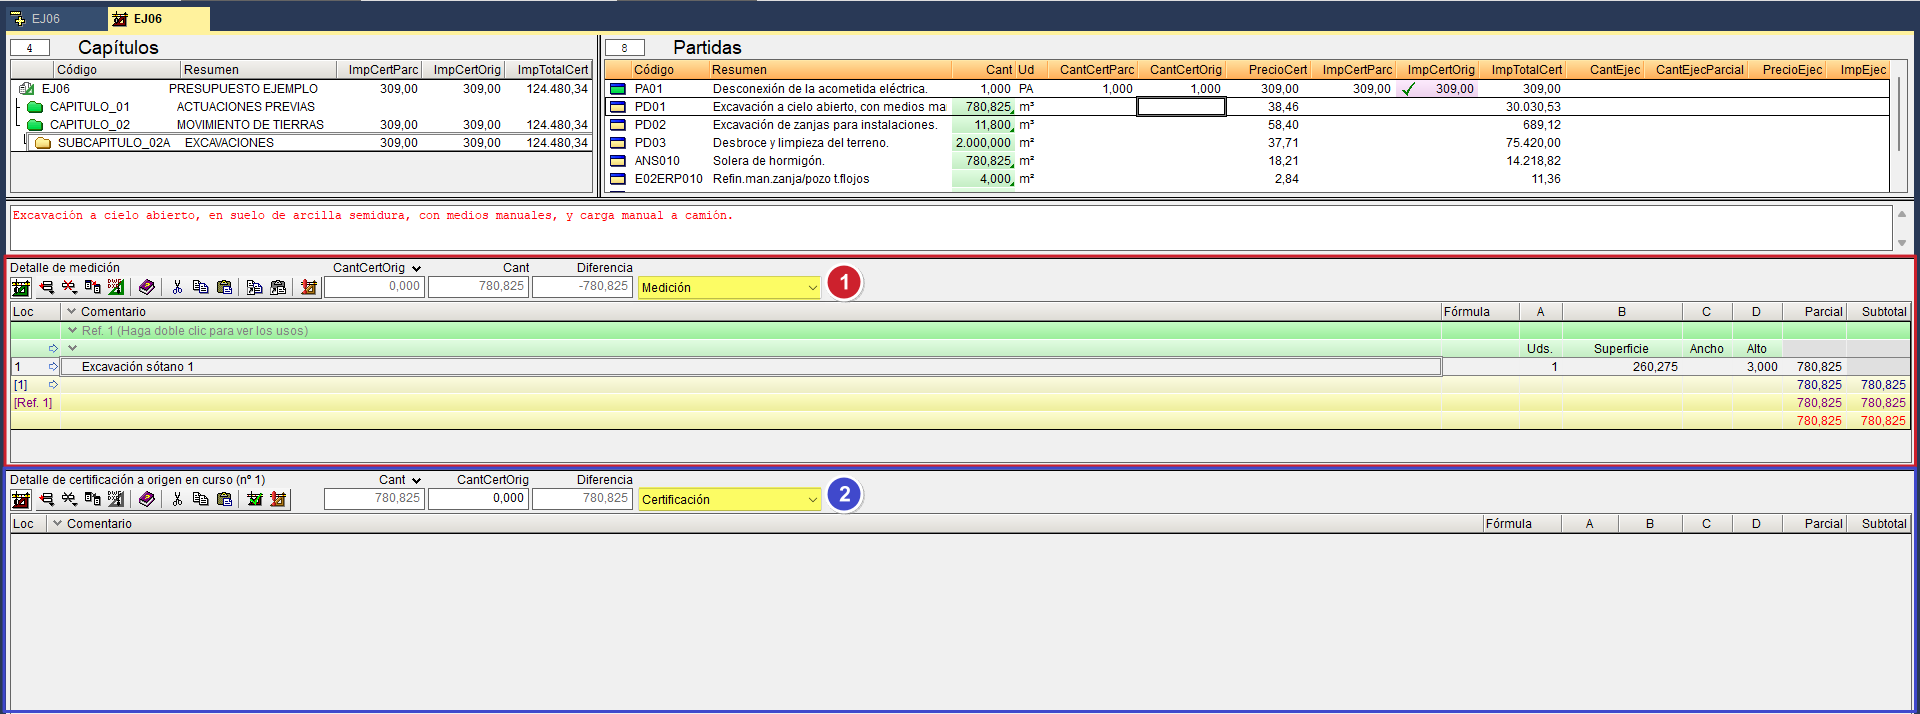
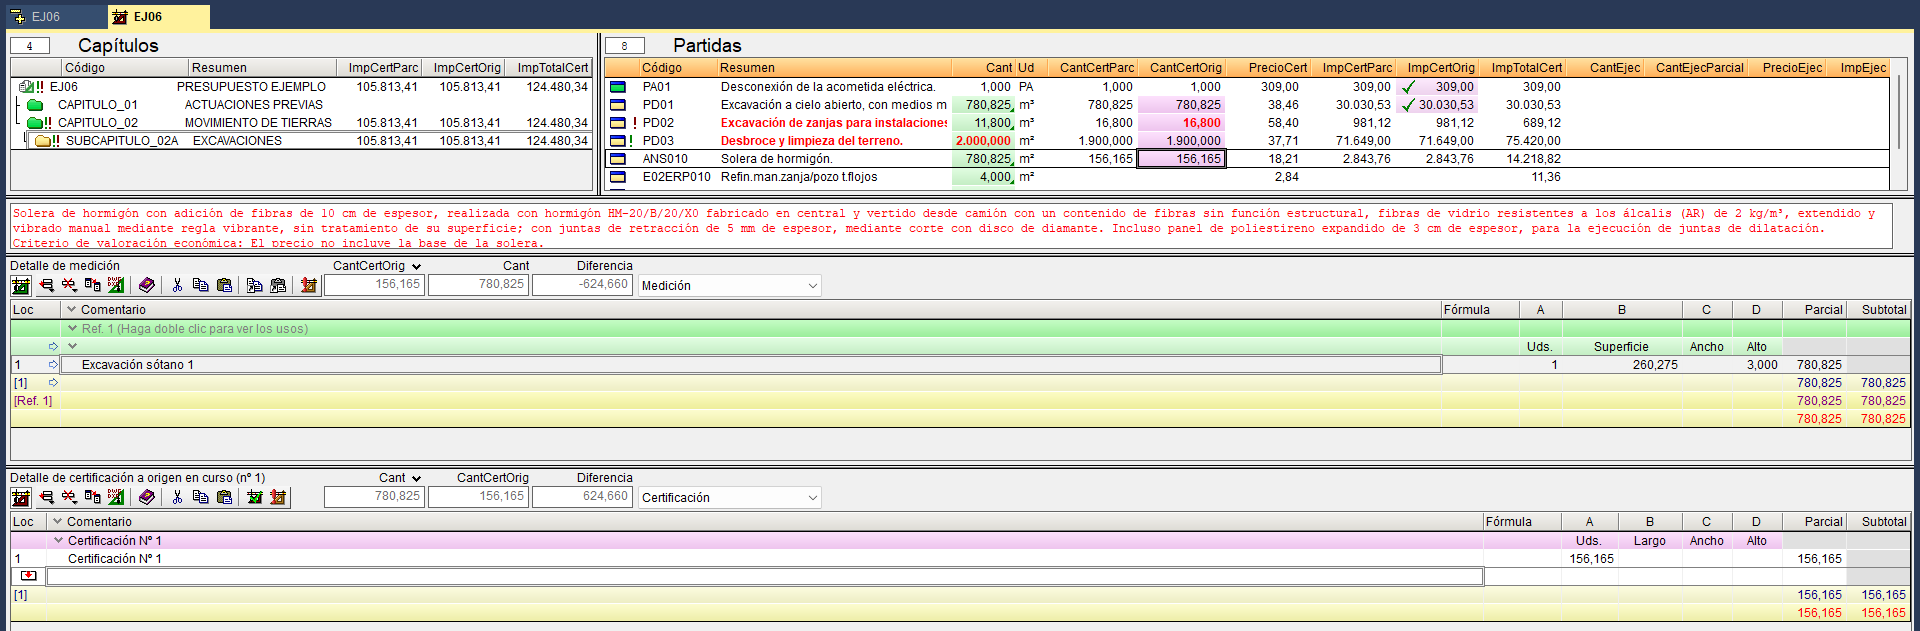
At the bottom of the "Quantities/Certificates" window, there are two quantity tables. By default, the top table displays the "Quantity" table (1), which shows data relating to the selected item, and the bottom table is the "Certificate" table (2), which can display the final certified quantities. These quantity tables can be switched (via the drop-down menu) to display other quantities relating to "Executed job", "Sales quantity" and "Study quantity". In the lower table, the number of the current or closed certificate is indicated. Furthermore, in the centre, the quantity measured in the project is shown alongside the total quantity recorded in certificates, and on the right, the difference between the two quantities ("Difference" or "Excess"); that is, the pending or excess quantity recorded in both certificates.
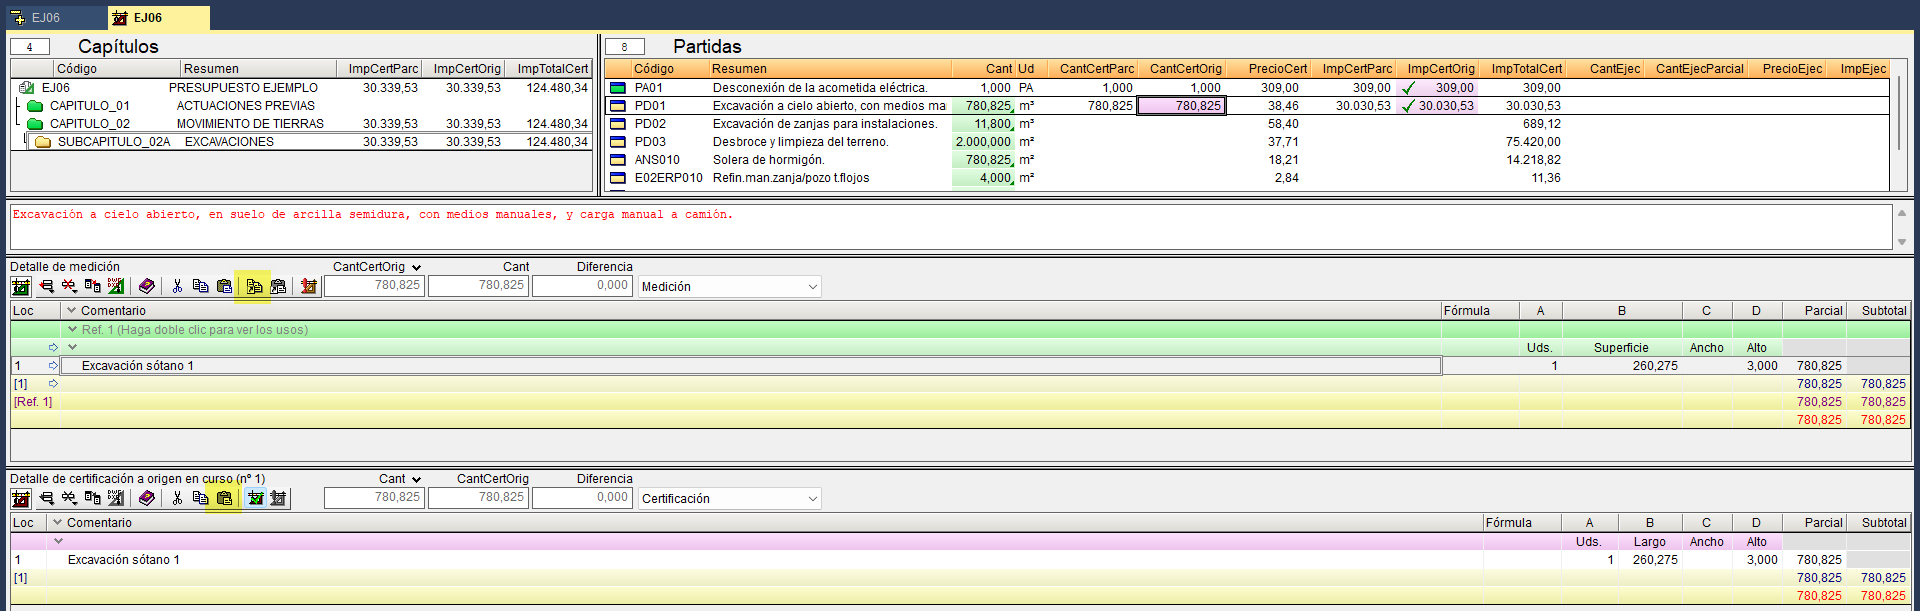
To enter a quantity to be certified in detail, you must first select the desired item in the "Items" section. Next, from the "Certificate" table, you can insert a new sub-table to enter the measurement of the work carried out or copy the project quantity details, if these match. In the first case, follow the steps outlined in the "Quantities with details" section. In the second case, simply hover over the green header of the "Quantities" table, click the "Copy current row, current sub-table or entire table to clipboard" button, and from the "Certificate" table, click the "Paste clipboard content at the end" button.
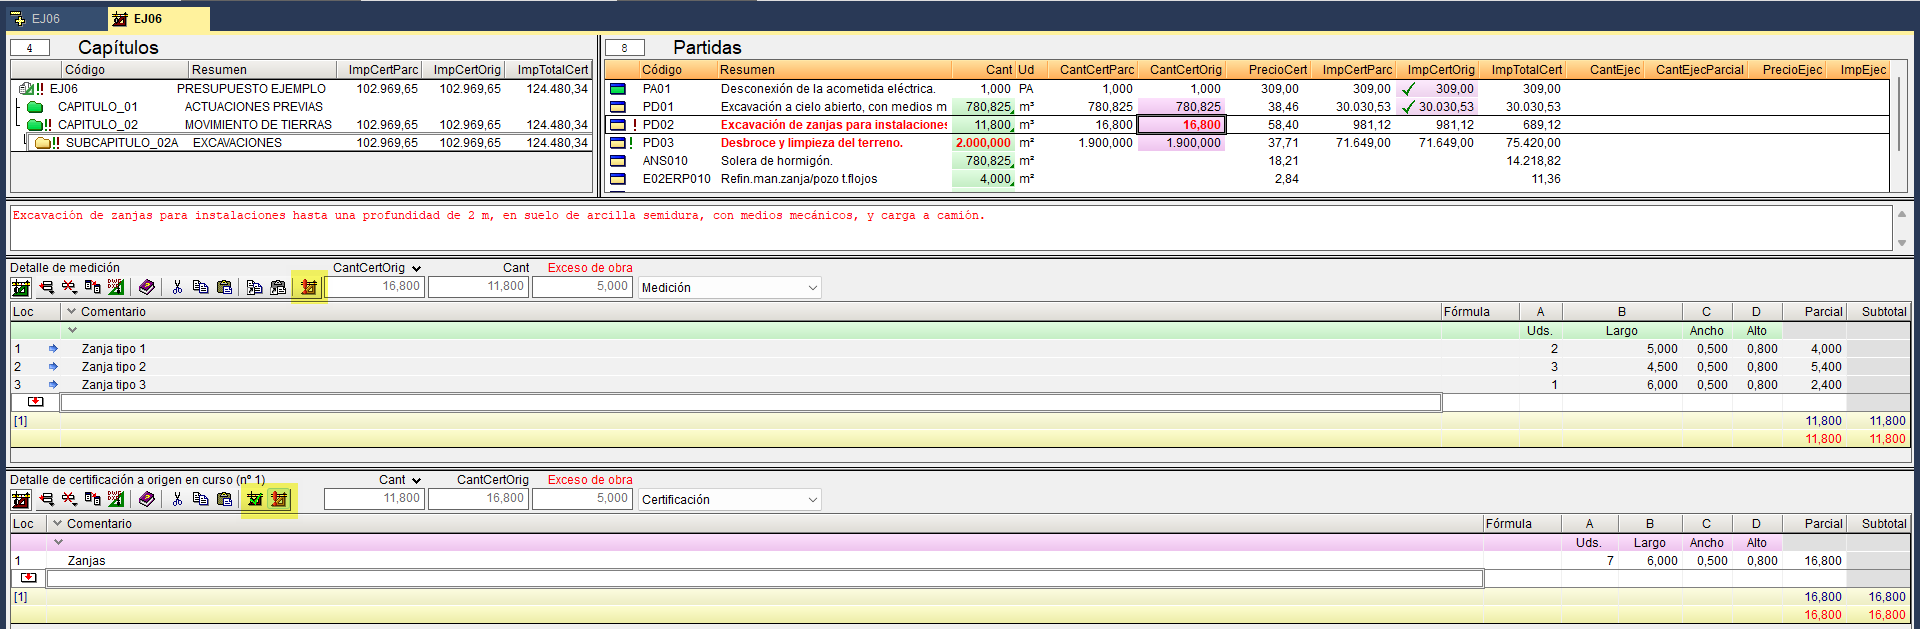
If the certificate quantity entered differs from that in the project or contract, you can click one of these buttons:
- "Marker corresponding to quantity awaiting revision" (located on the bar of the "Quantities" table)
When this is done, the summary text for the item and the measurement quantity turn red, and a green exclamation mark appears next to the icons for the item and the work section in which it is located, as well as in the root work section. - "Marker of certificate in progress pending revision" (located on the bar of the "Certificate" table)
When this is done, the summary text of the item and the certified quantity turn red, and a red exclamation mark appears next to the icons for the item and the work section in which it is located, as well as in the root work section.
When the item has finished running, you must click the "Finished certificate marker" button, which locks the quantity processed and certified so that it cannot be accidentally modified. This button is located on the bar of the "Certificate" table.
It is also possible to record partial quantities or figures for the start of the month via the "Cost breakdown structure" window. In this case, you must first enable the "Execution" or "Certificates" column view.
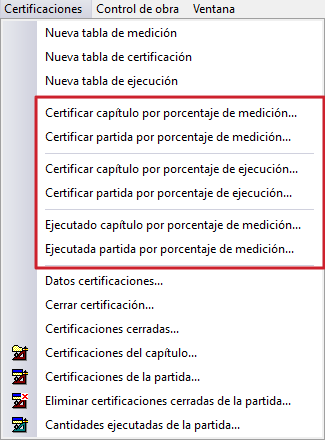
Certificates by percentage
Recording can also be done by "Percentage", and can be applied to a work section or item, using measurement or execution quantities for this purpose. The available options can be found in the "Certificates" menu, within the "Quantities/Certificates" window.
This method of on-site certificate issuance is common in cases where an item consists of several stages and extends over a period of time. For example, for the concrete floor item, 20% could be applied at the start, corresponding to surface preparation; 70% during the pouring of the concrete; and the remaining 10% once the work is completed.
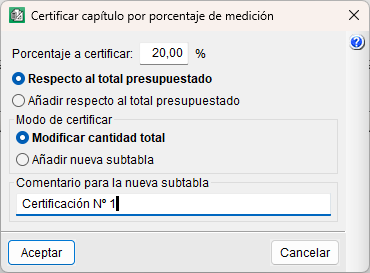
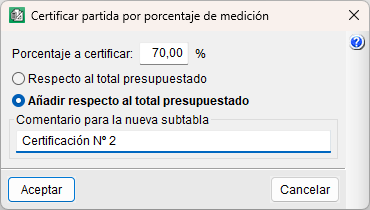
In this case, first navigate to the "Items" section and select the item you wish to certify. Next, go to the "Certificates" menu and select the "Valuation item by quantities percentage" option. In the dialog box, specify the percentage to be certified and choose between "Relative to the total budgeted" (the percentage is deducted from previously certified quantities) or "Add relative to the total budgeted" (the certified quantity is increased by the specified percentage). You can also specify the certificate method, choosing between "Modify total amount" (the amount is added to the certified amount field without a detail table, unless there is a previous certificate with details) or "Add new subtable" (the amount is added to a detail table). You can also add a comment to accompany the new subtable.
Another option is to certify by percentage for an entire work section, for which you must first hover over a work section without selecting any item. The percentage indicated will apply to all items contained within the work section.
Alternatively, you can set the reference quantity to be the quantity of work completed. To do this, use the "Certify item by percentage of completion" option. This is useful for the site manager who has been monitoring progress throughout the month.
Finally, another less common option is "Item executed by quantity percentage", which works by transferring quantities from the "Measurement" quantity table to the "quantity executed" columns in the "Items" section. This is useful for making production forecasts.
Certificates of conflicting or amended project prices
During the execution of a public works project, unforeseen tasks or changes to the initial design may arise, which may require the establishment of new prices or the adjustment of the prices agreed in the contract. These situations are governed by the applicable public procurement regulations and, in practice, by the terms of the works contract entered into.
To certify them in Arquimedes, they must be formally processed and approved in accordance with the contract and created as new work sections or items, incorporating them into the contract’s price structure for inclusion in the job certificates.
Closing job certificates
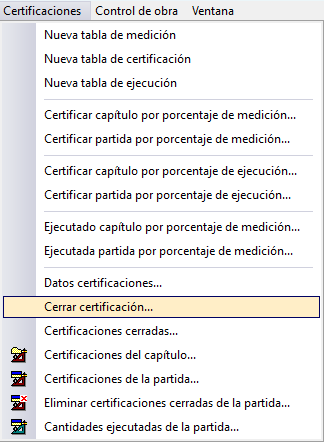
Once all the certificate quantities have been entered, the certificate must be closed. To do this, go to the "Certifications" menu (within the "Measurements/Certificates" window) and select the "Close certificate" option.
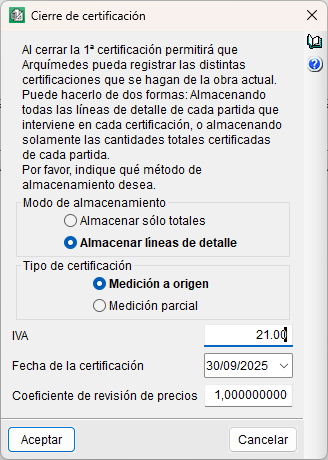
If this is the first time, you will be asked to enter the necessary data to configure the certificate closure (storage mode, certificate type, VAT, certificate date and price revision coefficient). It is advisable to select "Store detail lines" to know which data was entered in the "Certificate" tables. Similarly, to prevent the detail tables from being deleted every time a certificate is closed, it is advisable to select "Quantity to origin".
If the project contains at least one item with certificate pending review, the program will display a warning stating that if you proceed with closing the certificate, this flag will be removed from all items in the project.
The same procedure will be used to close the second and subsequent certificates.
When a certificate is closed in Arquimedes, the certificates are stored by date, so that the results of a closed certificate can be viewed and printed. Some of the list templates can only be used if closed certificates are employed. Furthermore, the quantities and amounts paid for the items are recorded, allowing payments to subcontractors and other suppliers to be tracked via the option available under "View" in the "Job control" menu (see the section "View job control data").
Rectifying job certificates
Arquimedes can be used to rectify:
- Certified amounts: regarding the most recent closed certificate or by editing specific certificates.
- Certification prices: by manually adjusting the value entered in "CertPrice".
- Certificate data: such as dates, bills of quantities or coefficients, by editing the first closed certificate.
Correcting to certified amounts
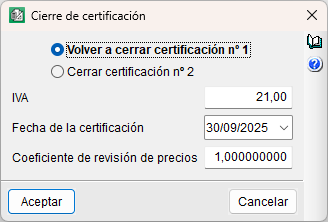
To make corrections, such as adding or removing certain quantities, if this is the last certificate closed with a source-based closure, you can make the changes and then close the certificate again using the "Close certificate" option in the "Certificates" menu.
If this is the last certificate closed with a partial closure, you must use the "Recover the last" button, make the changes to correct the quantities, and close the certificate again.

Corrections to certificate prices
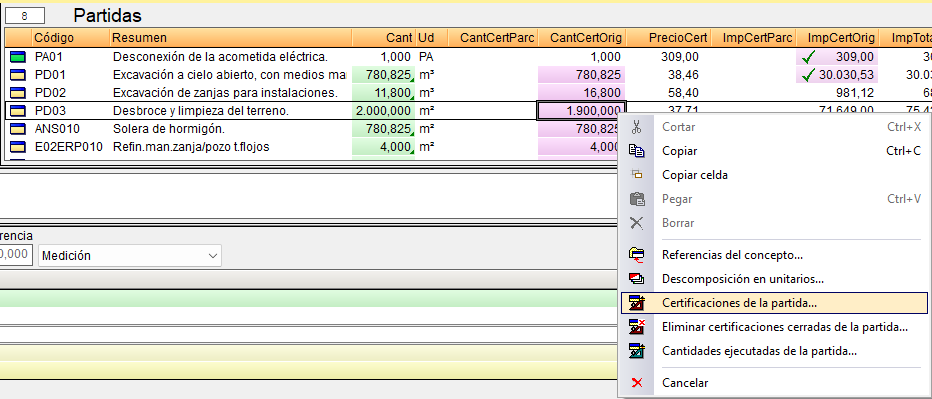
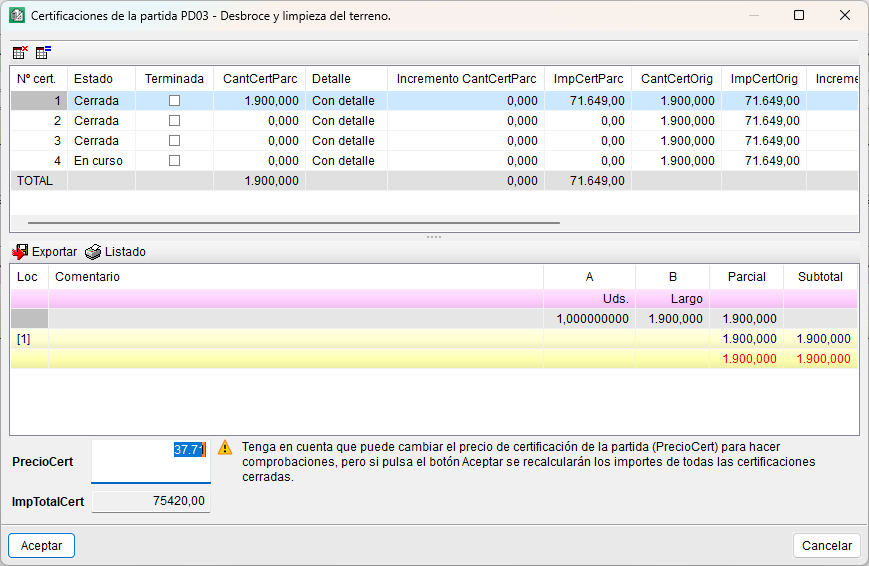
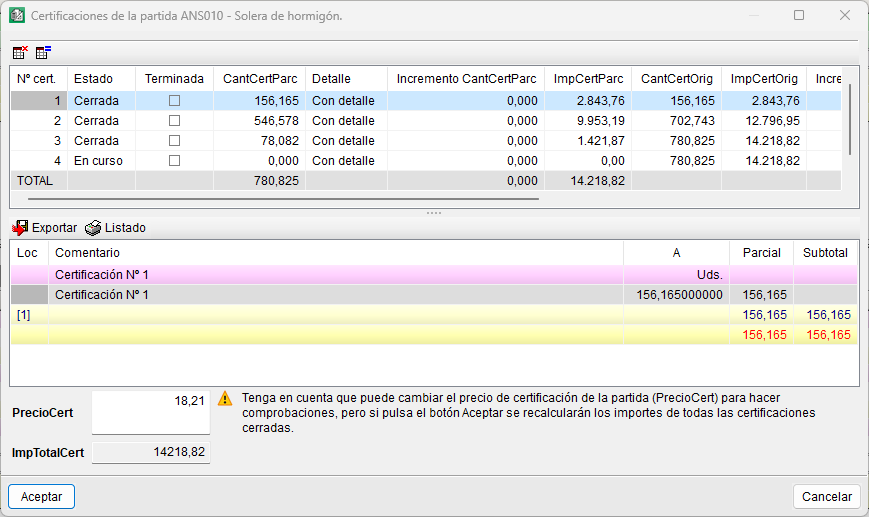
To change the certificate price for an item, right-click on the item in question and select the "Item certificates" option. In the dialog box, change the price in the "ValuationPrice" field.
Corrections to certificate data
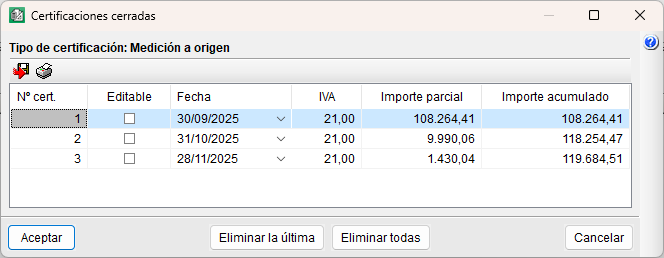
To change the initial details of a certificate, you must edit the first closed certificate and go to "Certificate details" in the "Certificates" menu. The details that can be changed are: the dates of the tender, award, contract formalisation and commencement; the award coefficient; and the total tender bill of quantities. To finish, simply toggle the "Editable" option in "Closed certificates".
Job certificate results
The results of the certificates can be viewed via various options within the program or through lists:
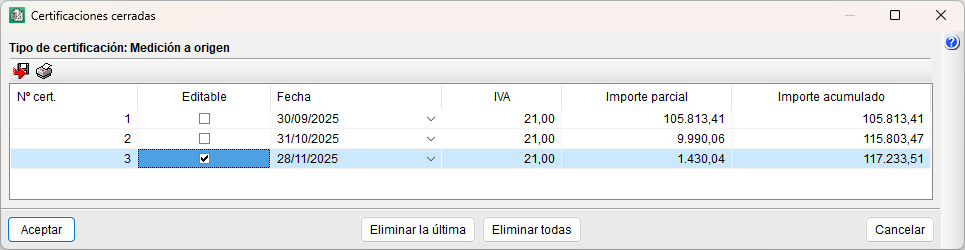
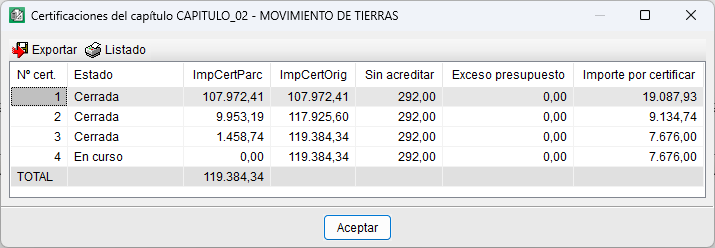
- "Closed certificates" option in the "Certificates" menu. Displays a table containing information about each closed certificate. Using the icons in the top-left corner of this dialog box, you can print the report of the selected certificate and export the content to CSV format for use in spreadsheet programs.
- "Work section certificates" option, available from the "Certificates" menu or from the context menu that appears when you right-click on a work section.
This allows you to view certificate details for the selected work section in the work section area.
- "Certificates" option, available from the "Certificates" menu or from the context menu that appears when you right-click on an item.
This allows you to view certificate details for the item selected in the items section.
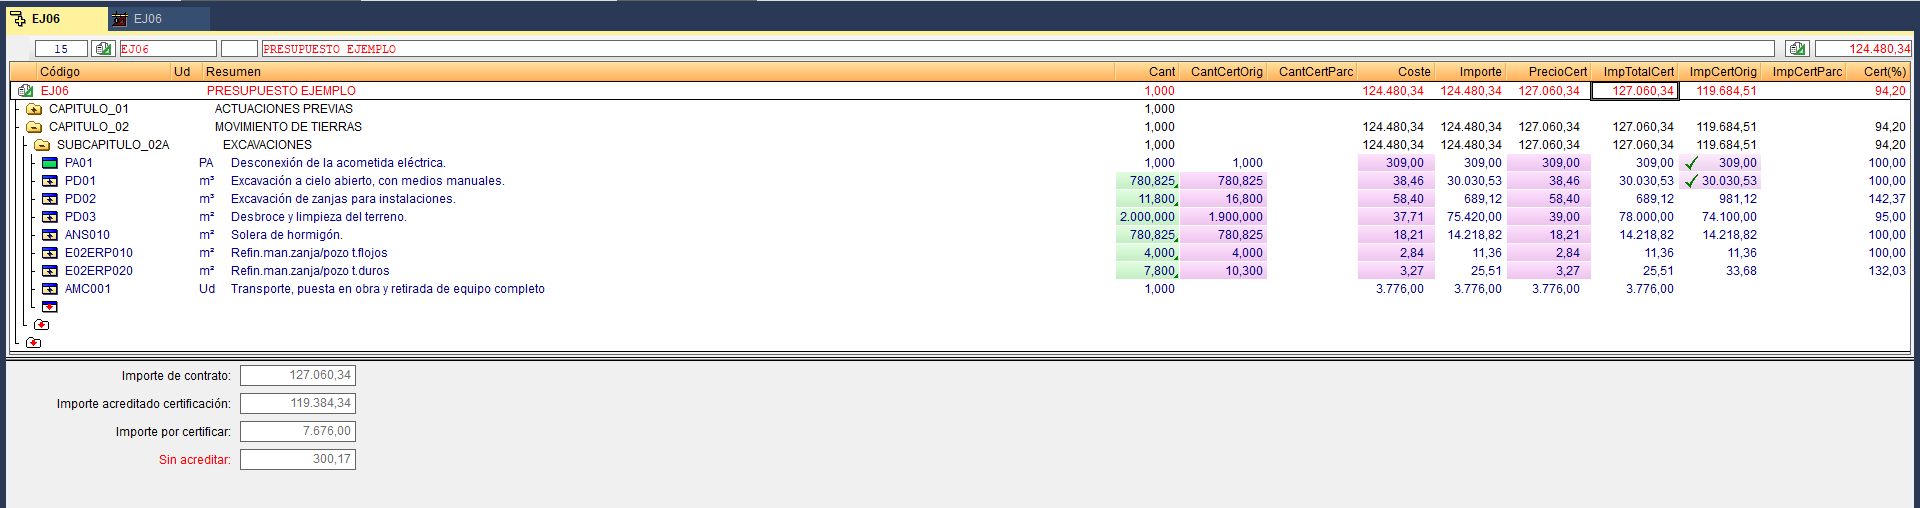
- "Cost breakdown structure" window.
Selecting the columns relating to certificates provides information on the selected level in the tree. From the work section, you can view information about the project, such as the amount to be certified, unclaimed amounts or the bill of quantities overrun.
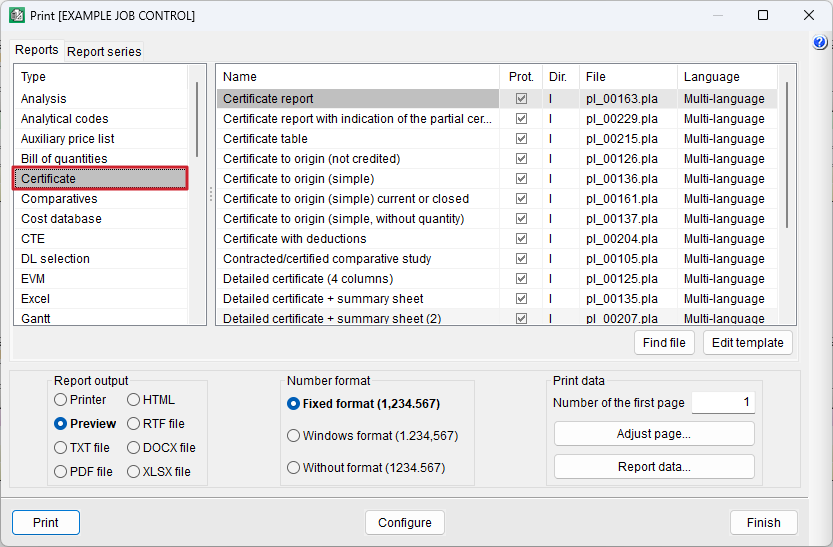
- Customisable reports of the "Certificate" type, via the "Print report" option.
Project planning: Gantt chart
With Arquimedes, users can create the project schedule (work program) and the payment plan (planned monthly expenditure) for a project or a financial proposal based on a validated bill of quantities. The tool allows users to generate one or more Gantt charts based on the bill of quantities’ structure of work sections, sub work sections and items, draw up a work schedule and link the various tasks. Once the diagram has been created, you can obtain the critical path and the corresponding timelines for labour and machinery.
It is important to distinguish the type of work plan being drawn up:
- Construction schedule as an annex to a project or a schedule submitted by the contractor to the developer
Specific dates are not usually included, as the actual plan for the start and progress of the works is unknown at that stage. Furthermore, when working on public sector projects, you must comply with the provisions set out in the Spanish Particular Administrative Clauses (Pliego de Cláusulas Administrativas Particulares) of the tender. - Project schedule drawn up by the site manager before work begins
Specific dates are included, as the actual schedule for the start and progress of the work is known at that point.
Creating the Gantt chart
Before creating a diagram, you must check that the operating system date is correct and that the bill of quantities has been finalised, with the items organised according to the construction process.
The Gantt chart editor is opened using the "Gantt chart" button on the bar or via the "Gantt chart" option in the "View" menu.
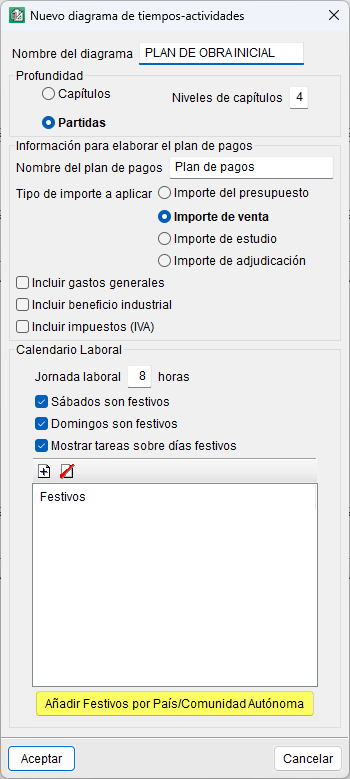
In the "New Gantt chart" dialog box, you define the data required for its initial configuration:
- Chart name.
- Selection of the depth of the "Cost breakdown structure" to generate the list of activities (work sections or items).
- Payment plan name.
- Selection of the amount type to be applied when calculating the payment plan (bill of quantities, sales, study or award).
- Inclusion (optional) of overheads, profit and/or VAT in the payment plan.
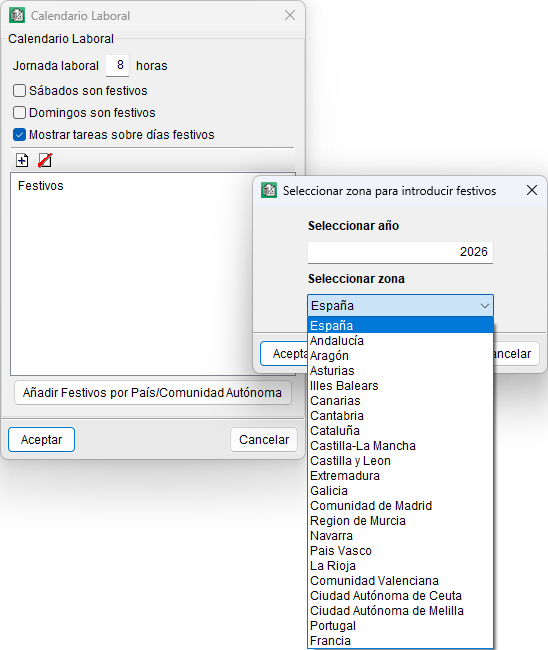
- Configuration of the working calendar: working hours, treatment of Saturdays and Sundays, display of tasks on public holidays and definition of public holidays.
An automatic entry button for public holidays is included, depending on the country or autonomous community.
Once accepted, the editor window appears, displaying a one-day duration bar for each activity in the list, in accordance with the hierarchical order of the "Cost breakdown structure". The start date set for the first activity corresponds to the operating system date. Each work section of the "Cost breakdown structure" becomes a container task, the duration of which depends on the tasks it groups together.
From this point onwards, you can enter the durations for each task, move them, split them or establish dependencies between them. The critical path (or longest path) is shown in red if the "Highlight critical tasks" option in the bar is selected.
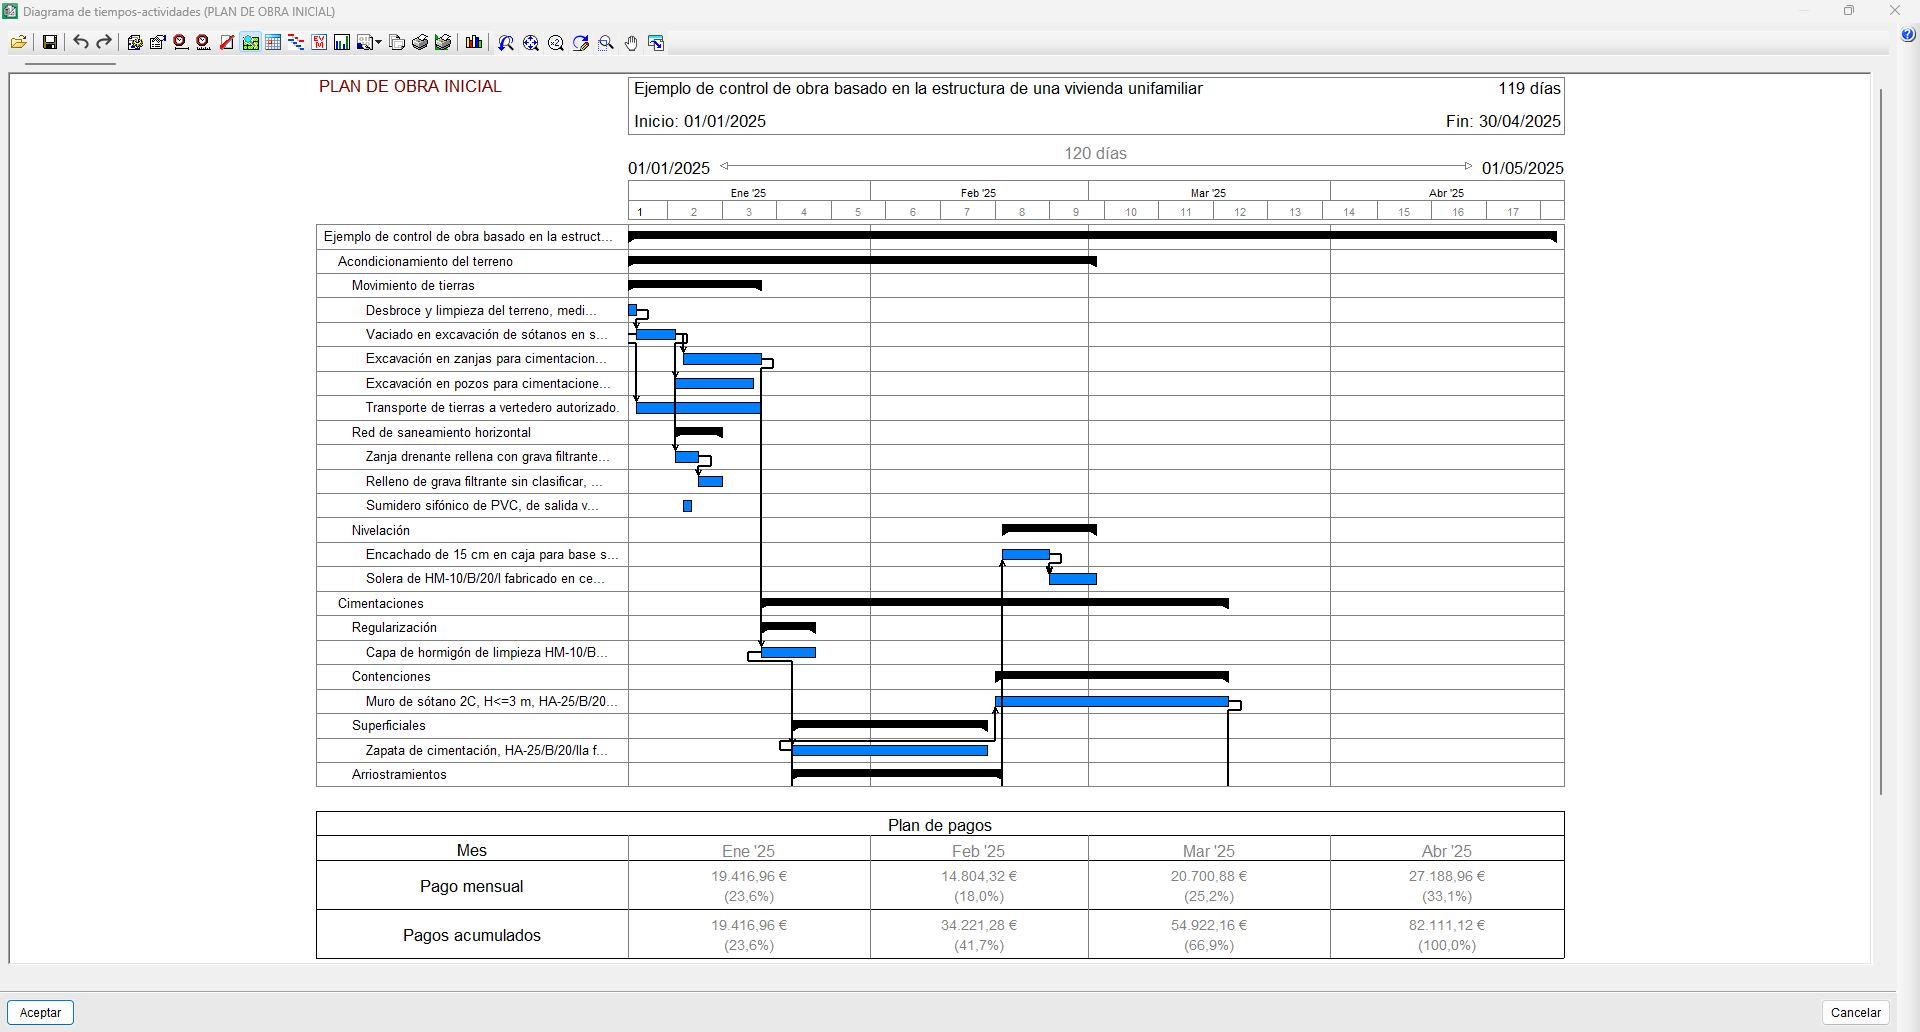
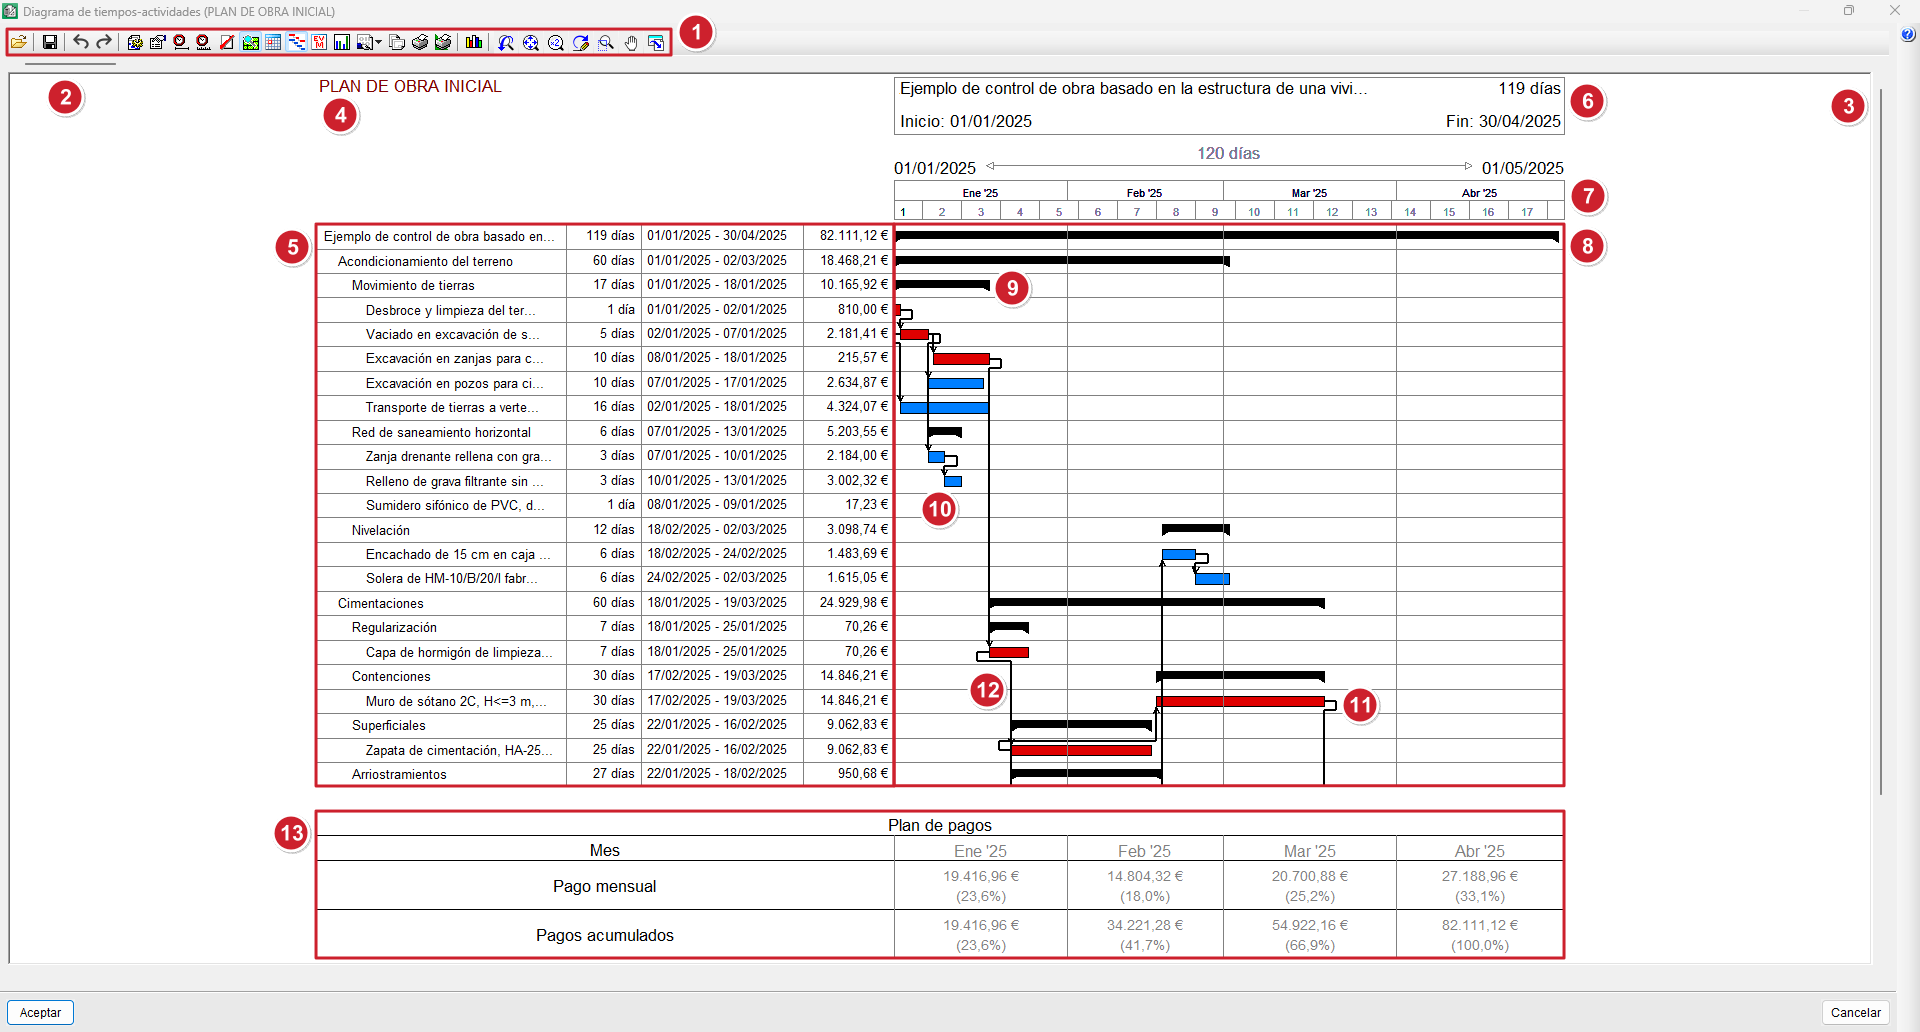
Gantt chart editor interface
The Gantt chart editor consists of:
- Top bar.
- Horizontal scroll bar for moving along the time scale.
- Vertical scroll bar for moving through the task list.
- Name of the Gantt chart currently being edited.
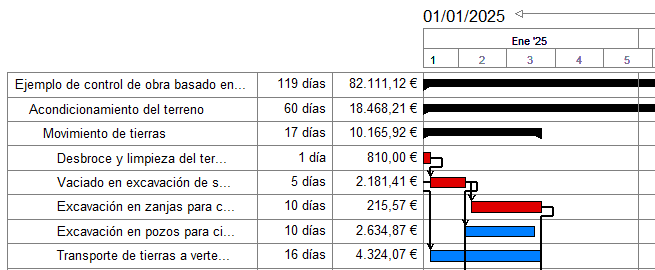
- List of activities showing duration, start and end dates, and cost.
- Area showing the duration of the selected activity.
- Area showing the section of the time scale displayed on screen.
- Activity area where the various activities and their dependencies are represented by bars.
- Container task (work section or sub work section).
- Simple task (may be an item or a sub work section).
- Critical task (or longest task) shown in red.
- Dependency lines (or black arrows).
- Table showing payment plan data or planned monthly investment (if enabled).
Using the Gantt chart editor
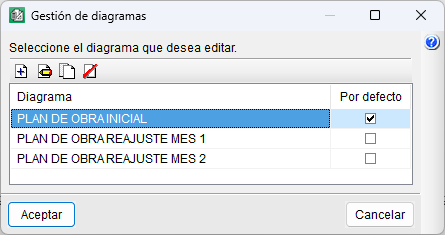
Managing charts
You can create one or more diagrams using the "Diagram management" option in the bar. You can also duplicate or delete them, or choose which one opens by default.
Display tools
To view the diagram in detail, there is a set of buttons on the bar that allow you to adjust the graphic display.

Delete and update tasks
A task can be deleted by right-clicking on it and selecting the "Delete task" option from the context menu.
To recover a deleted activity, you will need to manually add a new one, link it to the relevant cost centre and, finally, update it using the "Update tasks" button on the bar.
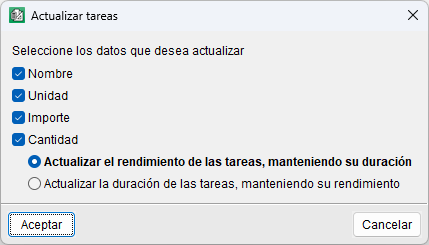
The "Update tasks" tool also allows you to synchronise the data for activities linked to cost centres when the quantities or cost of the associated items are modified. The tool allows you to choose between two options: adjust the output whilst maintaining the duration or adjust the duration whilst maintaining the output.
Set a start date and adjust the time frame
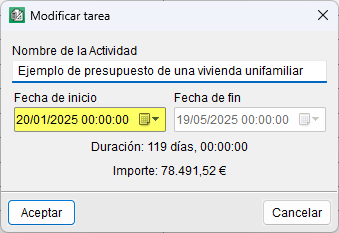
To start with a specific start date, place the mouse pointer over the bar of the first parent activity, right-click and select the "Task information" option. When you change the "Start date", all tasks will be moved at the same time.
The same action can be performed from the activity area by dragging the task to a specific date without releasing the left mouse button. To do this, you must have the "Show month and year labels" option enabled, which appears when you click the "Step" button on the bar or when you click on the area indicating the time scale range displayed on the screen.
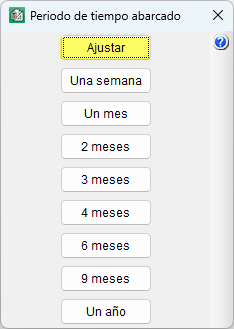
In this case, the section displayed on screen may not be sufficient, and the full diagram may not be shown. You can adjust this using the "Span" button, either by clicking "Adjust" or by selecting a more specific time period (one month, two months, etc.).
Work calendar
Arquimedes allows you to create a work schedule for each diagram by clicking the "Work schedule" button on the toolbar.
Duration of an activity
By using the "Task information" option (accessed via the right-click menu), you can also rename a task or set a duration for it. There are four ways to set a duration for a task:
- You can manually (from the activities section) use the mouse pointer to move, expand or collapse tasks according to the scale selected via the "Step" button.
- By entering a start date and an end date.
- By entering the duration directly in days.
- By entering the output per day, calculated based on the work team.
| Best practice: |
|---|
| The calculation of a task’s daily output can be estimated by breaking down the item, identifying the main resource that determines production and which takes the longest to produce a single unit of that item. |
Task amount
The cost of a task depends on the option selected in the "New Gantt chart" dialog box; it may be based on the bill of quantities, sales, study or contract award cost. Furthermore, it may include overheads, profit and/or VAT, as specified in that dialog box.
| Note: |
|---|
| For a task to have a cost, it must be linked to a cost centre (see the "Linking a task to a cost centre" tool in the "Editing tasks and dependencies" section below). |
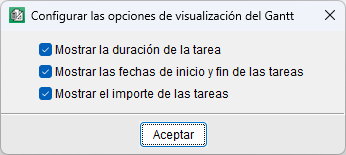
| More information: |
|---|
| To display the amounts, duration and/or start and end dates of tasks, you need to tick the relevant box under the "Configure Gantt chart display options" option. |
Editing tasks and dependencies
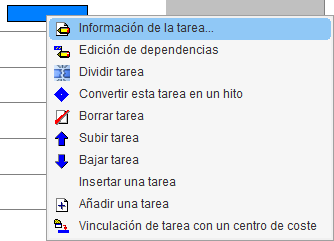
In the Gantt chart editor, tasks can be edited directly via the context menu that appears when you right-click on one of them. This menu allows you to perform the following operations:
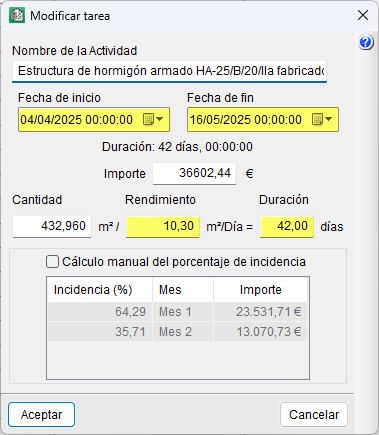
- Task information
- Opens the "Edit task" dialog box, where you can edit:
- Activity name, which identifies the task in the chart.
- Start and end dates, which define the planned duration.
- Amount associated with the task, either calculated or entered manually.
- Quantity and efficiency, the ratio of which determines the duration of the task.
- Manual calculation of the percentage allocation, a box that allows you to manually enter the monthly percentage allocation for the task (adding up to a total of 100%), rather than having it calculated automatically based on the amount or duration.
- Editing dependencies
Creates, modifies or deletes dependency relationships between tasks based on the link conditions (finish-to-start, finish-to-finish, start-to-finish or start-to-start). From the dialog box, select the task to which you wish to subordinate the current task (from among the rest of the project). Next, select the type of dependency from the drop-down menu in the "Dependency" column. You can add as many tasks as you like to create dependencies with the current one. - Divide task
Inserts breaks in the execution of a task (for example, waiting periods). You can define the start and end dates for each segment in the "Task information" section, or adjust them directly on the diagram by dragging with the mouse. - Change this task into a milestone
Turns the selected task into a milestone, i.e. a marker with no duration that represents a key point in the project (such as the start or end of a phase). It is visually distinguished by a diamond and may have associated dependencies. - Delete task
Removes the selected task from the diagram, along with its dependencies. - Move task up
Changes the hierarchical order of the selected task by moving it one position up in the list. - Move task down
Changes the hierarchical order of the selected task by moving it one position down in the list. - Insert a task
Creates a new task immediately above the selected one. It is assigned a duration equal to that of the containing task and an initial amount of zero. - Add a task
Creates a new task at the end of the list, with a duration equal to that of the containing task and an amount of zero. This is useful for incorporating complementary activities or new phases. - Linking a task to a cost centre
Associates the selected task with a cost centre, i.e. with an item or work section in the "Cost breakdown structure". There will be a single linked cost centre (item or work section) in the list, and it is possible to unlink it via the box in the "Linked" column.
| Note: |
|---|
| If you hover over an enclosing task (work section or sub work section) and right-click on it, the context menu will display the option "Add an enclosing task". |
Cost tracking by construction task
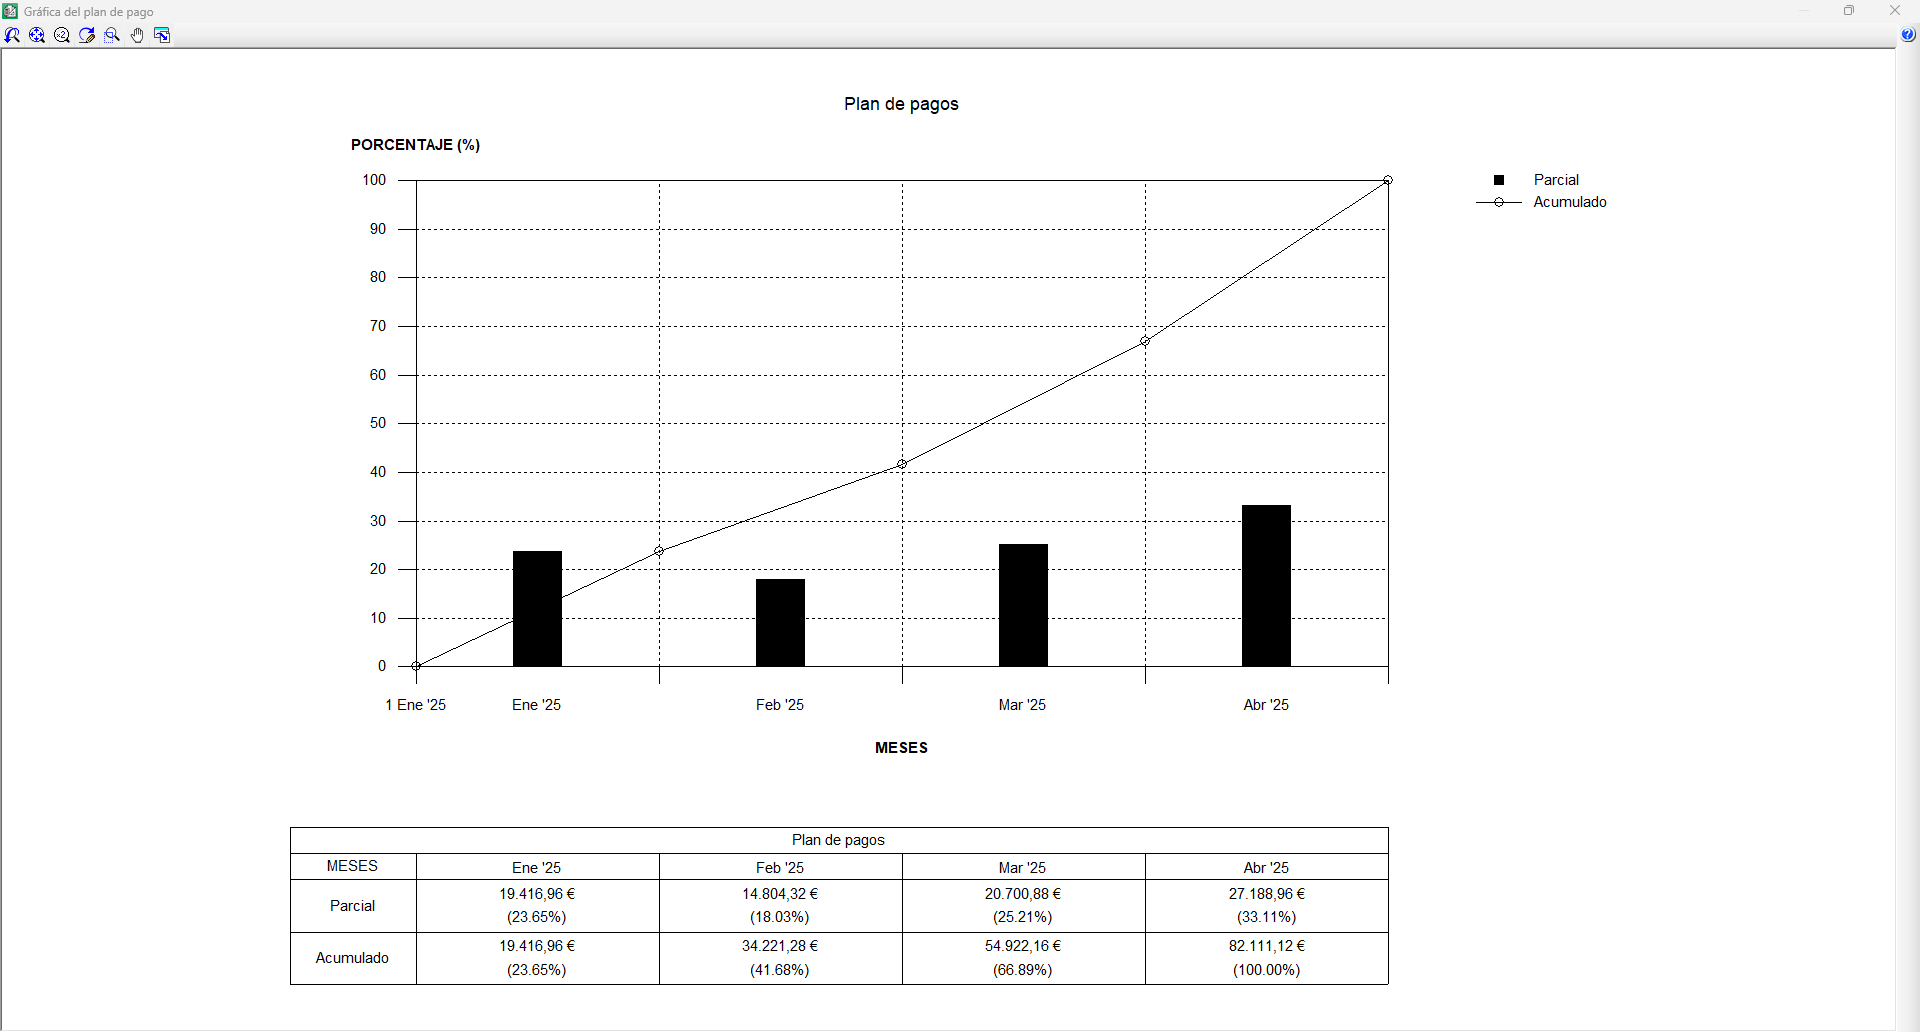
The payment plan is displayed as a table at the bottom of the diagram, provided the "Payment plan" option on the toolbar has been selected. This table consists of the same number of columns as the number of months the project spans, and two payment rows (monthly payment and cumulative payments), which show the amounts and percentages for each month. This plan, also known as "Monthly investment", corresponds to the monthly forecast of the sum of task amounts by month. The amounts to be spent on tasks are defined when creating the Gantt chart.
It is possible to plot the payment plan on a graph called "Investment curves". This is activated via the "Graph" option by selecting a title and defining the graph type. Two functions are plotted, representing the monthly and cumulative payments. It is possible to print the graph or save it to a file in DXF, DWG or JPG format, amongst others.
Earned Value Management (EVM)
The Earned Value Management (EVM) method is a cost control standard that enables the monitoring of a project’s costs and deadlines and provides the information needed to make decisions.
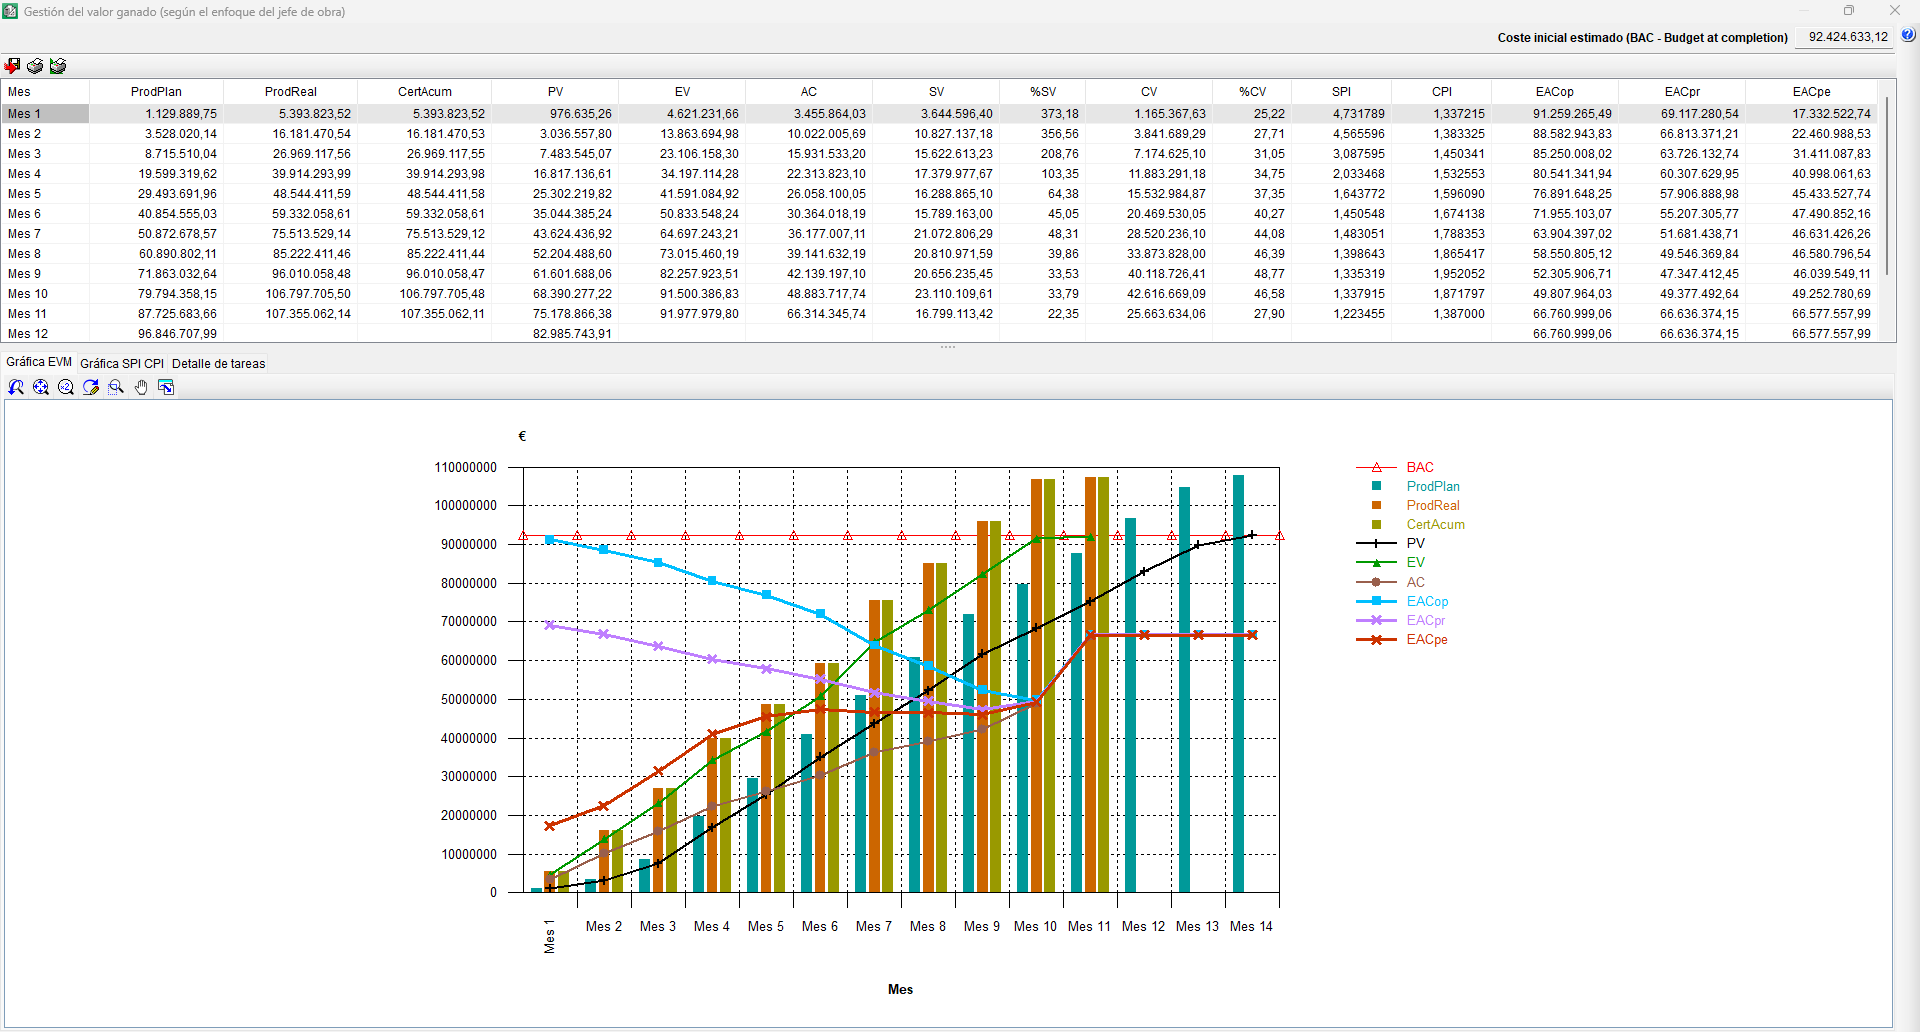
To view EVM from the site manager’s (contractor’s) perspective in Arquimedes, you must first create a Gantt chart with an "Items" level of detail. All tasks must be linked to cost centres (item type) with quantities and estimated costs, and must be updated in line with the items in the "Cost breakdown structure". It is also necessary to correctly allocate each item to its cost centre and enter the quantities actually completed to obtain the cost of completion for each phase of the project schedule. Furthermore, certificates must be finalised on the scheduled dates to record both the certified quantities and the amounts spent.
After completing all of the above, in the Gantt chart editor, click the "EVM (Earned Value Management)" option on the toolbar. A dialog box divided into two parts will then appear; the upper part displays the EVM model variables in monthly periods, together with planned production ("PlanProd"), actual production ("RealProd") and cumulative certificates ("AccumVal"). The lower part is divided into three tabs. The first displays the graph with the EVM model. The second displays the graph with the SPI and CPI indices. The third tab shows the breakdown of tasks by month.
Printing and exporting the Gantt chart
The Gantt chart editor features an "Export" option in its toolbar, which allows you to generate files in XML or MPX format (compatible with Microsoft® Project and other planning software).
| More information: |
|---|
| In Microsoft® Project versions 2007 to 2010, to import a file in MPX format, you must enable the "Allow loading of files with non-default or legacy file formats" option. From version 2013 onwards, the MPX format is no longer supported by Microsoft® Project. |
To print the Gantt chart, the editor offers several options in the bar:
- Print list template (recommended)
Prints using "Gantt" list templates. Allows you to print directly or export to PDF, DOCX, HTML, RTF, XLSX and TXT formats. - Print drawings
Print via a drawing output. In the "Drawing selection" dialog box, add a new element to the list and select the desired device. - Print current view
Print the current view displayed in the workspace or generate a file containing the drawing in a graphic format.
Using the "EVM" report template, named "pl_evm01.pla", you can generate a report based on the Earned Value Management model (from the site manager's perspective). This template is not accessible from the Gantt chart editor; you must close the editor and access it via the "Print report..." option located in the "Print" section of the "File" menu.
Table of contents
Complete your overview of Arquimedes by exploring the other sections available: