
Databases in Arquimedes
Arquimedes works with databases, which may contain cost databases or bill of quantities (projects).
Cost databases contain the elements (simple and concepts with breakdown) that serve as the basis for calculating bills of quantities, whilst bills of quantities apply these items to specific projects, including quantities, certificates or technical documents.
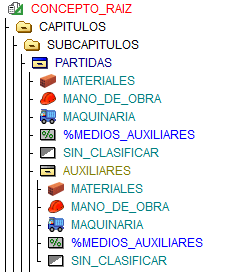
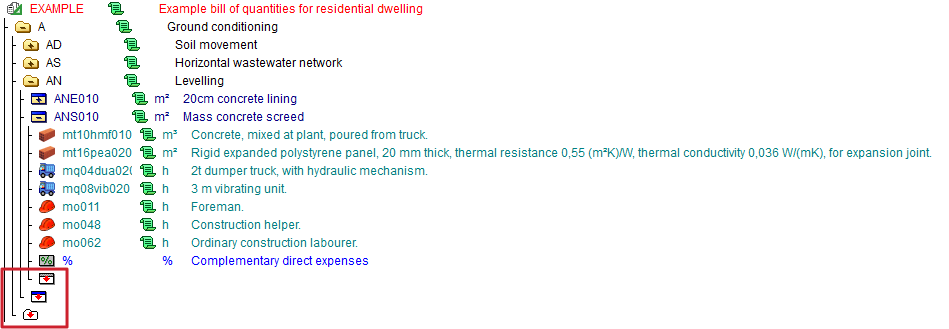
Setting up a database involves identifying and recording all its elements through a process of breaking them down into simpler parts known as concepts. These are organised into a hierarchical tree-like structure known as a Work Breakdown Structure (WBS). Each concept is identified by a unique code and contains associated information known as fields. In turn, they can act as a parent concept (containing others) or as a child concept (forming part of another). Concepts that cannot be broken down further are called simple.
The concepts in Arquimedes can be:
- Root concept
This is the only concept that is not part of the breakdown of another concept. In a bill of quantities, it represents the project being costed; in a cost database, it represents the cost database itself. - Work sections
Work sections are used to organise concepts and identify certain added amounts. If a work section is dependent on another work section, it is referred to as a sub work section, and there may be several levels of sub work section. - Concepts with breakdown
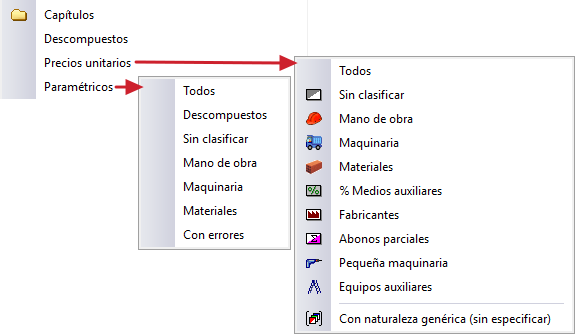
In a cost database, we refer to an "Item", which is an element containing a price and other associated information. If it does not have a breakdown, we refer to it as "Unclassified". - Items
In a bill of quantities, if an "Item" includes quantities, it is referred to as an "Item". If it does not include a breakdown, it is called a "Lump-sum item" (which may be subject to project verification or paid in full). It is used when there is no detailed information, and it is part of the price justification. - Resources
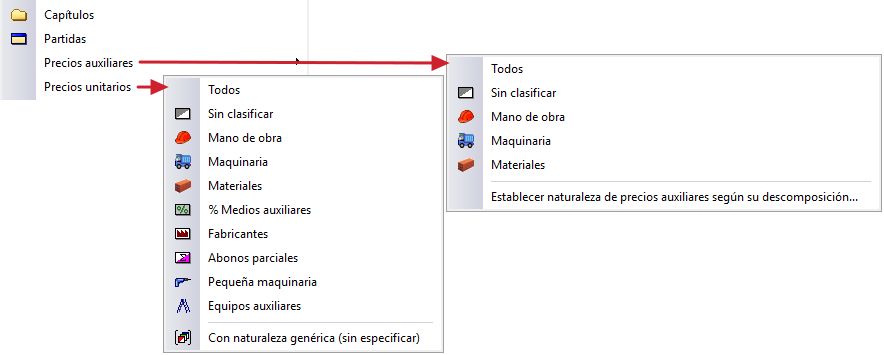
These are components that form part of the breakdown of a "Concept with breakdown" in a cost database, an "Item" in a bill of quantities, or an "Auxiliary price" in both a cost database and a bill of quantities. They can have any of the following types: labour, machinery, materials, auxiliary resources, unclassified and other. - Auxiliary prices
These are breakdown concepts used in various "Items" to avoid repeating price justifications. They do not take indirect costs into account. They can be used either as an "Item" or as an "Auxiliary price", but not both; otherwise, the program will display the warning "Item used as auxiliary price" on its icon. - Parametric
They define their code, summary, text, breakdown and other information in a variable manner using tables and arithmetic and logical expressions based on parameters. They can only be created in a cost database. - Percentages
They are calculated as a percentage of the amount of other items, such as overheads, small consumables, auxiliary materials or indirect labour. They can only be used in an "Item" or "Auxiliary price". Their code must contain a "%" or "&" character. - Partial payments
This allows items to be classified under "Price list nº 2" without affecting their price. It adds up the basic prices from the item breakdown that precede them, right up to the previous partial payment.
| Note: |
|---|
| In both a cost database and a bill of quantities, each item is unique but may appear in multiple breakdowns. The data associated with the item (unit, summary and price) are the same across all its occurrences; therefore, if any of these details are changed in one breakdown, the change will be reflected in the others. However, the quantity can be changed independently in each breakdown without affecting the others. |
Creating a new database
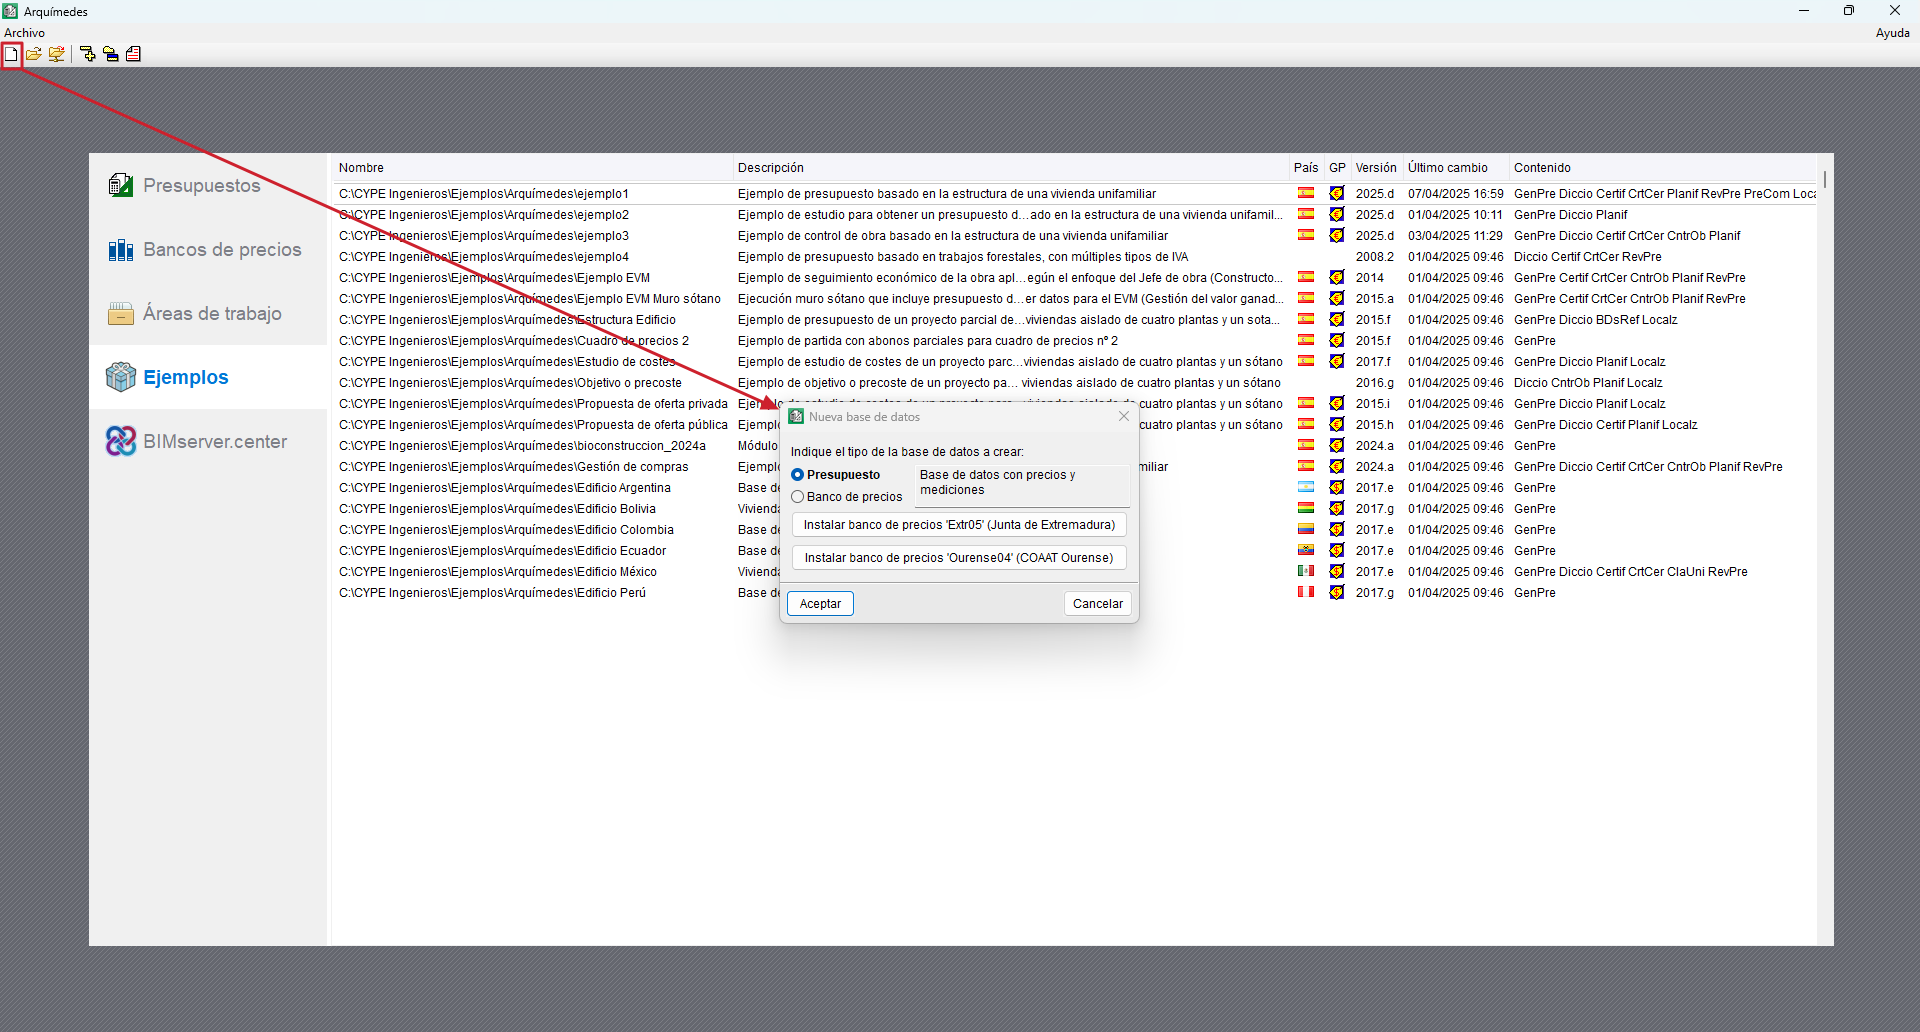
When you start Arquimedes, a presentation window appears where you can select the budget, cost database, work area or job you wish to open. This presentation window appears if no database was open the last time the program was closed.
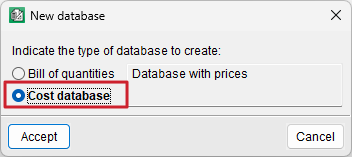
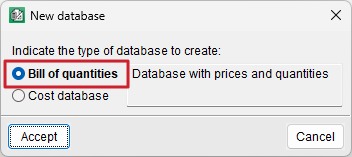
To create a new database, click on the "New database" icon on the top toolbar. Once selected, you will need to indicate the type of database to be created (bill of quantities or cost database).
You can also open one of the examples included in the program from the "Examples" section of the presentation window.
Cost databases
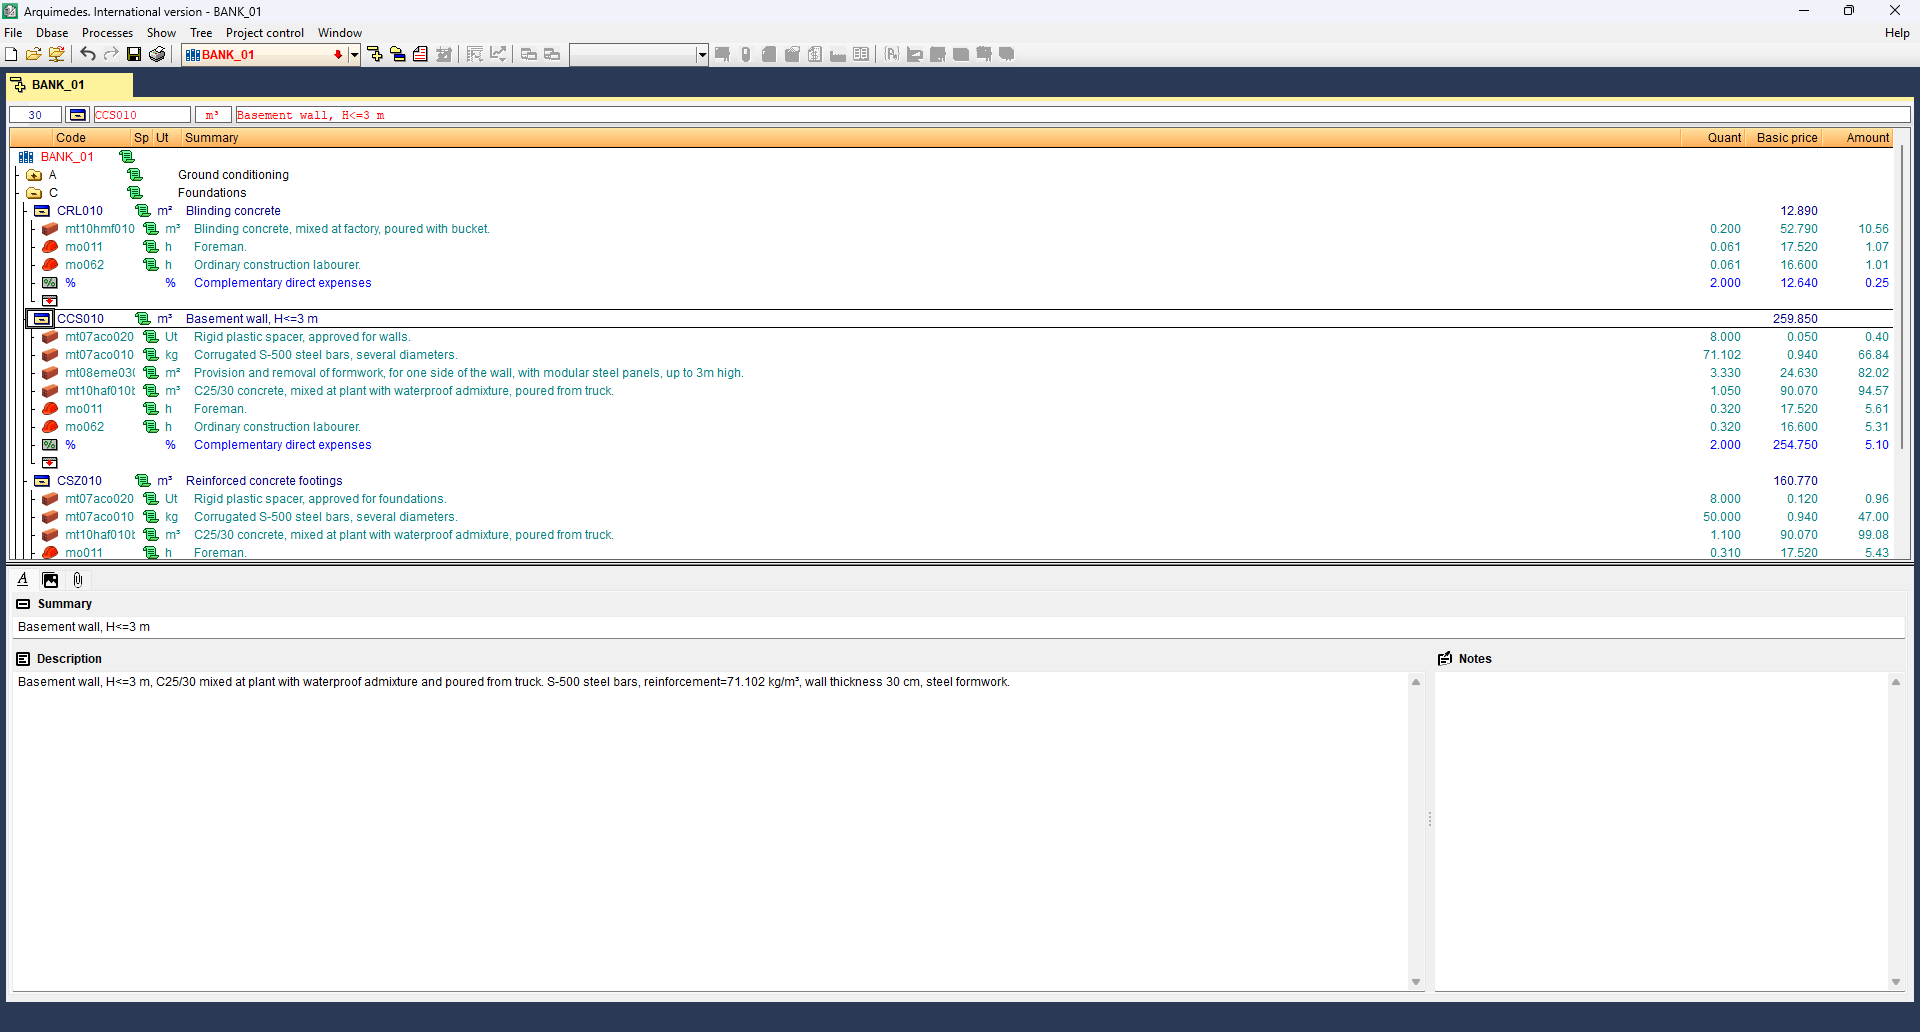
The cost database, also known as a base or price table, has all the concepts organised into work sections.
These contain the simple prices for labour, materials and machinery, and the broken down prices such as items and auxiliary prices.
They may come from public, private, or manufacturing entities and usually include complementary data such as specifications, regulations, or graphical information.
Regular updates are essential to ensure their validity.
In addition, they may have search keys associated with concepts to make it easy to locate them.
They can be classified into three categories according to their structure and level of parameterisation:
- Conventional (or standard): contain a closed list of items with fixed prices defined manually. They include simple and itemised prices.
- Parametric: generate prices from predefined combinations of parameters. They can be implemented directly in Arquímedes or compiled in DLL.
- Multiparametric: allow prices to be adjusted automatically based on multiple project variables (type, location, surface area, etc.).
Bills of quantities
The bill of quantities database is organised into "Items" grouped into chapters. These units are measurable and contractable components and can be valued based on experience, breakdown into basic concepts, or using price tables published by third parties.
When a unit is quantified in the bill of quantities, it is called an "Item".
Chapters allow the bill of quantities to be organised, structuring the "Items" according to the planned order of execution of the job, and cannot be repeated in the "Breakdown tree".
Bill of quantities hierarchy tree
The scheme of successive breakdowns of budget concepts can be likened to an inverted tree structure, where the trunk would be the root concept (associated with the name of the budget file), while the branches would be less complex concepts, such as "Work sections", "Sub-work sections", "Items", "Units" and "Auxiliaries".
Creating a new cost database
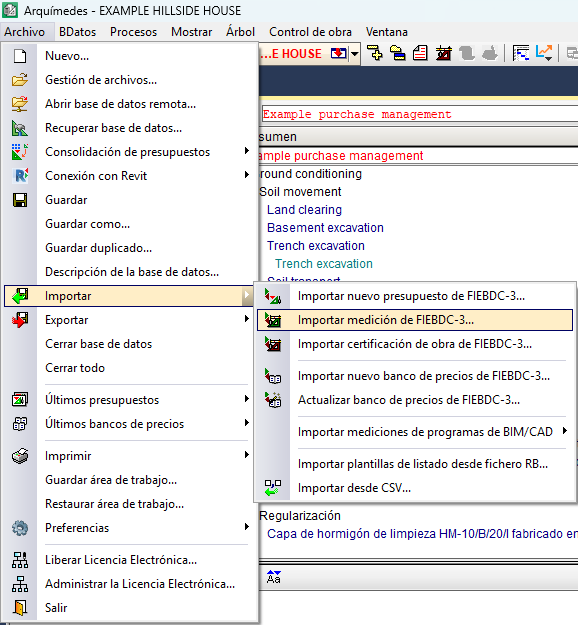
There are several ways to create a cost database in Arquimedes. You can import one from a file in FIEBDC-3 format or create a new one from scratch. You can also import a cost database from CSV format (see "Import from CSV" section).
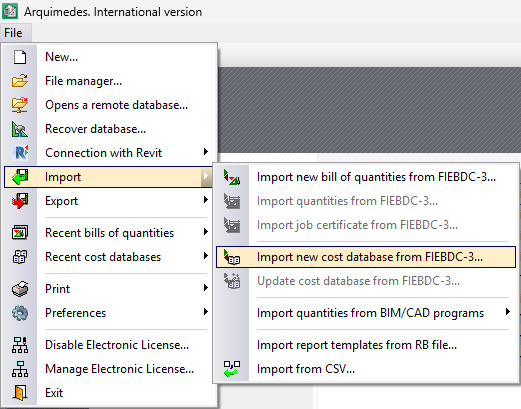
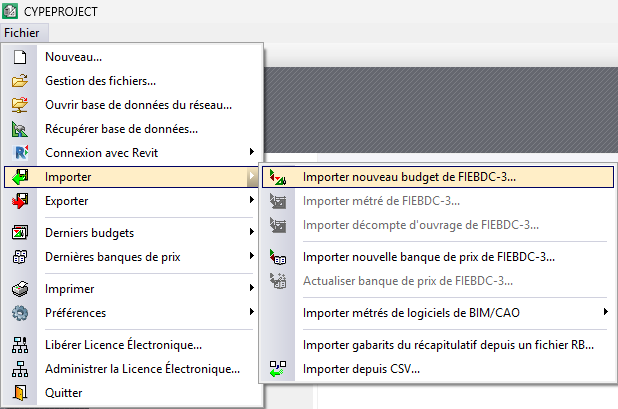
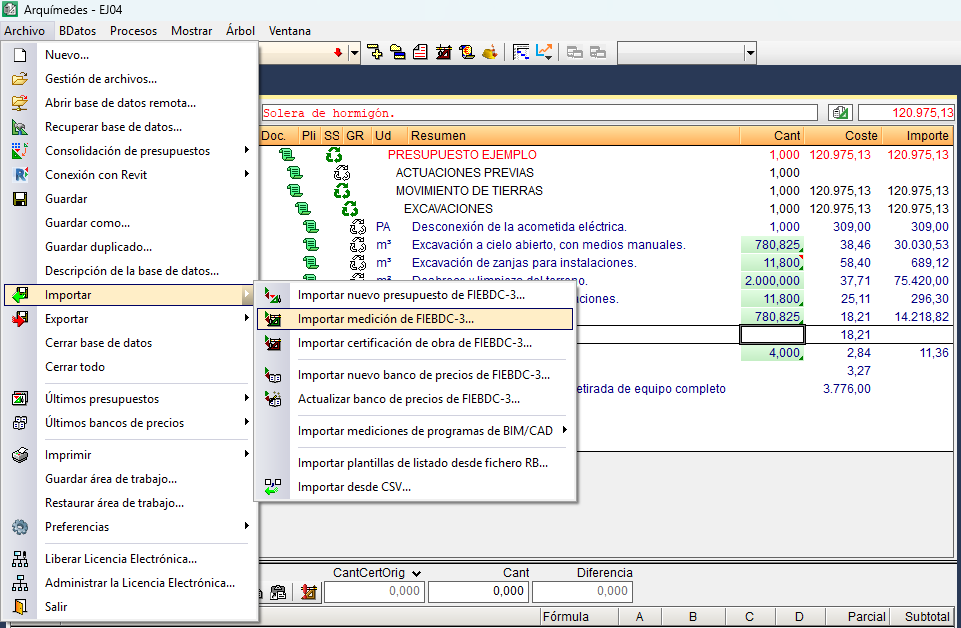
Import new cost database from FIEBDC-3
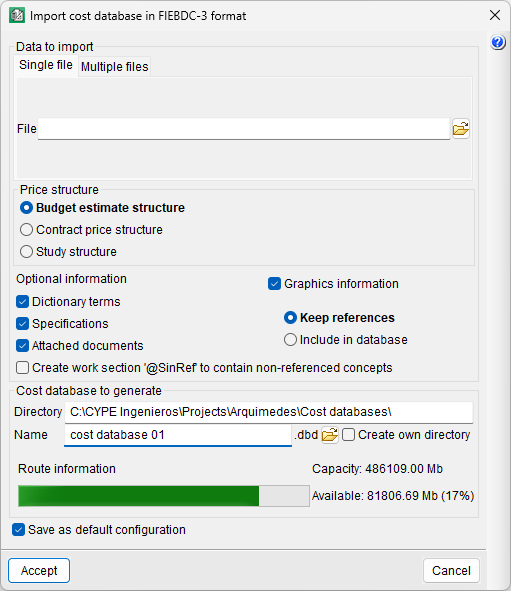
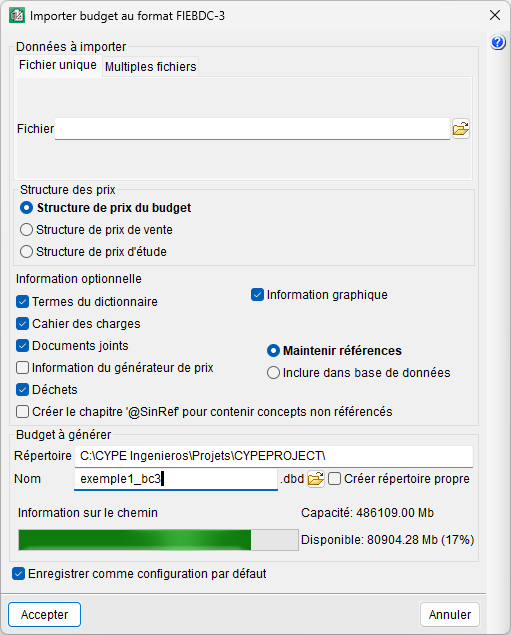
This option is located in the "Import" section of the "File" menu. The dialogue box that opens offers two options: the cost database can consist of a single file in BC3 format (tab "Single file") or multiple files (tab "Multiple files"). To import, select the location of the file or files and indicate the structure (bill of quantities, sale or study) that will receive the prices. Optionally, other additional information can be imported, such as dictionary terms, specifications or graphics associated with concepts.
It is advisable to check the "Create own directory" box in order to organise the different price databases installed on your computer better.
When you close the import dialogue box, the price bank in Arquimedes will appear in the "Breakdown tree" window with the assigned price structure.
| Note: |
|---|
| If, when importing a .bc3 file, it contains repetitions of the work section, a warning will be displayed for correction in the "Breakdown tree", marking its icon with 'XX' in red. To repeat the chapter content in the "Breakdown tree", use the "Paste duplicate" option. |
When importing a new cost database in FIEBDC-3 format, three files with the same name will be created, with extensions .dbd, .idx and .dat. Subsequently, a fourth file .dbz will be created automatically, containing information about the backups made by the program.
Create a new cost database from scratch
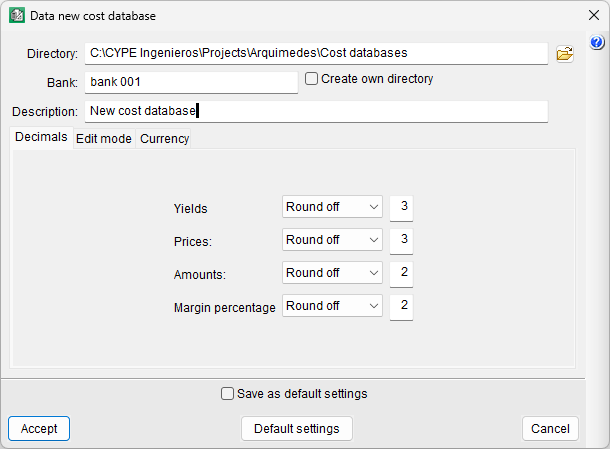
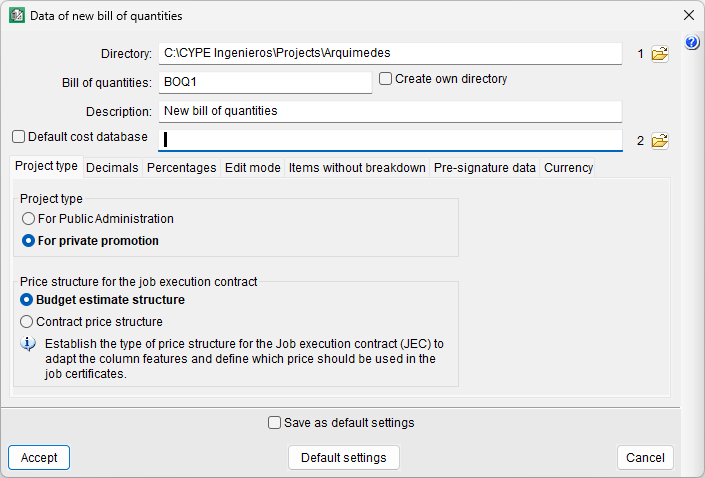
To create your own price database, select the "New database" icon from the top toolbar or the "New..." option from the "File" menu, then select the "Cost database" option. Next, you must indicate the directory, the bank and the description of the database.
In addition, there are three tabs for selecting the number of decimal places to be displayed, the work section editing mode, and the currency to be used.
| Best practice: |
|---|
| From the "Save as default options" checkbox at the bottom of the dialogue box, you can save the settings so that they appear by default the next time the program is run. |
Creating a new bill of quantities
There are several ways to create a bill of quantities in Arquimedes. You can import one from a file in FIEBDC-3 format or CSV format, or create a new one from scratch.
Import new bill of quantities from FIEBDC-3
This option is located in the "Import" section of the "File" menu. The dialog box that opens offers two possibilities: that the budget consists of a single .bc3 file (tab "Single file") or multiple files (tab "Multiple files"). To import, select the location of the file or files and indicate the structure (bill of quantities, sale or study) that will receive the prices. Optionally, you can import additional information, such as dictionary terms, specifications and graphics associated with concepts.
| Best practice: |
|---|
| It is advisable to tick the "Create own directory" box to organise the different bills of quantities installed on your computer better. |
When you close the import dialog box, the budget in Arquimedes will appear in the "Breakdown tree" window with the price structure that has been assigned.
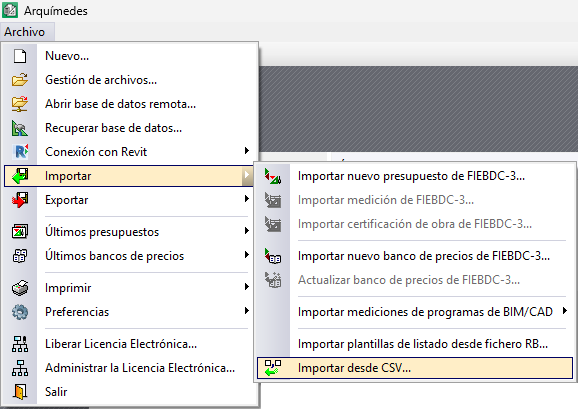
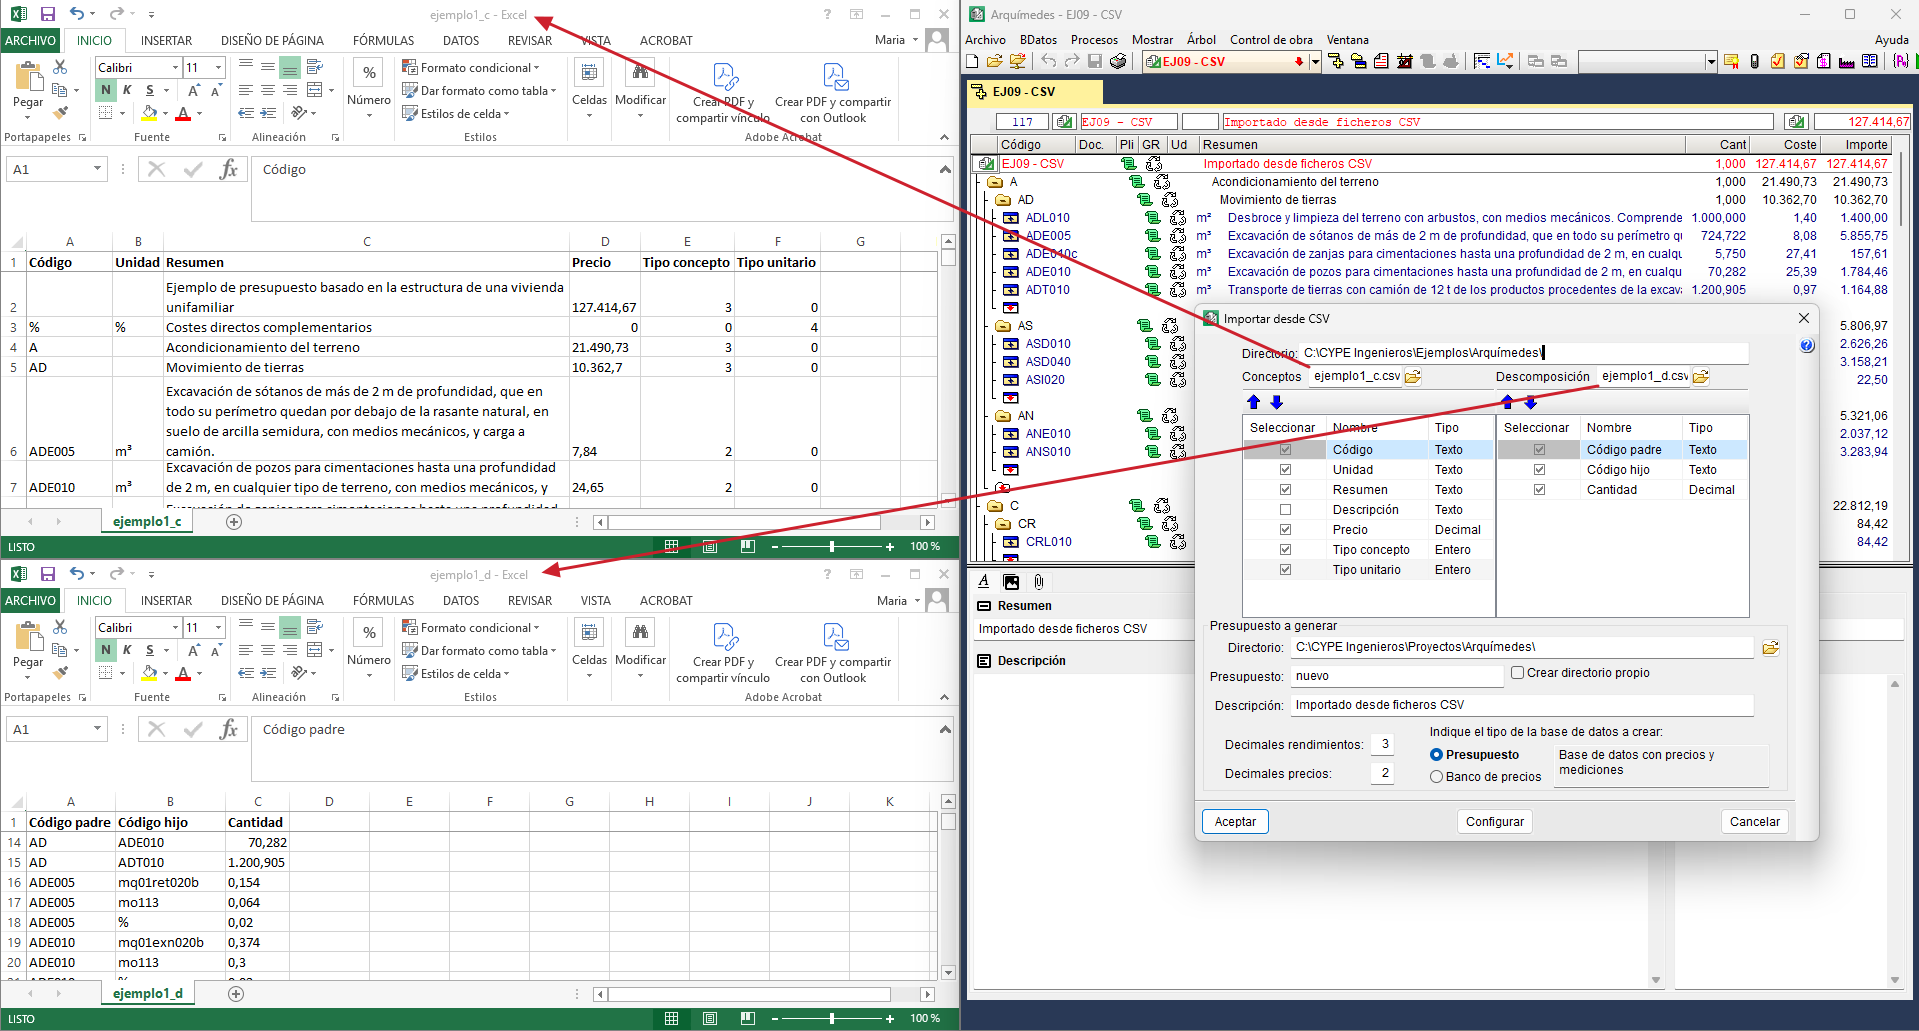
Import from CSV
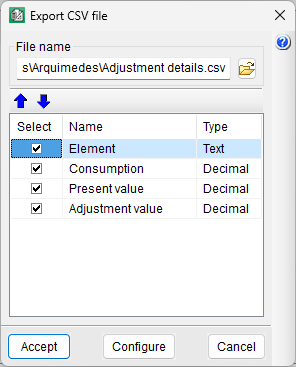
This option is located in the "Import" section of the "File" menu, and allows you to create a database in Arquimedes from two .csv files: one with the items and another with the breakdown of the work sections and the broken-down items. This tool is useful for importing bill of quantities or cost databases created in spreadsheets.
In the dialog box that opens, select the location of both files and indicate the type of database to be created (bill of quantities or cost database).
The concept file must include, for each line, the following fields: "Code", "Unit", "Summary", "Description" (optional), "Price", "Item type" (0 – Unclassified, 1 – Labour, 2 – Machinery, 3 – Materials, 4 – Auxiliary resources) and "Unit type" (0 – Simple, 1 – Parametric, 2 – Broken down, 3 – Chapter).
For its part, the decomposition file contains the "Parent code", the "Child code" and the "Quantity" with which the child concept intervenes in the parent.
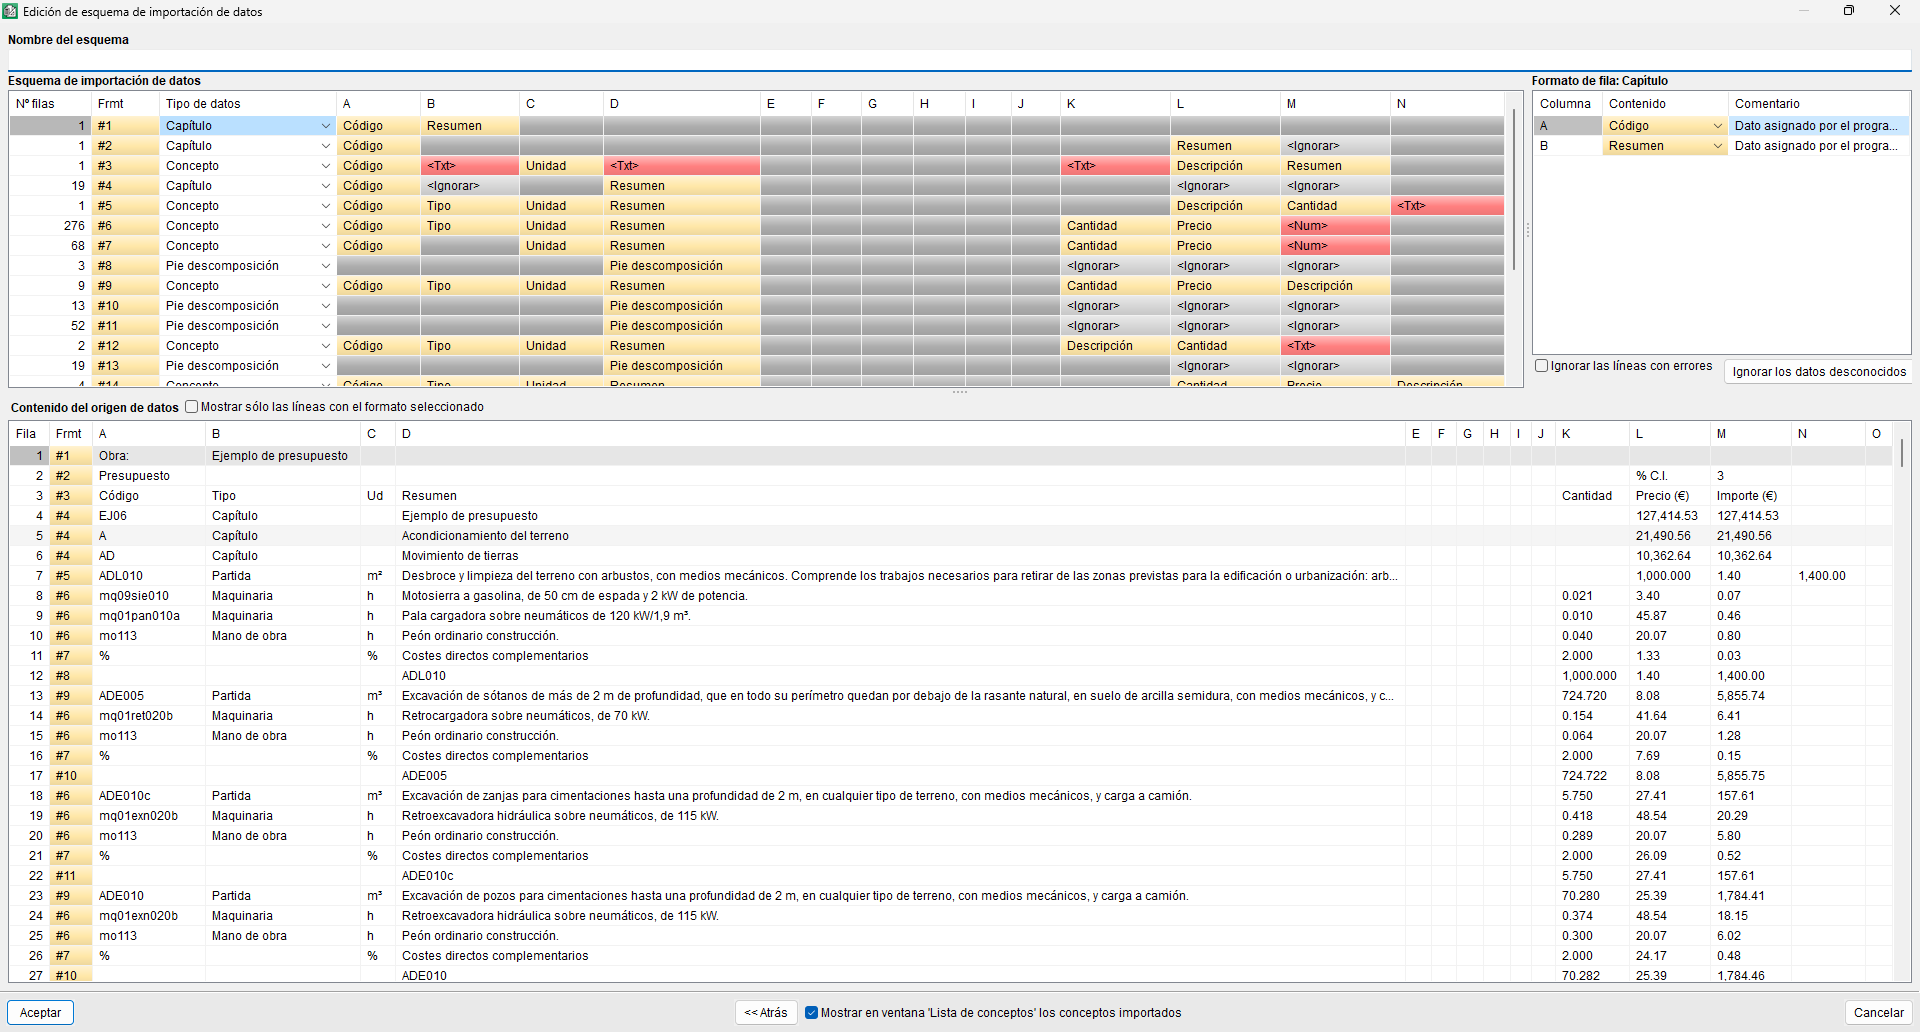
Import from CSV format
There is another way to import information from files in CSV format or from data copied to the clipboard (for example, from a spreadsheet such as Excel®, Open Office®, Google Docs®, etc.).
This option can be executed from the "Import" section of the "File" menu or from the context menu that appears when you right-click (in the "Breakdown tree" window) on a concept such as "Work section" or "Item" with or without breakdown.
The dialog box that appears before importing, when you select the option "Import from CSV format" offers several import options depending on the concept selected in the "Breakdown tree" window:
- Chapter tree and its breakdown
This option should be used when the information to be imported contains one or more chapter levels, including items with their breakdown and, optionally, measurement details. For the information to be extracted properly, each broken-down element, whether a chapter or an item, must have a line called "breakdown footer" that allows you to know what the last element of its breakdown is and thus be able to correctly interpret nested breakdowns. The files produced when exporting works to Excel belong to this type of format.
This option can be activated in the "Import from CSV format" dialog box if the previously selected concept is of the "Chapter" type (including the root chapter). - Item tree and its breakdown
This type of import should be used when the information to be imported only has items with their corresponding breakdowns and quantity details. This format is a subset of the previous one, so the same rules apply to the "footer" line.
As with the previous option, it is only active when the selected concept is of the "Work section" type. - List of items with their breakdown
The information imported with this option requires a simpler format. It does not need a "breakdown footer". In this case, different column formations are used to differentiate the broken-down items (they have no price or no amount) from the unit items that compose them (they contain quantity and price).
List of items with their breakdown
The information imported with this option requires a simpler format. It does not need a "breakdown footer". In this case, different column formations are used to differentiate the broken-down items (they have no price or no amount) from the unit items that compose them (they contain quantity and price).
It is active with the item types "Work section" and "Item". - Simple list of items
Information imported with this option requires the simplest format. It is a list of items, which may or may not contain a quantity or yield, and which will be added to the breakdown of the current item.
It is active with the item types "Work section" and "Item".
After selecting the desired option, the program opens another dialog box to edit the data import diagram.

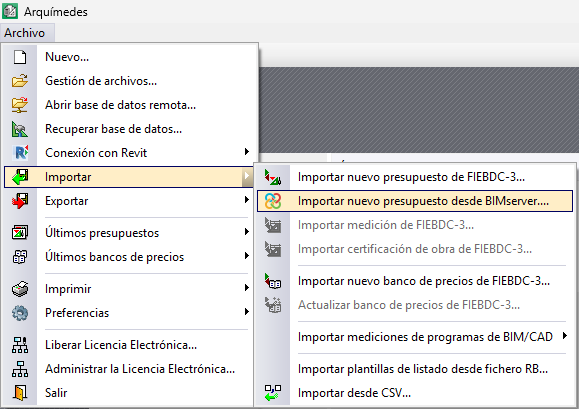
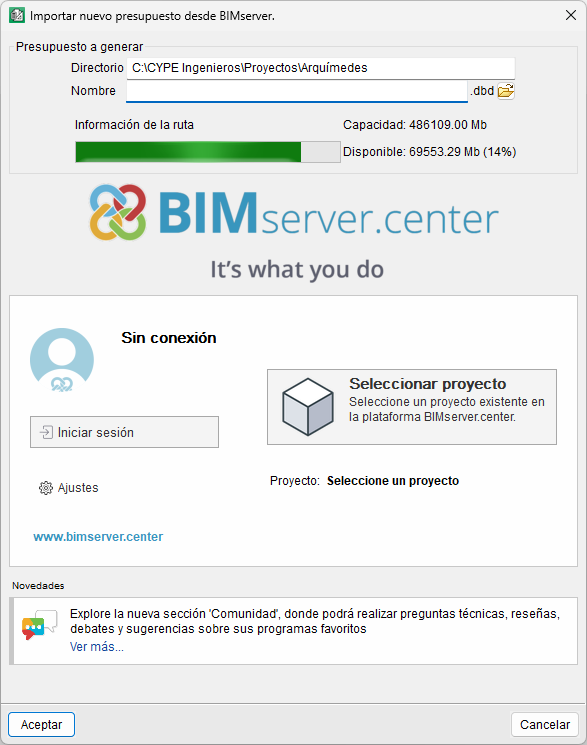
Import new bill of quantities from BIMserver
This option is located in the "Import" section of the "File" menu. It allows users to import and consolidate several BC3 files from a BIMserver.center project into a single bill of quantities.
In the dialog box that appears, you must select the directory where the bill of quantities will be generated, as well as its name. Next, you will need to log in with your BIMserver.center account and select an existing project on the platform. Then, you must select one or more contributions from the project, from which Arquimedes will automatically import all the BC3s it finds in those contributions.
| Note: |
|---|
| From "Settings", you can change the directory of files stored in the local cache. |
When you close the import dialog box, the consolidated bill of quantities will appear in the "Cost breakdown structure" window in Arquimedes.
Creating a new bill of quantities from scratch
To create your own bill of quantities, click the "New database" icon on the top bar or select "New..." from the "File" menu, then choose the "Bill of quantities" option. You will then need to specify the directory, the code and the description of the bill of quantities, and whether a cost database is to be used for the project (tick the checkbox and select the database).
A number of tabs also appear:
- Project type
Sets the project type (Public Sector or private development) and the pricing structure (bill of quantities or sales). - Decimal places
Sets the number of decimal places for measurements/quantities and amounts. - Percentages
Defines the percentages that vary for each project or contract. - Edit mode
- You can choose between two database creation options: "Normal" and "Insert". In the latter case, you can also set the levels of work sections and sub work sections.
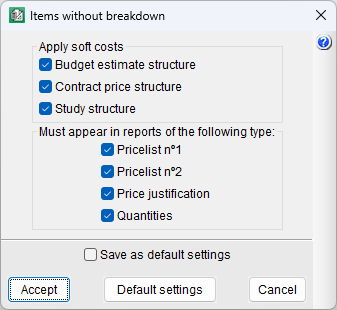
- Items without breakdown
Ensures that indirect costs are not generally applied to any item that does not have a concept with a breakdown. You can also hide them from a range of reports. - Pre-signature data
Specifies the data that will appear on the last page of the bill of quantities, such as the project location and date. - Currency
Select the currency to be used.
| Best practice: |
|---|
| By ticking the "Save as default settings" checkbox at the bottom of the dialog box, you can save the settings so that they appear by default the next time the program is run. |
Once this process is complete, the output displayed in the "Cost breakdown structure" window will consist of a hierarchical structure containing empty work sections, sub work sections and sections.
Add work sections to the bill of quantities
The work sections of a bill of quantities are used to organise and group items to make them easier to manage.
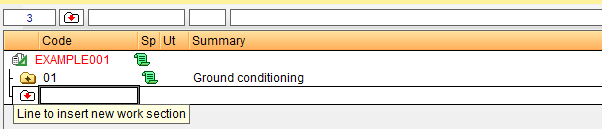
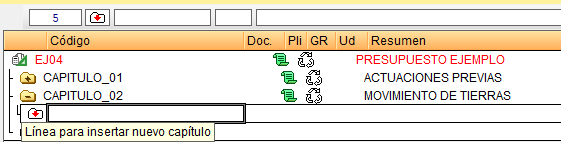
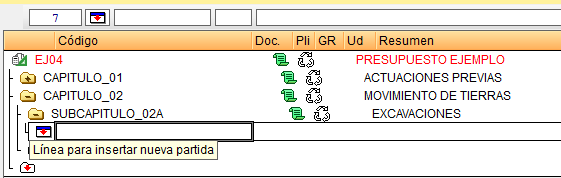
To add a new "Work Section", go to the "Code" column in the "Cost breakdown structure", next to the work section insertion icon, labelled "Line to insert new work section". From there, you can manually type in the alphanumeric code and press "Enter", then fill in the work section title in the "Summary" column. You will see that the folder turns yellow with a "+" symbol inside it.
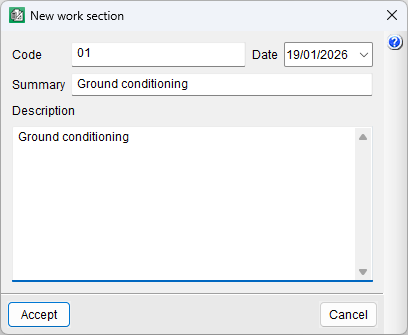
Another way to create a new "Work section" is to double-click the work section insertion icon, which will open the "New work section" dialog box where you can enter its code, summary, description and even the date. This dialog box can also be opened by hovering over the "Code" column and pressing "Enter" on the keyboard.
| Note: |
|---|
| For example, the first work section could be assigned the code "01" and the heading "Ground conditioning"; the second, the code "02" and the heading "Foundations"; and so on, resulting in a list of work sections that allows the bill of quantities items to be organised in a well-structured manner |
| More information: |
|---|
| The insertion line can be a work section (white box with a red downward-pointing arrow), a line item (white rectangle with a blue band and a red downward-pointing arrow) or an auxiliary or unit price (white rectangle with a grey band and a red downward-pointing arrow). |
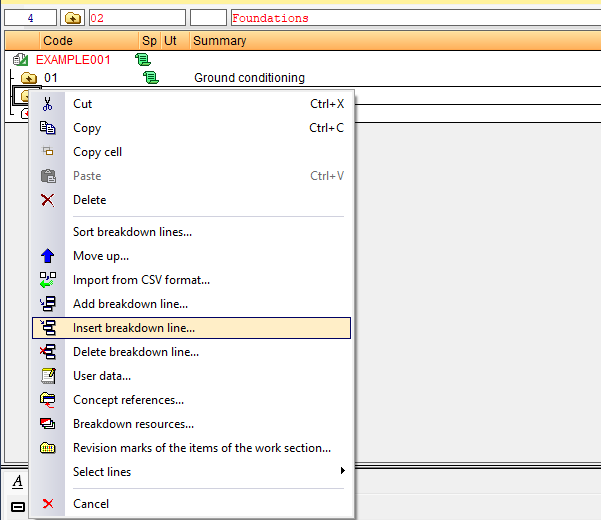
Add work sections between two existing ones
To add a new "Work section" between two existing ones, select a work section and click on the "Insert breakdown line..." option, which appears when you right-click or via the "Tree" menu. The new work section will be added to the top line of the selected work section.
Another way to do this is to add the work section at the end and move it using the "Cut" and "Paste" options.
| Best practice: |
|---|
| You can also drag and drop to move a work section, or hover over the work section you wish to move and use the "Move up" and "Move down" options that appear when you right-click. |
Add sub work sections to the bill of quantities
The work sections of a bill of quantities are supplemented by sub work sections at various levels.
To add a new "Sub work section", hover over the folder of the work section in which it is to be included and open it by double-clicking on it. This will create a new folder within the work section. There are then several ways to open the dialog box for inserting a new sub work section, such as:
- Double-click the insert work section icon (a white folder with a red downward arrow).
- From the "Insert breakdown line..." option in the right-click menu or the "Tree" menu.
- Hover over the "Code" column and press "Insert" on the keyboard.
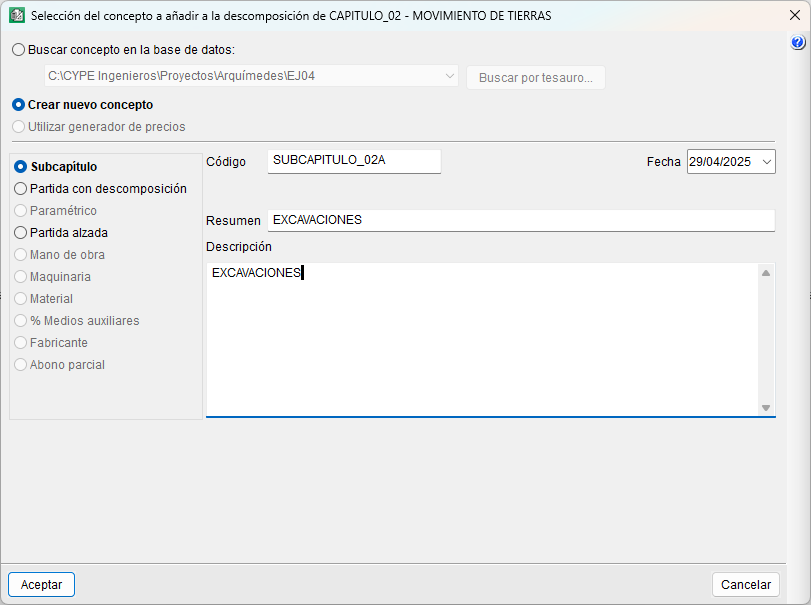
Using one of the three methods described above, the "Select item to add to the breakdown of..." dialog box will open. Here, select "Create new item" and "Sub work section", and enter at least the code and summary.
| Best practice: |
|---|
| To delete a work section or sub work section, simply hover over its folder and press "Delete" (or "Del") on the keyboard. To change the code or title of a work section or sub work section, hover over it, type in the new one and press "Enter" on the keyboard. |
Adding items to the bill of quantities
Once the structure of work sections and sub work sections has been created, items can be inserted at the desired level.
In Arquimedes, the bill of quantities can be broken down; that is, it can consist of other components (materials, machinery, labour, etc.) required for the execution of the work. They can also be simple items without a breakdown, i.e. items without a unit breakdown, such as lump-sum items. Furthermore, items can be copied from another bill of quantities or cost database (“Search in”); they can be created directly in the current bill of quantities (“Create new item”); or they can be used in the CYPE Cost Database (“Use CYPE Cost Database”).
Below are the different types of items that can be added to Arquimedes and how to enter them into the bill of quantities.
Create items without breakdown (Unjustified items)
These types of projects are difficult to assess initially, either because it is unclear what needs to be done to execute them or because they depend on third parties. One example would be utility connections.
There are two types of unjustified items:
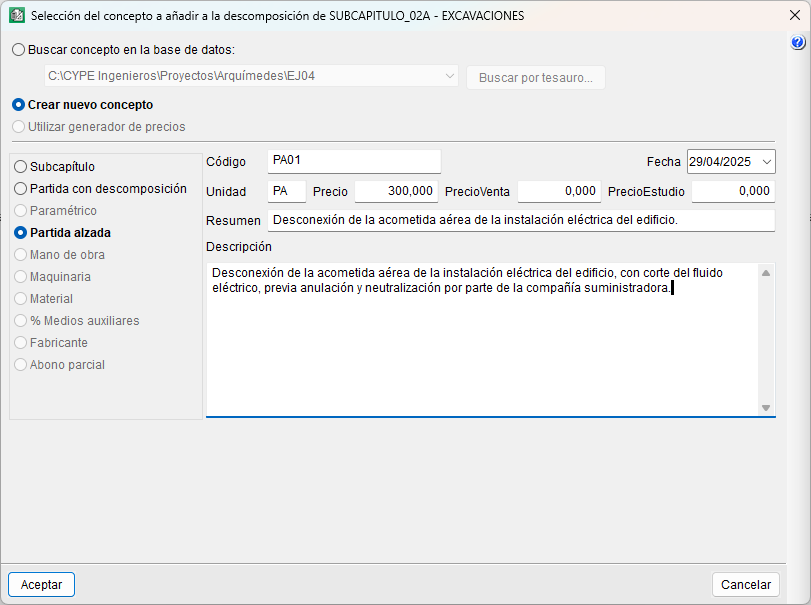
- Lump-sum payments
These are treated in the same way as unit prices. Their total quantity is always one unit. They are paid in full to the contractor once the works to which they relate have been completed. They always appear in the pricelists and in the list of unit prices in the price justification appendix. - To be verified on site
These items are subject to quantities, using the relevant quantities and the unit prices from "Price table No. 1" or approved alternative prices. These items do not appear in the pricelists or in the list of unit prices in the price justification appendix.
In Arquimedes, you can configure how items without breakdown are handled via the "Items without breakdown" option in the "Settings" section of the "View" menu.
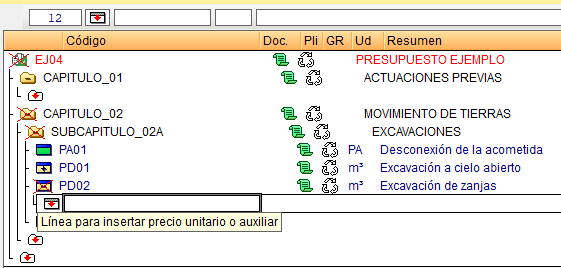
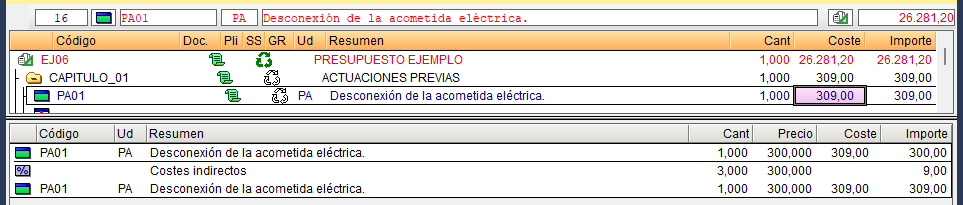
To insert an unjustified item, you must open the folder for the work section or sub work section where you wish to add it, and either double-click the insert item icon (a white rectangle with a blue band and a red downward-pointing arrow) or right-click on that folder and select the "Insert breakdown line" option from the context menu or the "Tree" menu. Both actions will display the dialog box "Selection of the concept to add to the breakdown of...", where you should select "Create new item" and "Unjustified item", and specify at least the code, unit (usually PA), price and summary.
| More information: |
|---|
| The "Unjustified item" (or PA) created will display a green rectangle with a blue stripe and may show a price slightly higher than the one entered, as it includes the application of soft costs to the item. To adjust the soft cost, go to the "Percentages" option in the "Settings" section of the "View" menu. |

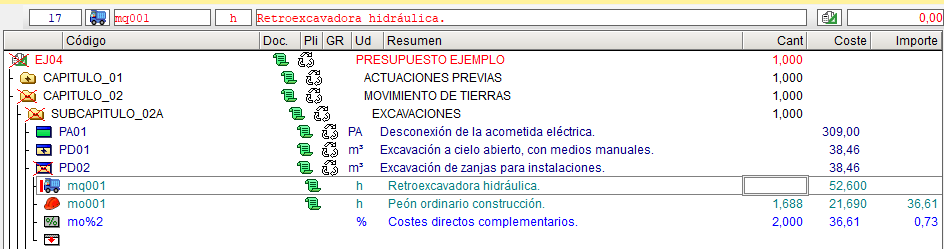
Creating items with breakdown
To enter this type of transaction, double-click the transaction entry icon, then select "Create new item" and "Item with breakdown". You must specify at least the code, unit and summary. Once you have confirmed, the program will ask whether you wish to create the breakdown immediately or later.
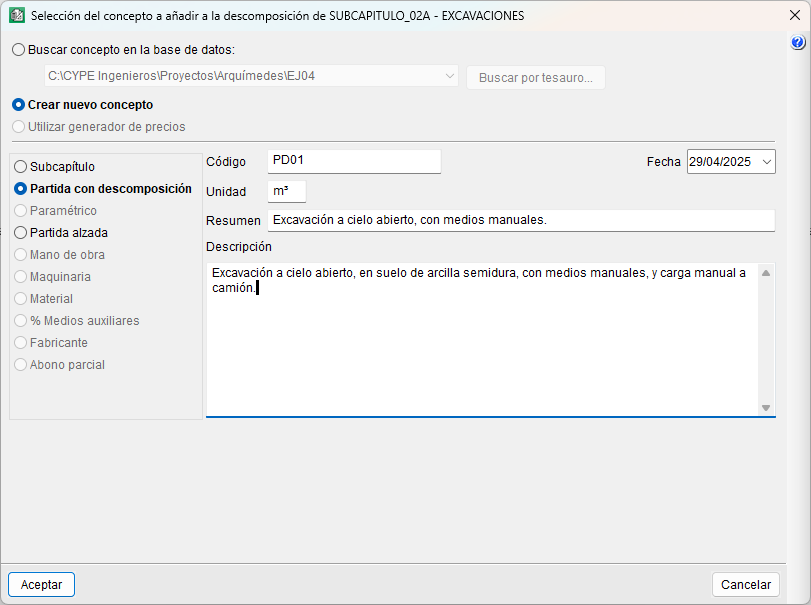
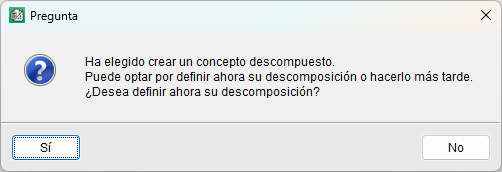
- Defining the breakdown when creating the item
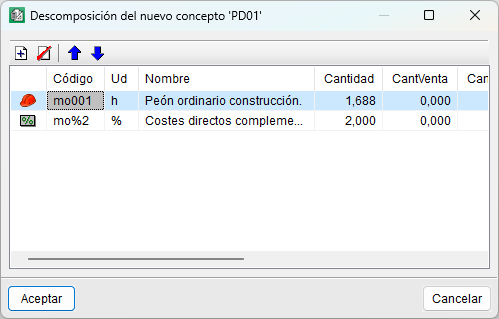
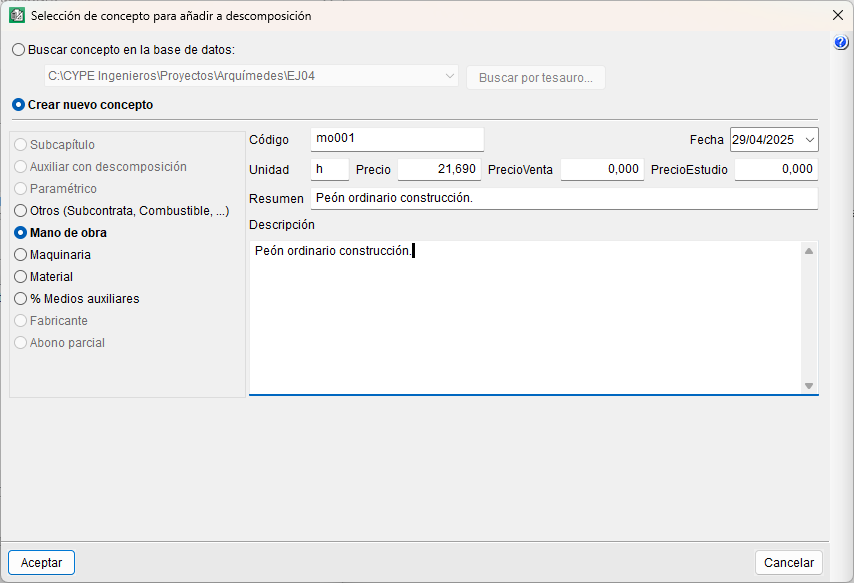
If you select "Yes", a dialog box will open so you can start adding items. Clicking the "Add new item to the list" button will open a new dialog box allowing you to search for an item in an open database or create a new item of the type labour, machinery, materials, etc.
If you create a new one, after defining it, back in the breakdown dialog box, you must specify its quantity (output).
- Defining the breakdown at a time other than when it was created
If you select "No", the item icon will display a red cross and a warning, as it has been defined incorrectly. To define the items, double-click on the auxiliary or unit price insertion icon; in the dialog box that appears, you can search an open database or select "Create new item" and choose the desired type.
If you create a new one, after defining it, you must specify its quantity (yield) in the "Qty" column of the "Cost breakdown structure".

| Note: |
|---|
| If no quantity is specified, the red cross will continue to appear with the message "Incorrect price. This element, or one of its breakdown, has its quantity or price equal to or less than zero". |
| Best practice: |
|---|
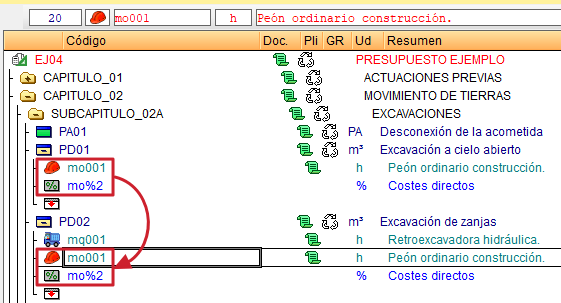
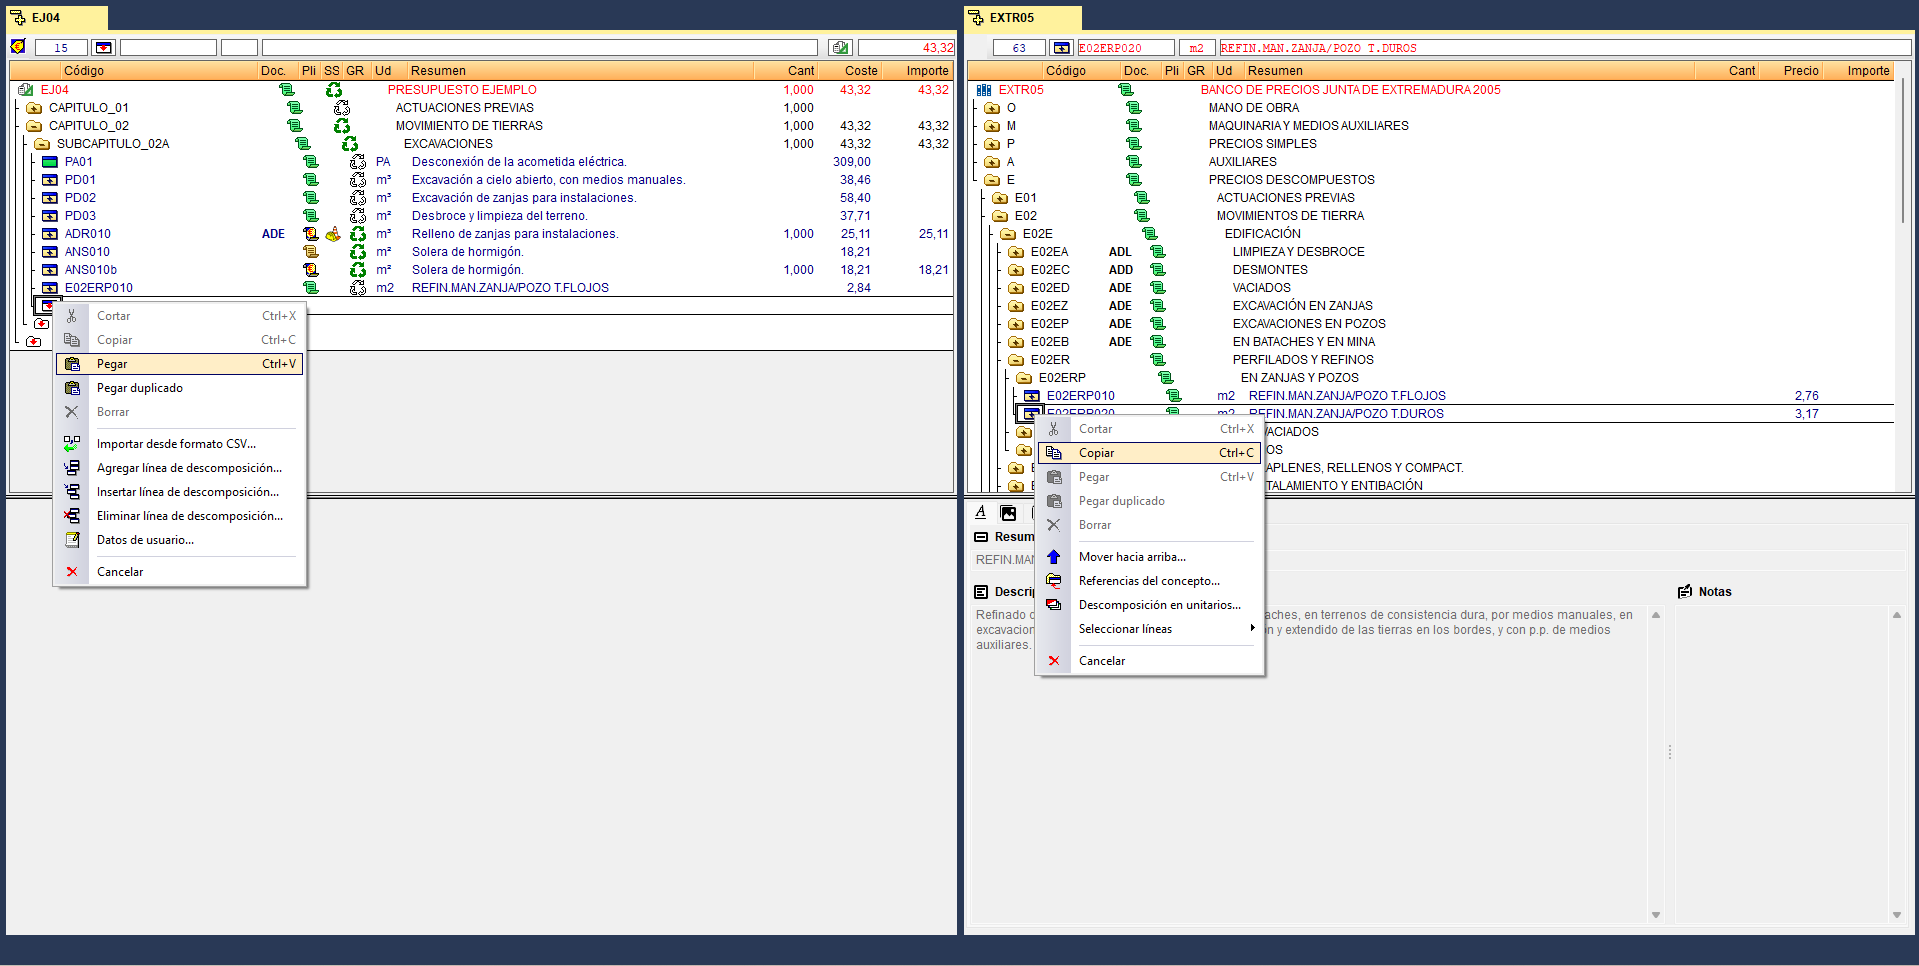
| To break down an item, you can copy an auxiliary or unit price from the same database or from another open database, and paste it directly into the item’s breakdown level. You can use the clipboard ("Ctrl + C" and "Ctrl + V") or drag and drop using the right mouse button. |
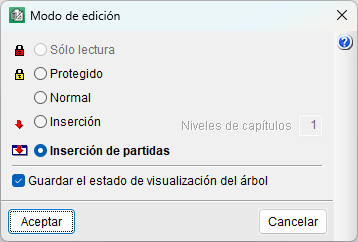
Depending on the "Edit mode" that has been set – "Insert" or "Insert items" – the item icon will appear as a yellow rectangle with a blue band, blank, or with a "+" sign. In the first option, you will need to add its breakdown using the "Insert breakdown line..." option via the right-click menu or the "Tree" menu.
The second option, however, allows you to break down the item directly within the cost breakdown structure by double-clicking on its icon. The item will initially appear empty and with an auxiliary or unit price insertion line.
| Note: |
|---|
| The "Edit mode" can be changed via the option of the same name in the "View" menu, under "Settings", or via the "Tree" menu. |
Copying concepts from an external database
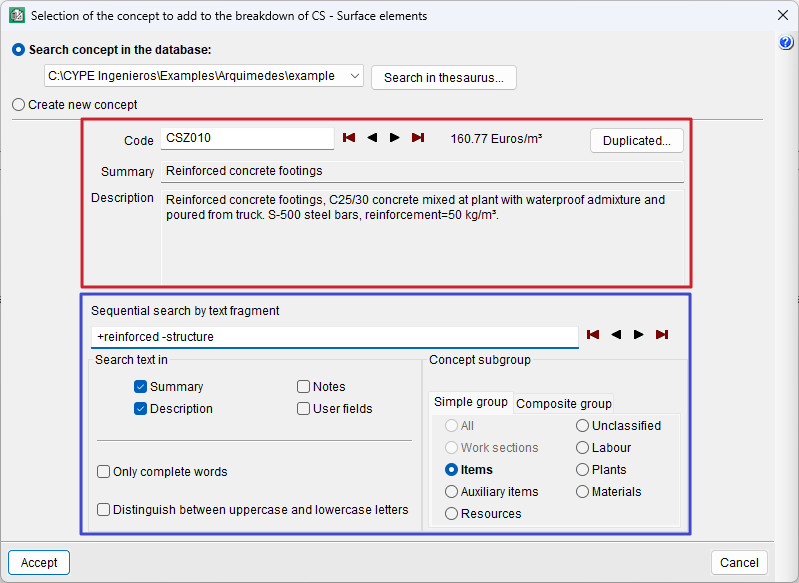
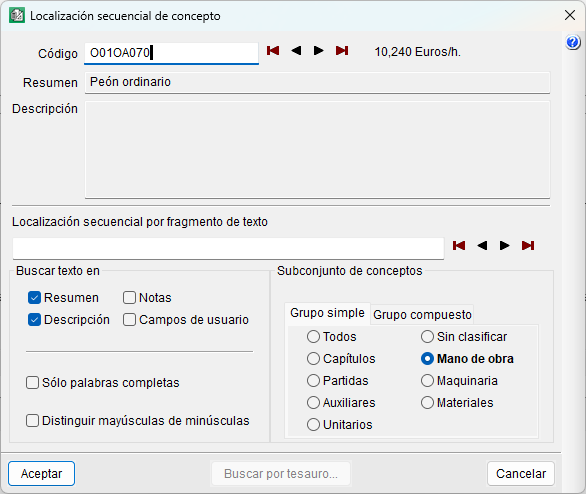
To insert an item from an open database (such as a cost database or another bill of quantities), double-click the "Insert item icon" and select "Search concept in the database". You can search the database using the item code or by entering text.
- Searching for an item by code
To search by code, type part of the code or the full code into the "Code" field and use the buttons to move to the top or bottom of the list, or the buttons to move to the next item to the left or right in the list of items. - Searching for a concept using text
To search by text, you can use either the "Summary" or "Description" fields, or both at the same time. You can enable the search for concepts of a specific type ("Concepts with breakdown", "Parametric", etc.) and "Sequential search by text fragment", using the field provided for this purpose.
| Best practice: |
|---|
| Search terms may include a "+" sign to ensure that the term is included, or a "-" sign to exclude terms that contain it. You can also combine several words by enclosing them in double quotation marks to search for a specific text string, or use an asterisk at the start of each suffix to find words ending in a particular suffix. |
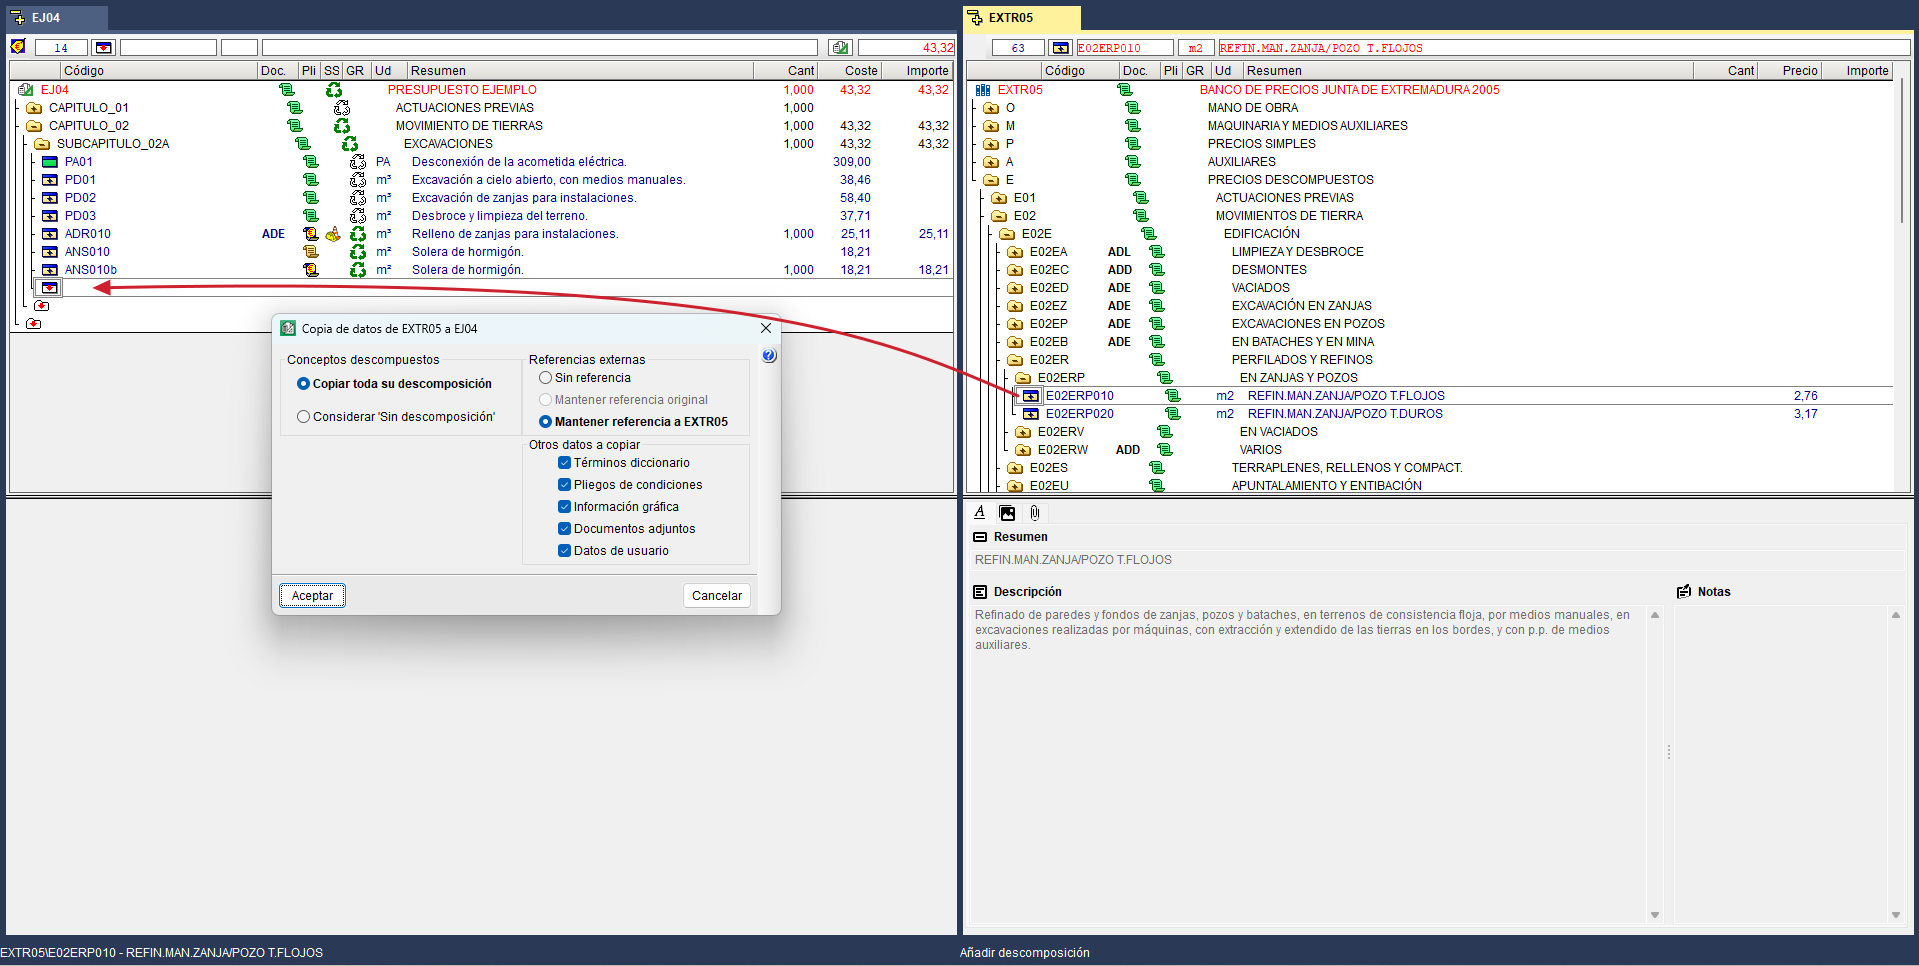
Copying the item by dragging it
Another way to copy items from an external database is to place the cursor over the item you wish to copy, click and hold the left mouse button, and drag the item to the item insertion line in the bill of quantities. A dialog box will appear, allowing you to specify how you wish to copy the data and whether or not to retain the external reference. Depending on whether the external database is a cost database or a bill of quantities, the dialog box for setting how the copy will be made will display other available options.
| Best practice: |
|---|
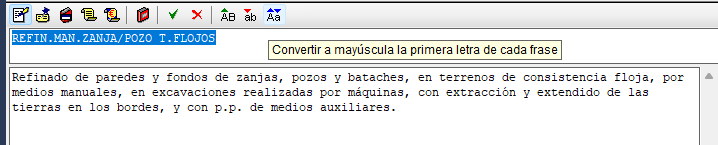
| If the summary or description is in uppercase and you want it to be in lowercase, you can select the text you want to convert and click the "Capitalize text" button on the bar. You can also use the keyboard shortcuts ("Ctrl + C" and "Ctrl + V") by copying part of your "Description" and pasting it into the "Summary". |
Copy and paste an item
You can also copy and paste. First, locate the item you wish to copy from the external database, place the cursor over it, right-click and select "Copy" from the context menu. To paste the item into the bill of quantities, position the cursor on the insertion level where you wish to place it, right-click and select "Paste" from the context menu.
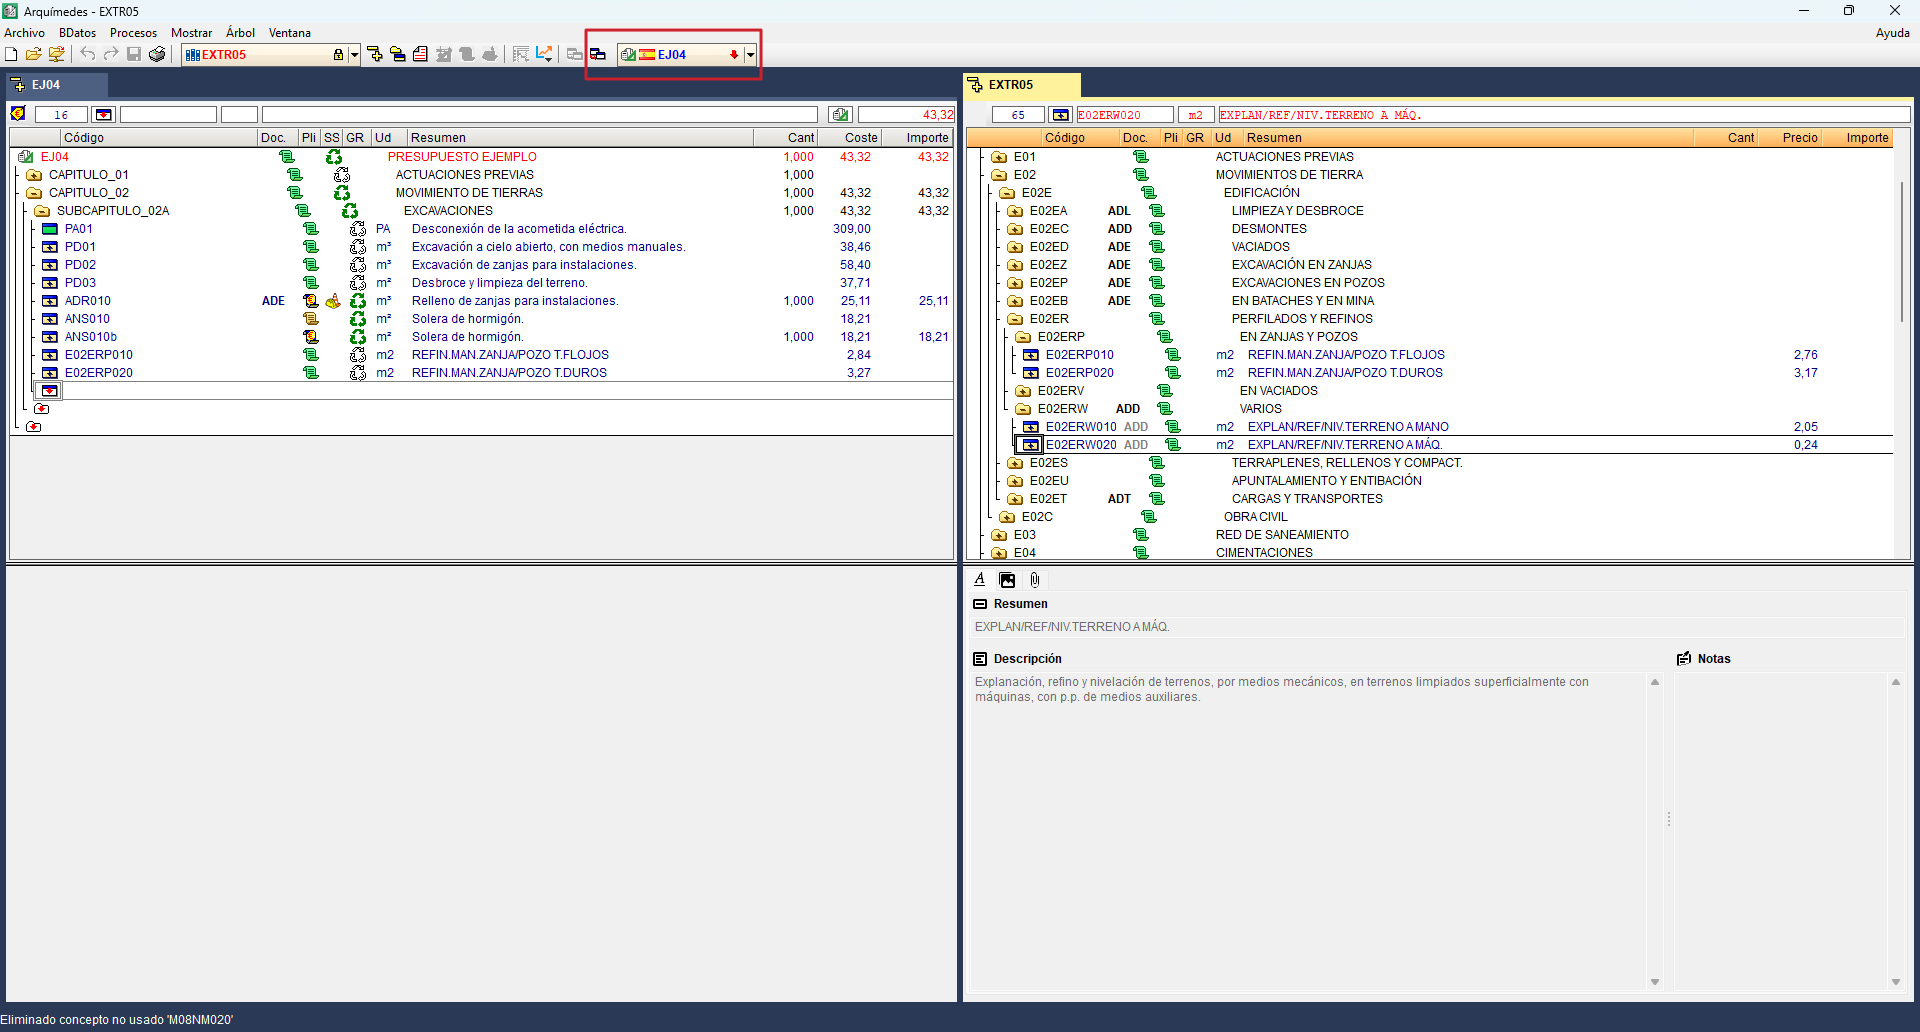
Copy and paste multiple items
To copy multiple items, place the cursor on the line where you wish to insert the items in the work section of the bill of quantities. Then, using the "Window" menu, switch to the external database that has already been opened and, using the drop-down box located on the right of the top bar, select the bill of quantities.
Once this is done, click the button to the left of the drop-down box, labelled "Copy current concept(s) to the specified DB". Next, locate the item or items you wish to copy and click this button. A dialog box will then appear, allowing you to specify how you wish to copy the data and whether or not to retain the external reference.
Entering quantities into the bill of quantities
Once the items have been added to the structure of work sections and sub work sections, you can start entering quantities.
You can either type the total quantity directly into the "Quantity" column or specify the quantity in detail in a quantity table. You can also take quantities from a drawing file in DXF or DWG format.
The different methods of quantity entry are shown below.
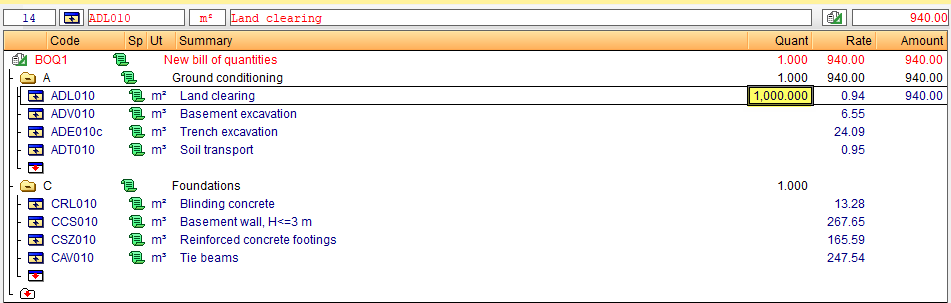
Quantities without details
The quantity is entered manually, without a breakdown, in the "Qty" column on the line of the item to be measured. This option is usually used when no comment is required or when the item is an unjustified item. Type in the desired numerical value directly and press "Enter". The program automatically multiplies this by the item price and calculates the totals for each level.
If you wish to change the quantity, simply type in a new quantity.
| Note: |
|---|
| The columns used to enter quantities are "Quant" (quantity in the bill of quantities), "SalesQuant" (quantity in the sales price structure), "StudyQuant" (quantity in the study price structure), "ExecQuant" or "PartialExecQuant" (execution quantity) and "OrigCertQuant" or "PartCertQuant" (certificate quantity). |
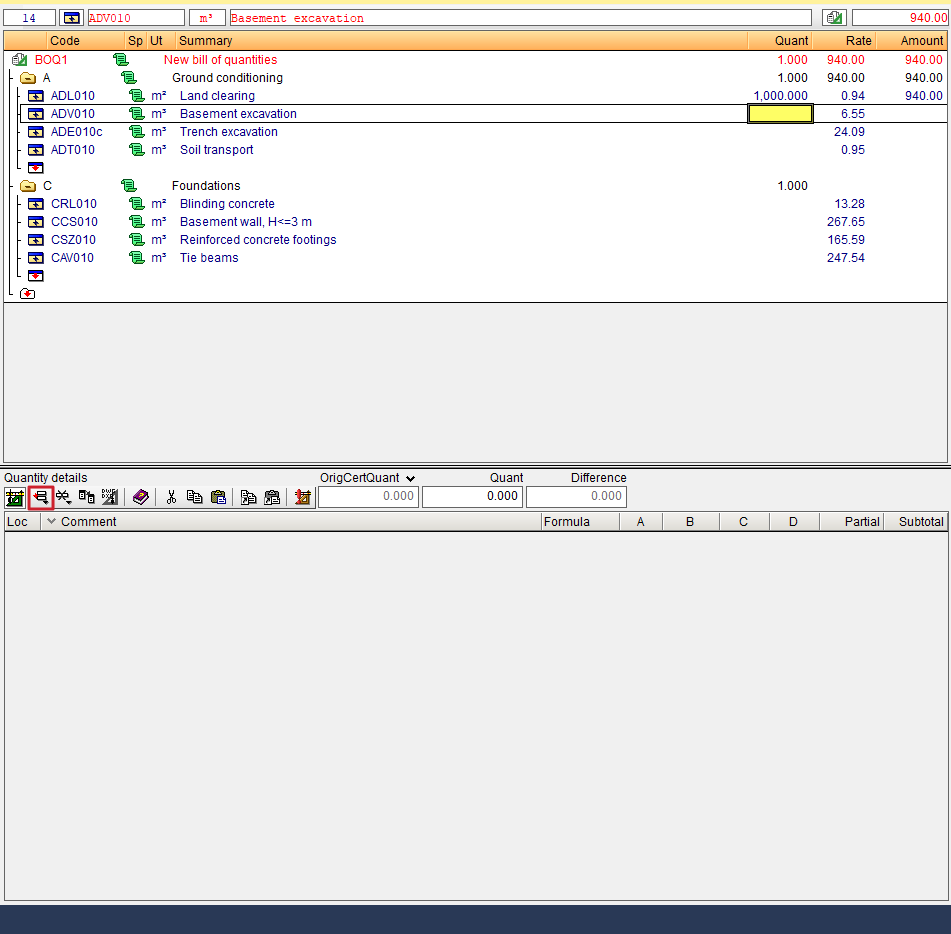
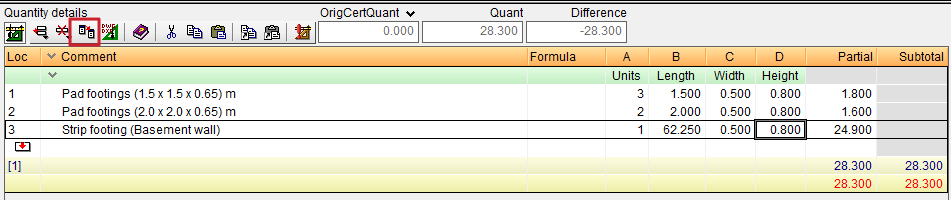
Quantity details
To take a detailed quantity measurement, you need to create a quantity table, consisting of sub-tables which in turn contain detail rows.
Placing the cursor in the "Quant" column of the item row you wish to measure activates the "Quantity details" area at the bottom of the screen. This area includes a button bar at the top, designed for tasks such as inserting or deleting lines and sub-tables, measuring on DXF/DWG drawings, or copying and pasting references; and three boxes displaying: the certified quantity, the measured quantity (both initially set to zero) and the difference between the two.
To set the mode in which the quantity tables are edited, to facilitate data entry or viewing, you can configure the "Measurement line edit mode". This option is available in the "View" menu under the "Settings" section.
| More information: |
|---|
| You can find more information about the quantity tables by clicking the "Help on the use of the table" button on the bar. |
Inserting a quantity table using a sub-table
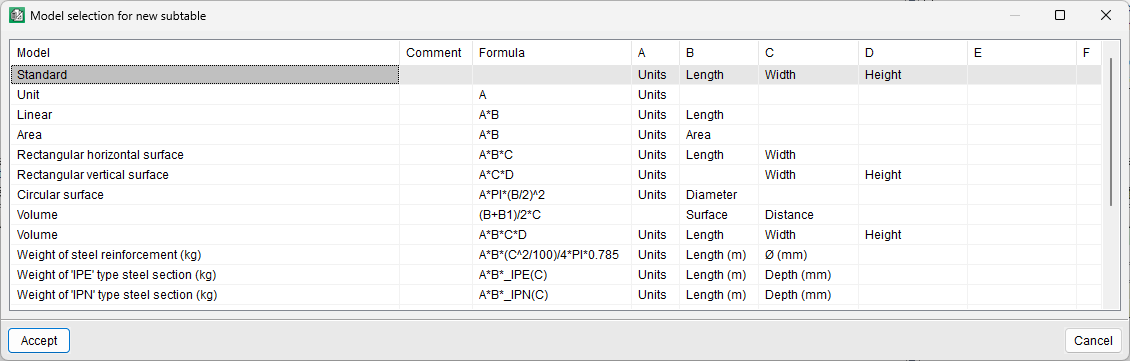
From the "Quantity details" section, you can create a quantity table by clicking the first button labelled "Inserts normal line, insertion line or subtable" and selecting the "Insert new subtable" option, which allows you to add a sub-table with a formula predefined by the program.
To insert a standard sub-table, in the "Model selection for new subtable" dialogue box, select the "Standard" option. This step can be streamlined by using the "Insert new default sub-table (Standard)" option directly".

Inserting detail lines
In the subtable created, enter detail rows, adding comments (in the "Comment" column) and values in the numeric data cells (labelled as columns A, B, C, D, E and F). The headers of these columns can be renamed to better reflect the content entered (for example, change "Length" to "Area" if this is more representative).
| Best practice: |
|---|
| To hide unnecessary columns, you can double-click on the column header and adjust the visibility as required. |


Delete detail lines, subtables or tables
The second button in the "Measurement details" section is "Deletes current line, current subtable or complete table", which allows you to delete the current detail row, the current subtable, the entire table, or delete the detail whilst retaining the total. Furthermore, if the subtable is referenced or there is a referenced row, this button allows you to delete it by removing the reference.

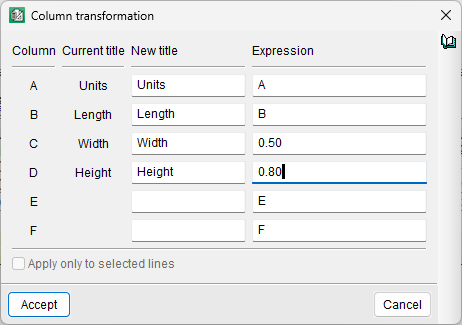
Tool for streamlining data entry
To simplify the entry of repetitive data across columns—provided that all data in the column will be the same—you can use the third button, "Launches the dialogue box for transforming the columns of the current subtable". This feature allows you to apply an expression to the columns that make up the quantities subtable. You can also apply mathematical expressions to the columns, such as setting the value of one column to twice the value contained in another. For example, use the expression "B*2" in column A, and leave the field in column B blank.
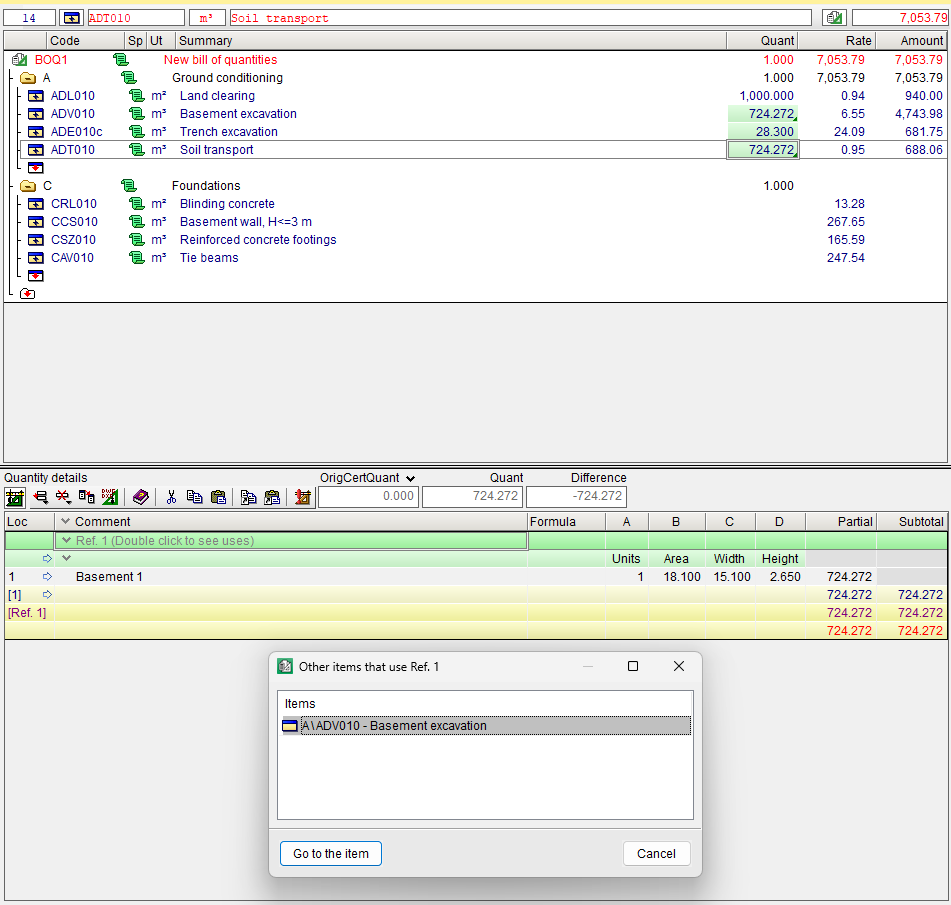
Quantities with references between items
Links or connections can be established between tables, sub-tables or quantity lines for different items within the same bill of quantities. This means that when a referenced quantity is modified, the changes are automatically updated across all items that share that reference. Furthermore, it is possible to have multiple references within the same quantity table.
Links are created using the "Copy reference" and "Paste reference" buttons located on the bar in the "Measurement details" section.
To copy a reference, simply place the cursor on any field in the subtable header (green), the subtable footer (light yellow), the table footer (dark yellow) or the measurement line (white) and click "Copy reference". Next, position the cursor where you wish to paste the reference, bearing in mind that the content of what has been copied must match the location where you intend to paste it, and click "Paste reference".
Formulas in quantity tables are also copied to linked tables provided they are in the header of the subtables. If the formula is in the total row, it will not be copied to the other linked table. This is useful, for example, for applying different coefficients.
The referenced rows will appear with a grey background and a blue arrow, and the headers will be displayed in a darker shade of green (depending on whether it is a table or sub-table). By double-clicking on this header, you can see in which items a particular reference is being used. You can also do this via the "View other uses" option in the context menu that appears when you right-click on the table or subtable.
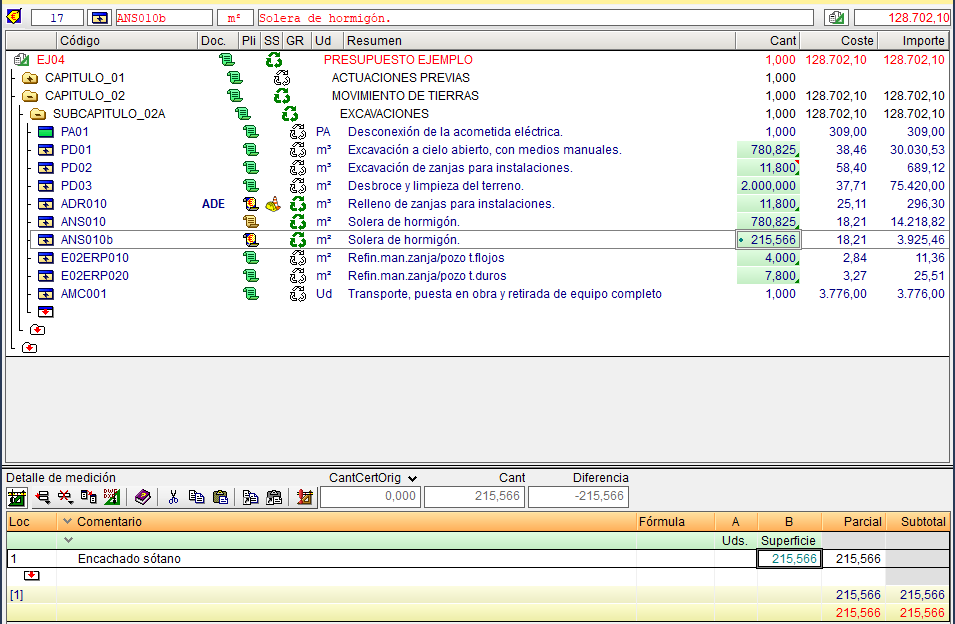
Items with referenced measurement quantities are identified in the "Cost breakdown structure" window by coloured triangles (red or green) and an information message.
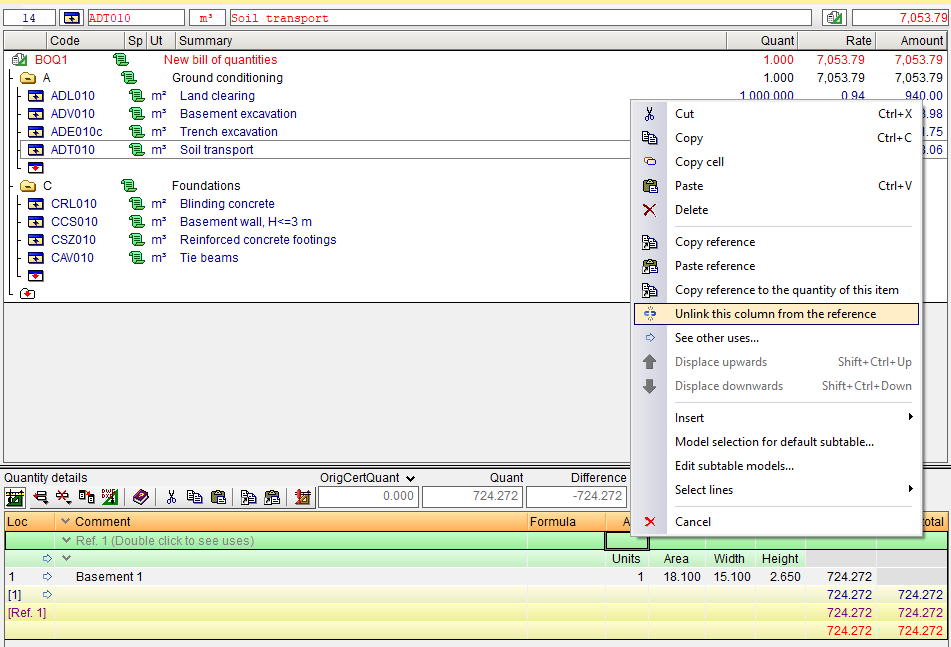
Unlinking
Links that have been created can be removed using the "Delete reference" option under the "Delete current row, current subtable or entire table" button in the bar of the "Quantity details" section. This option is available whenever a table with active references is displayed.
You can also unlink one or more columns from two linked tables or subtables by selecting "Unlink this column from the reference". This option is available in the context menu that appears when you right-click on the cell in the reference header row and the column you wish to unlink. This option allows you to keep two quantity tables linked even if they are identical except for one (or more than one) of their columns.
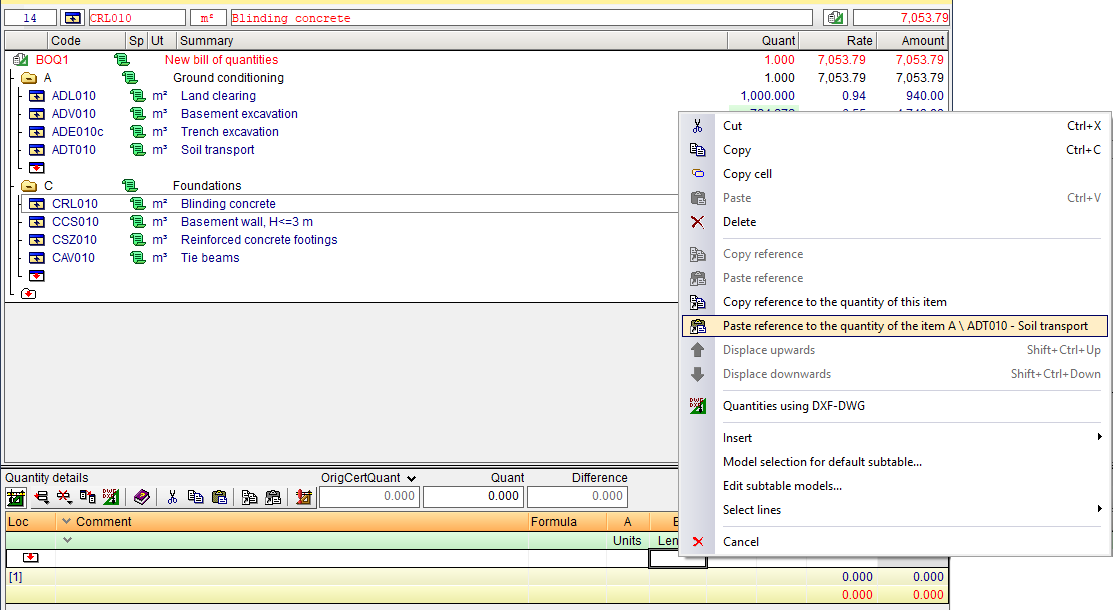
Reference values directly in numeric cells
You can reference values directly in numeric cells from another item (for example, copying the total quantity from one item to another). To do this, place the cursor on the quantity of the item you wish to copy, with the reference set to the "Quantity" column, and select the option from the context menu "Copy reference to the quantity of this item" that appears when you right-click on the item’s quantity, and paste it into a quantity cell in the quantity details area using the context menu option "Paste reference to the quantity of the item".
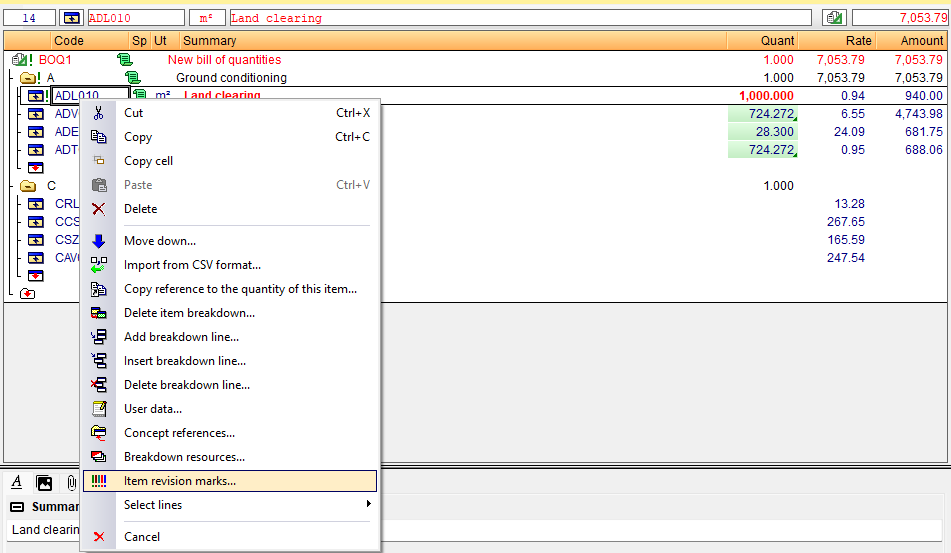
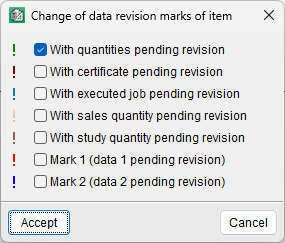
Marks for reviewing items
Item review marks allow users to identify, at the item level, those items that need to be reviewed. There are five types of marks that can be applied to an item with a measurement, certificate, execution, sales or study quantity pending review. Users can also choose two additional types of marks to review data as they see fit (mark 1 or mark 2). There can therefore be 7 types of item review marks.
Each item marked in this way is indicated by an exclamation mark ("!"), which takes on a different colour in each case to identify the type of mark selected. This symbol is placed to the right of the item symbol. The marks are propagated upwards, causing the work sections containing the item to be flagged as well, right up to the root work section.
Item review marks are easily applied using the "Item revision marks" option in the context menu that appears when you right-click on any field of any item.
The summary text of the description of the marked items is displayed in bold and red so that they can be identified more easily.
When a report is printed, the program alerts the user if there are any marks in the project.
Quantities in FIEBDC-3 format
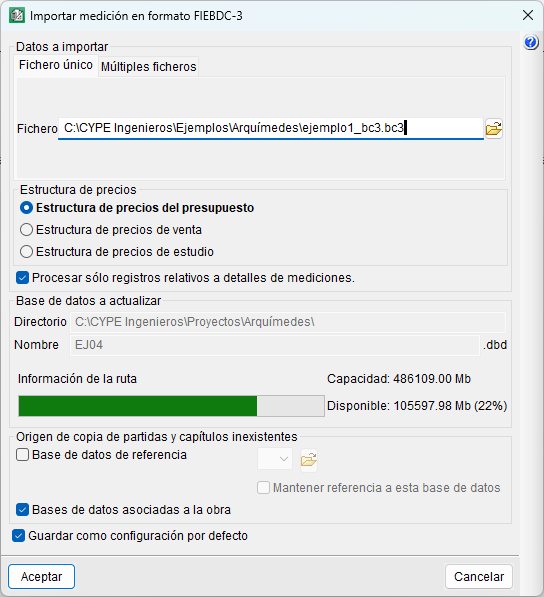
You can import a quantity contained in one or more .bc3 files into the current bill of quantities using the "Import FIEBDC-3 quantity" option in the "Import" section of the "File" menu.
In the dialog box that opens, there are two options: the quantity can consist of a single .bc3 file (the "Single file" tab) or multiple files (the "Multiple files" tab). The import process begins by selecting the location of the file or files, and you must specify the structure (bill of quantities, sales or study) to which the prices will be assigned. Optionally, you can include only records relating to quantity details.
When you close the import dialog, the quantity will appear in the "Cost breakdown structure" window with the price structure that has been assigned. Furthermore, if there are any new items, they will be added to the existing bill of quantities.
| Note: |
|---|
| Before using this option, the target bill of quantities must be active and not write-protected. |
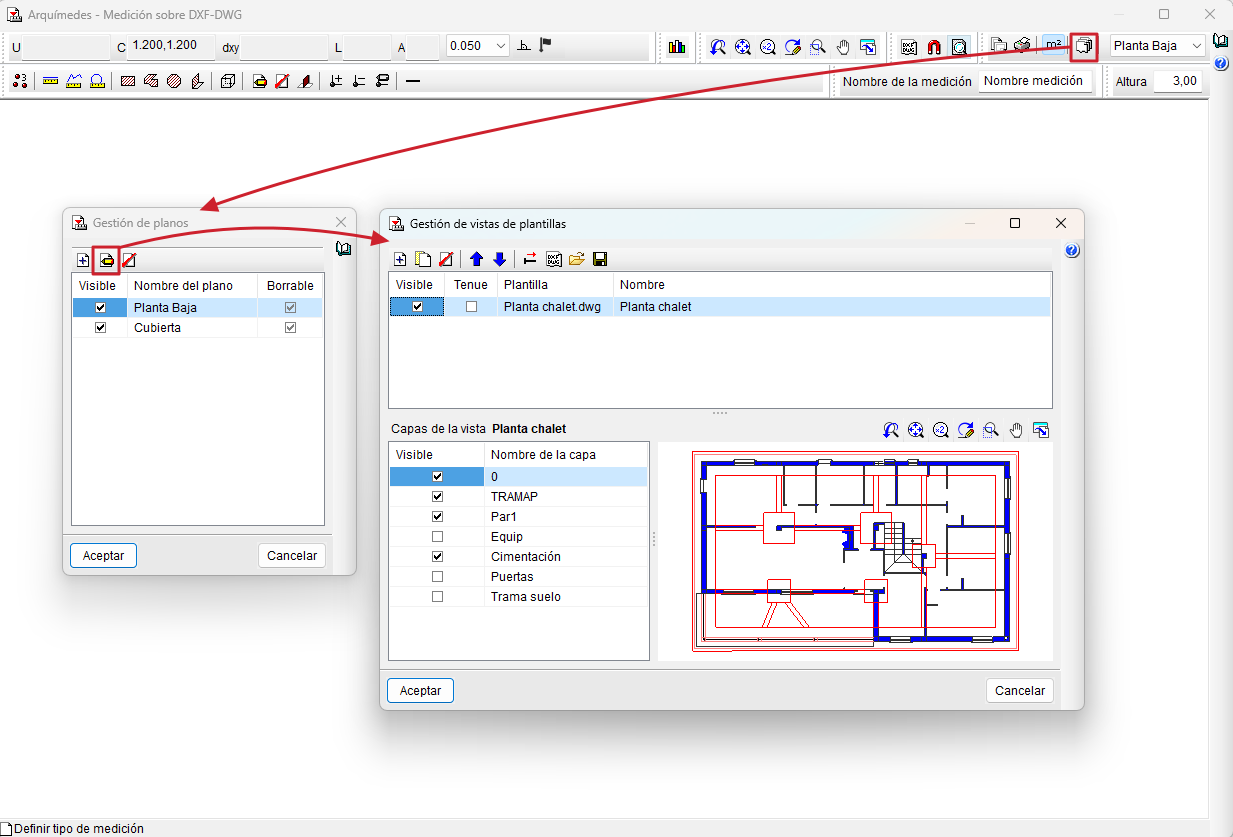
Quantities over DXF
Automatically measuring drawings allows users to get quantity lines directly in Arquimedes from files in DXF, DWG or compatible image files (JPG, PNG, etc.), without the need to manually enter numerical values. This functionality is available through the "Quantities over DXF" module.
To start measuring, a new subtable has to be inserted, for example, a default one (Standard). From this subtable, when you place the cursor on a numerical data cell (columns A, B, C, D, E or F) and click on the "Quantities using DXF-DWG" option, the "Quantities using DXF-DWG" dialogue box will be displayed.
From this dialogue box, users can access the "Drawing management" option on the toolbar to add and name the different drawings that make up the job. Normally, one drawing is defined per floor, type of job or section to be distinguished, and each drawing can be made up of one or more drawing files. If a plan is selected and "Edit" is selected, the "Template view management" dialogue box will be accessed, from where templates can be inserted using the "Add", "Import templates to the job" or "Obtain GXF" option. It is possible to activate or deactivate the layers that are considered necessary in this same dialogue box.
The DXF and DWG files used must be correctly prepared, at a scale of 1:1, where one drawing unit corresponds to one meter, and close to the origin of coordinates (0,0).
Once the drawings have been defined, one of them is selected using the current drawing selector and a name is assigned to the quantity. Then, by activating "Template object snaps" in the toolbar, it is possible to count elements, and measure lengths, surfaces and/or volumes. The program will automatically obtain the numerical data and place it in the quantity table.
If openings need to be discounted (e.g. openings in floor slabs), the "Add/Remove quantity" tool can be activated, which will apply a negative sign to the corresponding quantity.
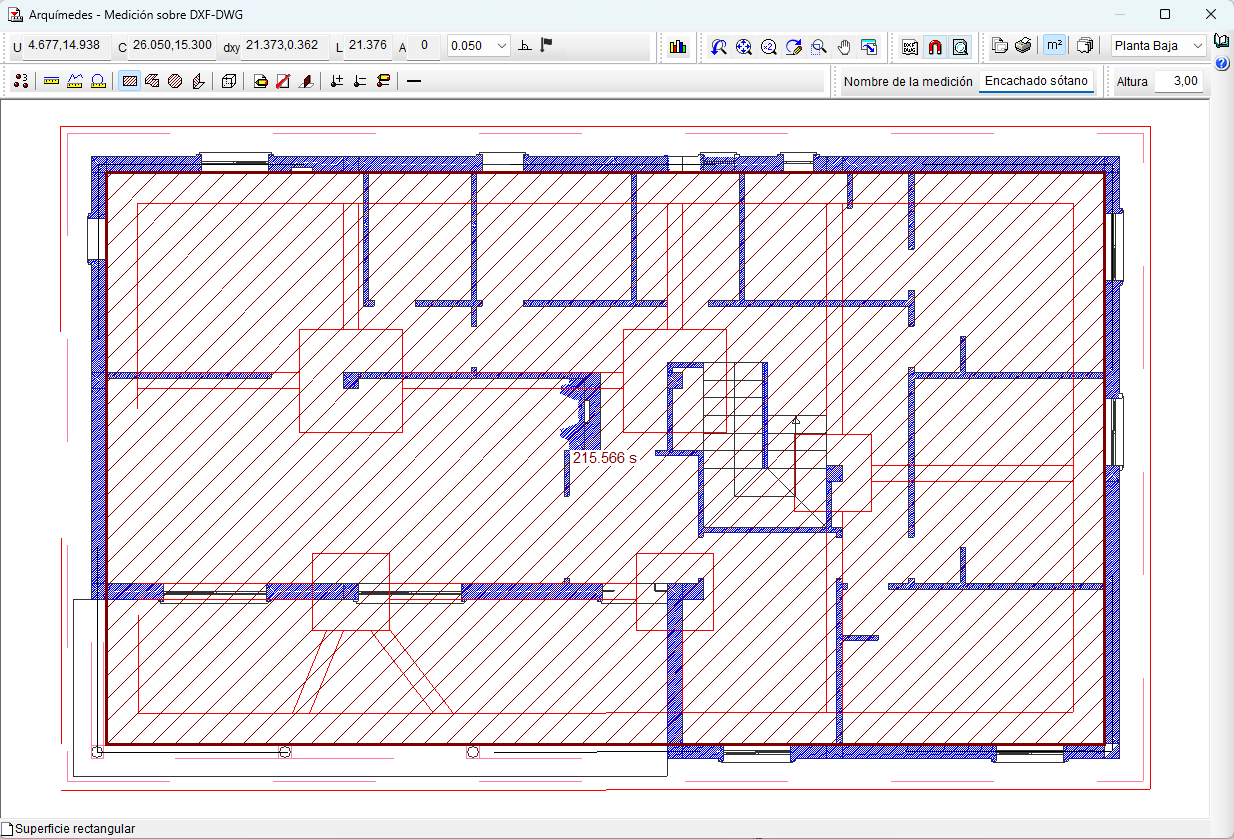
Items with quantities obtained with automatic drawing quantities are identified in the "Qty" column of the "Cost breakdown structure" window with a green dot and an information message.
Also, when double-clicking on a number cell with an associated automatic drawing quantity (identifiable by its green colour), the "Arquimedes - Quantities over DXF - DWG" dialogue box will open again, showing the drawing on which the quantity was taken. From this box, the quantity can be reviewed and adjusted directly.
Integration with other programs
The "Quantities using DXF-DWG" module can also link and import quantities automatically from CAD programs: Allplan® and Archicad®. (Until Arquimedes version 2019.e, the connection to +Extended® - AutoARQ® was also supported).
For the connections between these programs and Arquimedes to be effective, the connection applications must be installed, which are available on the Arquimedes product webpage by clicking on the "Download" option. Specifically, from the "Plugins compatible with Arquimedes" section.
Connection between Allplan® and Arquimedes
The connection between Allplan and Arquimedes is established by installing the "Connection with ALLPLAN®" plugin, which activates the "Arquimedes" catalogue (from Allplan version 2014.1.1 onwards) and "user_kat" or "nem_ava" for earlier versions.
Linking Arquimedes items to Allplan elements
When modelling in Allplan, you can manually assign each element (wall, floor, etc.) the code of an item from an Arquimedes bill of quantities.
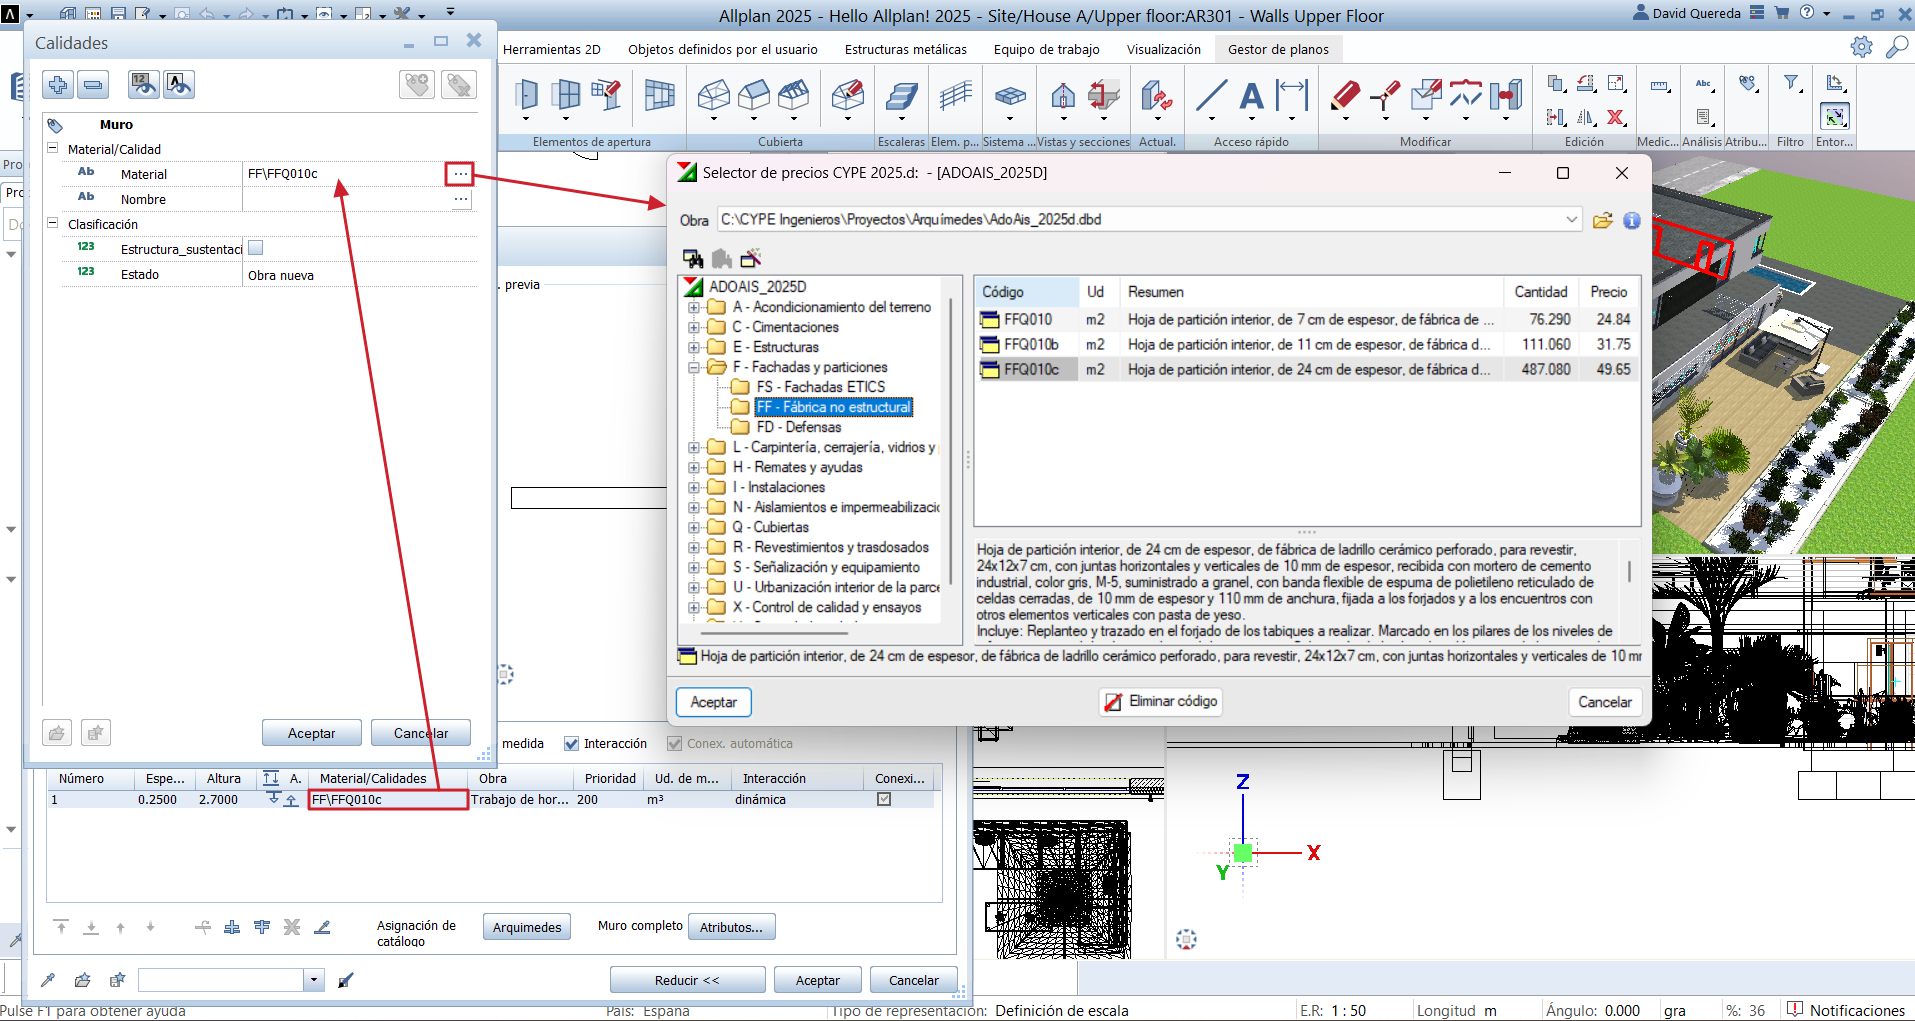
When inserting an element and editing its properties, you must check that, at the bottom of the window, the "Catalogue assignment" button displays the "Arquimedes" catalogue. If another catalogue appears by default, you can change it by double-clicking on the current one and, in the dialog box that opens, double-clicking on the "Material" cell to select the desired catalogue.
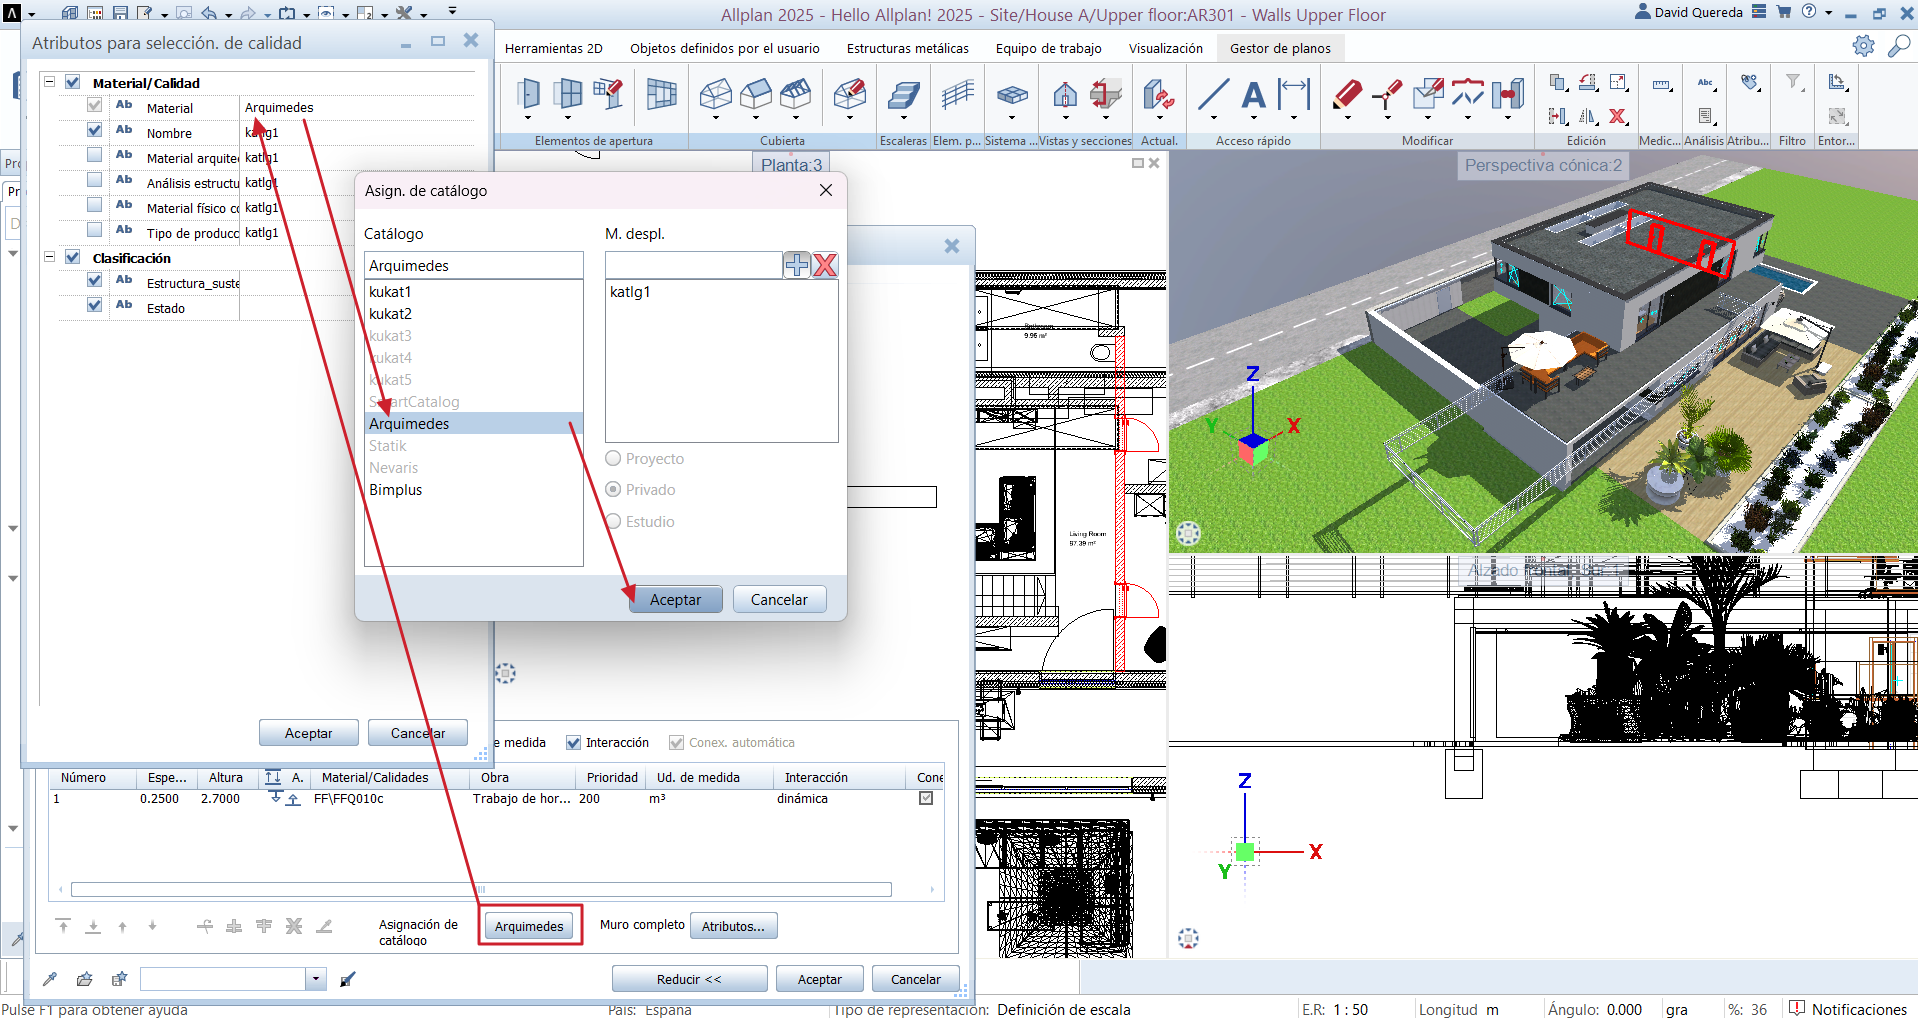
Next, in the "Parameter, Attribute" tab of the element’s properties window, double-click a cell in the "Material/Qualities" column. The "Qualities" dialog box will appear; clicking the three-dot button next to the "Material" cell will open the "CYPE price selector". In this selector, select a .dbd file from a previously saved (but not currently open) Arquimedes database. The structure of work sections and items contained in that database will then appear. Double-clicking on an item automatically assigns it to the "Material/Qualities" cell.
Importing quantities from Allplan into Arquimedes
Before exporting the quantities, you must check in Allplan how the elements are to be measured: by cubic metres, square metres, linear metres, number of units or kilograms. This setting is defined in the "Unit of measurement" column.
After this, a file with the .xca extension is generated, also from Allplan, using the "Export quantities" option in the "File" menu, "Export". During this process, you can select which elements to export (using the magnifying glass button) or export all active elements by selecting the "All" option. It is important to ensure, via the settings wheel, that:
- The selected report template is "Measurements_(Conn_with_prog).rdlc".
- The file type is "Allplan BCM (.xca)".
- The tracking program is the desired version of Arquimedes.
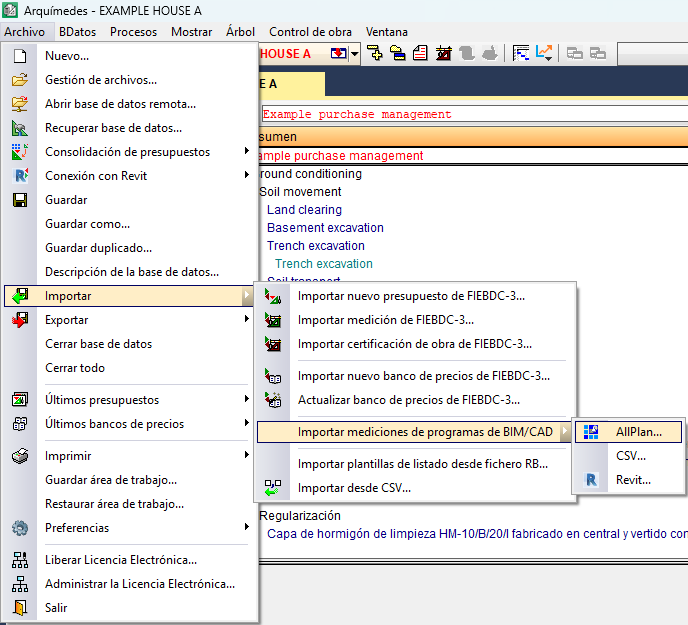
Finally, in Arquimedes, there are three ways to import an .xca file:
- Allplan can automatically launch Arquimedes
After generating the .xca file, Allplan can automatically launch Arquimedes and start the import process. Users can choose whether to import into an existing bill of quantities or a new one, define the reference database and activate the associated databases. - Associating the .xca extension with Arquimedes
If the operating system is configured to associate .xca files with Arquimedes, double-clicking the file will open the program directly. From there, users select the same options as in the previous case to continue with the import process. - Directly from Arquimedes
From Arquimedes, you can manually access the "Import quantities from BIM/CAD programs: Allplan" via the "File" menu, "Import". After selecting the previously generated .xca file and choosing whether to import into an existing bill of quantities or a new one, you can configure the import options, such as grouping detail lines or setting the composition of the "Comment" and "Comment 2" columns, amongst others.
In all cases, Arquimedes generates new items with their corresponding quantity tables based on the information received from Allplan. If an item with the same code already exists, a new quantity sub-table will be added to that item rather than creating a new one.
Items not found in any of the active databases will be included in the "@ALLPLAN" work section, automatically created by Arquimedes to ensure that no quantities are lost.
| Best practice: |
|---|
| To import the file into Arquímedes and extract the quantities, you must have a license to use Arquimedes and the "Quantities over DXF" module. |
Connection between Archicad® and Arquimedes
To connect Archicad with Arquimedes and export BIM model quantities in BC3 format, you need to install CYPE’s "Archicad Connection" plug-in and also the Goodie for Archicad, "FIE-BDC3 Extension".
In addition, you must create a "Cype" menu within Archicad containing the "Import from Arquimedes" and "Link property objects to criteria…".
| Note: |
|---|
| From Archicad 23 onwards, the connection between Archicad and Arquimedes is only available for the Spanish version of Archicad. Up to and including Archicad 22, Graphisoft only offers the "FIE-BDC3 Extension" in English, French, Spanish and Portuguese. |
Linking Arquimedes items to Archicad elements
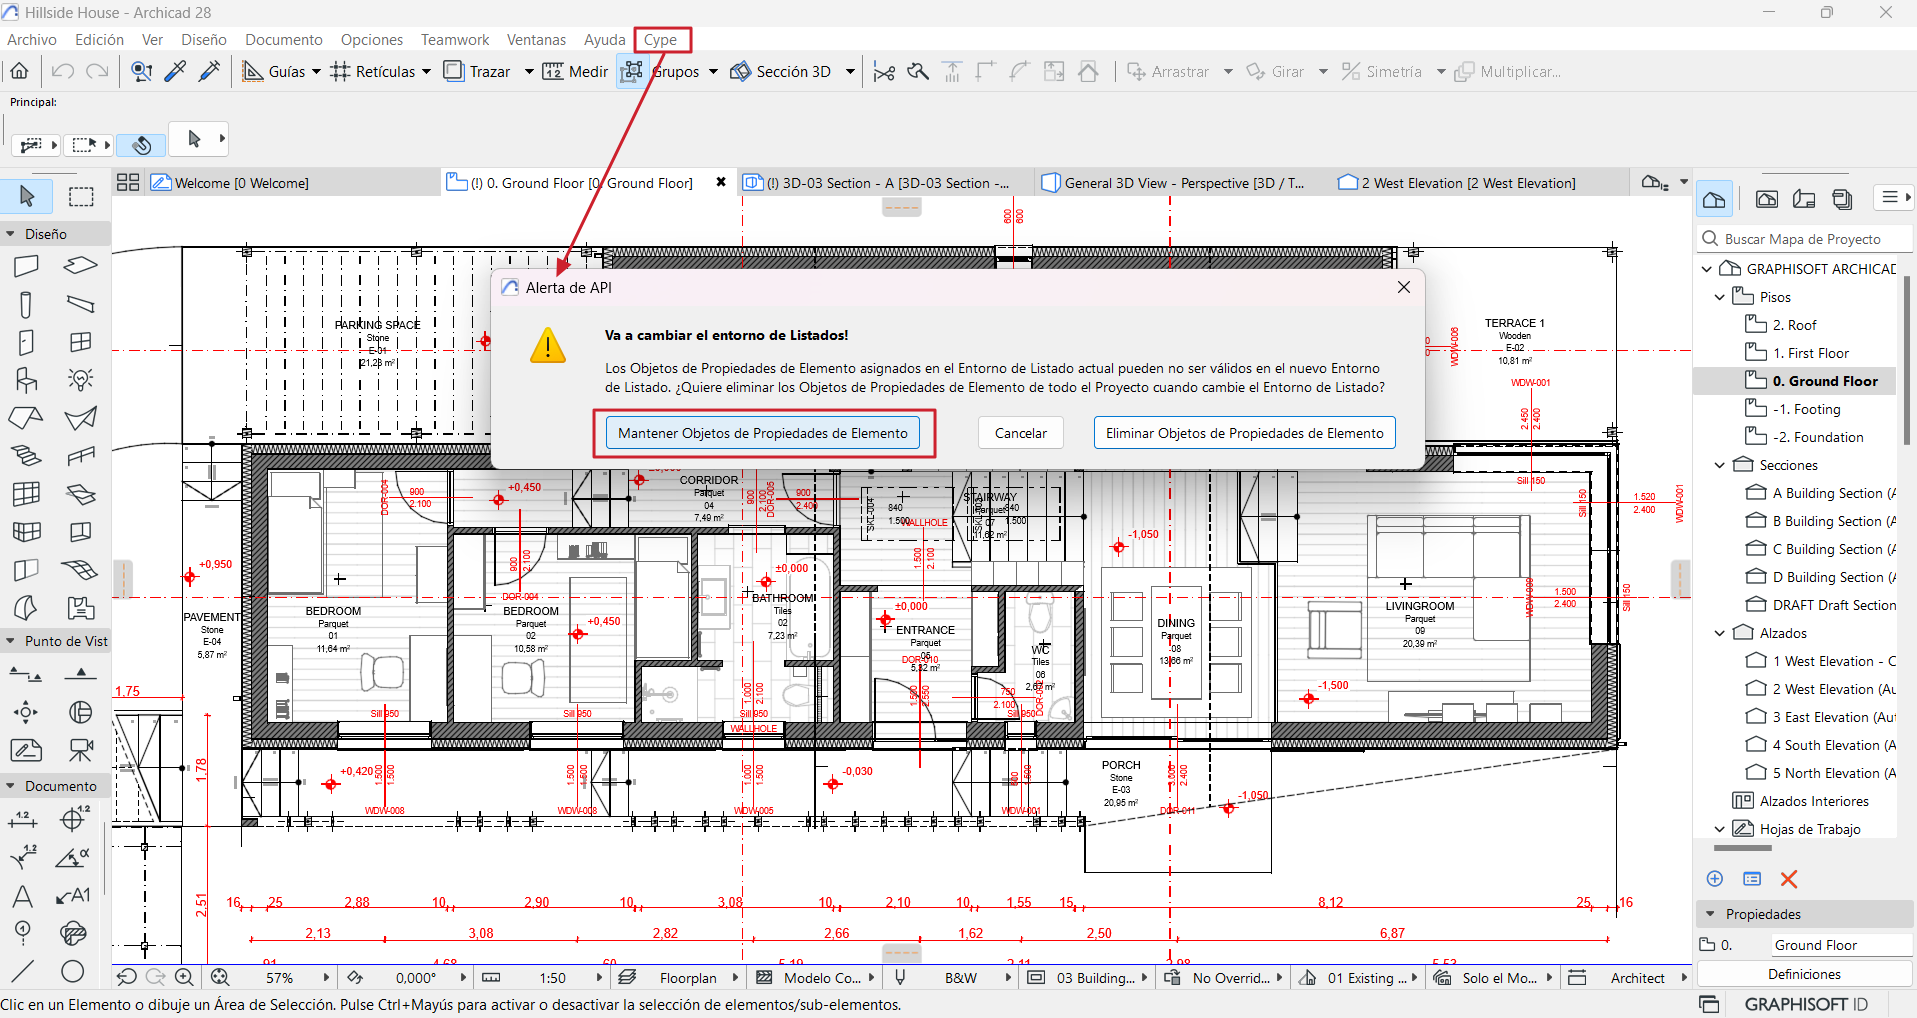
First, you need to establish a connection between the Archicad project and Arquimedes by selecting the "Import from Arquimedes" option from the "Cype" menu within Archicad. This option opens the "API Alert" dialog box, where you must tick "Keep element property objects". You only need to create this connection once in each Archicad project.
Next, you need to establish links between the elements whose quantities you wish to export and their corresponding Arquimedes item. There are two ways to create this link (and it is possible to use both methods within the same Archicad project):
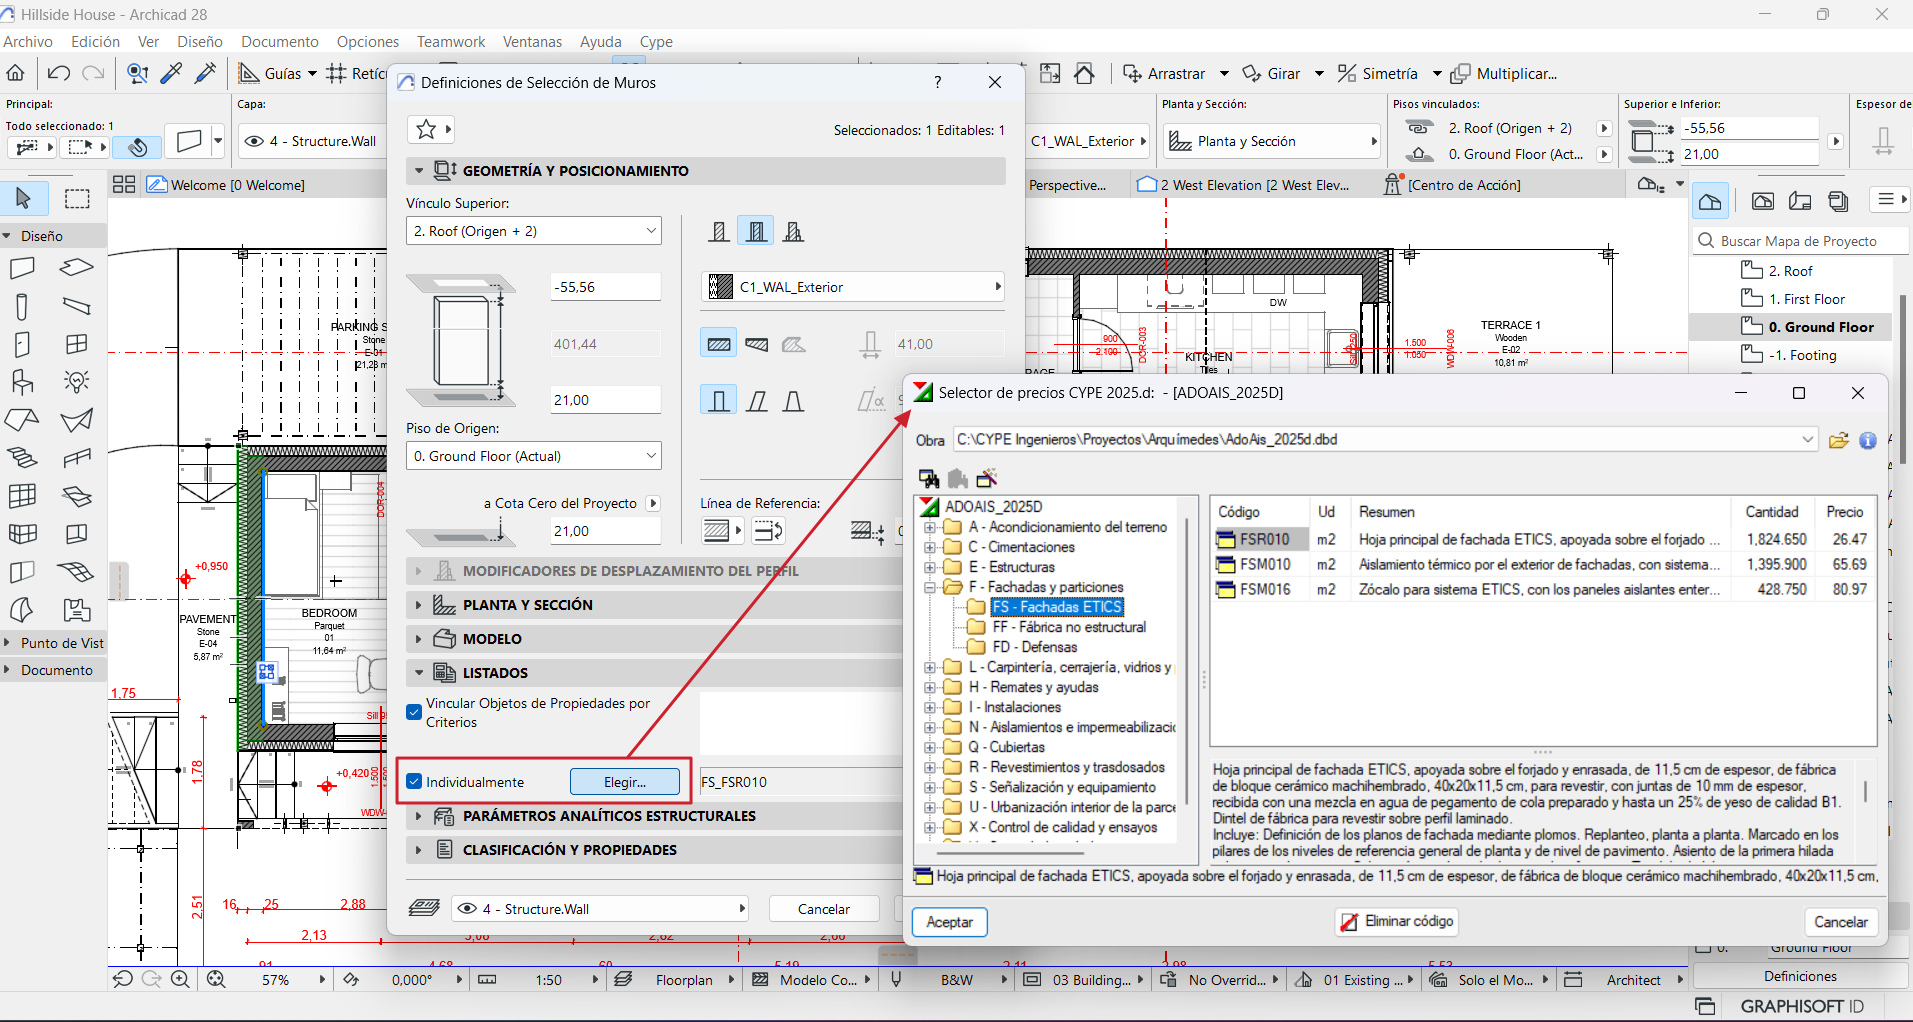
- Direct linking of element – item
After selecting one or more elements of the same type, the "Define the selection of..." option is activated in the "Edit" menu, under "Element definitions", or via the "Ctrl + T" shortcut. Within the dialog box, select the "Individually" option (or click "Choose" if an item has already been linked and you wish to change its code). This action will cause Archicad to communicate with Arquimedes and open another dialog box called "CYPE price selector". In this dialog, you must select the Arquimedes bill of quantities to which the quantity of the selected element is to be exported and the Arquimedes item to which the selected element or elements are to be linked. - Linking by criteria
This linking is done automatically by setting a series of user-defined criteria, via the "Link property objects to criteria..." dialog box in the "Cype" menu in Archicad.
Importing quantities from Archicad to Arquimedes
Finally, a file with the .bc3 extension is also created in Archicad using the "Save as" option in the "File" menu.
This file can be read in Arquimedes via "Import FIEBDC-3 quantity...", available in the "File" menu by clicking on "Import" (see the "Measurement in FIEBDC-3 format" section).
| Best practice: |
|---|
| To import the file into Arquimedes and extract the quantities, you must have a license to use Arquimedes and the "Quantities over DXF" module. |
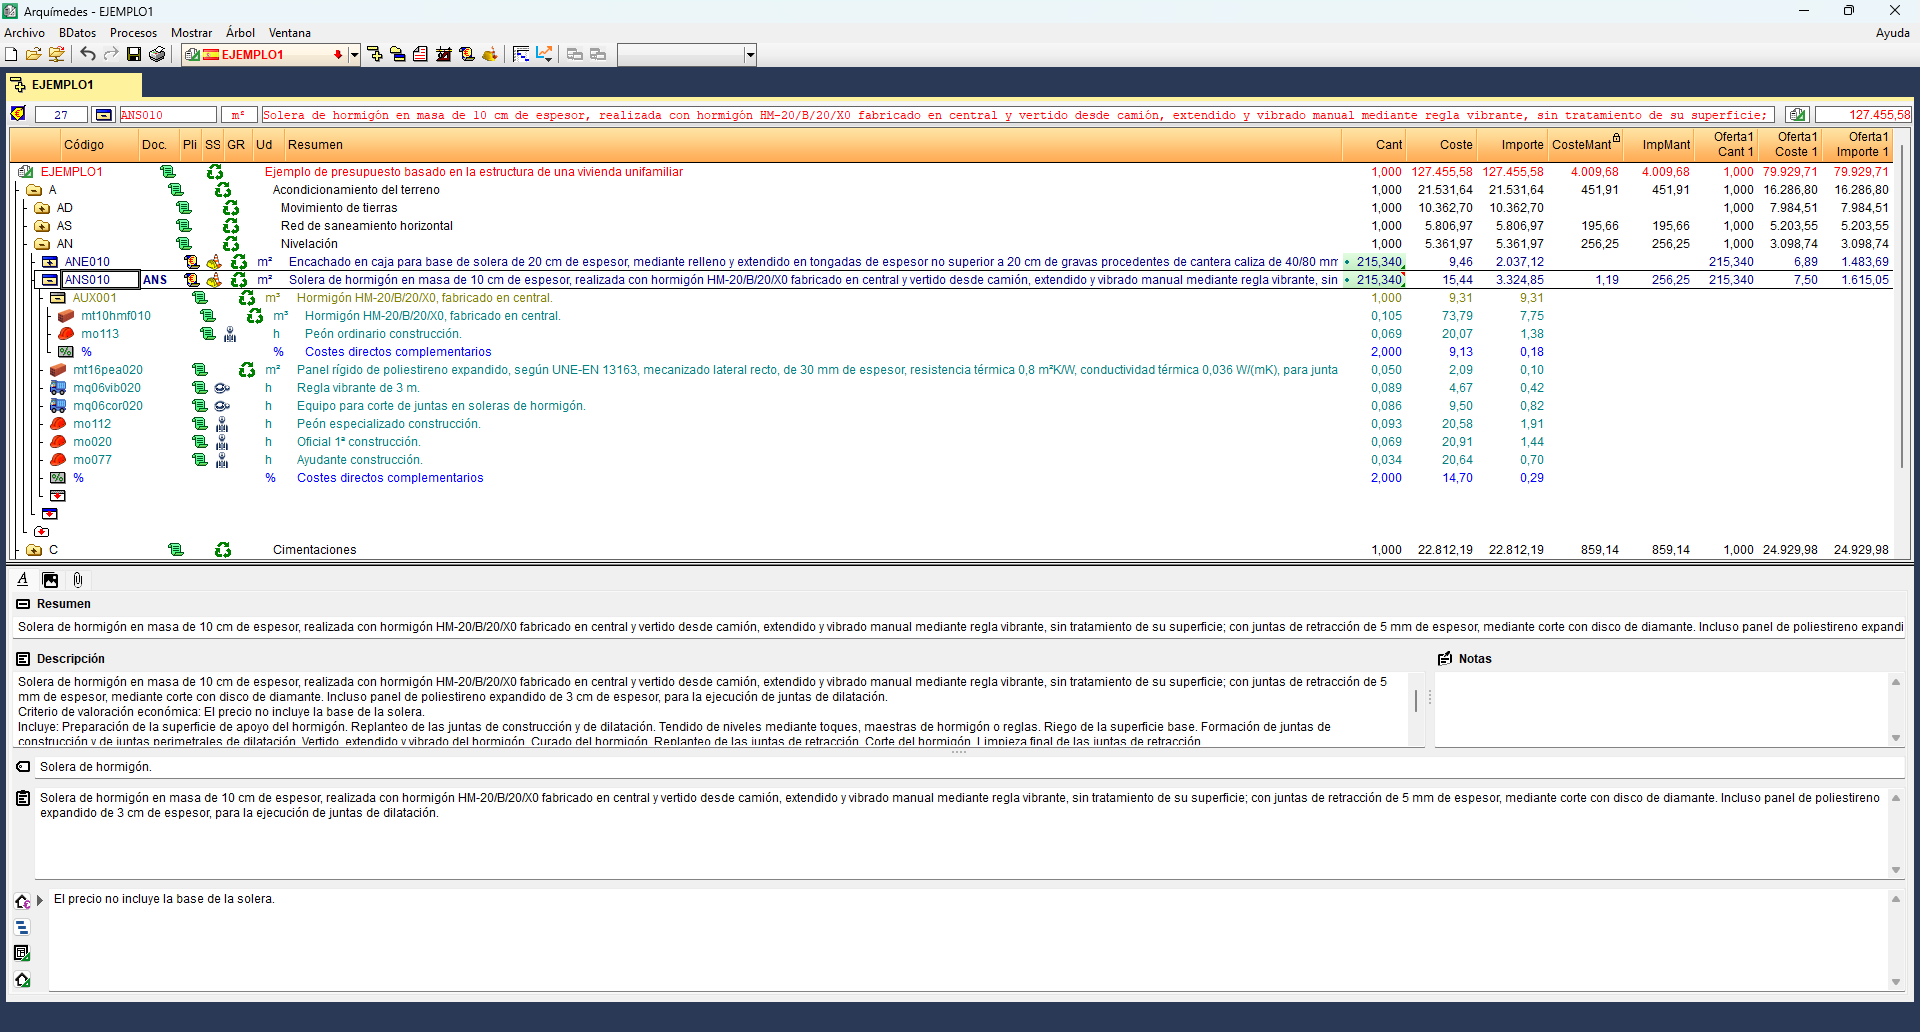
Bill of quantities adjustments and price changes
Once the measurement work is complete, the prices are reviewed and the bill of quantities is revised if necessary. This may involve, for example, aligning it with a standard price per square metre, or adjusting the unit prices for labour, materials or machinery, amongst other things.
| Best practice: |
|---|
| Before running certain processes (such as currency conversion, price increases or adjustments to the bill of quantities), you can configure the automatic backup procedure. To do this, go to the "Automatic backup settings" panel, which can be found under the "File" menu, then "Preferences". |
The most common bill of quantities adjustments include the following:
Changing a price
Changing a unit price
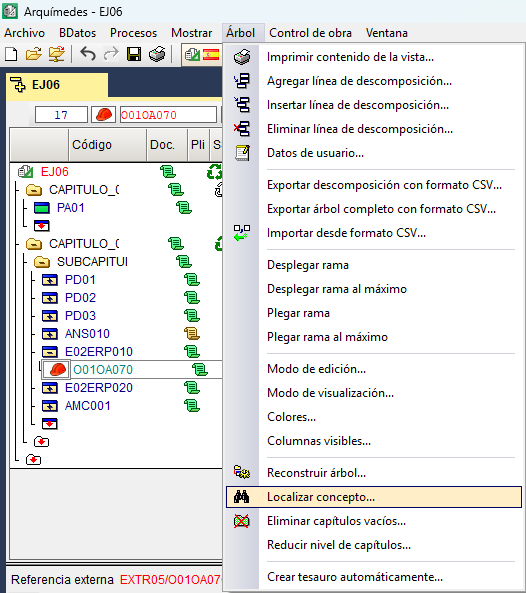
To change a unit price, you must first locate the item. One way to do this is via the "Find item" option in the "Tree" menu, which allows you to search for it using the item code or by entering text. This displays the first item containing the item in the current database within the "Cost breakdown structure". You can also search manually in the "Cost breakdown structure".
Once you have located it, go to the"Cost" column and enter the new value. The change is reflected in the price immediately and affects all other items that include it.
Changing a price for which there is no breakdown
To change the price of an unjustified item, hover over the item’s cost and enter a new amount. As you are editing the final cost field, the corresponding percentage for soft costs is automatically deducted from the amount.
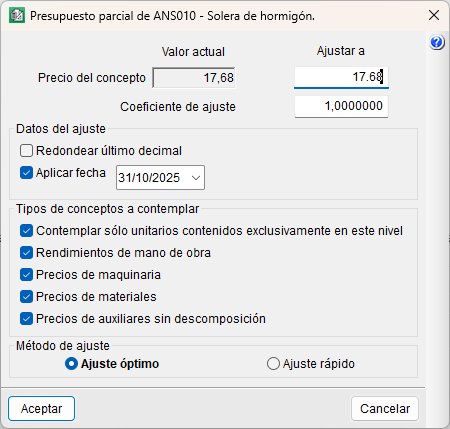
Price adjustment with breakdown
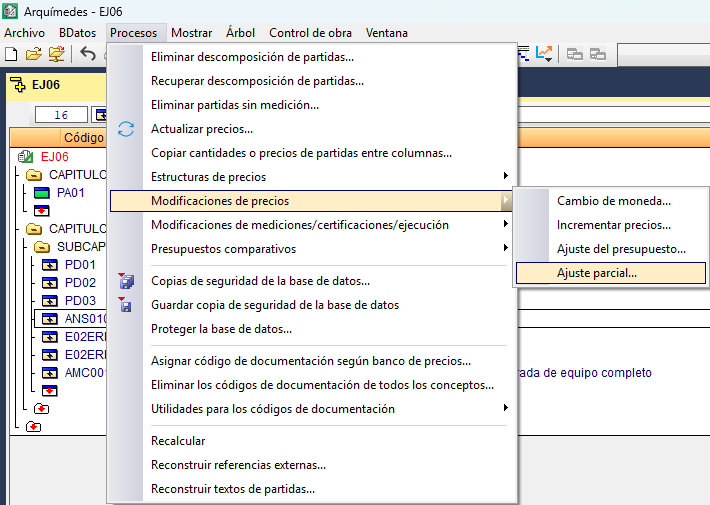
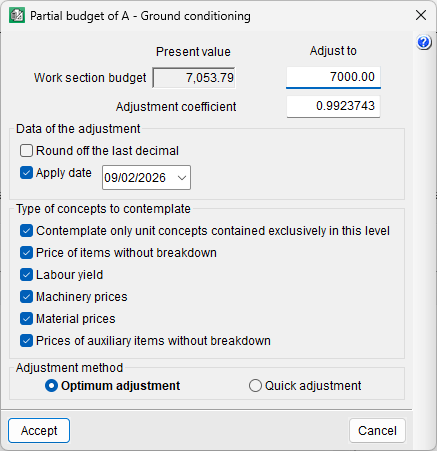
In this case, the price cannot be modified directly, as it is made up of the individual concepts that form part of it, along with their prices and the quantities involved, as well as the percentage of soft costs. Therefore, to modify the total price, you must adjust one of these items using the "Partial adjustment" tool, found in the "Processes" menu under "Price modifications", after selecting the line for the item to be adjusted.
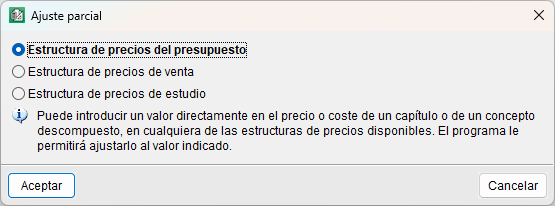
In the dialog box that appears, you must select the price structure to which the adjustment is to be applied: the bill of quantities, the sale or the study.
After this, another dialog box opens to adjust only the price of the selected concept. This dialog box displays the current price of the concept, a field for entering the new price, and a field for specifying an adjustment factor if required. It also allows you to select the option to round to the nearest decimal place or to apply the modification date. You can also select the types of concepts in the breakdown that are to be altered to achieve the price adjustment:
- Include only unit prices contained exclusively at this level
Uncheck this box if you do not wish to modify the cost of a concept with a breakdown that is included in the breakdown you wish to modify. If checked, this will only affect the labour rate of the concept with a breakdown. - Labour rates
If ticked, the labour rate of the selected concept’s price is modified, but this does not affect other prices with breakdown. - Machinery prices
The program will not apply changes to machinery if the machinery for this concept is used in other items on the bill of quantities. - Material prices
This is similar to the previous point. - Auxiliary prices without breakdown
This is similar to the previous point.
Finally, you can choose between the adjustment method:
- Optimal adjustment
This method will approximate or even yield the exact value that has been defined, provided this is mathematically possible, based on the selected criteria and the number of concepts within the breakdown. - Quick adjustment
This obtains a coefficient based on the "Current value" and the new price entered in the "Adjust to" box, which is applied to all concepts involved, except for labour, which is applied to outputs.
Change of cost breakdown
To make it easier to adjust the bill of quantities, sales and cost prices for items, the program allows you to change them without having to disable, cancel or manually adjust the quantities or unit yields. When entering a value for a bill of quantities, sales or study price for an item, or for an auxiliary price that includes yields and prices in its breakdown, the program offers the following three options:
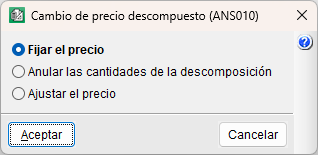
Fix the price
The item price or the modified auxiliary price (whether for a bill of quantities, sales or analysis) will not depend on its breakdown. At the same time, all its breakdown lines are disabled (though not deleted), including those that may be added to the concept at a later date. The concept will be treated in the same way as a concept without a breakdown in soft cost calculations (unjustified items), in reports and when exporting to other formats.
If the "Set price" option is selected, a check mark appears next to the price of the item or the auxiliary price that has been modified, and another next to the unit quantities in its breakdown. If you hover the cursor over the item price or the auxiliary price, a text label appears stating "Fixed price (does not depend on its breakdown)". If you hover over the unit quantities, a text label appears stating "Quantity disabled".
The fixed price can be unlocked using the "Unlock fixed price" option, which is found in the context menu that appears on screen when you right-click on that price. This option enables the breakdown of the item or auxiliary price, meaning that the price value once again depends on this breakdown.

Cancel the breakdown quantities
The quantities and unit prices that make up the price (whether for a bill of quantities, sale or study) of the item being modified are reset to zero. The concept will be treated in the same way as a concept without a breakdown in soft cost calculations (unjustified items), in reports and when exporting to other formats.
Since the unit price remains unchanged, if the user re-enters quantities in the breakdown, the item’s price will once again depend on the breakdown.

Adjust the price
This option opens the same dialog box as the "Partial adjustment" tool
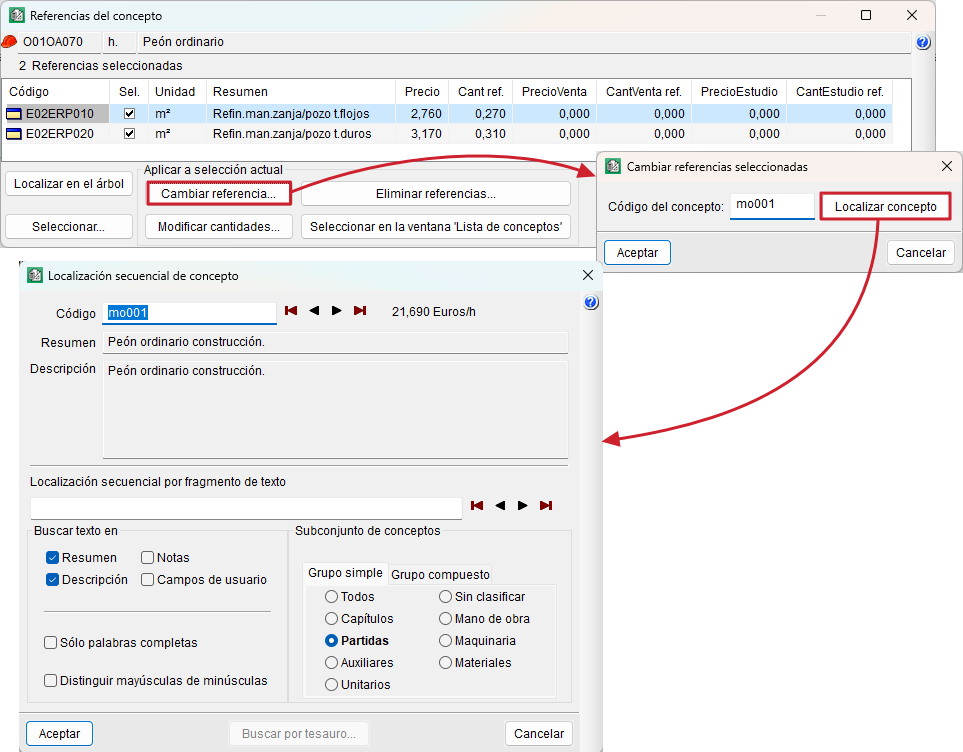
Consolidating prices from two or more reference databases
Sometimes it is necessary to merge two resources with different codes and even different prices, but which are essentially the same item, from two different databases.
Locate one of the items you wish to merge in the "Cost breakdown structure" and use the "Item references" option in the "View" menu. In the dialog box, select all the items involved from the "Sel." column using the "Select all" option. At the bottom of the box, select "Change reference", where you enter the new item code.
Partial adjustment of a work section or sub work section
A bill of quantities adjustment may be necessary for a work section or sub work section, for example, when specific tasks on a construction site are subcontracted (such as electrical systems, plumbing, etc.).
In such cases, to ensure that the adjustment to the work section does not affect other work sections of the bill of quantities, you must first navigate to the line of the work section in which you wish to adjust. Next, use the "Partial adjustment" tool, accessible via the "Processes", "Price changes" menu. Once at this level, the dialog box displays an additional option:
- Prices for items without breakdown
This option is useful when you want these amounts to be round figures.
| Note: |
|---|
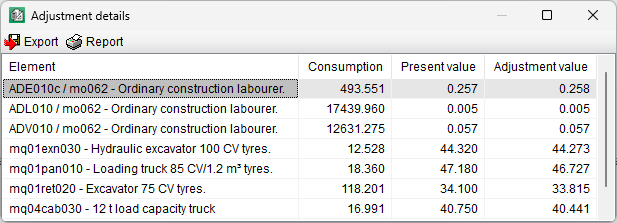
| From the "View details" section of the "Settings results" dialog box, you can export the report containing the settings details to a .csv file by clicking the "Export" button. You can also print a list containing the settings details by clicking the "Report" button. |
Comparative bills of quantities
Arquimedes can simultaneously compare different bills of quantities or various offers received during a tendering process. This feature is useful for contrasting bidders’ proposals or comparing a base bill of quantities with a revised version.
The comparative is carried out at the item level, not at the unit breakdown level, and is based on matching item codes and the chapter and subchapter structure of the base bill of quantities.
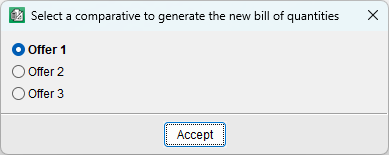
Creating a new comparative bill of quantities
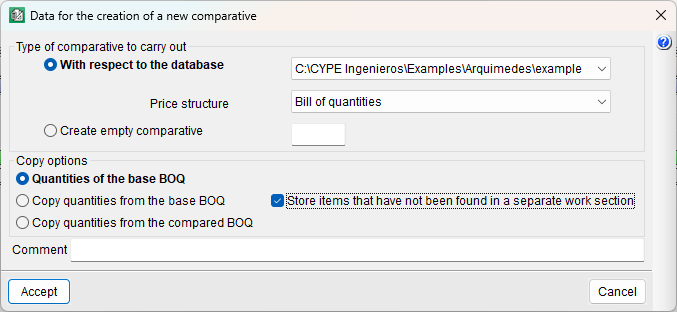
A comparative bill of quantities can be generated using the "New comparative bill of quantities" option (in the "Processes" menu, under "Comparative bills of quantities"), from:
- An open database
A bill of quantities in Arquimedes, BC3 or spreadsheet format. - An empty comparative
Entering data manually from paper-based or other non-readable offer formats.
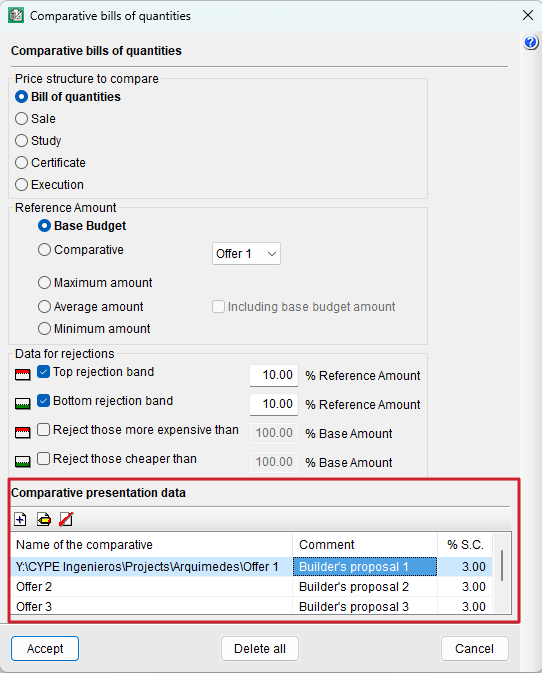
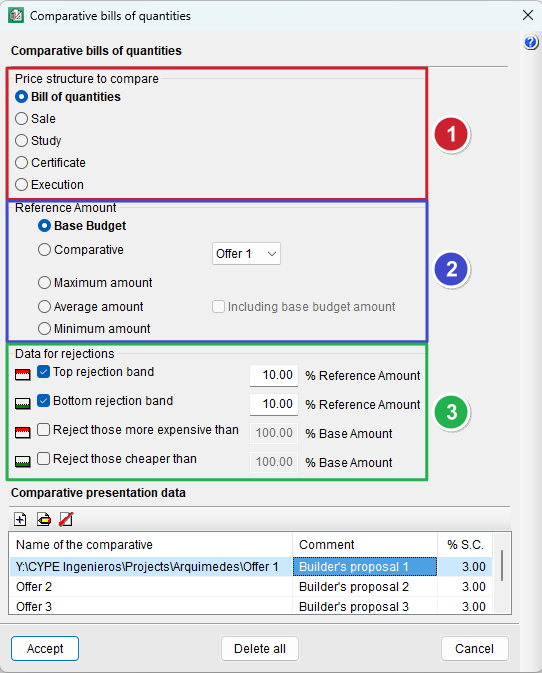
During the configuration, you can do the following:
- Select the price structure to be used (bill, sale, study, certificate, or execution).
- Define where the measurement quantities will come from, using three copy options:
- Quantities of the base BOQ
The measurement quantities from the base bill of quantities (used in the tender) are applied, without the possibility of modification. - Copy quantities from the base BOQ
Starts from the measurement quantities of the base bill of quantities, but they can be manually adjusted. This is useful for creating an empty comparative, as it allows you to enter the quantities from the received offer and view the quantity differences. - Copy quantities from the compared BOQ
Takes the quantities from the received offer. This is useful when the offer includes revised measurements that may justify differences in amounts.
- Quantities of the base BOQ
- Decide how to handle items not present in the base bill of quantities (storing them in a separate item named "@NoClas").

Comparative bills of quantities can be retrieved in Arquimedes format using the "Create new bill of quantities using comparative" option (from the "Processes" menu, under "Comparative bills of quantities").
It is also possible to add or delete comparatives and modify their configuration data using the "Comparative presentation data" option.
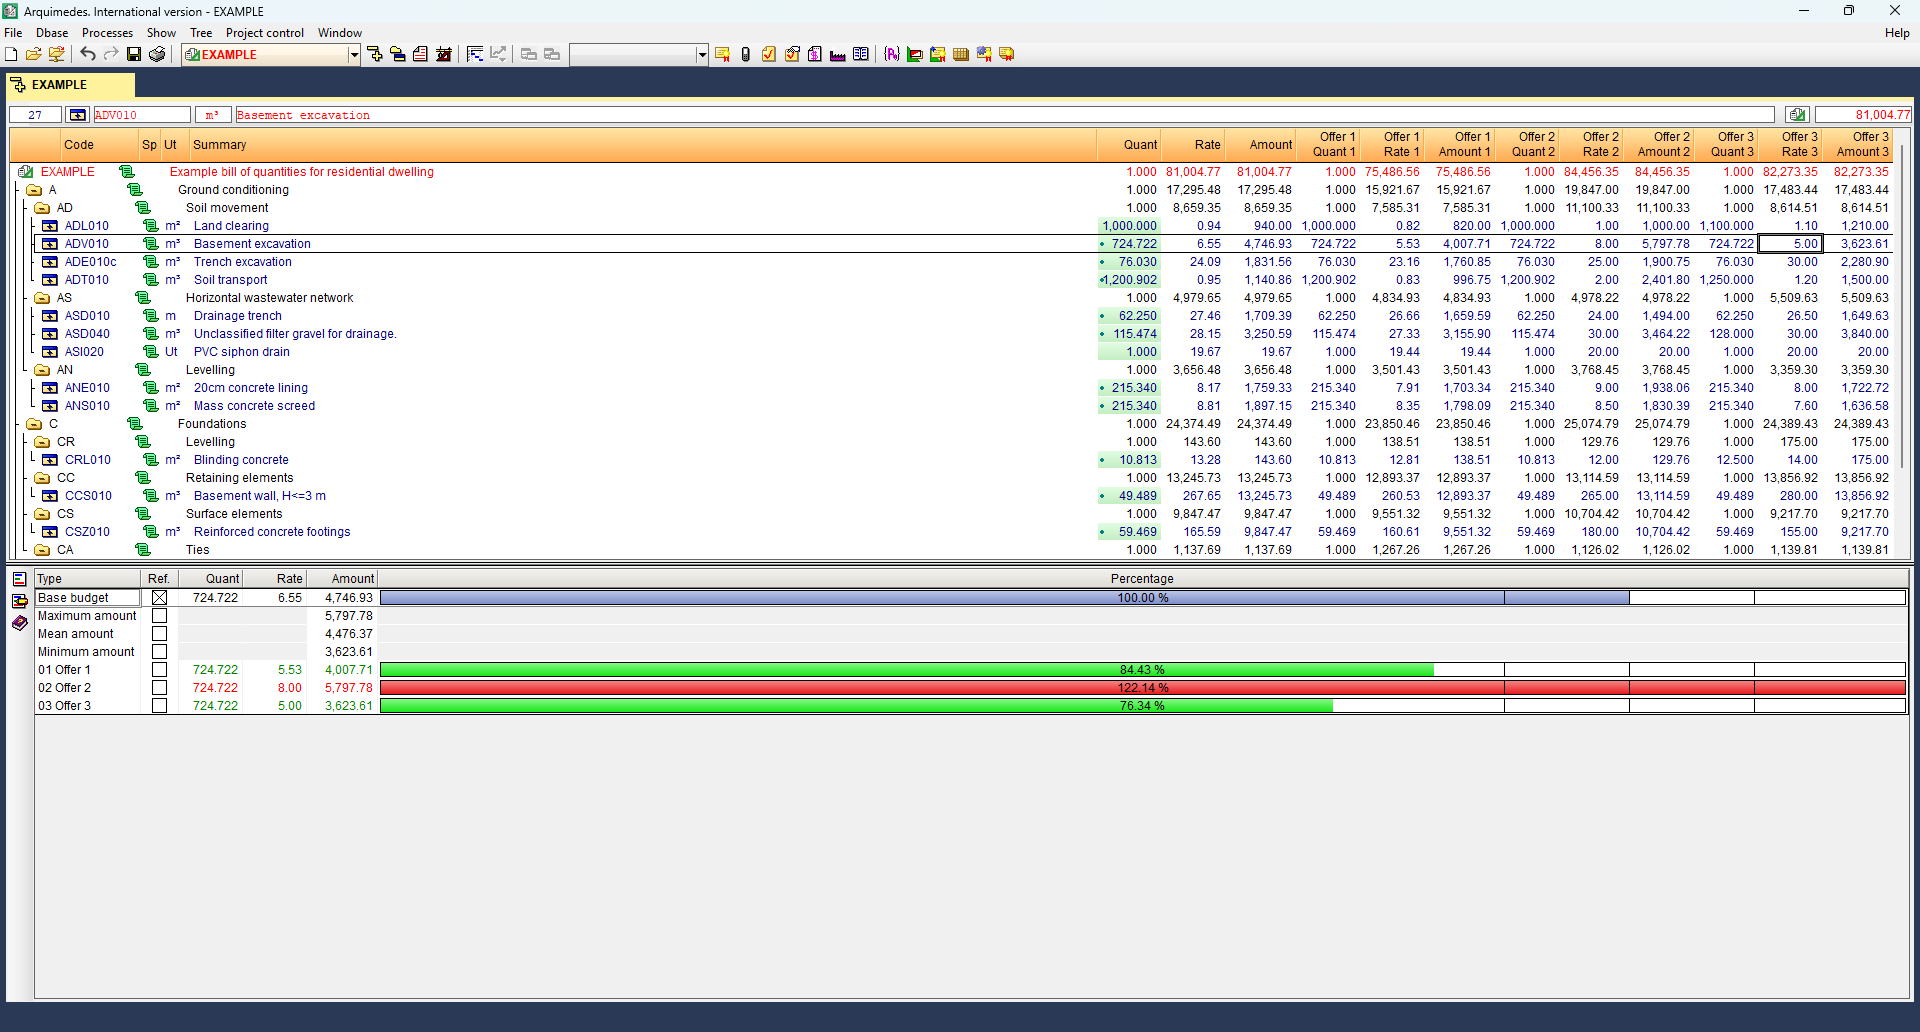
Entering measurement quantities and costs
First, in the "Cost breakdown structure" window, you need to activate the column display "Comparatives (by comparative group)" or "Comparatives (by quantity type)" (by right-clicking the column header).
- If an empty comparative has been created, simply enter the data (costs) in the "Rate" column cells for the corresponding offer.
- If, in addition to creating an empty comparative, you have selected "Copy quantities from the base BOQ", enter the data (quantities and costs) in the "Quant" and "Rate" column cells for the corresponding offer.
In both cases, the "Amount" column will be filled in automatically.


Analysing the comparative bill of quantities results
When selecting a cell in any of the compared columns, a table appears at the bottom, showing the compared data for the selected item or work section.
This table allows you to:
- View graphical bars comparing the offer amounts with the reference amount (e.g. average amount).
- Apply exclusion bands to identify disproportionate or risky offers based on percentage differences.
The colours used are:
- Red: offers exceeding upper limits.
- Green: offers below the lower limit.
- Blue: offers within the acceptable range.
Using the "Ref." column in the table, you can change the reference amount used for calculations. The "Quant", "Rate", and "Amount" columns refer to the price structure being compared (box 1).
The three vertical black lines shown on the graph bars correspond to the reference amount, and this amount is reduced or increased by the indicated percentages.
To the left of the table, you’ll find shortcut buttons to "New comparative bill of quantities" and "Comparative presentation data".
| More information: |
|---|
| The reference amount (box 2) and the exclusion bands (box 3) can be configured according to the needs of the process. |
| More information: |
|---|
| To print comparative reports (from "Print current database"), you must select a comparative-type report, such as "Comparative bills of quantities" or "Comparative between valid and modified BOQ" (see the "Results output" section). |
Arquimedes Server
The "Arquimedes Server" module is used to manage the simultaneous access to the same database (bill of quantities or cost database) of several users connected to a network via a configuration of permissions and access methods.
Arquimedes database server
The multi-user work enabled by the "Arquimedes Server" module is managed from the Arquimedes Database Server application. This app is installed independently from the rest of the CYPE programs, using a compressed file that can be found on the Arquimedes product website by clicking on the "Download" button. The installation is carried out specifically from the "Plugins compatible with Arquimedes" section, in the "Arquimedes Database Server (64 bits)" file.
Other CYPE programs do not need to be installed on the device where the server is installed. The Arquimedes Database Server works as a Windows service; therefore, there is no need to start a user session on the computer where it is installed.
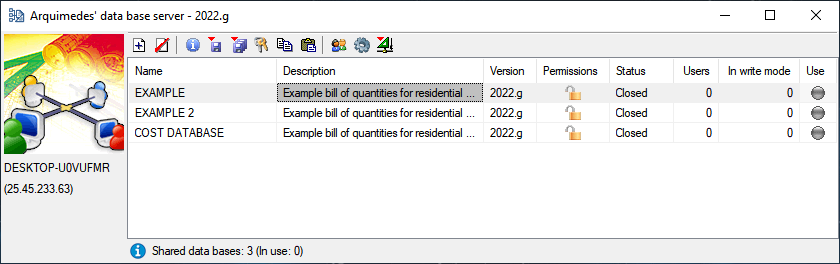
Remote and local databases
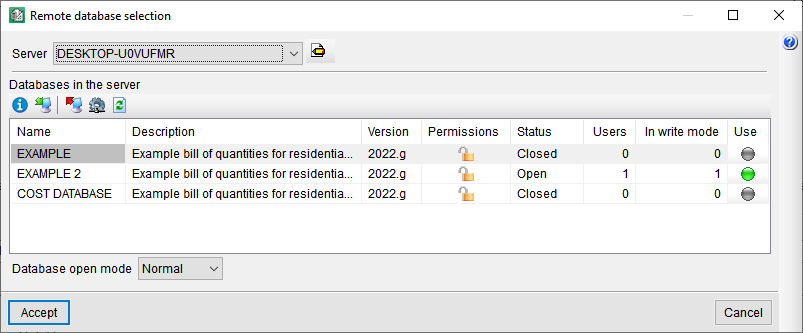
All Arquimedes databases can be operated in multi-user mode from any workstation on the network by simply declaring the desired databases in the Arquimedes database server. In Arquimedes, declared databases are called remote databases as opposed to local databases that are not defined on the server and only allow one user to access them at a time.
The "Open remote database" button on the Arquimedes toolbar opens a dialogue box for selecting a database server. If no server is detected, click on the "Server management" button and add a server by IP or machine name.
Configuring accessibility to the remote databases
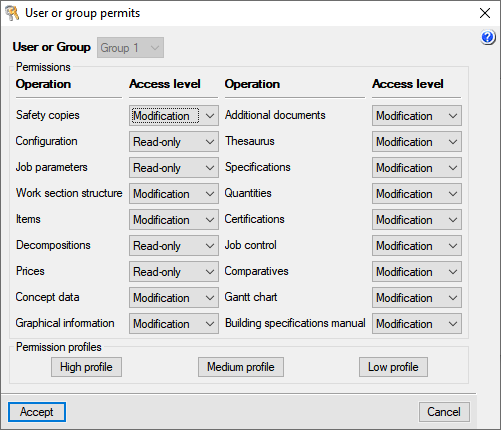
The Arquimedes database server allows you to access remote databases by network users to be limited. A remote database can be modified only by certain users (each with configurable operating levels) who optionally have an access password.
Therefore, the Arquimedes database server configures the remote database accessibility by defining a series of permissions with which a customised Control - Operability relationship is obtained. This configuration provides several ways of accessing the remote databases. Two extreme situations are described below:
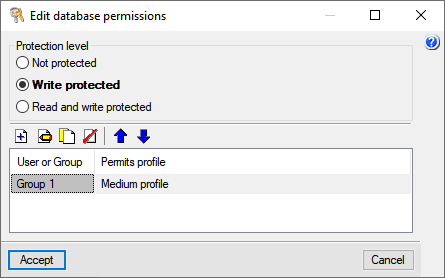
- Any network user (with a license to use Arquimedes and its "Arquimedes Server" module) has free access to all remote databases.
- Any desired remote databases may have the following access limitations:
- Each remote database has its own list of users who are granted access after identifying themselves with a user name and password (each user must have a license to use Arquimedes and the "Arquimedes Server" module).
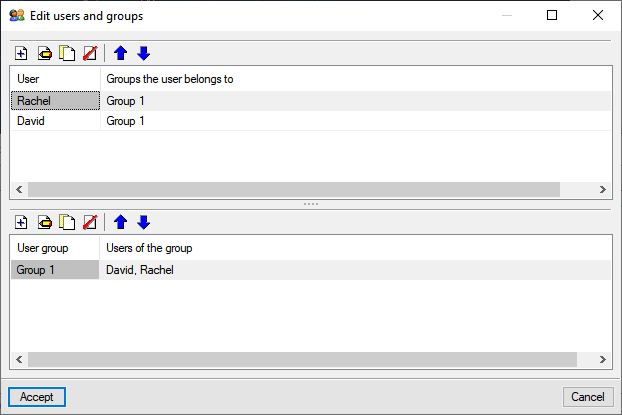
- The operations that the users included in this list can carry out on the remote database are configurable, so each of them may have different limitations concerning their manipulation. These limitations may also be different for the same user in each remote database in which they are declared.
- Each remote database can be hidden from unauthorised users.
In order to improve the coordination of users' work, Arquimedes allows users working with the same remote database to exchange text messages.
Using the "Send message to user" button or the "Send message to all users in the database" button, you can send a text message to the user or to all users in the database.
Simultaneous running of more than one Arquimedes database server
More than one Arquimedes database server can be installed on the same network, although a single remote database can only be registered on one server. Therefore, in a company network, there could be several Arquimedes Database Servers that each control different remote databases. Each server may have its own users, and there may even be users common to the different servers.
Permissions in the user license for working with Arquimedes Server
Users who wish to access any remote database must be licensed (single-use or network) to use Arquimedes and the "Arquimedes Server" module. The Arquimedes Database Server does not require any user licenses.
Other features
To access further features offered by the program, several modules can be found on the “Arquimedes modules” webpage.
Table of contents
Complete your overview of Arquimedes by exploring the other sections available: