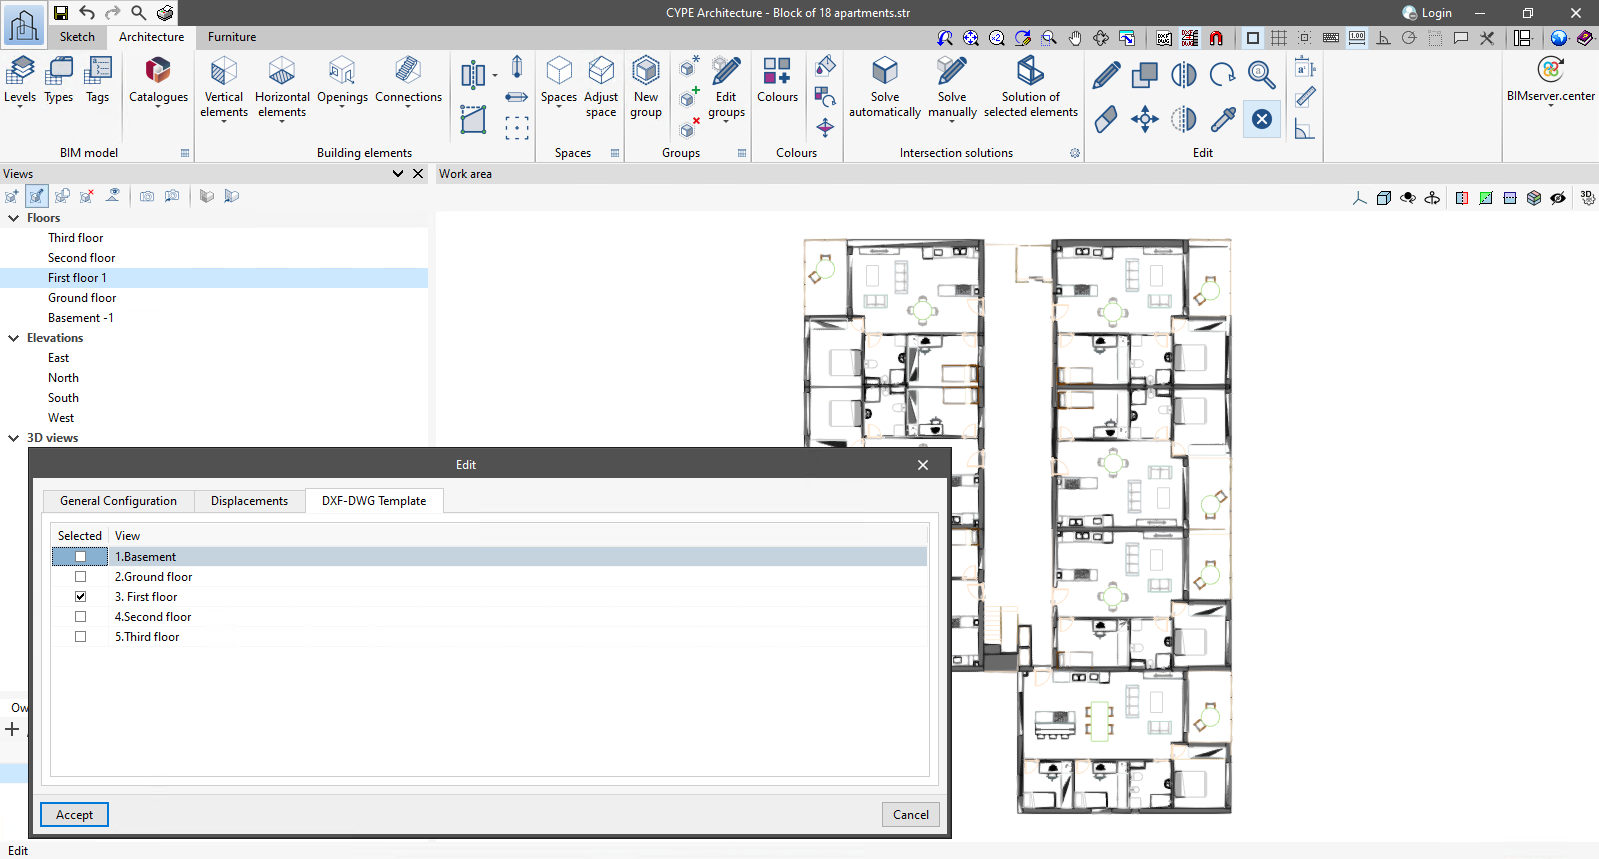
Update history​

CYPELEC Electrical Mechanisms

Character set in FIEBDC-3 export (.bc3)

As of version 2023.f, the character set to be used when exporting the bill of quantities in the standard FIEBDC-3 format (.bc3) can be selected from the "Bill of quantities" tab in the applications that have it. For this purpose, the "Character set" field has been included in the export configuration window and has three options:

  • Automatic selection
    The ANSI character set shall be used whenever possible. If the application detects characters that are not compatible with ANSI encoding, the UTF-8 character set shall be used.
  • ANSI
    This is the character set defined for Windows and the default character set used in previous versions. Not all Unicode characters can be represented by this encoding format.
  • UTF-8
    Through this standard encoding format (RFC 3629) all Unicode characters can be represented. However, the current FIEBDC-3 standard specification (3/2020) does not support UFT-8 encoding, so the ANSI character set should be used where possible (Automatic selection).

Thanks to the possibility of exporting and importing the bill of quantities in UTF-8 encoding, applications can now share bills of quantities that include Unicode characters. This establishes a fully multilingual environment for managing the project’s bills of quantities.

In the FIEBDC-3 standard, the character set is specified in the CHARACTER_SET field of the V record.

Mapping to resources

As of version 2023.e, applications with a "Bill of quantities" tab can map their model's elements to an item's resource. For this purpose, in the editing of a mapping file, the "Resource code" option has been added when components are modified in the "Classification" list. By activating this option, users can specify the resource code on which the quantity of the model element will be mapped. This will be added to the breakdown of the concept described by means of the "Concept code" and "Concept reference"  fields.

When the resource indicated in the mapping file is a cost breakdown in the associated cost database, only the unit components of this breakdown shall be assigned to the concept.

“UNTEC method” work section structure

The predefined work section structure "France - UNTEC Method" has been added when creating a new "Set of measurement rules" (Open BIM Quantities) or a "Mapping file" (applications with a "Bill of quantities" tab).

Graphical editing of the reference system of the model

Since version 2022.a, the applications integrated within the Open BIM workflow via the BIMserver.center platform include a tool for managing project reference systems. This option is available from the configuration window that appears when linking or updating a BIMserver.center project via the "Geographic location and reference system" option. As of version 2023.d, the applications now allow users to run a graphical environment where they can visually define a reference system for their model. To do this, the "Geographic location and reference system" window now contains the "Visual editing of the local reference system of the model" option.

From the "Visual editing of the local reference system of the model" window, the origin and orientation of the reference system of the model can be indicated in the workspace with the "Define the reference system of the partial model" tool. Both the axes of the reference system of the model, which we have just entered and the axes of the reference system of the site can be viewed in the workspace. The latter appears with a "Site" tag.

To make it easier to define the reference system, the 3D models corresponding to the BIMserver.center project contributions selected during the linking process are displayed. The management of the visibility and object snaps of these models is carried out from the "Elements read" menu in the left sidebar of the window. The "Views" menu can also be found in the same options bar, from which different types of 2D and 3D views of the model can be generated. These tools can already be found in several CYPE applications. For more information on how they work, please refer to the User’s Manual for the 3D work environment tools available in CYPE applications.

Apart from 3D models, 2D drawings or plans can also be imported from CAD files (".dxf", ".dwg", ".dwf") or images (".jpeg", ".jpg", ".bmp", ".png", ".wmf", ".emf", ".pcx"). These files and object snaps are managed through the "DXF-DWG Template" and "Template object snaps" options accordingly.

Once the editing is complete, the coordinates and orientation of the reference system of the model with respect to the reference system of the site are moved to the corresponding fields in the "Geographic location and reference system" window.

Quantities on the 2D/3D model

As of version 2023.d, all applications with a "Bill of quantities" tab now have a new set of tools that allow users to measure the work area. More specifically, the following options have been added:

  • Measure length
    The distance between points inserted in the work area can be measured. Several segments can be entered and the application will calculate the sum of the lengths of each one.
  • Measure area
    The area of a polygon defined by points inserted in the work area can be measured. Several polygons can be entered and the application will calculate the sum of the areas of each one.
  • Measure angle
    The three-point angle inserted in the work area can be measured. Several angles can be defined and the application will calculate the sum of them.
  • Count the number of objects
    The number of selected 3D model objects can be counted.
  • Measure the area of objects
    The total area of the selected 3D model objects can be measured.
  • Measure the volume of objects
    The total volume of the selected 3D model objects can be measured.

In order to make it easier to measure the quantities of the model, the work area has been modified to incorporate the 3D work environment tools that are already available in other CYPE Open BIM applications:

  • Defining views
    Different types of 2D and 3D views of the model can be generated from the "Views" panel in the sidebar of the work area.
  • Elements read
    The visibility and object snaps of model components can be controlled from the "Elements read" panel in the sidebar of the work area.
  • Inserting components
    When entering a measurement in the work area, the application provides a toolbar to make it easier for users to interact with the environment.

As well as measuring the 3D model, this new set of tools can be used to take measurements on plans or 2D drawings imported from CAD files (".dxf", ".dwg", ".dwf") or images (".jpeg", ".jpg", ".bmp", ".png", ".wmf", ".emf", ".pcx"). These files and the object snaps are managed through the "DXF-DWG Templates" and "Template object snaps" options respectively.

In order to use the measurements in the project's bill of quantities in a simple way, a button with a blue arrow has been added to the editing panel of the detail lines next to the editing window of each variable (A, B, C and D). Clicking it will assign the value of the measurement made on the work area to the variable.

Improved "Zoom" tool

The option to "Zoom" into the 3D model element has been added in the following cases:

  • "Quantities of the BIM model" tab in Open BIM Quantities
    In previous versions, users could frame a component of the IFC model in the 3D view. The same can now be done for the different groups of elements (types, entities, structure, layers and groups).
  • "Bill of quantities" tab in applications
    In previous versions, users could frame the elements used in a quantity detail line of the bill of quantities in the 3D view. The same can now be done for items and work sections.

Font size

The "Font size" option has been added to the general configuration menu of the applications. This tool allows users to increase or decrease the basic size of the font used in the user interface of the programs. Thanks to this implementation, the accessibility of the applications has been improved while also ensuring the correct visibility of the content on devices with different screen resolutions.

To enter a "Basic size" the "Set custom font size" option must be checked. The size users can enter is the application's basic font size. Any other font sizes that may exist in the program's interface will be automatically modified proportionally according to the change in the basic size.

It is important to note that, as this is a common parameter, its modification will affect all installed CYPE tools.

New example job

A new example job has been added for an apartment block with 8 dwellings. In this building, based on the architectural model, the distribution of electrical mechanisms and lighting points is completed with the corresponding checks of the protection volumes in bathrooms and toilets, and the minimum provision in rooms.

Automatic saving options

CYPELEC Electrical Mechanisms version 2023.b now includes the possibility of automatically saving jobs every so often.

Managing the visibility and object snaps of external elements

A new tool has been implemented in the user interface that is common in Open BIM applications with a 3D working environment. Now, the management of the elements from the digital model of the building, which comes from the associated BIMserver.center project, is carried out from the "Elements read" menu located in the left sidebar of the application. 

The elements read are structured in the form of a tree based on two classification types: "Models" and "Categories". The organisation by "Models" allows users to inspect each contribution linked to the job and each associated 3D model within it. On the other hand, the "Categories" group the "Elements read" into families according to their features. Next to each tree component, three buttons are displayed to control the visibility, the display mode (solid, transparent or wire) and the object snap. It should be noted that the organisational settings applied to the organisation by "Models" prevail over those indicated by "Categories".

Applications can have default visibility and object snap settings when creating a new view. Furthermore, when entering new components with the tools in the program, the application itself can force the activation or deactivation of the visibility and object snaps of certain categories. When this happens, a yellow padlock will be displayed next to the set options. When users finish using the tool, the tree will return to its original state.

In previous versions, the management of the visibility of BIM project models was carried out in the configuration panel of a view. As a consequence of this improvement, editing is now managed from the "Elements read" menu in the left sidebar and has therefore been removed from the previous location. However, in the editing panel of a view users can indicate whether the view should have its own configuration for viewing these elements or whether it should use the general configuration of the job. For this purpose, the "Use a specific view configuration for the view" option has been added. When this option is active, the "View" text will appear in the "Elements read" menu.

In addition to the component tree of the external models, the "Elements read" menu includes a toolbar with a group of buttons that allow the following actions to be carried out:

  • Isolate selection
    Allows elements from the 3D model to be isolated. Users can select the elements of the 3D model that they wish to isolate and when right-clicking on them, the rest of the elements from the model will disappear.

  • Hide
    Allows the selected elements to be hidden. Users can select the elements from the 3D model that they wish to hide and by right-clicking on them, they will disappear.

  • Show all
    Shows all hidden elements.

  • Aspect
    Allows users to choose between normal drawing or monochrome drawing.

  • BIM information
    Displays a panel showing the attributes associated with the selected component.

In version 2023.a, the management of visibility and object snaps of external elements is available in the following CYPE Open BIM applications:

  • CYPE Architecture
  • CYPELEC Distribution
  • CYPELEC Electrical Mechanisms
  • CYPELEC PV Systems
  • CYPEPLUMBING Water Systems
  • CYPETHERM RE2020
  • CYPEURBAN
  • Open BIM Analytical Model
  • CYPE Construction Systems
  • Open BIM COVID-19
  • CYPE Lightning
  • Open BIM Sampling
  • Open BIM Site

Additional symbols for normal and emergency lighting points and for electrical outlets

The number of electrical symbols that users can select for normal (wall or ceiling) lighting points, emergency lighting and sockets is extended.

Horizontal positioning of electrical mechanisms

Mechanisms can now be introduced in a horizontal position to be placed on technical floors, worktops or furniture.