Introduction
Arquimedes has an editor for configuring report templates. Using this tool, you can define both the data to be included and its layout, format and behaviour when generating the report.
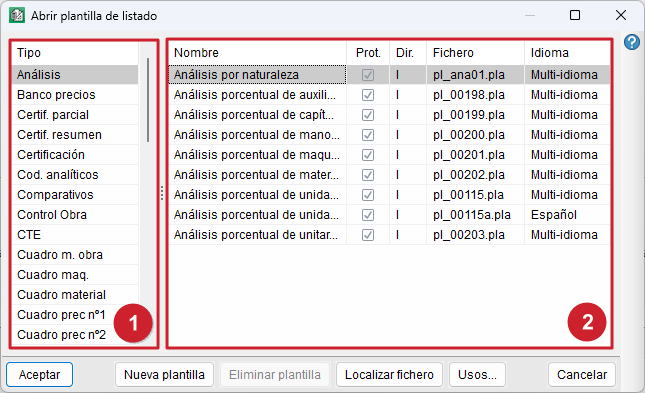
This editor can be accessed via the "Edit list templates" option, located in the "Print" section of the "File" menu. An initial window will open where you can browse templates by type; edit an existing template; delete unprotected templates; or create a new one.
Each template has two names: a short name and a long name. The short name (the "File" column) provides an abbreviated indication of the type of list the template will generate. There will normally be several templates of the same type. The program sorts them alphabetically by type and groups them to make them easier to find. The long name (the "Name" column) provides a more detailed description of the template’s purpose.
Some templates have the "Prot." box ticked (protected or read-only). These are the templates that the program provides ready-made.
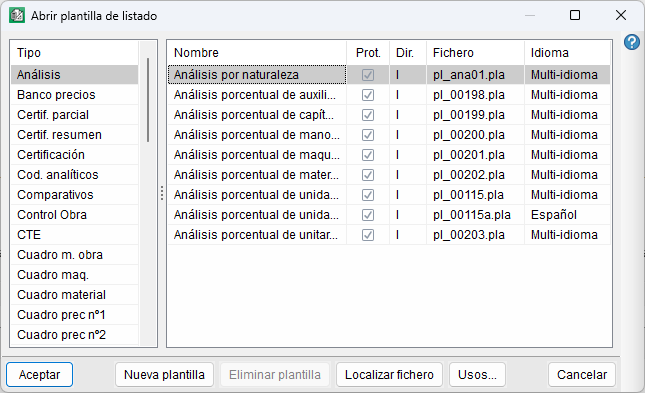
The table on the left (1) contains a list of all the available template types. The table on the right (2) contains a list of the available templates for the selected type.
| More information: |
|---|
| The following link provides a list of the templates and template series available by default in the Arquimedes installation. |
To edit an existing template, click "Accept" or double-click on the full name. The "New template" option allows you to create a new template from scratch. With "Delete template", you can delete unprotected templates that you no longer wish to keep. The "Uses" option lets you see which report series use the selected template. If the template is not associated with any report series, the program will display an information message.
| Best practice: |
|---|
| To streamline your work with the Report Template Editor, we recommend starting with an existing template that is similar to the report you wish to create and adapting it to suit your requirements. This way, you can make use of its structure, record models, objects and configuration, avoiding the need to define all these elements from scratch. For further information, please see "Creating a template". |
Report Template Editor interface
The interface that appears when you open the Report Template Editor contains the following areas, options and menus:
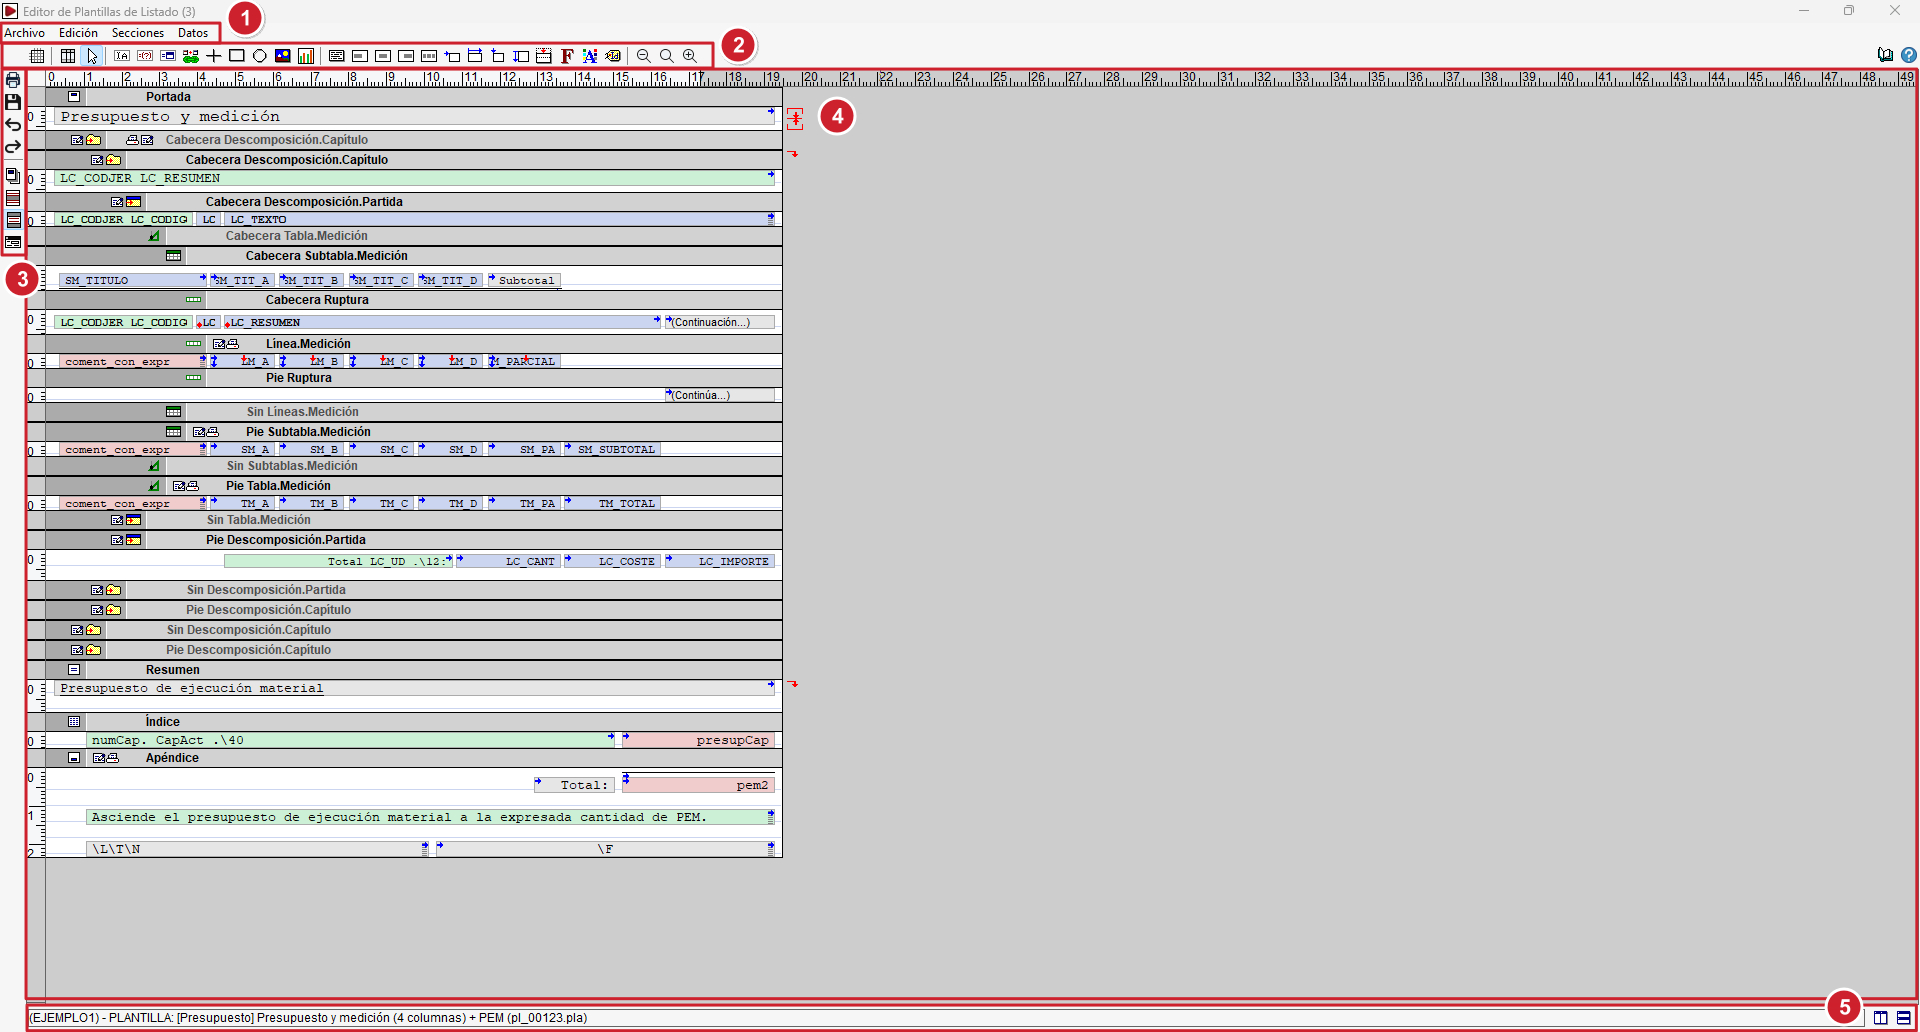
- At the top are the editor’s main menus: ‘’
- "File" menu
Options for template management, page settings and printing. - "Edit" menu
Various editing tools and general template settings. - "Sections" menu
Manage the sections that make up the template and access their options. - "Data" menu
Access various elements relating to the data and the template’s functionality, such as variables, sections, the page template and scripts.
- "File" menu
- The top toolbar contains the tools for inserting and editing the various alphanumeric and graphic objects in the template, as well as other design, alignment and adjustment tools.
- The side toolbar contains shortcuts to various options for editing and managing the template.
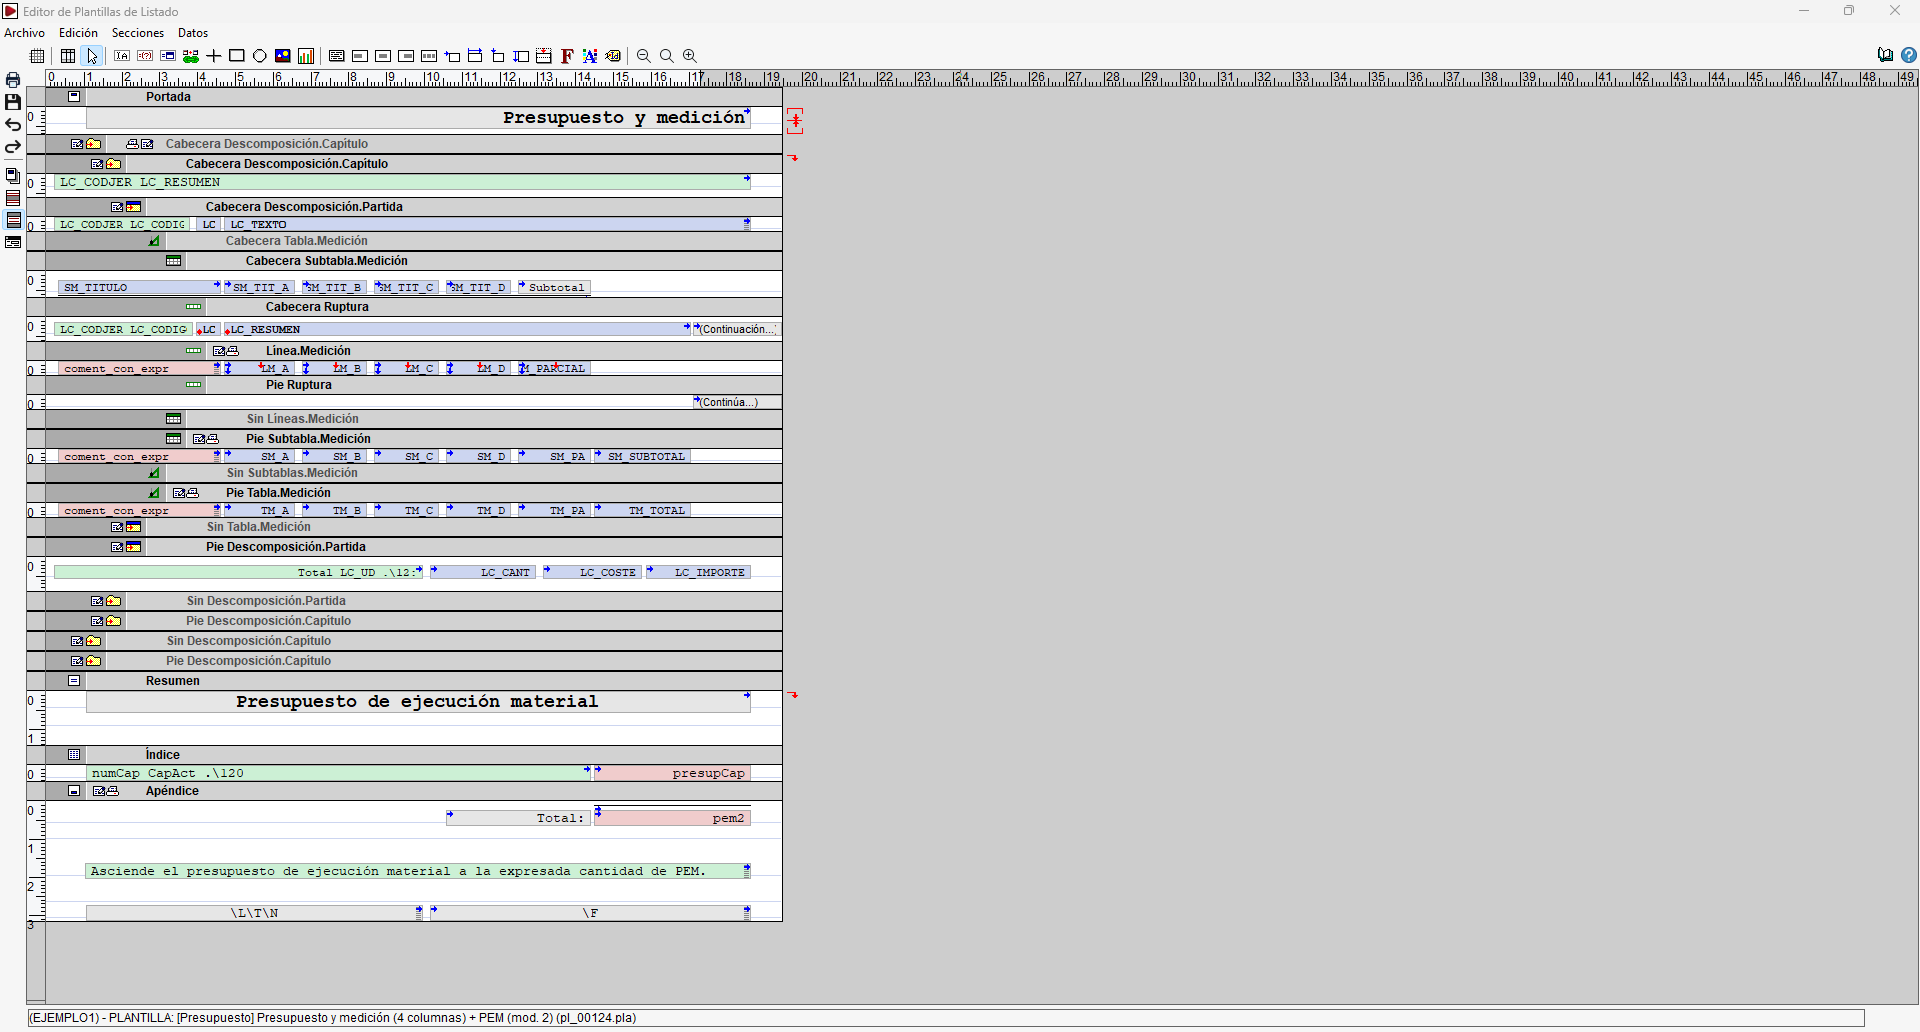
- In the centre is the editing area, which graphically displays the content and structure of the template, organised into sections, zones and rows, upon which the various objects are arranged. The horizontal and vertical guides make it easier to position and redesign them.
- At the bottom are the status bar and the tools for working with multiple windows.
Template structure
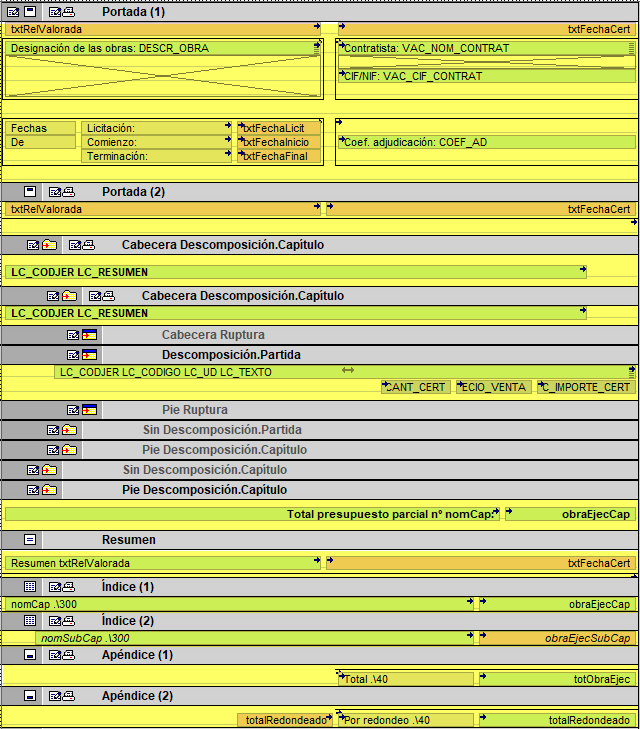
A report template has four types of sections, each of which in turn comprises a specific number of fields, which in turn contain rows and objects (graphical and alphanumeric) that enable the information in a report to be printed.
Sections
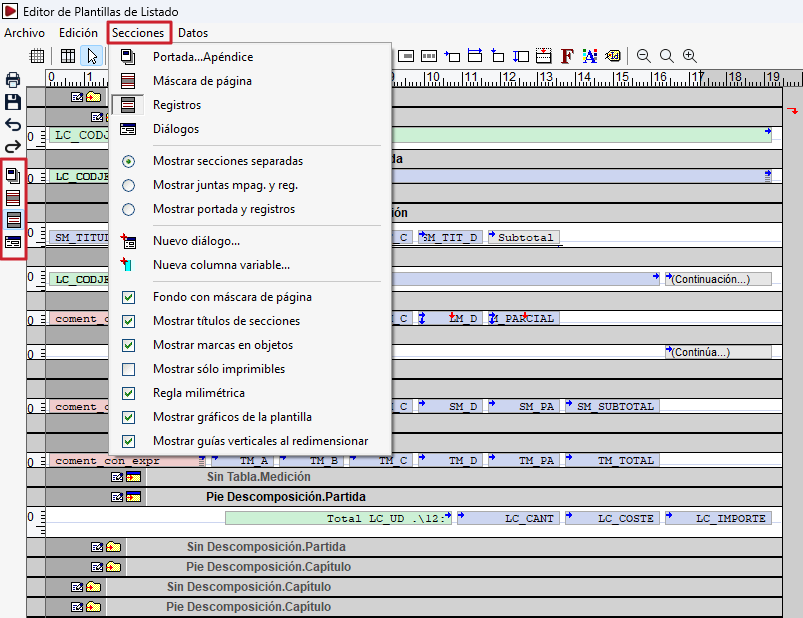
A template is organised into four types of sections:
- Cover page…Appendix, which combines the opening section of the report (front page) and the closing section (summary, table of contents and appendix). A template may only contain one section of this type, and it is even possible to omit it altogether.
- Page mask, where the page headers and footers are defined. A template can only contain one section of this type.
- Records, which contain the main body of the report and display data from the record templates. Several sections of this type can be defined within a template. The number of fields that each of these sections may contain is not fixed, although each section may only belong to one of the established types, which, broadly speaking, could be defined as header, body and footer.
- Dialog boxes, which allow the user to create their own data request dialog boxes to include in a list. These dialog boxes are, in fact, windows which may contain a window title, text, and a blank space in which to enter numbers or text (variables).
Record sections can be hierarchical and recursive. Alternative sections can also be added to display different blocks of information at the same level.
Zones
Each section is divided into zones with specific functions:
- Cover page
This is printed at the start of the list. It can be printed as a full page (as a title page) or only as much as the specified details allow, for example, to serve as a header on the first page. - External mask
This consists of the top header and the bottom footer. It is commonly used for general information, such as the list title, the name of the database or the current page number. The top header can be combined with the cover page so that the cover page appears on the first page of the report instead of the top header itself. - Internal mask
This consists of the lower header and the upper footer. It also allows graphic elements to be positioned across both areas, for example, to create continuous vertical lines separating columns. - Break header
This is printed when records continue on a new page, except on the first page. - Record
Printed once for each instance of the associated record template. - Footer Break
It is printed after the register sections and can be used to display a summary, initials or other concluding information. - Summary
This is printed after the records sections and can be used to display a summary, initials or other concluding information. - Index
Generate an index by calling the procedureindex()from any of the script lines in the template. To obtain a different result on each call, you must include at least one alphanumeric object associated with a variable whose value varies between two calls. - Appendix
This appears at the end of the report and can be used to include information following the table of contents, such as prefaces, a summary or a note.
Zones can be configured to:
- Be printed or not
- Cause page breaks
- Be adjusted vertically
- Be split when they reach the end of a page
- Execute scripts before and after they are printed
- Copied, pasted and swapped
- Have alternative variants
| More information: |
|---|
| For further information on the layout of headers and footers, please refer to "Printing headers and footers". |
Title bar
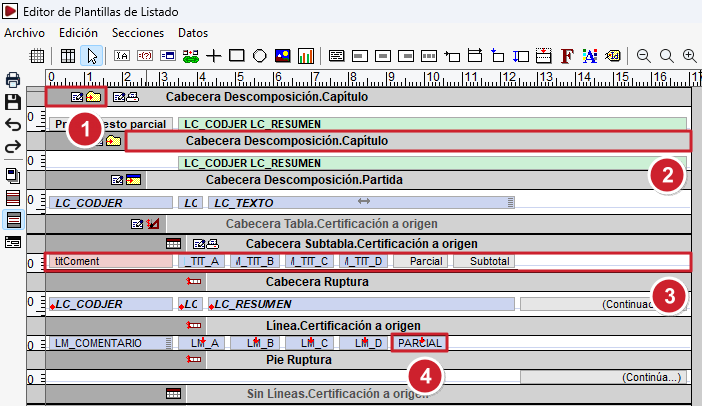
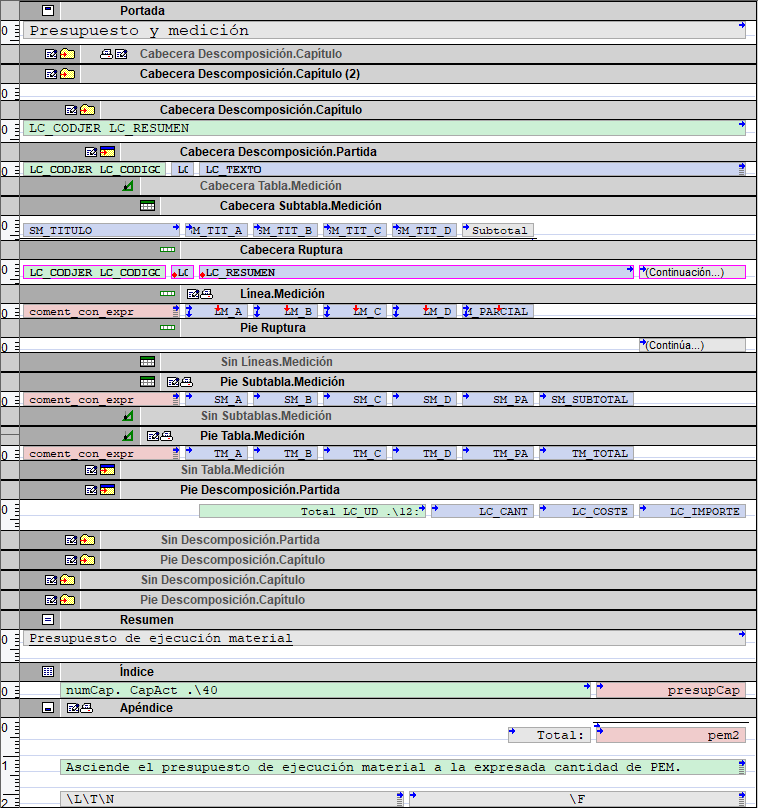
By default, each section and zone of the template is displayed in the editor with a title bar acting as a header. Various elements may appear in this bar:
- Dash symbols, which indicate the presence of dashes associated with the zone. The symbols corresponding to the dashes "When loading record", "Before printing zone" and "After printing zone" may appear.
- Icons for this section, which indicate the registration model used and the associated options.
- Bar title, consisting of the name of the area and, in the record sections, the corresponding record template.

Lines and items
Any area where text is to be printed must contain at least one line. A line, or text baseline – represented in the template editor by a grey horizontal line – provides the necessary framework for containing objects. There are two basic types of objects:
- Alphanumeric objects, which are:
- Exact text, for fixed texts.
- Variables – whether template or stored – to display the value of a variable.
- Registration fields for printing information from the database.
- Strings of alphanumeric characters, combining text, variables and fields within a single expression.
- Graphical objects, including:
- Perpendicular lines
- Rectangles
- Circles or ellipses
- Drawings
- Charts
The editor can be used to move, redesign, select, copy, align and delete objects. It also supports multi-line objects and different scrolling or scaling behaviours to adapt the template to the content and the paper size.
Creating a template
A template can be created from an existing template or from scratch.
Creating a template from an existing one
To create a template from an existing one, open the template you wish to use as a basis and use "Save as" to create a duplicate of the current template. You can then make the necessary changes to this copy.
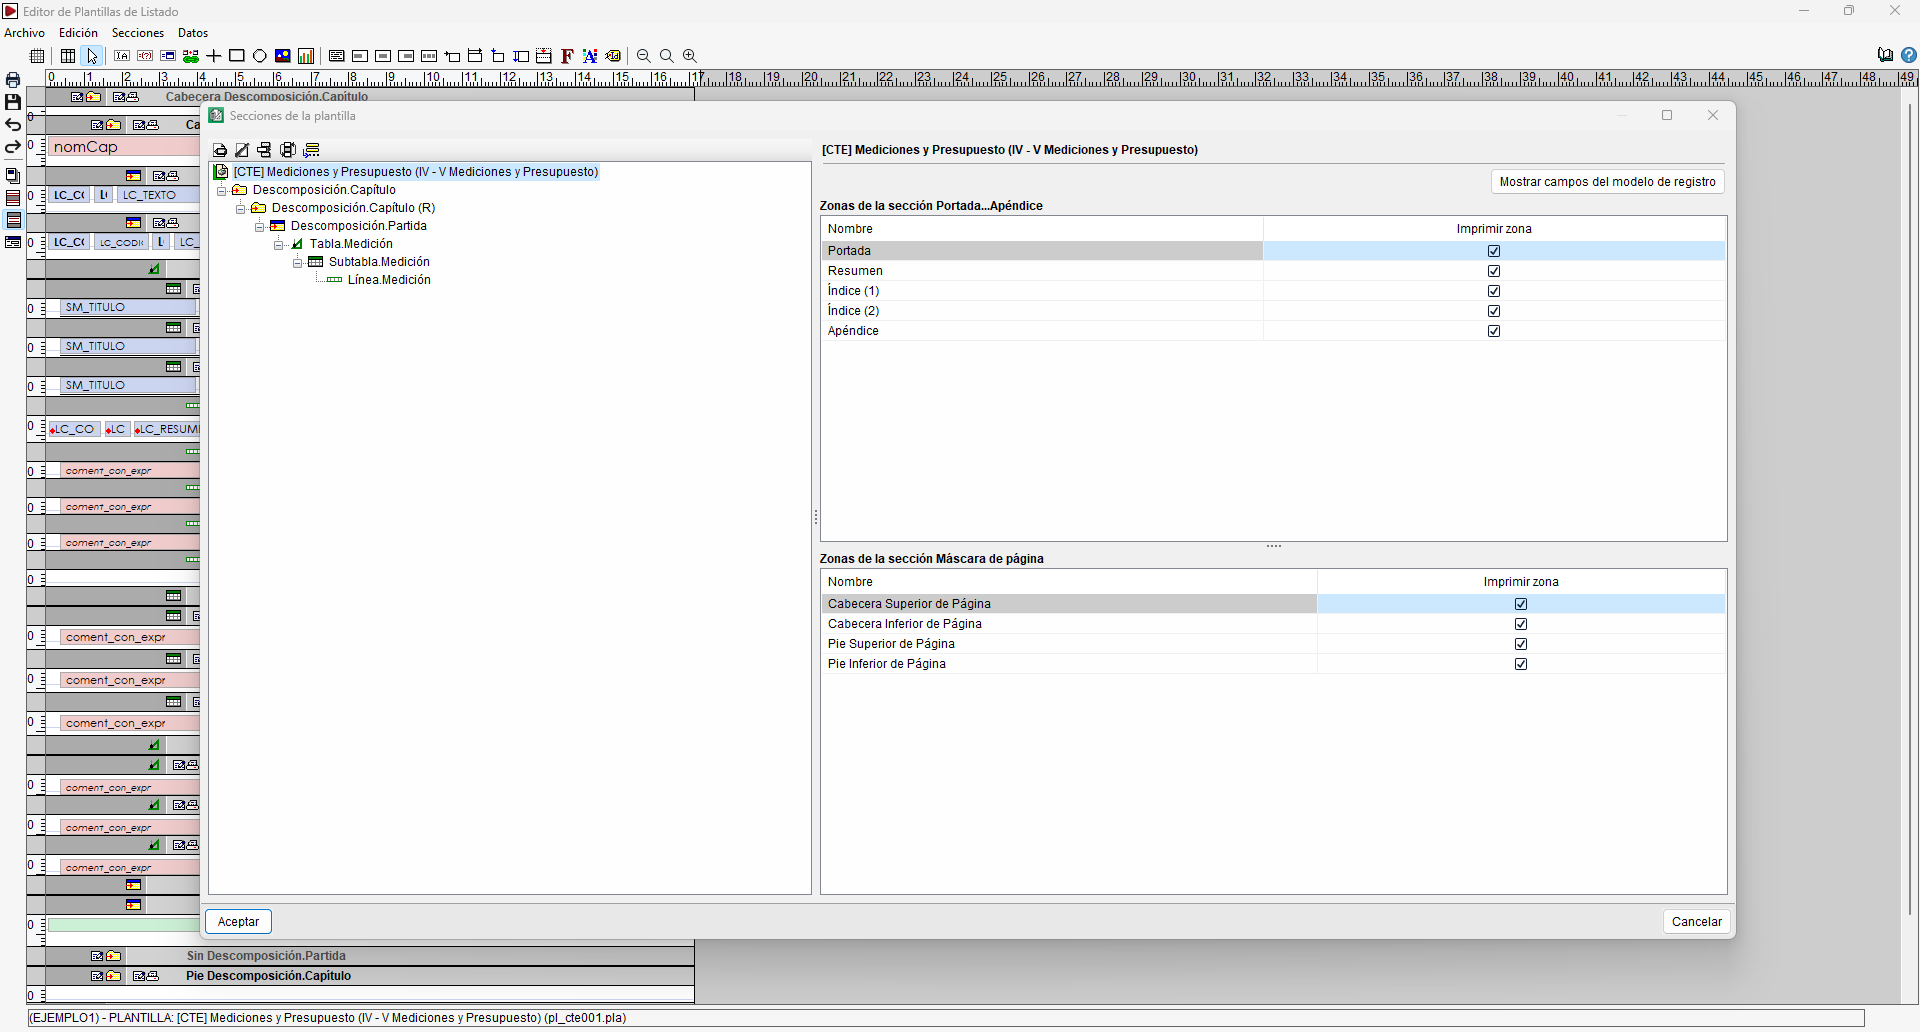
The section structure and record templates in the new template can be amended at a later date via the "Template sections" option in the "Data" menu.
The editor also lets you open several templates simultaneously in order to copy sections, zones or objects between them. When carrying out these operations, any scripts and variables associated with the copied elements are also copied, where required, into the destination template.
Creating a template from scratch
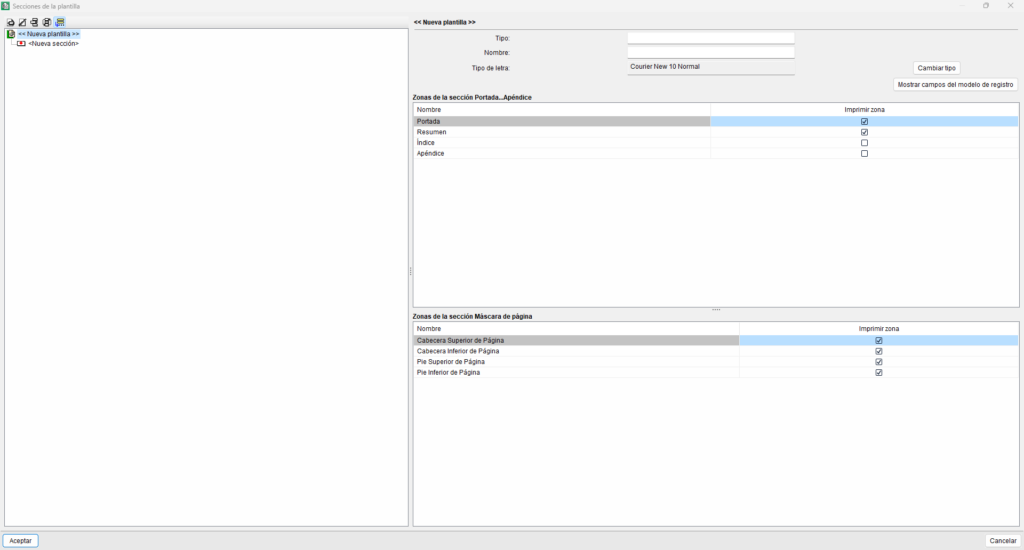
To create a template from scratch, use the "New template" option in the "Open report template" window. In this case, you need to define:
- The identifier and the default font. The short name (template type), the long name and the default font are defined in the top right-hand corner of the window.
- The zones to be used. In the bottom right-hand corner, select the areas of the section that you wish to include in the template.
- The sequence of record templates that will provide the data for the report. On the left-hand side, the composition of the record sections that make up the template is defined. For further information, please refer to the "Registration models" section.
During the design phase, the "Print report" option in the "File" menu lets you check the result using the database that is currently open.
Registration models
Registration models represent the information stored in the databases managed by Arquimedes. Each model contains fields that can subsequently be used in the objects of the report template.
Models can be linked together to form a register sequence, which determines the order, hierarchy and relationship between the data to be printed. Some templates can start the sequence, others must be linked to a preceding template, and some are recursive, allowing structures with a variable number of levels to be represented.
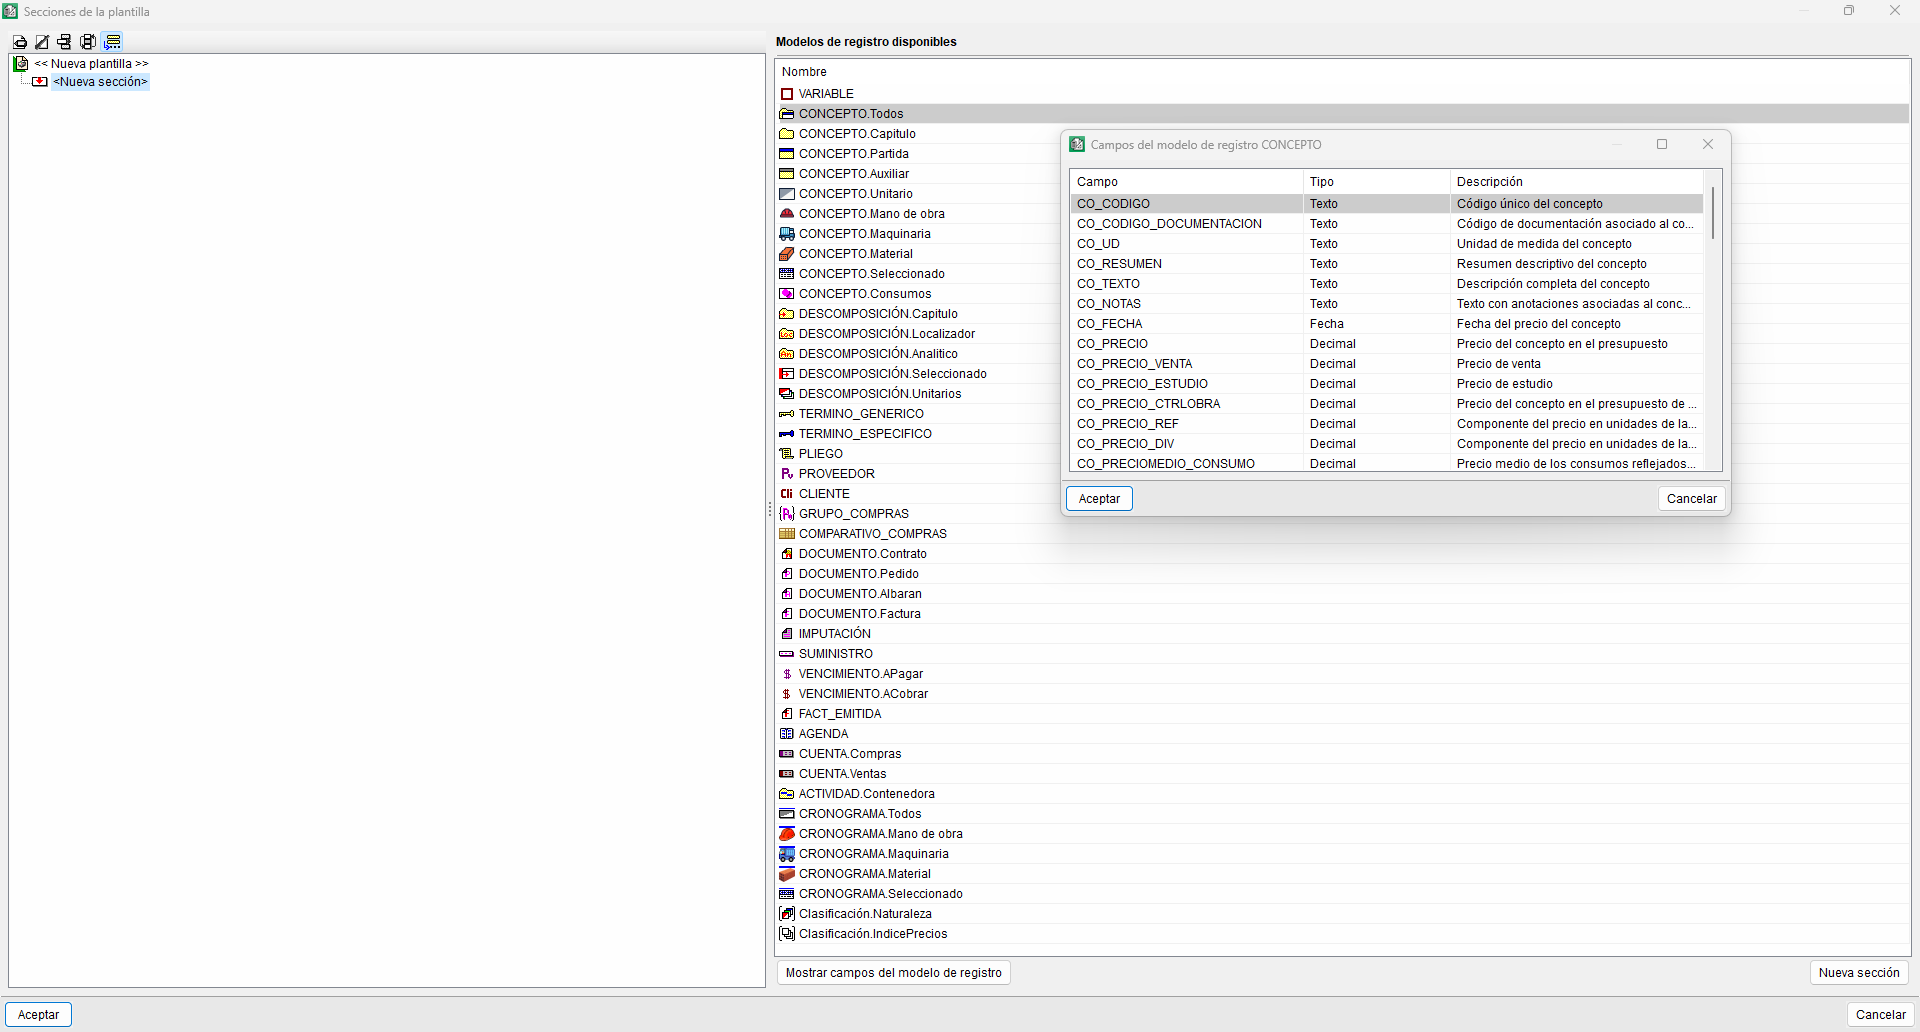
Of the registration models listed below, all except the first (General) are available for inclusion in the sequence.
- GENERAL
Contains general information about the database, such as its name, the number of decimal places used, etc. It serves as a basis for cover pages and page headers; for performing analyses with rounding in template scripts; and provides total amounts for the direct construction costs (DCCs), certificates, etc. - VARIABLE
This special record template, which contains no project data, lets you perform operations on variables in the template and display the results. It is the only template that allows for multiple print-outs at section level through the combined use of two variables. - CONCEPT
Contains all the fields that define a concept. It comprises the following sub-models:- CONCEPT.All. Lists all the concepts in the database (except the root chapter).
- CONCEPT.Work section. Lists only the work sections (excluding the root work section).
- CONCEPT.Item. Lists only the items, that is, the sub-headings that fall under chapters and are not chapters themselves.
- CONCEPT.Auxiliary item. Lists all concepts with breakdowns that are neither work sections nor items.
- CONCEPT.Resource. Lists all concepts without further breakdown that are not chapters.
- CONCEPT.Labour. Lists all resources of the ‘labour’ type.
- CONCEPT.Machinery. Lists all resources of the ‘machinery’ type.
- CONCEPT.Material. Lists all resources of the ‘material’ type.
- CONCEPT.Selected. Lists all the concepts that appear in the "Concept list" window.
- CONCEPT.Consumption. Lists all the fields that define a concept which has been entered in a direct allocation to a cost centre. This is the template to select under the "Breakdown.Item" sub-template.
- CONCEPT.Consumption. In this case, all concepts are processed.
- CONCEPT.Consumption2. In this case, all concepts are processed, and the cost centre items are grouped with the allocated items. This is the model to select under the "Breakdown.Item" sub-model.
- BREAKDOWN
Contains all the fields that define a breakdown line for any broken-down concept. It allows the contents of the database to be represented hierarchically. It comprises the following sub-models:- BREAKDOWN.Work section. Lists all the breakdown lines that refer to chapter-type concepts. It is required as the starting point for a hierarchical list and is recursive.
- BREAKDOWN.Item. Can only be applied if it is linked to a "BREAKDOWN.Work section" record sub-model, thereby generating a breakdown of the work section into line items.
- BREAKDOWN.Auxiliary item. This allows you to obtain the top-level breakdown lines for a line item, provided it is linked to one of the following sub-models: "BREAKDOWN.Line Item" or "ITEM.Line Item".
- BREAKDOWN.Breakdown. This recursive model is provided to enable the design of reports in which it is necessary to view all levels of breakdown for the concepts involved. It therefore includes auxiliary concepts and their breakdown. It must be linked to one of the following sub-models: "BREAKDOWN.Item" or "CONCEPT.Item".
- BREAKDOWN. Partial allocation. This special model allows you to obtain the breakdown lines for an item in price table no. 2, provided it is linked to one of the following sub-models: "BREAKDOWN. Item" or "CONCEPT. Item".
- BREAKDOWN.Location code. The locators defined in the quantity tables can be used to create a hierarchy of special work sections, constructed temporarily on the basis of these. It can only be used as the start of a sequence and is recursive so that it can be adapted to the different levels of locators present in your databases.
- BREAKDOWN. Analytical. This model allows you to create database reports by adopting the structure or work section organisation of a different database.
- BREAKDOWN. Selected. This template has been designed to enable the creation of partial reports, based on a pre-selected breakdown of lines from the "Tree" window. It can only be used as the start of a sequence.
- BREAKDOWN. Unitary concepts. This recursive model is provided so that reports can be designed in which it is desirable to view all levels of breakdown of the concepts involved; however, in this case, the breakdown of the auxiliary concepts is included, rather than the auxiliary concepts themselves.
- BREAKDOWN.CostCentre. Represents the cost centres to which the consumption of the supply has been allocated, provided that it is linked to "CONCEPT.Consumption".
- BREAKDOWN.PriceJustification. Summarises the auxiliary items on a single line at the end of the item’s price justification, provided that it is linked to one of the following sub-models: "BREAKDOWN.Item" or "CONCEPT.Item".
- GENERIC_TERM and SPECIFIC_TERM
These two models form the structure of each database’s dictionary and provide access to the thesaurus, which links specific terms to concepts and vice versa. - TABLE, SUBTABLE and ROW
Each table consists of one or more subtables plus a total row; in turn, each subtable includes a header row, data rows and a subtotal row. Normally, the three templates are used consecutively in the sequence of records within the templates designed to generate measurement lists, and they comprise the following sub-templates:- TABLE.Quantities. View the details of a measurement for an item.
- TABLE.Sales quantity. View the sales quantity details for an item.
- TABLE. Study quantity. View the detailed study quantity for an item.
- TABLE.Certificate to origin. Provides access to the details of a consignment’s origin certification.
- TABLE.Certificate to origin with partial closure. View the details of a consignment’s certification. Each "partial" certificate is displayed in a separate table.
- TABLE. Partial certification. View the details of a specific partial certificate for an item. This template can be used whether the project uses the "partial" closure type or the "at source" closure type.
- TABLE.Execution. View the details of the actual quantity executed for an item.
- REFERENCE
Locate concepts that use another concept in their breakdown. It contains the following submodels, which are only available as submodels of "CONCEPT" and "BREAKDOWN":- REFERENCE.Immediate. This model enables you to obtain a set of references for a concept.
- REFERENCE.Item. This recursive model generates a tree of references for the concept in question, down to the item level.
- REFERENCE.Work section. This recursive model generates a tree of references for the concept in question, down to the work section level.
- SPECIFICATIONS
Retrieve the items associated with specifications. It can only appear at the start of the sequence of record templates. It includes the sub-template "SPECIFICATIONS_SECTION", which represents the sections of the specification. - SUPPLIER
Contains fields containing information about the supplier, such as code, name, address, etc. - CLIENT
Contains fields containing customer information, such as reference number, name, address, etc. - PURCHASING_GROUP
Represents each of the purchasing groups defined in the project. - PURCHASE_COMPARATIVE
Represents all the purchasing comparisons defined in the project. - DOCUMENT
Access the construction management documents via the following sub-models: "DOCUMENT.Contract", "DOCUMENT.Purchase Order", "DOCUMENT.Delivery note" and "DOCUMENT.Invoice". - CHARGE
Provides information about this document, such as the code, name, associated cost centre, etc. - SUPPLY
Provides information on the amounts, documents, cost centres, etc., to which the items are linked. - SUPPLY_CONTRACT
Represents all supplies under the contract, with additional information on certified quantities. It must be added as a sub-model of "DOCUMENT.Contract". - SUPPLIES_PURCHASES
Represents all the supplies included in a purchase comparison. It must be added as a sub-model of "PURCHASE_COMPARISON". - DUE PAYMENT
Contains information on due dates, such as amounts and dates. It includes the sub-models "DUE PAYMENT.ToPay" for incoming invoices and "DUE PAYMENT.ToCollect" for outgoing invoices. - EMITTED_INV
Provides information on issued invoices, such as the document code, name or date. - SCHEDULE
Access all the information displayed in the program’s schedule. - ACCOUNT
View account codes and names. It includes the sub-models "ACCOUNT.Purchases" and "ACCOUNT.Sales", for invoices received and invoices issued, respectively. - ACTIVITY.Container
A recursive model representing the first level of container activities in the time-activity diagram. It includes the "ACTIVITY.Task" sub-model, which represents the tasks contained within each activity. - CHRONOGRAM
View the prices used in the cost centres associated with the tasks in the Gantt chart. It includes the following sub-models:- CHRONOGRAM.All. Represents each of the unit prices used in the cost centres associated with the tasks.
- CHRONOGRAM.Labour. This represents each of the labour rates used in the cost centres associated with the tasks.
- CHRONOGRAM.Machinery. Shows the individual prices of the machinery used in the cost centres associated with the tasks.
- CHRONOGRAM.Materials. Shows each of the prices of the materials used in the cost centres associated with the tasks.
- CHRONOGRAM.Selected. Represents each of the unit prices shown in the "List" window, which are used in the cost centres associated with the tasks.
- Classification.Nature
This represents the classification of all the individual concepts used in the work. - Classification.PrixIndex
This sets out the classification of all unit items used in the project. - Classification.Resource
Represents the classes into which the parent class is subdivided; this may be "Classification.Nature" or "Classification.PriceIndex".
When defining the template structure, registration models determine which data from the database will be available for generating the list. This information can be supplemented using variables, which are used to store and modify values whilst the list is being generated, and using scripts, which enable analyses to be carried out, actions to be controlled, and customised behaviour to be defined.
Variables
Variables let you store and use additional information whilst generating a report.
Most of the information used by a template is obtained directly from the fields in the record templates. However, variables let you work with data that does not come directly from these fields; for example, to store partial results, perform analyses, control certain actions using scripts, or collect information entered via dialog boxes.
Variables can be used in various parts of the template, such as alphanumeric objects, captions and dialog boxes. However, they do not need to be linked to a template object, as they can also be used internally to perform analyses or control how the report works.
The Report Template Editor lets you work with template variables and storable variables.
| Note: |
|---|
| Record fields provide information from the record templates and cannot be modified using scripts. Variables, on the other hand, can receive and modify values during report generation. Furthermore, storable variables allow their values to be retained in the database used to generate the report. |
Template variables
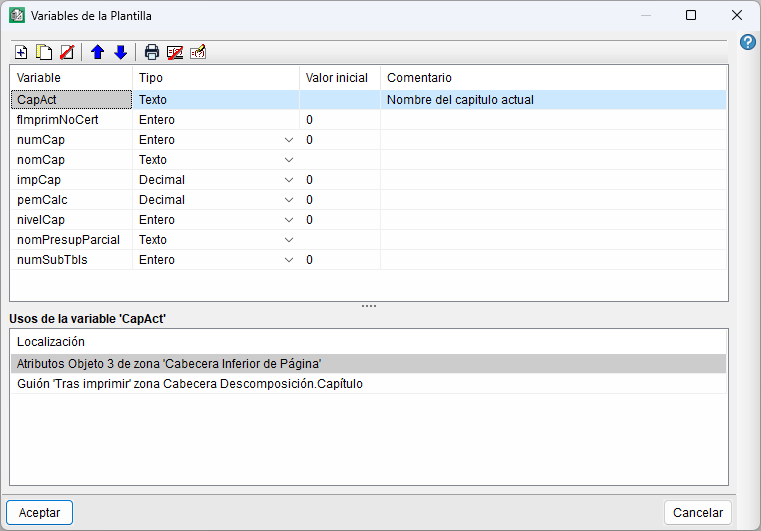
Template variables are defined and stored within the template itself. They can be managed via the "Template variables" option in the "Data" menu.
Each variable is defined by the following data:
- Name
Identify the variable uniquely. It may consist of letters without accents, numbers and the underscore character (_). It is not case-sensitive; therefore, for example,total,TotalandTOTALall refer to the same name. Nor may it coincide with the name of another variable, a record field, a function, a procedure or a reserved word in the scripting language. - Type
Determine the type of information that the variable can store. It can be a decimal number, an integer or text. - Initial value
Define the value that the variable initially holds until it is modified, for example, by a dash assignment statement. - Comment
Add a description to help identify the variable in the windows displaying the available variables.
The window also displays the uses of the selected variable, showing the objects and scripts in the template in which it is used. This lets you identify its dependencies before modifying or deleting it.
The defined variables can also be reordered using the next and previous buttons to make them easier to identify and locate.
Storable variables
Storable variables are used in scripts in a similar way to template variables, but with the difference that their values can be stored in the database used to generate the report. Thus, whilst template variables belong to a specific template, storable variables allow information associated with the database to be retained.
Storable variables are sorted into groups of storable variables, categorised by type. These groups can be used in different templates, although each template may use no more than one group.
Storable variables are managed via the "Storable variables" option in the "Data" menu. Access varies depending on whether the template has a group of storable variables associated with it.
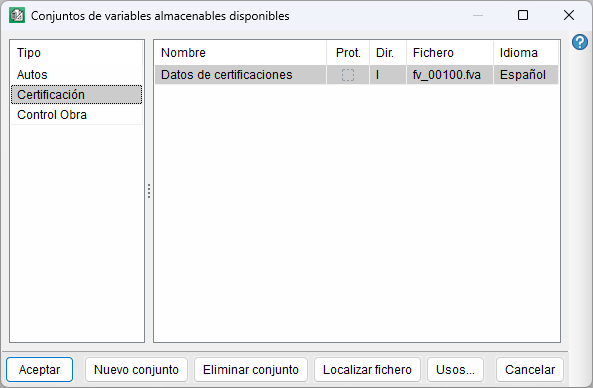
If the template does not have an associated group, the program allows you to select an existing one or create a new one. When you select this option, the "Available storable variable groups" window opens, from which you can select, create or delete groups, locate their files and view their uses.
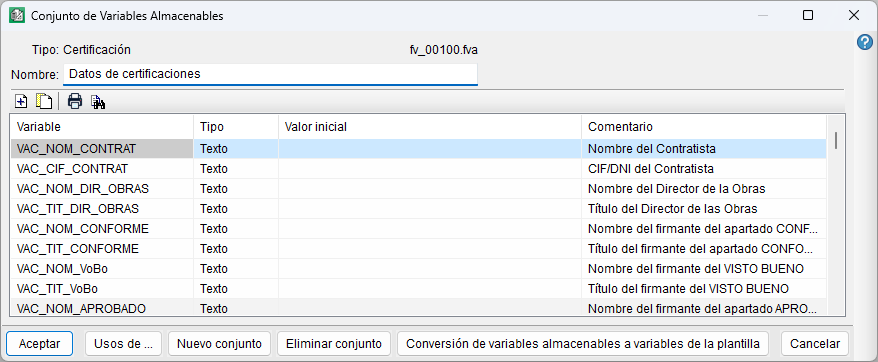
If the template already has an associated group, the "Storage Variable Group" window opens directly. This window displays the variables it contains, along with their type, initial value and comment, and lets you manage the variables in the group and view their uses.
Furthermore, the "Conversion of storage variables to template variables" option lets you convert the variables in the group into variables specific to the template.
| Best practice: |
|---|
To avoid conflicts with the names of record fields and template variables, we recommend that you use identifying prefixes in the names of storable variables. For example, for a set relating to certificates, you could use the prefix vac_, with names such as vac_certno or vac_lowcoeff. |
Template scripts
Scripts enable logic and automation to be incorporated into templates using the program’s own programming language. Whilst many reports can be designed without them, others need them to perform analyses, modify variables, display messages, control printing or define customised behaviour.
A report template may contain the following types of scripts:
- Initialisation script
Only one can be defined per template. It runs just before the report is printed. - Script 'Upon loading'
This can be defined for each record section. It runs after the data for each record has been loaded and before it is printed using the section fields. - Script 'Before printing'
It can be defined for each section of the template. It runs immediately before each instance of the section is printed and can be used to prepare the variables used by its objects, along with other operations. - Script 'After printing'
It can be defined for each area of the template. It runs immediately after its content is printed and can be used to update variables used by the page mask objects, along with other operations.
Script editor
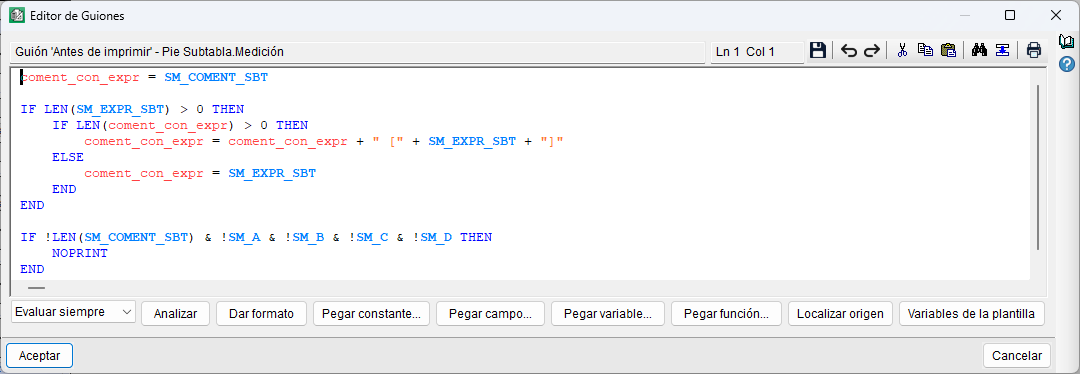
The Script editor lets you define and modify the script content in the template. At the top, it shows the type of script being edited and the section or area to which it belongs.
As well as the usual editing tools, it offers the following options:
- Script evaluation. Specify whether the script should be evaluated whilst the report is being generated. The available options include "Always evaluate", "Evaluate if visible" and "Do not evaluate". The latter option lets you keep the defined script without it being executed.
- Analyse. Check the script’s syntax for any errors.
- Provide format. Format the code to make it easier to read.
- Paste constant. Select and insert a constant at the current cursor position.
- Paste field. Select and insert an available record field at the current cursor position.
- Paste variable. Select and insert an available variable at the current cursor position.
- Paste function. Select and insert a scripting language function at the current cursor position.
- Locate origin. Trace the origin of an element used in the script.
- Template variables. Access the variables defined in the template.
In addition, the top toolbar includes tools for saving, undoing and redoing, cutting, copying, pasting, searching and replacing, amongst other editing functions.
Variables used in scripts
Scripts can use different types of variables to store and manipulate information whilst they are running. In addition to template variables and storable variables, internal variables – used for intermediate calculations within a script – and dynamic variables – which are based on internal variables and allow values to be retained and shared across different executions and scripts – can also be used. User variables can also be used; their values are stored in the database and can be used in expressions associated with calculated user columns.
| More information: |
|---|
| By clicking the "Show detailed information…" option, located in the top right-hand corner of the Script Editor, you can access help on the language and syntax of report template scripts. This information includes operators, constants, variables, arrays, procedures and functions available for defining scripts. |
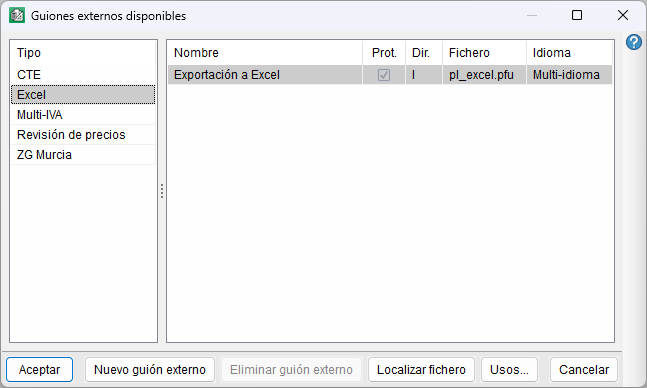
External script
As well as the scripts defined directly in the template, the template can use an external script.
External scripts are sorted by type and can be used by different templates.
These scripts are managed via the "External script" option in the "Data" menu. If the template does not have a script associated with it, the program allows you to select one from the available external scripts or create a new one. It also lets you manage existing external scripts, locate their files and view the templates in which they are used.
Dialog boxes
Dialog boxes let you request or modify information whilst the report is being generated, using windows defined within the template itself. They may include text, editable fields, tick boxes, drop-down menus and other elements linked to variables.
To display a dialog box whilst the report is being generated, you must make the relevant call from one of the scripts in the template.
Creating and configuring dialog boxes
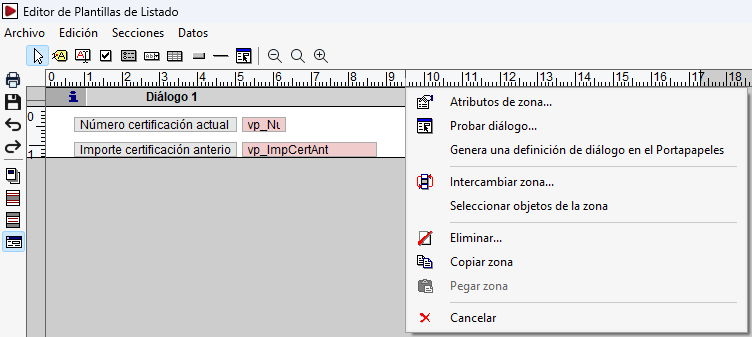
Clicking on the dialog box’s title bar opens a menu containing configuration options. Under "Zone attributes", you can change the number of lines in the dialog box; if you set a value of 0, the dialog box is removed. The "Check dialog box" option allows you to check its appearance and functionality whilst designing it.
Using dialog boxes in scripts
There are two ways to display a dialog box from a script:
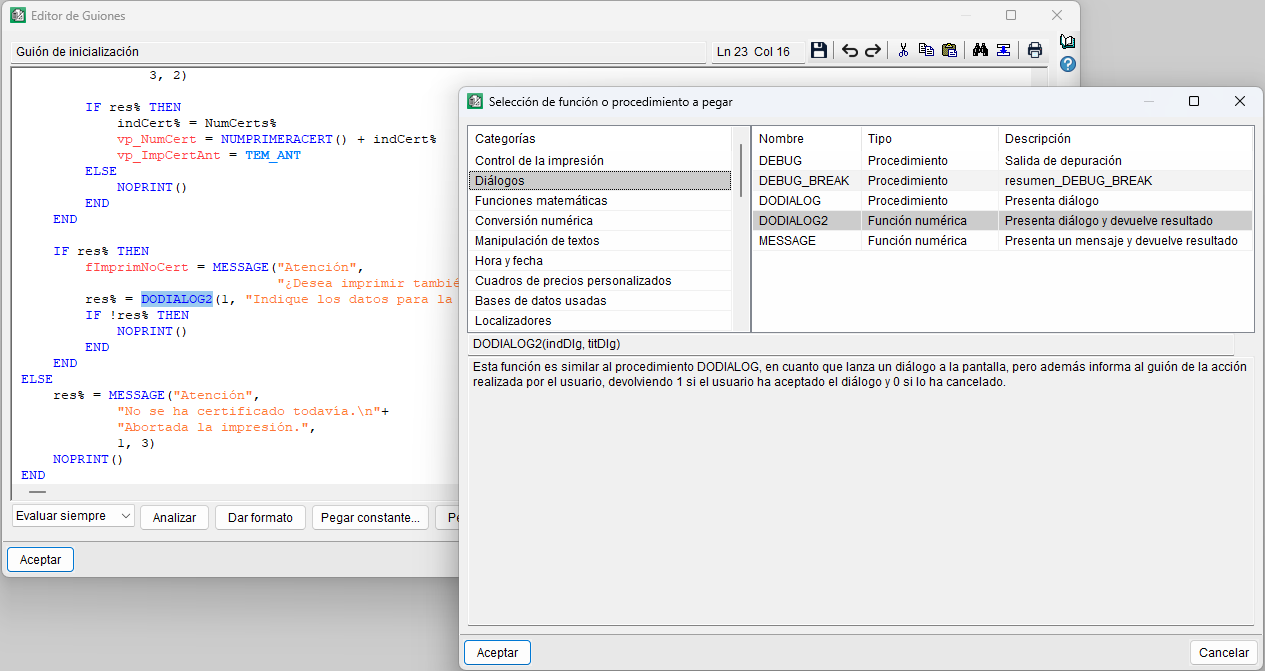
DODIALOG(indDlg, titDlg)Displays the dialog box identified by "indDlg", with the title set to the text specified in "titDlg". When you click "Accept", the changes are stored in the variables used, and the script continues to run. When you click "Cancel", the variables retain their previous values and the script continues.DODIALOG2(indDlg, titDlg). It works similarly to "DODIALOG", but it also returns a value that indicates the action taken: 1if the dialog box has been accepted and 0 if it has been cancelled. In this way, the script can carry out different actions depending on the option selected.
Editing a template
The Report Template Editor offers different editing options depending on which template element you are working on.
These options are organised according to the different levels that make up their structure: