
How to deal with program problems or errors
Users can follow these steps if they experience problems or errors in CYPE software:
Investigation of the problem or error
The first thing a user can do when faced with a problem or error in the program is to investigate it. To help with this, they can:
- Use CYPE Mentor, our built-in AI assistant that is available at all times, to ask your questions and get guidance.
- Please refer to the available documents and resources, including general recommendations for identifying and/or avoiding errors, as well as the list of issues in CYPE software.
- Access the software's user communities.
Furthermore, if possible, we recommend updating to the latest version of the program, as it will include most of the fixes for known issues.
Security validation errors
If the problem encountered is a security check error, it will be displayed on screen in a specific format, indicating the line of code where the problem lies.
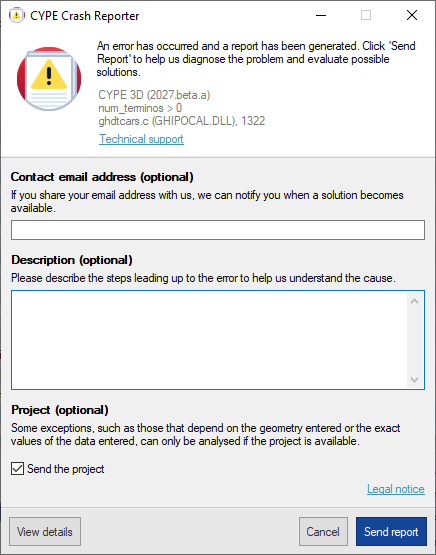
In these cases, the CYPE Crash Reporter tool will open automatically, allowing you to create and send an error report to the CYPE team.
The aim of this report is not to resolve the problem at this stage, but to highlight its existence under specific conditions so that it can be investigated and/or rectified in future versions of the program.
Contact technical support
If needed, and provided that you have access to the technical support service, you can contact the CYPE team via the various channels available to submit your enquiry, problem or error directly and try to resolve the issue.
To streamline communication and the enquiry process, we recommend that you:
- Check and provide the licence number and program version you are using.
- Document the error correctly:
- Use clear, descriptive language, stating the program being used and the steps taken up to the point where the problem was encountered;
- Provide the relevant code or the full text of the error message, or illustrative images of the problem (including the option to take and share screenshots for publication on web platforms);
- Where appropriate, submit the project file containing the error or query, for which you may compress and share the project in .CYP format files.
The scope of this service can be viewed here.
CYPE Mentor
CYPE Mentor is an AI assistant integrated into CYPE’s apps.
Access
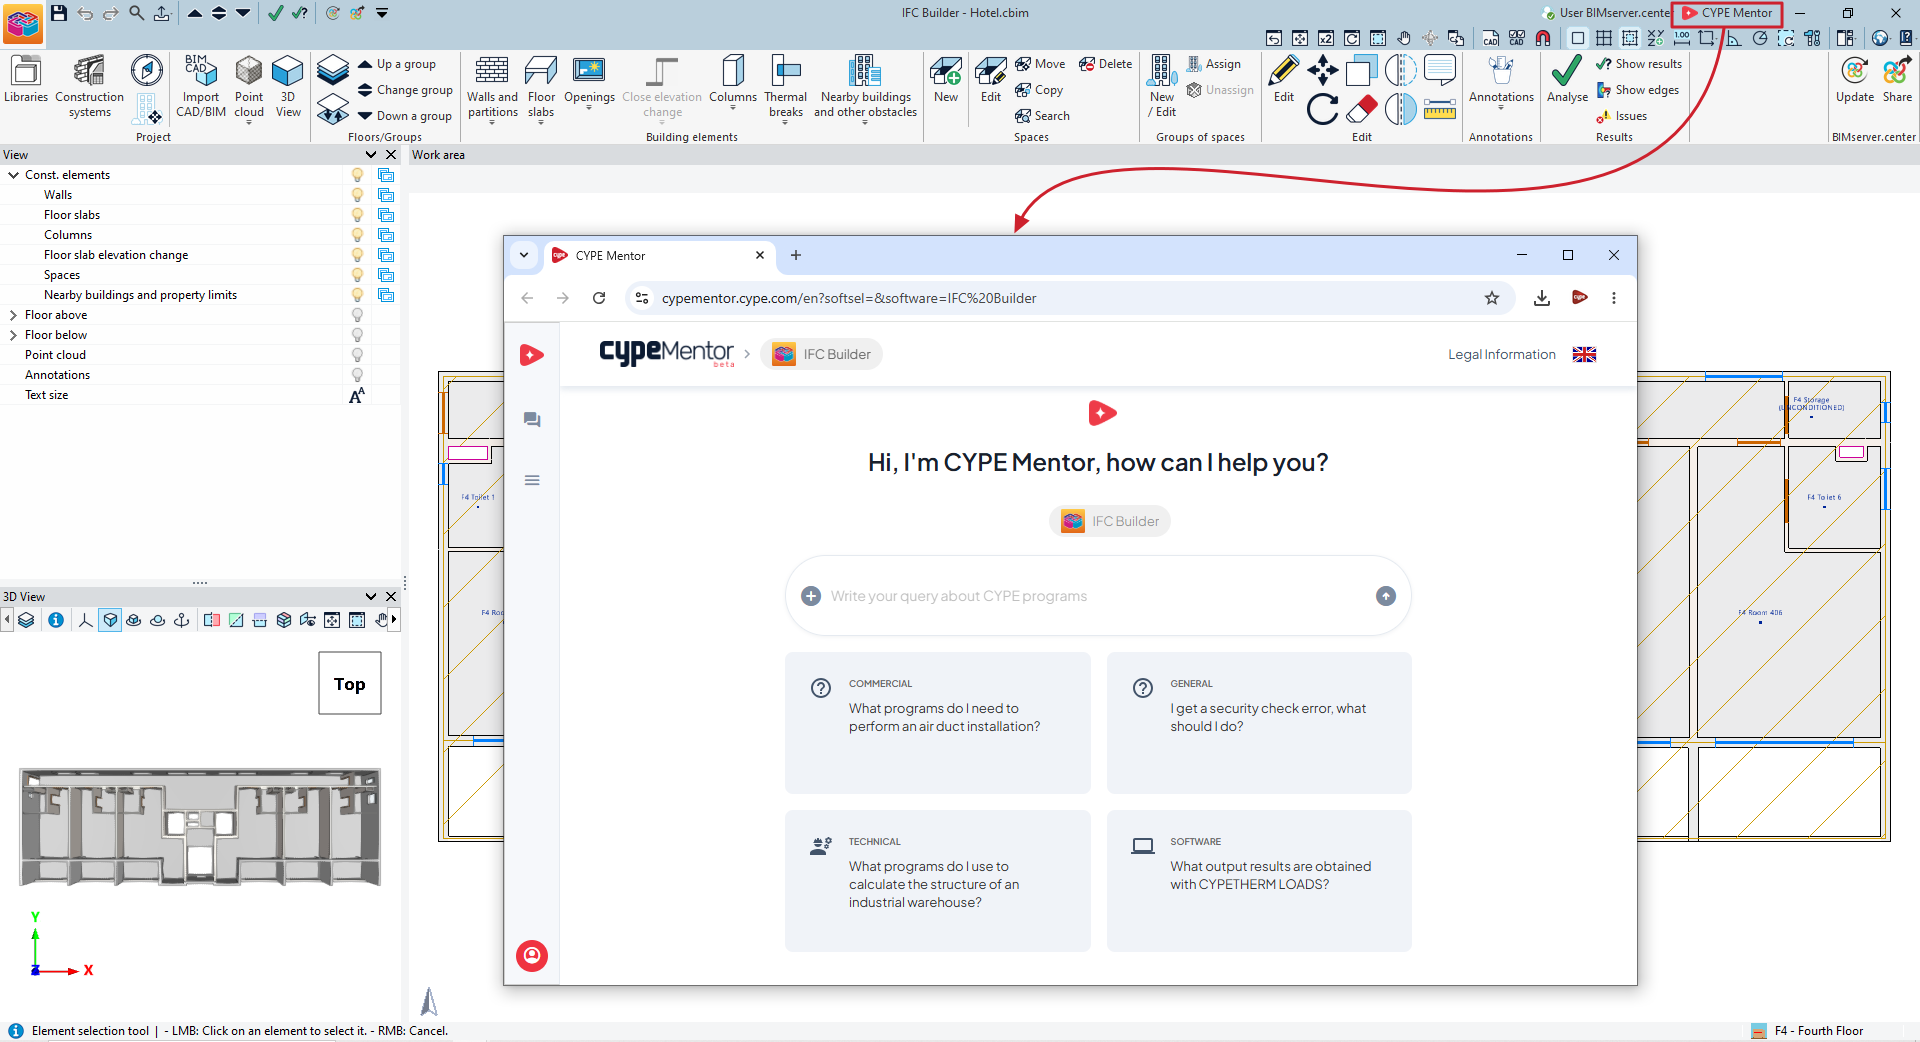
To access this tool, click on the "CYPE Mentor" button located at the top right of the top toolbar in CYPE apps. This will open the CYPE Mentor page in your default web browser; you can also access it via the following link.
Interface
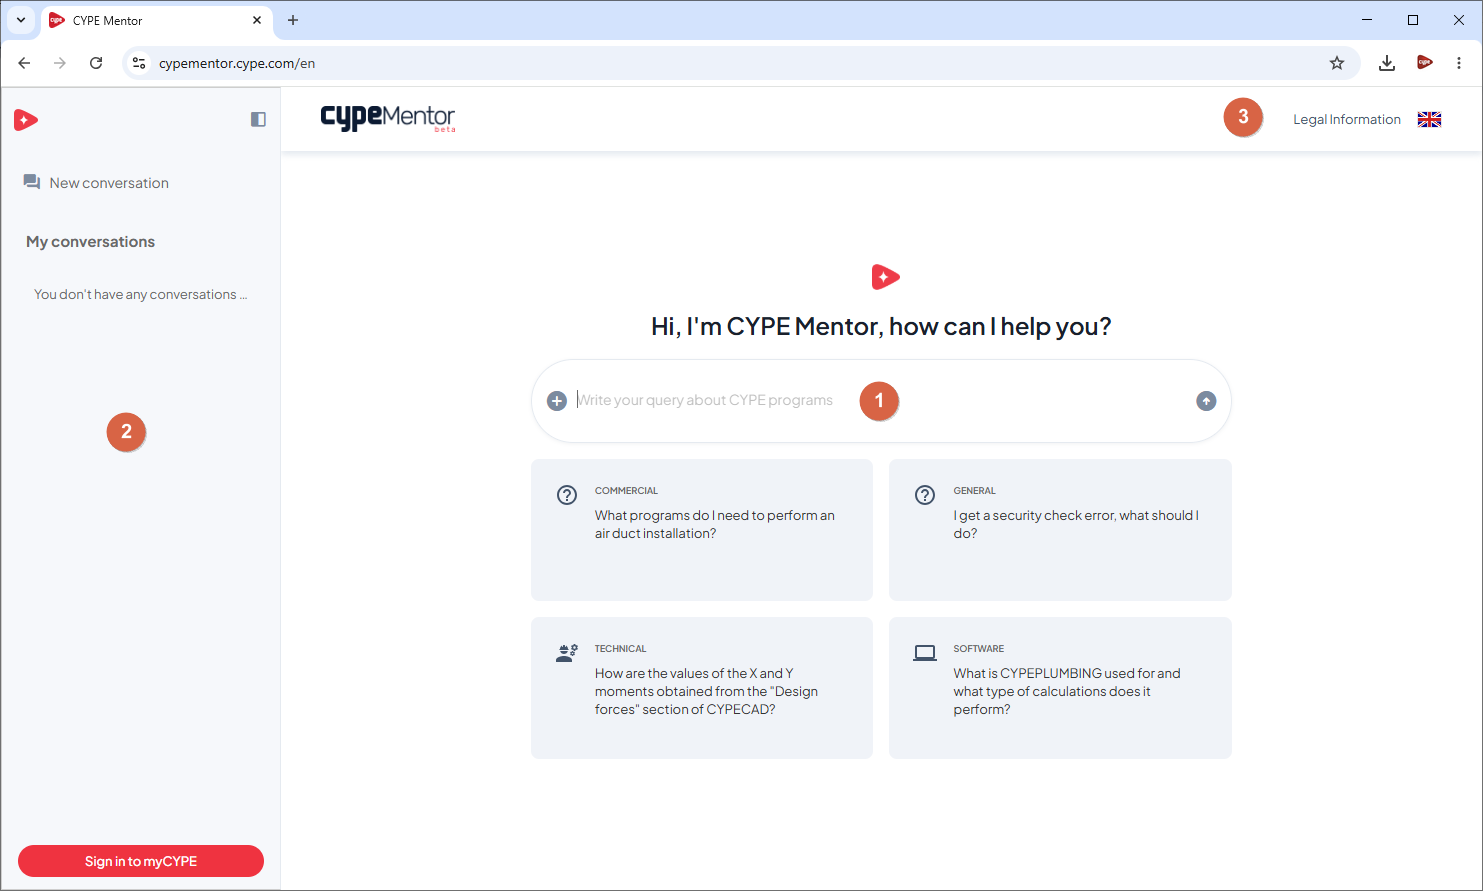
The CYPE Mentor interface is divided into different sections:
1) Input field (centre)
- Enter your prompt in the text field, in the language of your choice.
- Enter prompts related to the program used to launch CYPE Mentor to receive context-specific answers, as well as faster access to help and technical support.
- Add an image to your prompt using the button to the left of the text field (useful for asking a question based on a screenshot).
- Use the buttons at the bottom to view example questions.
2) Side menu (left)
- The "My questions" section displays your conversation history.
- Create a new conversation via "New conversation".
- Sign in to "myCYPE" (at the bottom of the section) to:
- Submit more than 3 queries per day.
- Save your conversations.
3) Top bar (top)
- Select a CYPE program to provide context for your queries (particularly useful if you accessed the page from an app).
- Access the "Legal notices".
- Change the language of the CYPE Mentor interface.
Answers
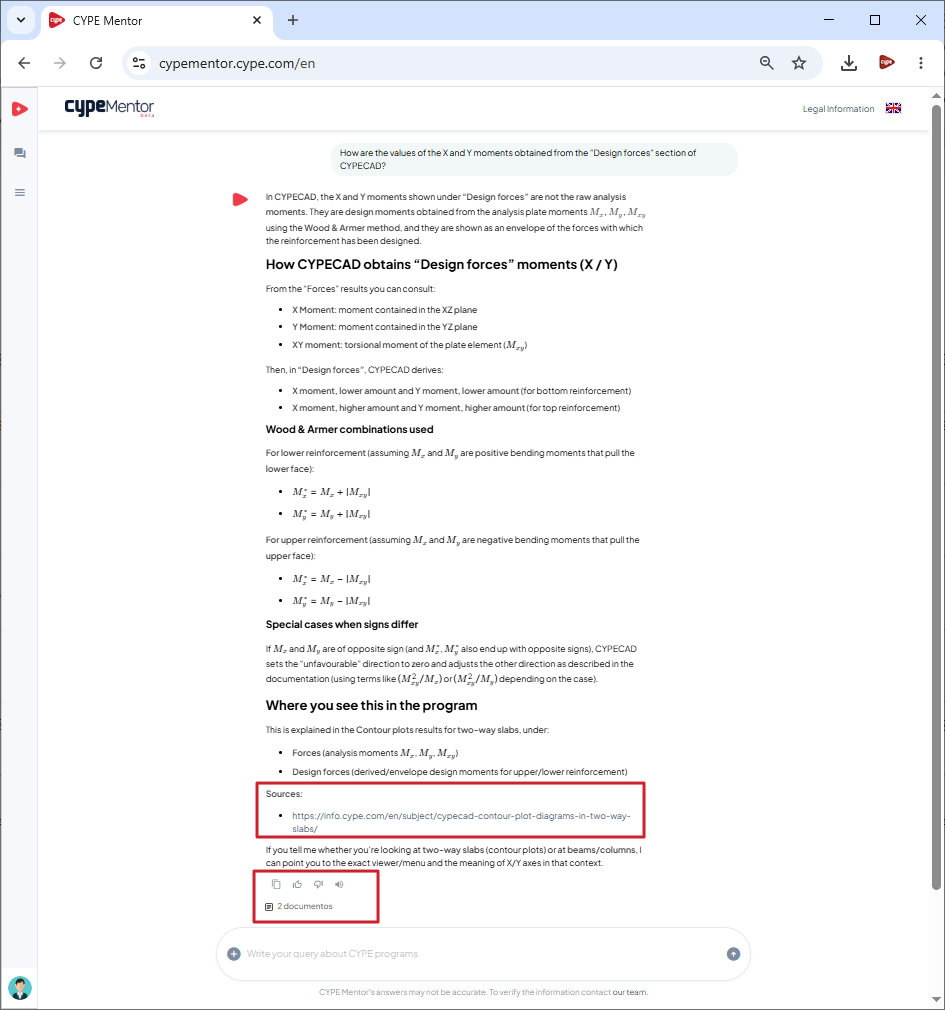
Once you have entered and submitted your query, CYPE Mentor will generate and provide a response in the conversation, based on its knowledge base.
At the bottom of each response, where applicable, links will be provided to the "Sources" used in its creation.
The tools at the bottom let you "Copy" the response to the clipboard, as well as "Send positive feedback" or "Send negative feedback" depending on whether it was helpful or not. You can also "Listen to message" to hear an automated narration of the response, as well as access other "Documents" for reference.
Scope
CYPE Mentor can be used for several purposes, such as obtaining information about CYPE’s software, asking technical questions, or seeking commercial information.
The CYPE Mentor technology is powered by information provided by CYPE’s documentation database, which is continuously evolving. CYPE Mentor’s responses may contain errors and do not replace formally regulated knowledge. To verify the information, please contact the CYPE team.
General recommendations for preventing and/or identifying errors
The following general recommendations may help to reduce the likelihood of errors occurring, to identify them once they do occur, or to restore backups:
- Examine the file to try to identify any unusual or particularly complex situations that may be difficult to resolve through the program’s internal processes. Delete or remove the elements involved in that situation and reenter them more clearly. You may use the following error search and localisation methods.
- Please ensure that you have entered all the required information into the program, including all references and parameters in the various alphanumeric fields used to define elements.
- Locate and study a similar example, if one exists, under "File" → "Examples", and try to reproduce the structure of the information shown in the example in your own project.
- Save manual backup copies regularly and use different file names via "File" → "Save as", so that you can return to a working version of the model at any time.
- The program automatically creates backup copies in files with the extension ending in the dollar symbol ($) in the same directory as the template file. If needed, you can recover the data from these backups using various methods.
Methods for identifying and locating errors
The following search methods allow you to identify errors or problems in a file in several ways.
In both cases, you start with a model or file containing an error, but the cause of the error is unknown and has not been pinpointed. The aim is to pinpoint the problem using a search method that involves trial and error after eliminating groups of elements.
Sequential search
This method involves a sequential search, removing elements or parts of the model (for example, the floors) one by one until the error is found.
Example
A model of a five-storey building (ground floor, 1st, 2nd, 3rd and 4th floors). The error is on the 2nd floor, but its exact location is unknown. The following search procedure is used:
- A backup of the file is made.
- The 4th floor is removed. The error keeps appearing.
- The 3rd floor is removed. The error keeps appearing.
- The 2nd floor is removed. The error no longer appears. The error is on the 2nd floor.
Binary search
This method performs a binary search by eliminating halves of the model until the error is found.
Example
A model of a water supply system with a common service connection and two risers supplying the two parts of the system (I and II). Each riser supplies two dwellings (dwellings IA, IB, IIA and IIB). The error is in dwelling IIB, but its location is unknown. The following search procedure is used:
- A backup of the file is made.
- I has been removed. The error keeps appearing.
- The original file is recovered.
- II is removed. The error no longer appears. The error is in II.
- The original file is recovered.
- IIA has been removed. The error keeps appearing.
- The original file is recovered.
- IIB is removed. The error no longer appears. The error is in IIB.
Limitations
- The proposed methods require that the models resulting from the removal of part of the data from the file be consistent and capable of being calculated when necessary. Furthermore, they must be representative of the original situation.
- If the error is not located at a specific point in the model, these methods will not yield valid results.
- Similarly, if the error occurs in multiple locations, the procedure for identifying them may be more complex.
Backup recovery
We recommend that you regularly save manual backups with different file names via "File" → "Save as", so that you can revert to the error-free state of the model at any time.
In addition, the program automatically creates backups. These backups are saved as files with a filename ending in a dollar sign ($) in the same directory as the model file. If necessary, you can restore this backup in various ways:
Backup recovery in programs with a single-file system
If the program uses a single file to store the model’s basic information, you will find a single file with a file extension ending in a dollar sign ($). In this case, you can manually replace this dollar sign with the full file extension of the relevant program to try to recover the information.
Example
- We want to recover a CYPE Architecture project. This program saves the project to a .str file, but a backup copy with the extension .st$ has also been generated in the same folder.
- 2. To restore the project, simply change the extension from .st$ to .str. You may also need to rename the file if its name matches that of the original file, provided it is in the same folder.
- 3. Once renamed, the program can open the new .str file from the "File" menu.
Backup recovery in programs with multiple file systems
If the program uses several files to store the model’s baseline information, you will find various files with extensions ending in the dollar sign ($). In this case, you can manually replace this dollar sign with the full extension. This must be done for all files with these characteristics.
Example
- We want to recover a CYPECAD project. This program saves the basic information on the structure of floors and columns in a .c3e file, and has generated a backup copy with the extension .c3$ in the same folder. In addition, the floor plan information is stored in the DAT folder within the same directory, with PLN files corresponding to the information for each floor plan, and PL$ backup files for each of the floor plans.
- To recover the project, copy the .c3$ file to a new folder and change its file extension to .c3e. You must also create a DAT folder and copy the PL$ files into it. You must then change the extension of each of these PL$ files to PLN.
- Once this has been done, the program can locate the new .c3e file in the new folder and open the project with the recovered information.
If there are other elements, such as walls or stairs, you can follow the same process:
- Extract the files containing information on these elements (identified by a $ symbol in their file extension).
- Paste them into the new directory whilst maintaining the same file and folder structure.
- Change their file extension to match that of the original file.
If the error is in a particular floor or element, you can try deleting one of these files (for example, a PLN file for a floor) to see if you can open the project with partial data and recover some of the remaining information.
Backup recovery in Arquimedes
Arquimedes uses a file with the .dbz extension to store the backup. This file is saved alongside the files with the extensions .dbd, .dat and .idx, which make up the contents of the project. To restore the .dbz backup file, you must rename the file extension to .zip and unzip it using a file extraction program. Inside, you will find various sets of files:
- The .i00, .i01, .i02, etc. files correspond to backup copies of the .idx file at different points in time. One of these files can be extracted into a new folder and renamed with the .idx extension.
- The .d00, .d01, .d02, etc. files correspond to backup copies of the .dat file at different points in time. One of these files can be extracted into the same new folder and renamed with the .dat extension.
The original .dbd file must be copied to the new folder so that it is grouped with the new .idx and .dat files obtained through this process.
Once this has been done, Arquimedes can locate the .dbd file in this new folder via the "File" menu and open the project with the recovered data.
Error in CYPE software – Warning: A security check has failed
Users may encounter the following type of error when working with or performing calculations using CYPE software:
Warning: A security check has failed
Expression: expression_reference
File: filename.c (FILE.DLL)
Line: XXX
Module: program_name.exe
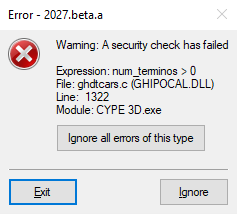
The two options available at the bottom are "Exit" and "Ignore":
- If you click on "Exit", the program will close; you may lose any unsaved data up to that point.
- If you click on "Ignore" and select "Yes" in the dialogue box that appears, the program will skip the check and continue running. In some cases, errors of the same type may reappear: you can repeat the process to skip any subsequent errors.
In addition, the "Ignore all errors of this type" option allows you to automatically ignore consecutive security check errors of the same type.
Source of the error
CYPE programs incorporate tens of thousands of different security checks in the code to ensure their correct internal operation. If any of these checks is not satisfied, an error appears. In general, each of these checks corresponds to a different problem and has a specific solution.
Actions and recommendations
The following steps and recommendations may be helpful if you encounter a security validation error.
CYPE Crash Reporter
CYPE Crash Reporter is a tool designed to facilitate communication between the user and the CYPE team, enabling users to report and submit error reports as soon as they occur in the programs, with the aim of notifying the team of the issues and speeding up their resolution.
The CYPE Crash Reporter panel opens automatically when an error occurs and allows you to enter the following details to complete the report:
- Contact email address (optional)
In this text field, users can enter their contact email address. This way, the CYPE team can notify users when a solution becomes available. - Description (optional)
In this text field, you can provide details of the steps taken before the error occurred, so that the situation is clearly described, which will help the CYPE team to understand the procedure followed and identify the cause. - Project (optional)
- Send the project (optional)
When the “Send the project” option is selected, CYPE Crash Reporter automatically sends the project to the CYPE team along with the error report.
The project file must be submitted in order to identify certain errors that cannot be reproduced without the project, such as those dependent on the geometry entered or the exact values of the data entered.
Some errors may be difficult to reproduce even when the project is available (for example, if they occur whilst an element is being added); in these cases, having the project where the error occurred significantly increases the chances of identifying and correcting the problem.
- Send the project (optional)
At the bottom of the panel, in addition to the "Legal notice", the following options are displayed:
- View details
Displays technical details about the error, the program, the user and the system. - Cancel
Cancels the sending of the error report. - Send report
Generate and send the error report, and the information provided, to the CYPE team.
| Note: |
|---|
| Reports submitted via CYPE Crash Reporter are sent directly to CYPE’s Development department, not to Technical Support. The aim is to analyse and rectify the problem to prevent it from recurring in future versions of the program, both for the user who reported it and for all other users of the program. However, if you require specific assistance in identifying the cause or would like to find a temporary solution whilst we work on the fix, you can contact Technical Support via the usual channels. The correction of errors is neither an automatic nor an immediate process, and you may need to wait for the release of a new version that includes the corrected errors. For this and other reasons, we recommend keeping your software up to date. CYPE releases updates on an ongoing basis and the error you have encountered may already have been corrected in a more recent version. |
Checking the version and licence number
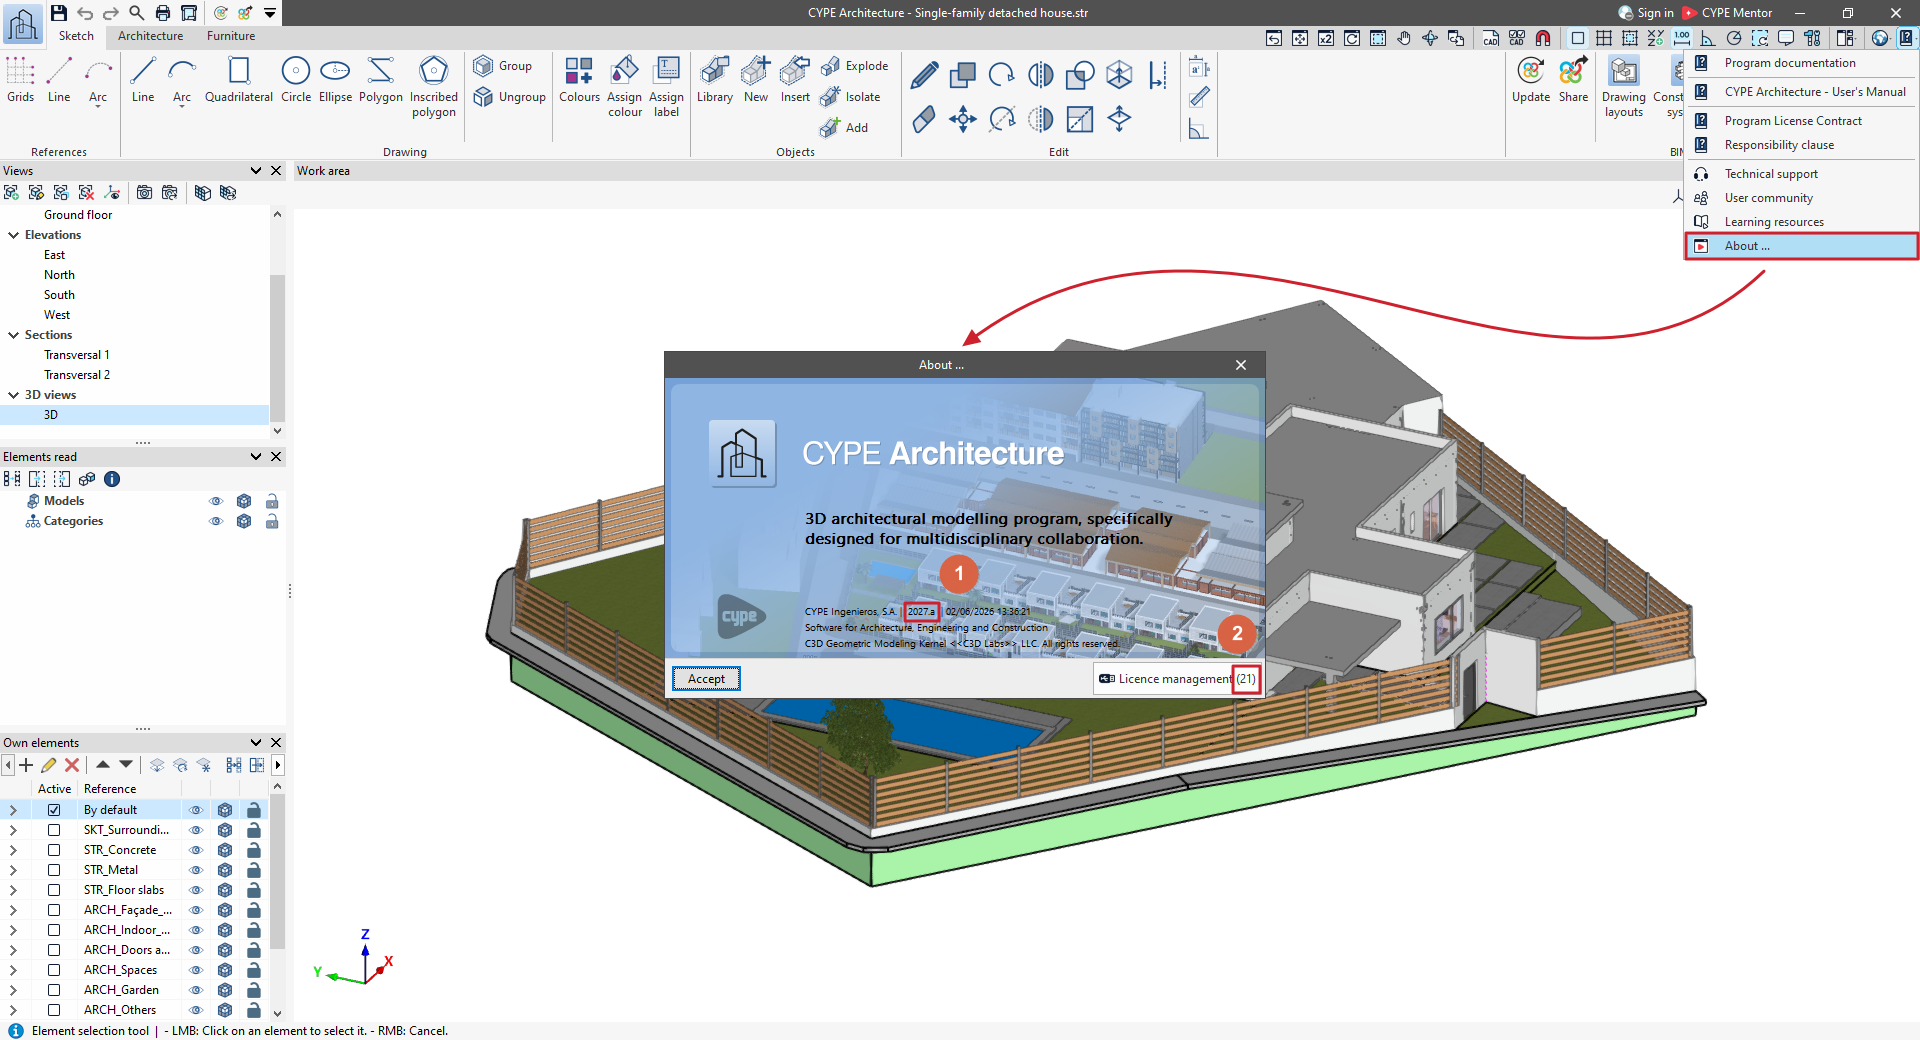
To see the version (1) and licence number (2) you are using in a CYPE program, open the "Help" menu at the top of the program and click on the "About" option.
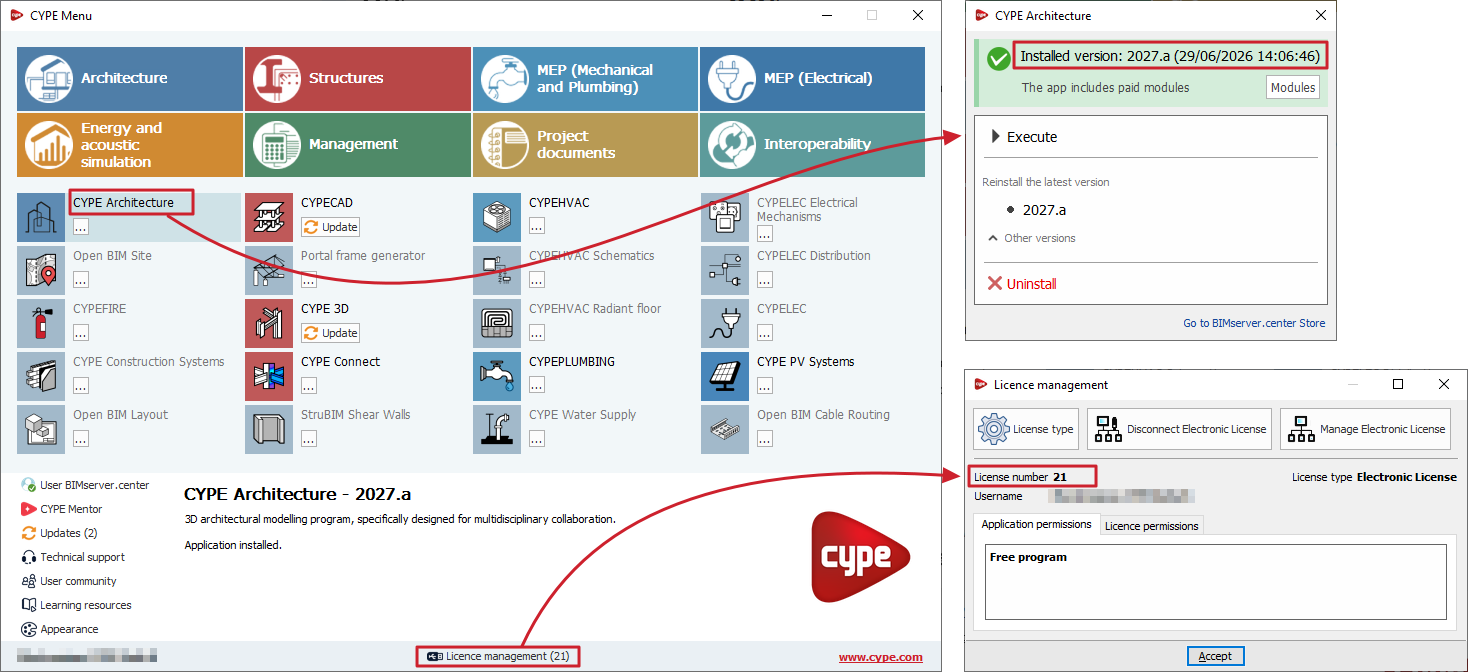
In CYPE Menu, you can also check the licence number currently in use using the "Licence management" button at the bottom of the window and the installed version of each app in the information panel on its access panel.
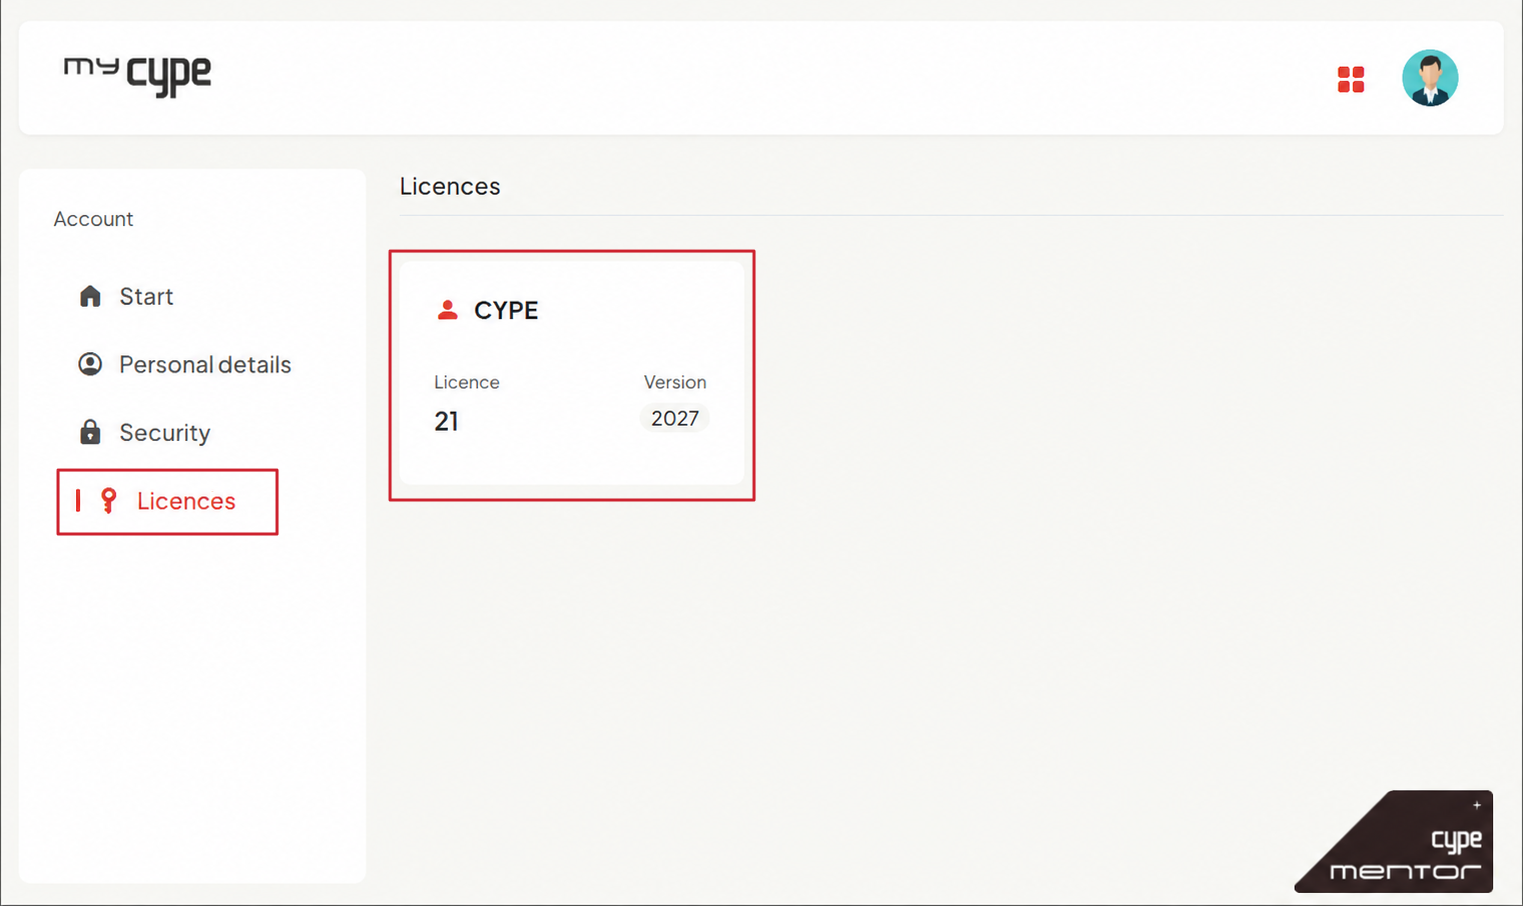
In myCYPE, you can also check the licence number and the software version covered by the licence in the "Licences" section.
Share the project file
To share the project file from any CYPE program, follow these steps:
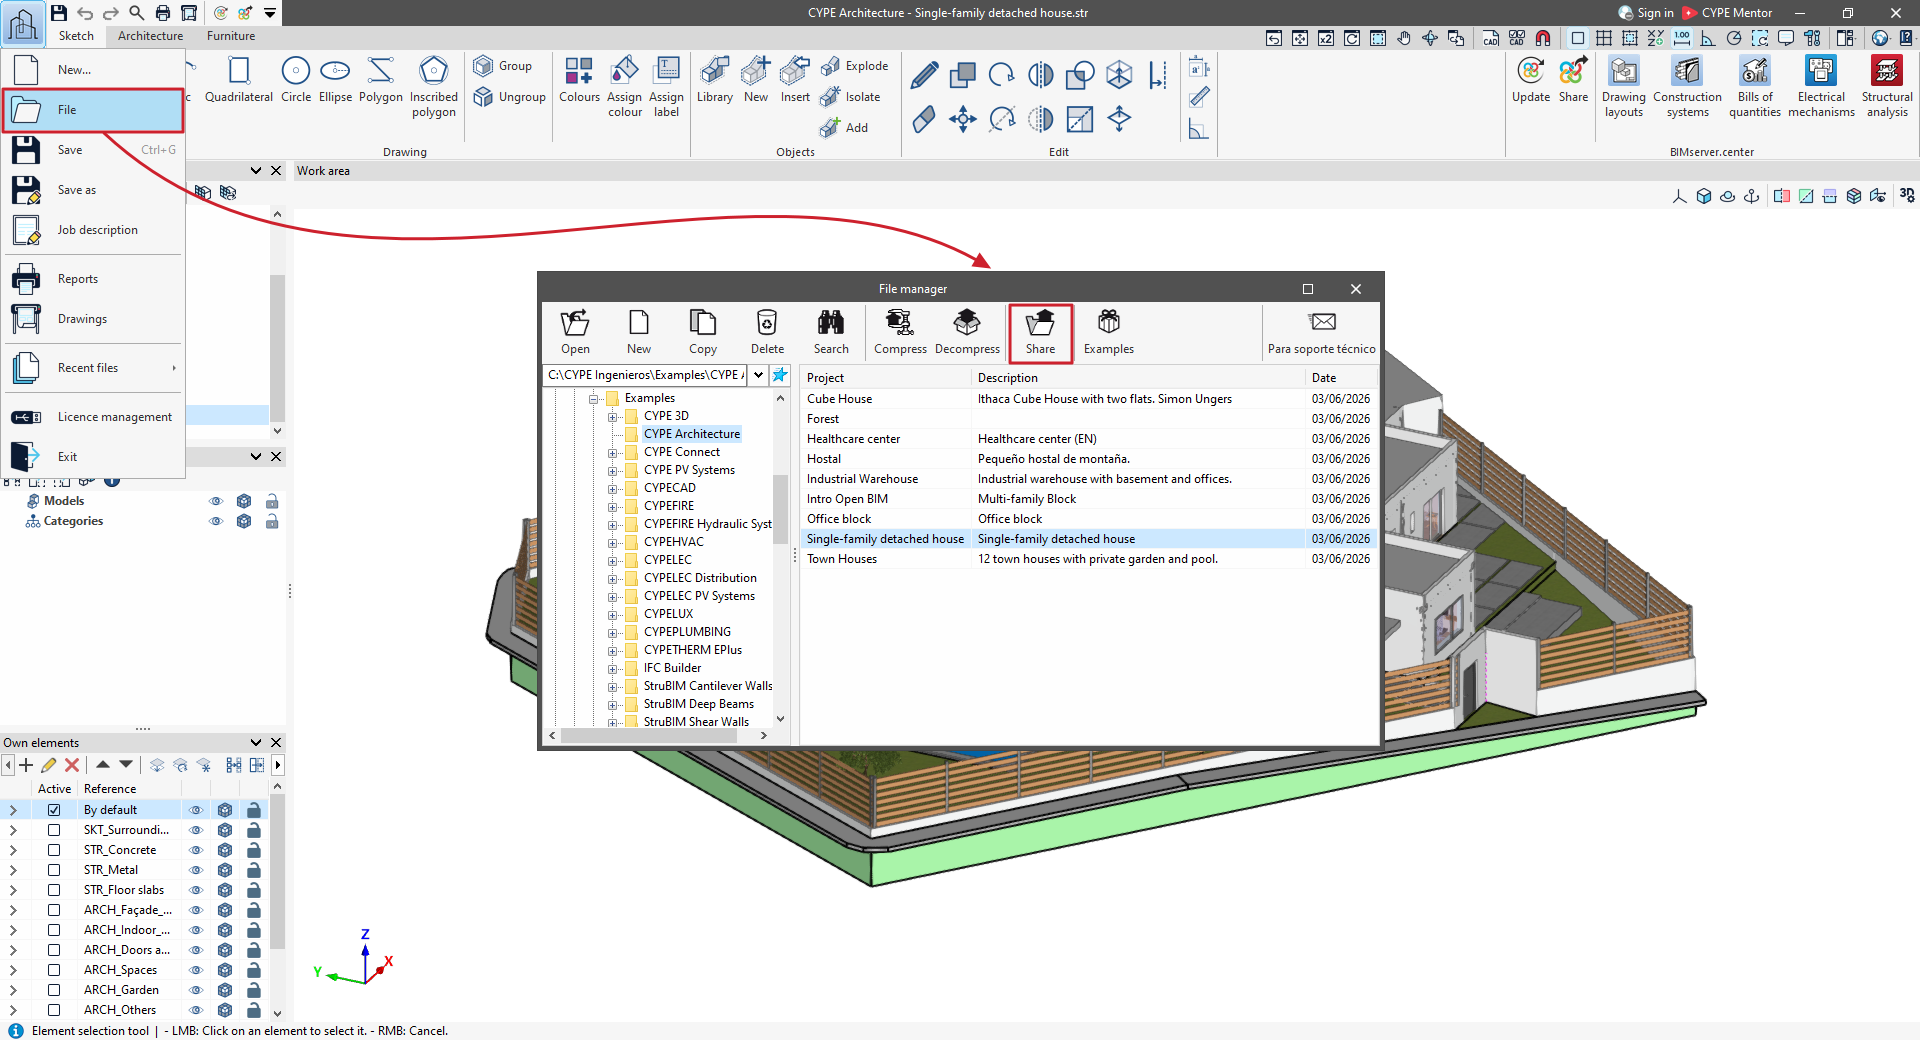
1. First, click on the program logo in the top-left corner, then click on "File".
*In programs such as CYPECAD, you should open the "File" menu at the top of the program interface and select the "File management" option.
2. In the window that appears, select the project you want to share from the table. By default, the project that is currently open will be selected. Then click the "Share" option on the top toolbar.
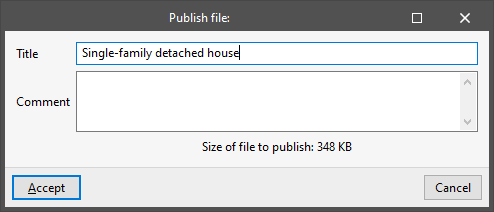
3. Next, enter a "Title" and a "Comment".
4. Once the process is complete, the program will display a dialogue box containing a link to the published file. You can copy this link by left-clicking on it directly from here.
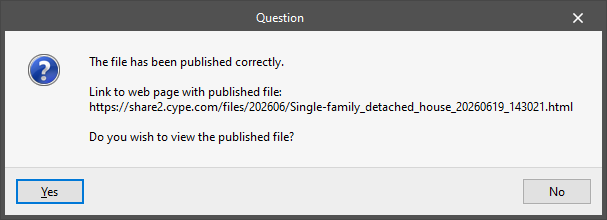
5. If you wish to view the published file, select "Yes" to access the link via your browser. You can copy and paste the link to share the CYPE program file with anyone you wish. The project is hosted on a server and will only be accessible to those who have this link.
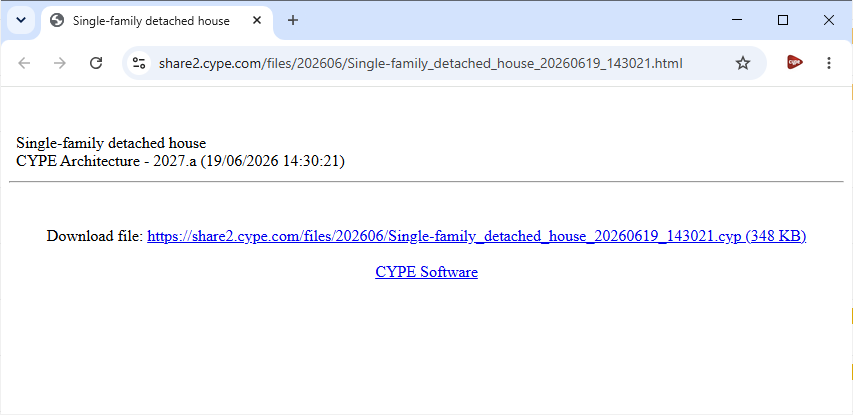
The link allows you to download a compressed file with the .cyp extension, which contains information about the work. It can be opened from within the program using the "Extract" button, which is available next to "Share" in the menu mentioned above.
In the directory for each version, C:\Users\username\AppData\Roaming\CYPE Ingenieros\v20XX\cypecad (previously C:\usr\cype\cypecad), a file named links.txt is generated, containing links to published projects. This file also contains the links to the screenshots that can be captured and published by pressing the F12 key on the keyboard.
| Note: |
|---|
| When using this option, you may see the message "It has not been possible to connect to the server: share2.cype.com (12007)". In this case, you must ensure that the FTP ports are enabled so that the program can upload the file to the CYPE server. If this is not possible, select the "Compress" option in the file manager to obtain a compressed file in CYP format and save it to your hard drive. You can then attach and send this file by email to the technical support addresses if you wish to contact them. |
Capturing and sharing screenshots
You can capture a screenshot of any screen in CYPE’s software and share it online via a private link, which you can then provide or publish wherever you wish. Only people who have this link will be able to view the screenshot.
1. To capture a screenshot, press the F12 key on the keyboard whilst one of the CYPE programs is the active window on the computer.
2. The "Capture a screenshot and share it online" dialogue box will then appear, showing the screenshot and allowing you to add a title and a comment.
In this dialogue box, you can also select only a portion of the captured screen for publication. To do this, simply use the left mouse button to select the two opposite corners of the rectangle enclosing the desired area.
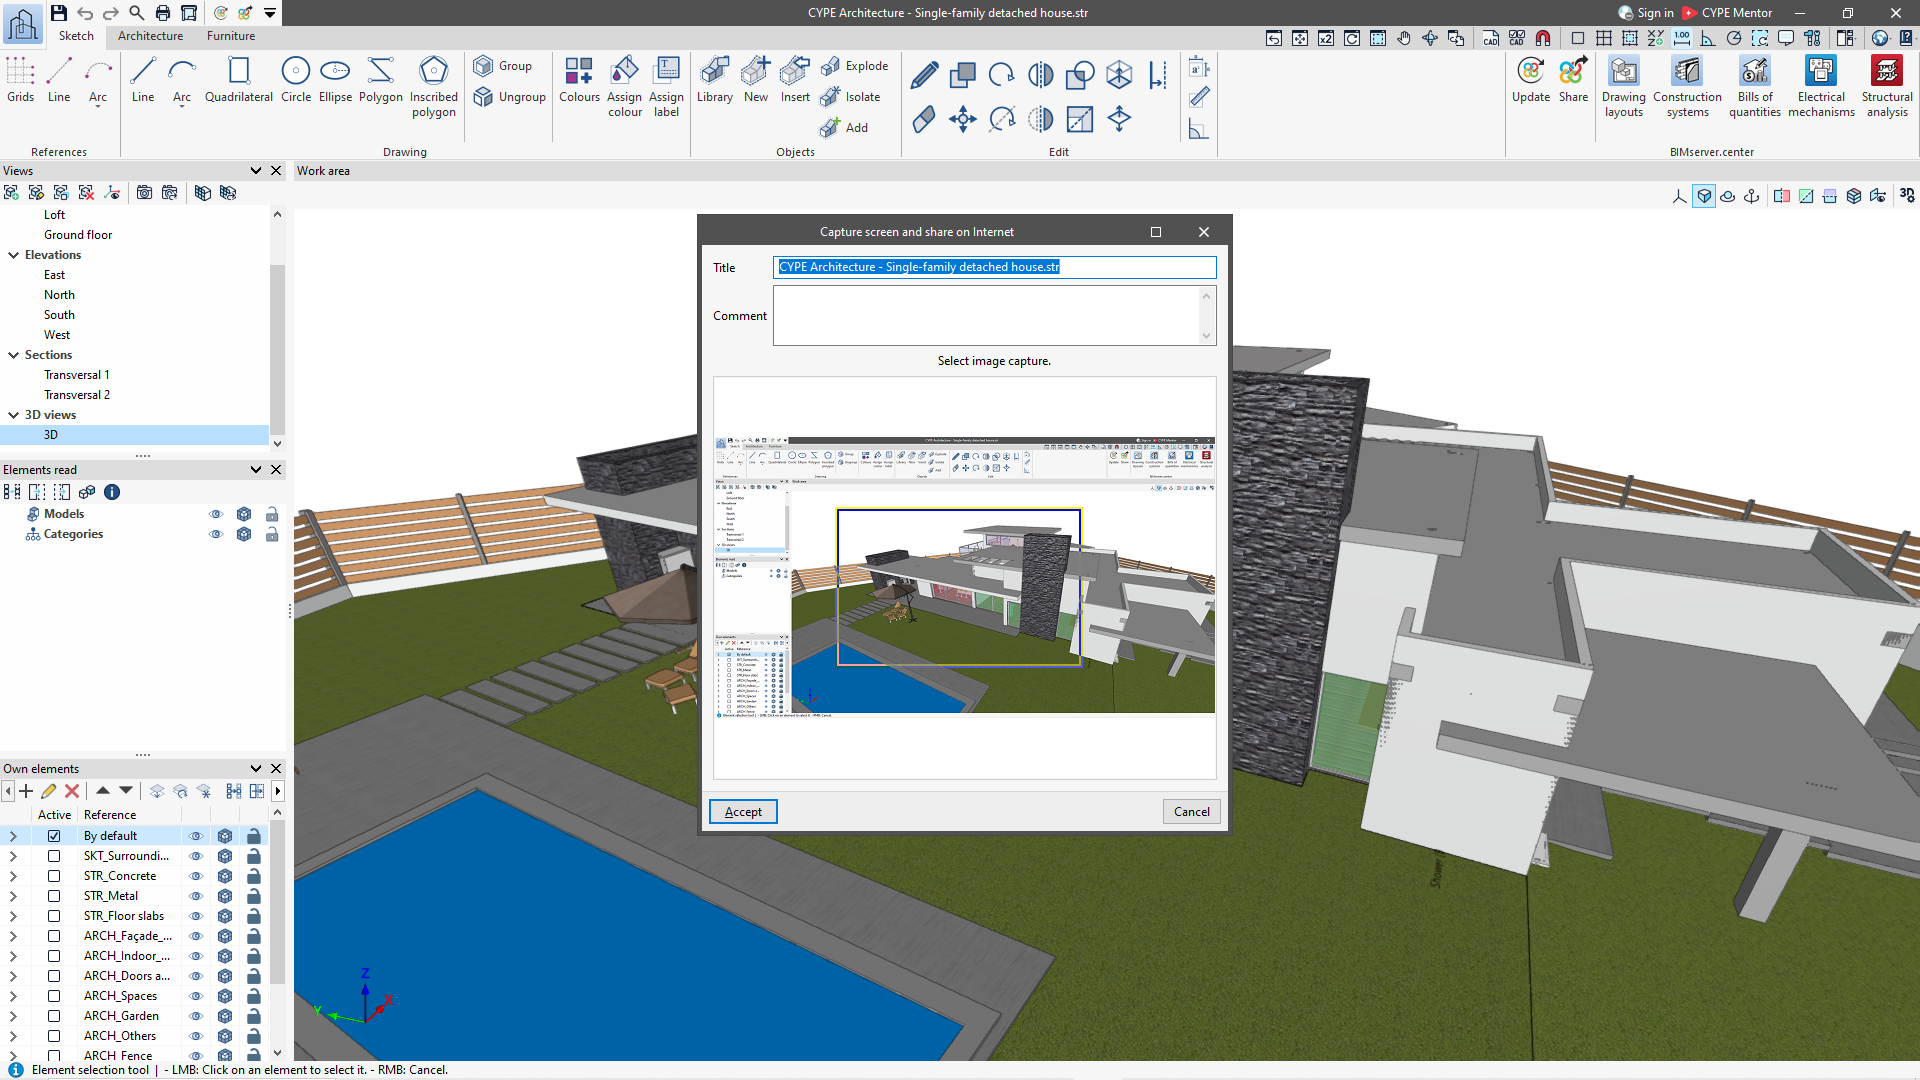
3. Once the dialogue box has been accepted, the program displays a separate window offering users two types of URL so that they can post the screenshots on different forums. Depending on where you want to post the URL, you will need to use one or the other.
The same window also displays the link that allows you to access the published screen from any web browser.
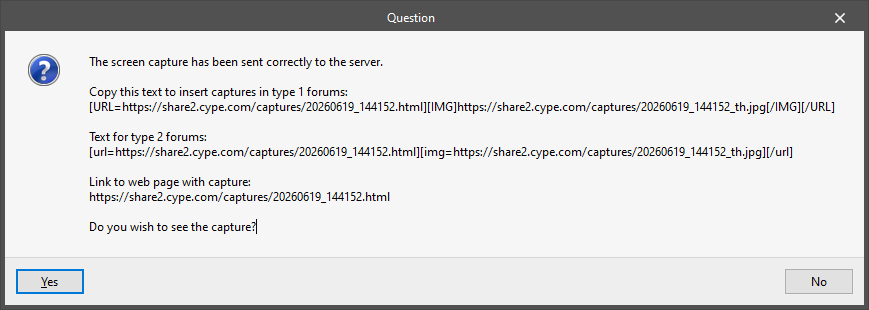
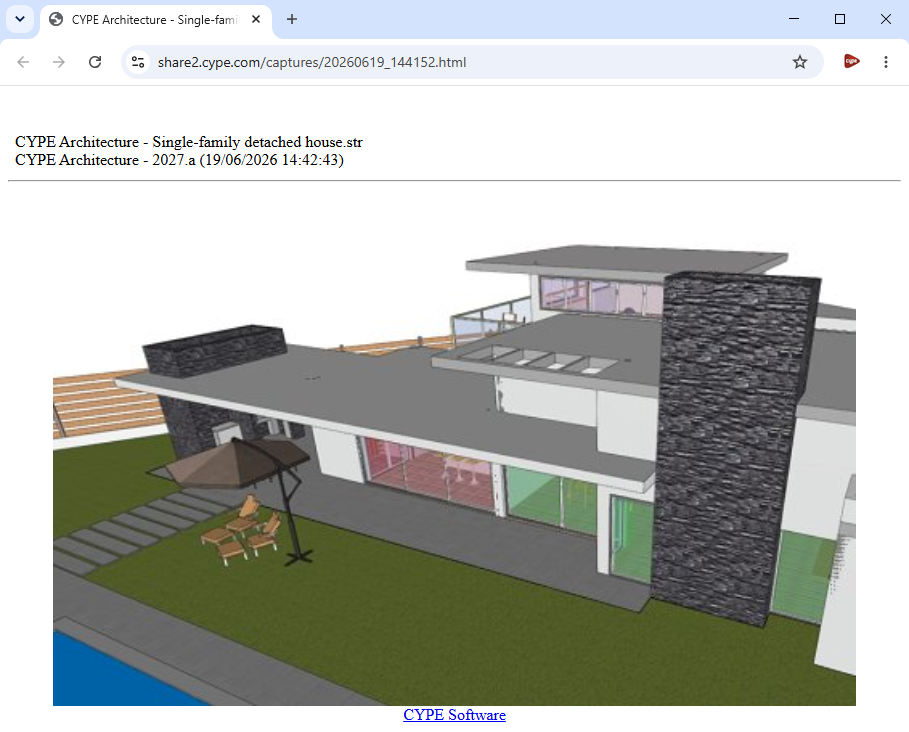
4. If you wish to view the published screen, select "Yes" to access the link via your browser. You can copy and paste it to share the CYPE program screen with whoever you wish. The image is hosted on a server and will only be accessible to those who have the link.
In the directory for each version, C:\Users\username\AppData\Roaming\CYPE Ingenieros\v20XX\cypecad (previously C:\usr\cype\cypecad), a file named links.txt is generated, containing links to the published screens. This file also contains links to projects that have been published using the "Share" option.
Decompressing a compressed file using CYPE software
To decompress a file compressed in .cyp format using CYPE software, follow these steps:
- Select the "File" option from the "File" menu to open the "File management" panel
- The work will be decompressed to the folder or directory currently selected in the "File management" panel. You can change the folder or directory to be decompressed by selecting it in the navigation pane on the left-hand side before clicking the "Decompress" button. The work will be decompressed to that directory, even if the compressed file selected below is located in a different folder or directory.
- Next, select the "Decompress" option at the top of the "File management" panel
- This will open the "Compressed Jobs Selection" dialogue box, where you can locate and view compressed files with the .cyp extension. You can navigate to other folders or directories on your system to locate compressed works in .cyp format.
- Once you have located the .cyp file, click on "Open" to decompress it and accept the confirmation prompts. The program will display a message informing you whether a file with the same name already exists; if so, it will overwrite it if you confirm this.
- Once the file has been decompressed, it will appear in the list of files. From here, you can double-click to open it.
| Notes: |
|---|
| Before decompressing the files, we recommend renaming any existing files in the destination folder that have the same name as the file being decompressed, as the latter will overwrite the former if they share the same name. Furthermore, if a file with the same name is open in the program, the decompression process cannot be started as the file is in use. In this case, you must first rename the open project (for example, via "File > Save as") to avoid this situation. If the decompressed file does not appear in the file list, it may be a file from a different CYPE program. You can locate the decompressed file by opening the folder in Windows File Explorer. You can also consult the list of CYPE program file extensions to identify the exact CYPE program used to originally compress the file into .cyp format. You should then open that program and decompress the archive again. |
Scope of the technical support service
The technical support service aims to ensure the correct operation and use of the software, assisting users in the event of incidents and enquiries relating to its operation.
The information set out below is provided for general information purposes only and is not binding.
Services covered
The technical support service includes the following:
- Handling and resolving technical issues that affect the normal use of the app.
- Providing user support for functional and operational queries regarding the program.
- Assisting with the installation, configuration, and updating of the program.
- Offering recommendations to optimise the use of the tool.
- Recording and reporting errors for correction in future versions of the program.
Availability
Support is provided through the channels established by the organisation and within the specified hours. Response and resolution times may vary depending on the nature of the enquiry, its complexity, the resources available and other circumstances.
Development requests
Program development (either by modifying existing features or incorporating new capabilities) is not part of the technical support team’s responsibilities. However, the team may collect and forward such requests to the development team or the relevant manager for evaluation, feasibility analysis and possible planning. The eventual implementation of these requests will be subject to prioritisation processes, the availability of resources and the criteria established by the organisation. As a result, it is generally not possible for the support service to guarantee their implementation or to set deadlines for completion.
Training requests
Standard support channels are primarily intended for incident management and operational enquiries. Any requirements for training or structured knowledge transfer, where necessary, can be arranged and organised separately in accordance with the procedures established by the organisation. To this end, you can view the list of courses or get in touch with the CYPE team.
Scope
Addressing issues related to infrastructure outside the scope of the software, and any substantial intervention on third-party systems that are not part of the supported solutions, fall outside the scope of the service.
Although guidance on the use of certain features may be provided during the provision of the service, decision-making regarding the objectives of the project developed with the software rests with the party responsible for the project.
Initial information. Table of contents
Please refer to the following general information to familiarise yourself with CYPE's software and start working with it:
- Access
- Basic installation
- Advanced installation
- Getting started
